You're standing at the sink with a water report in one hand and a filter shopping tab open in the other, trying to make sense of numbers that all seem to blur together. pH gets most of the attention, but alkalinity is the quiet line that often tells you whether your water will stay steady, swing around, or make your filter work harder than it should. For homeowners focused on filtration, that difference matters just as much as taste, because the wrong choice can leave you with scale, corrosion, or a cartridge that doesn't behave the way you expected.
The Water Report Puzzle Most Homeowners Miss
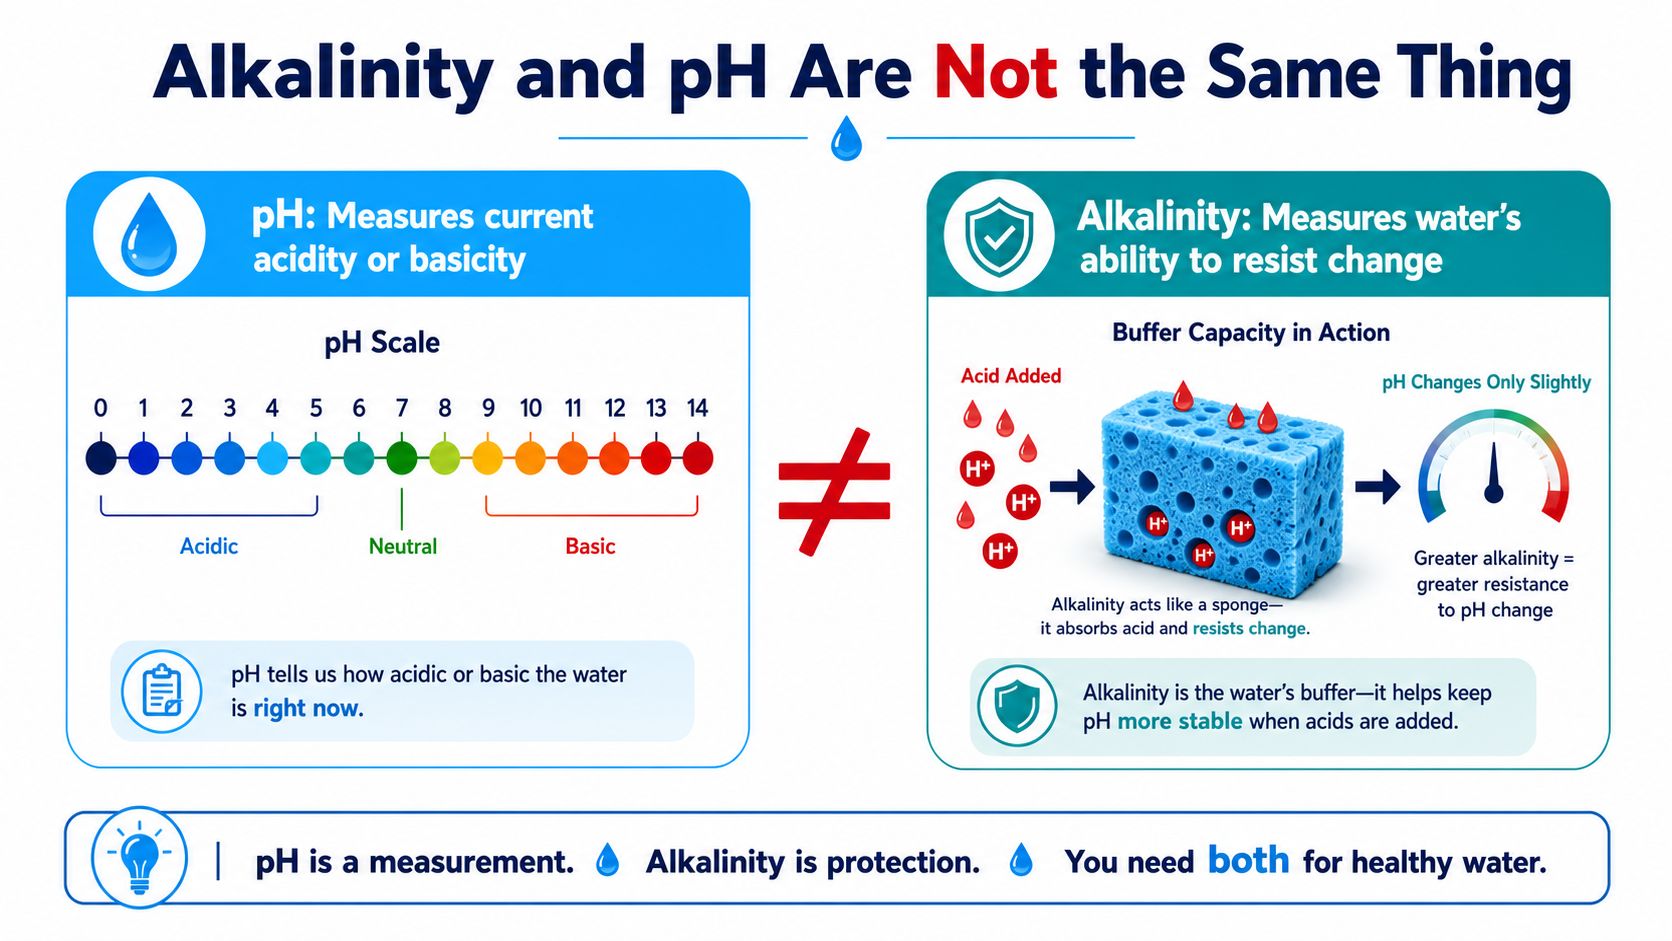
A lot of water reports look straightforward until you reach the line for alkalinity. It sits there beside pH, and it's easy to assume they're two ways of saying the same thing, but they aren't. pH tells you the water's current acidity or basicity, while alkalinity tells you how much the water can resist a change when acid shows up.
That's why two samples with the same pH can act very differently in your home. One might shrug off a bit of acidic water from plumbing or treatment changes, while the other shifts fast and starts creating trouble for copper pipes, a coffee maker, or a filter that depends on stable chemistry. The number is really about buffering capacity, not a snapshot of how “basic” the water looks at the moment (USGS water science on alkalinity and water).
What that means at the kitchen sink
Think of pH as the water's current mood and alkalinity as its patience. Water with higher alkalinity has more reserve, so it takes more acid to change that mood. Water with low alkalinity has less reserve, so even a small chemical shift can move it quickly.
That reserve matters to filtration because filters don't work in a vacuum. If your water has weak buffering, a treatment step that changes pH can be less predictable, and the same issue can affect corrosion control and taste. The key question isn't just “What is alkalinity in water?”, it's “How does this water behave once it's inside my plumbing and filtration system?”
Practical rule: don't read pH alone and call it the full story. If alkalinity is low, pH can move more easily after treatment or contact with acidic materials.
Alkalinity and pH Are Not the Same Thing
A water report can show a pH that looks fine and still leave you with water that reacts badly in plumbing or treatment. pH is the reading you have right now, while alkalinity is the reserve that keeps that reading from changing too easily (Thermo Fisher alkalinity basics).
pH works like the water's current mood. Alkalinity is the cushion behind it, the part that absorbs an acid hit before the chemistry swings too far. Two samples can share the same pH and still behave very differently in a house, because one has more buffering reserve than the other.
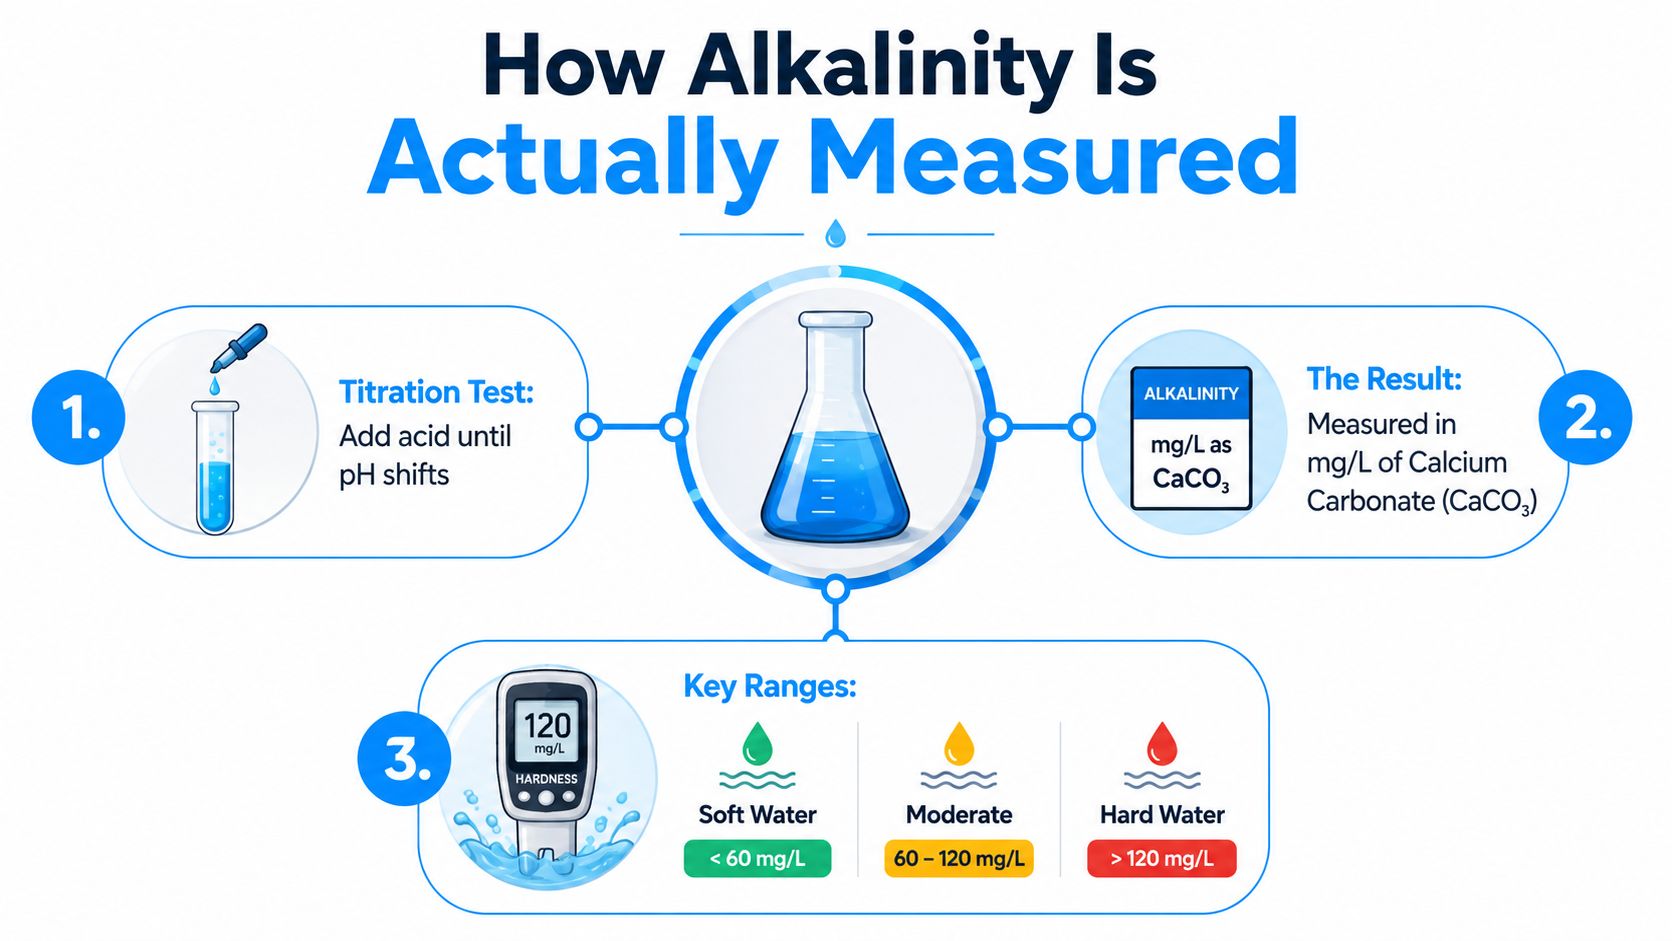
You may also see alkalinity described through acid titration to about pH 4.2, the endpoint used to measure how much acid the sample can absorb before its buffering reserve is used up (U.S. EPA archived method). That is what turns a chemistry idea into a usable number on a report.
The report is not judging whether your water is “good” or “bad.” It is showing how much resistance the water has before its chemistry starts to shift.
How Alkalinity Is Measured
A water test for alkalinity starts with a controlled acid challenge. A lab adds acid in a steady way and watches how much it takes to push the sample to the standard endpoint, around pH 4.2. The more acid the water can absorb before reaching that point, the more buffering reserve it has. That is why alkalinity results help explain why one source of water stays steady while another shifts more easily.
The result is then reported as mg/L CaCO3, which gives everyone the same reference point when reading a water report. In water-chemistry reporting, 1 ppm equals 1 mg/L for this format, so homeowners may see the same number written either way. That is one reason the label can look unfamiliar at first, even though the meaning is straightforward once you know what the lab is measuring.
The ranges homeowners need
Water reports often group alkalinity into practical bands: under 20 mg/L as CaCO3 is very low, roughly 20 to 160 mg/L is moderate, and above 160 mg/L is high. Those bands help you read the water in terms that matter at home, not just in a lab notebook. A sample can also be described in more general guidance as sitting in a middle zone that gives the water enough reserve without pushing too far toward scale.
For a homeowner, those ranges are less about chemistry labels and more about how the water behaves in the house. Very low alkalinity can leave water quick to change, which matters if plumbing or treatment nudges the water acidic. Higher alkalinity can make water more likely to leave scale behind. That becomes part of filter selection, because a filter that changes mineral balance or treatment response may make sense in one home and not in another.
If you are testing a home system and need to verify what the numbers mean before buying equipment, pairing alkalinity testing with broader water-quality screening gives a clearer picture. That is the point of protect your facility with water testing, you are not guessing at the chemistry behind the tap.
What Low, Moderate, and High Alkalinity Mean at Home
A water test result makes more sense once you connect it to what happens at the tap. Low alkalinity means the water has less buffering reserve, so it changes more easily when it meets acidic conditions in plumbing or treatment. Moderate alkalinity usually gives a steadier middle ground. High alkalinity can hold pH more firmly, but it can also leave mineral residue behind.
Alkalinity Ranges and What They Mean at Home
Range (mg/L as CaCO3)
Typical Home Effects
What to Watch For
Under 20
Water can change quickly, and plumbing chemistry may be less stable
Corrosion risk, pH swings, inconsistent treatment
20 to 160
More predictable buffering in everyday use
Usually easier to manage with standard filtration
Above 160
Strong reserve, but more likely to leave mineral deposits
Scale on heaters, kettles, and membranes
Low-alkalinity water is often the quiet troublemaker in a house. It may taste flat, and it may be less forgiving if your plumbing or treatment setup nudges the water acidic. In homes with copper piping, that matters because unstable water chemistry can encourage corrosive behavior.
Moderate alkalinity is the comfort zone for many homes. The water has enough reserve to resist quick swings, so filters and treatment changes tend to behave more predictably. That does not mean every system is identical, but it does mean the water usually gives you a more stable starting point.
High alkalinity works differently. The water can resist acid well, which sounds helpful until mineral deposits start showing up on hot surfaces and inside equipment. That is why the same alkalinity number can point two homes toward different filter choices, depending on whether the bigger concern is corrosion, scale, or how a treatment system will respond.
Homeowner takeaway: read alkalinity as the water's reaction habit. You are not just checking a number, you are checking whether the water tends to stay calm or leave a mess behind.
How Alkalinity Shapes Your Filtration Choices
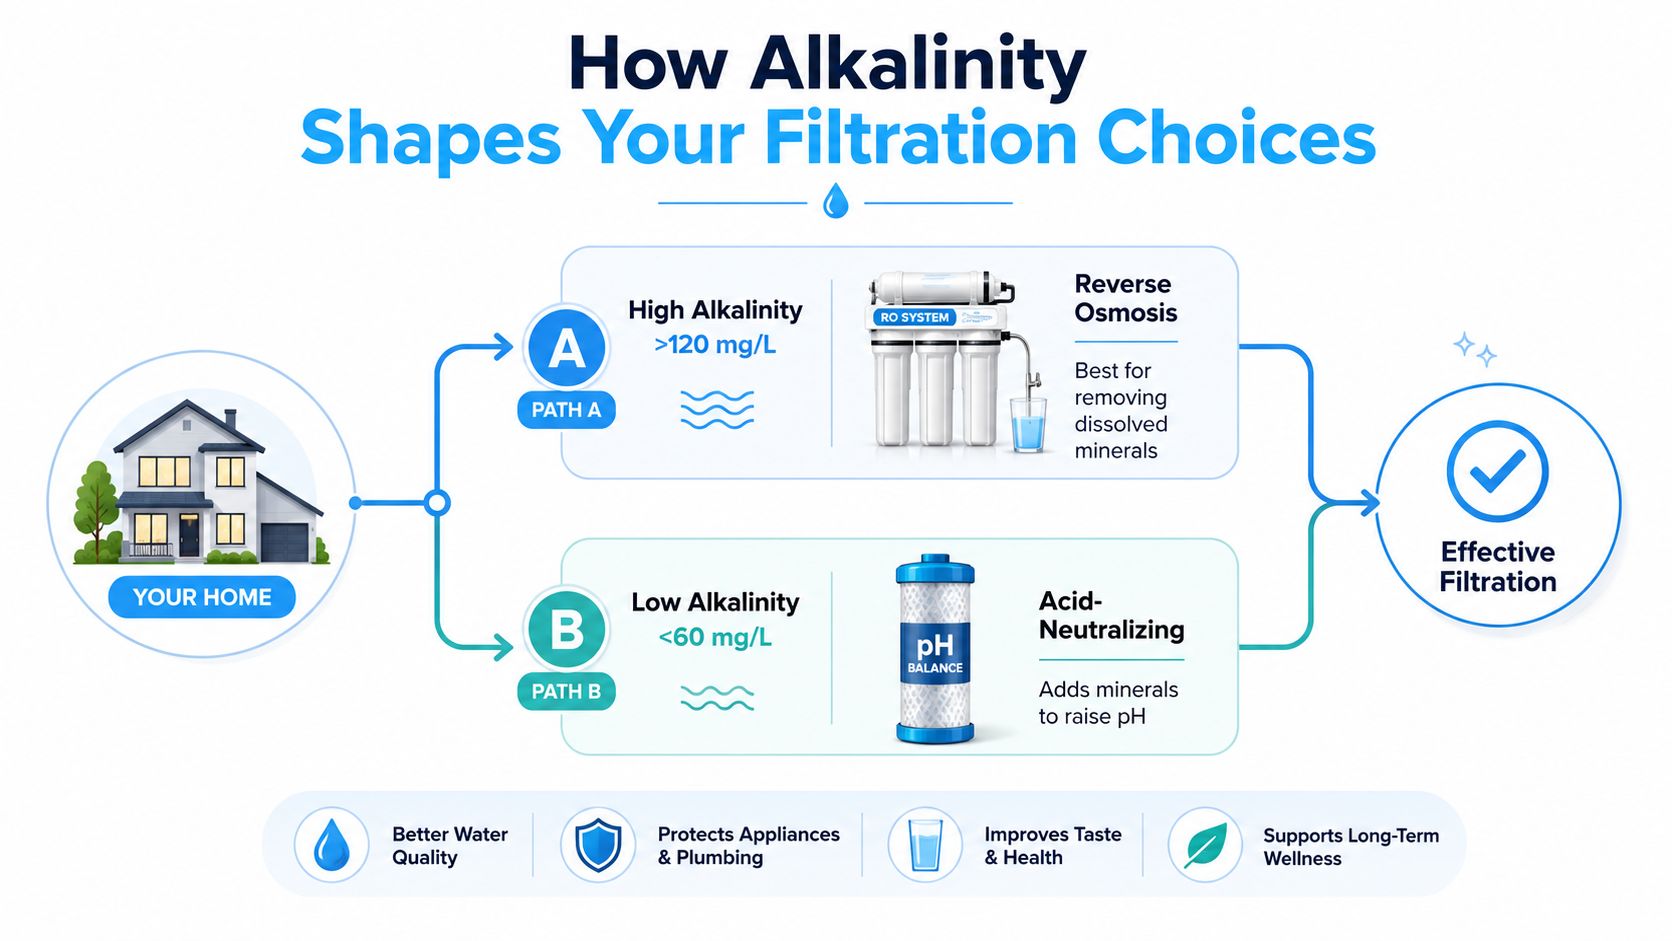
Alkalinity changes the filter decision because it changes what the water needs before and after treatment. A home with low alkalinity often needs help stabilizing chemistry, especially if the goal is to protect plumbing and keep pH from dropping around metals. A home with high alkalinity may need a system that reduces dissolved mineral load and helps slow scaling on sensitive equipment, especially in reverse osmosis setups.
Matching the system to the water
For low-alkalinity water, an acid-neutralizing or remineralizing approach can make sense because it adds buffering and helps the water act less aggressive toward plumbing. That's especially relevant when you're trying to keep a home system stable instead of reacting to repeated pH drift. For high-alkalinity water, reverse osmosis is often the more useful point-of-use option when the goal is to reduce mineral taste and manage the dissolved material that contributes to scale.
Cartridge life also depends on this chemistry. If the water has little buffering, a filter doing chemical balancing may have to work harder to keep performance stable. If the water carries high alkalinity, scale management becomes part of the maintenance picture, especially for membranes and heating equipment.
Water Filter Advisor publishes guidance on alkaline water filters that emphasizes testing both the source water and the filtered water, which is the right habit when you're trying to see whether a filter changed the chemistry in a meaningful way. It also explains that pH tells you whether water is more acidic or more alkaline, which is why the report needs to be read as a whole rather than by one number alone.
Common Myths About Alkaline Water and Alkalinity
The word “alkaline” gets used in marketing so often that it's easy to confuse chemistry with a health claim. Alkalinity in the water-quality sense is buffering capacity, not a promise that the water is healthier, better, or more nourishing. It tells you how the water behaves when acids enter the picture.
Another common mistake is assuming high pH always means high alkalinity. That isn't true. A sample can have a similar pH to another sample and still respond very differently to acid because its buffering reserve is lower or higher.
What to ignore and what to trust
Ignore the urge to chase a magic pH number. That number alone doesn't tell you whether your filtration setup will stay stable, whether your copper piping is happy, or whether your RO membrane is going to see more scale than you expected. Trust the actual report line for alkalinity, because that's the number that speaks to reserve and resistance.
The simple way to stay grounded is to look at the chemistry you already know. pH is current condition. Alkalinity is buffering capacity. Once you separate those two ideas, the marketing language loses a lot of its power.
Reading Your Own Water Report With Confidence
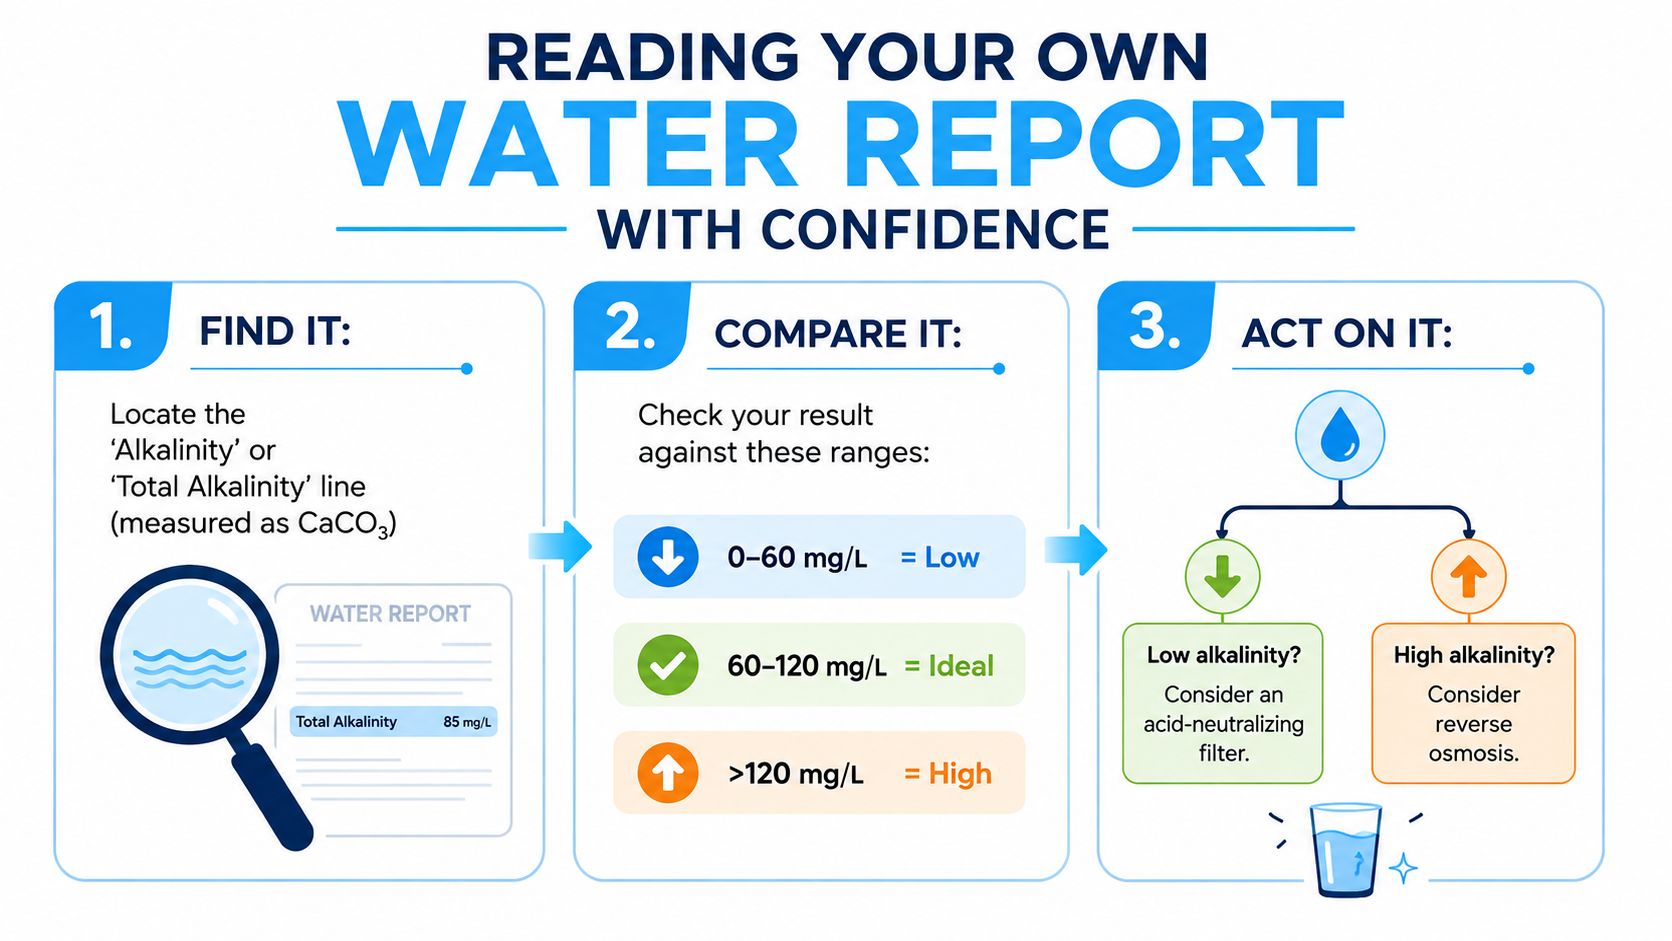
Start with the alkalinity line, sometimes labeled Total Alkalinity, and note whether it's reported as mg/L as CaCO3. Then place it into the low, moderate, or high range you saw earlier, because that gives you the quickest read on how the water will behave in the home.
Find it. Look for Alkalinity or Total Alkalinity, and confirm the unit.
Compare it. Use the range as a guide, low, moderate, or high.
Act on it. Low alkalinity can point you toward an acid-neutralizing filter, while high alkalinity may push you toward reverse osmosis.
If your home has known lead plumbing, don't stop at alkalinity. Pair it with a dedicated lead test, because buffering capacity alone can't tell you what metals are in the water. For more practical help with choosing and maintaining home systems, use the advice hub at Water Filter Advisor's guidance page.
If you want to turn your water report into an actual filtration decision, Water Filter Advisor can help you compare home systems, understand what the numbers mean, and match treatment to your source water. Visit Water Filter Advisor to explore practical buying guides, testing tips, and maintenance advice that fit real homes.
You usually notice a bypass valve the day you don't have one.
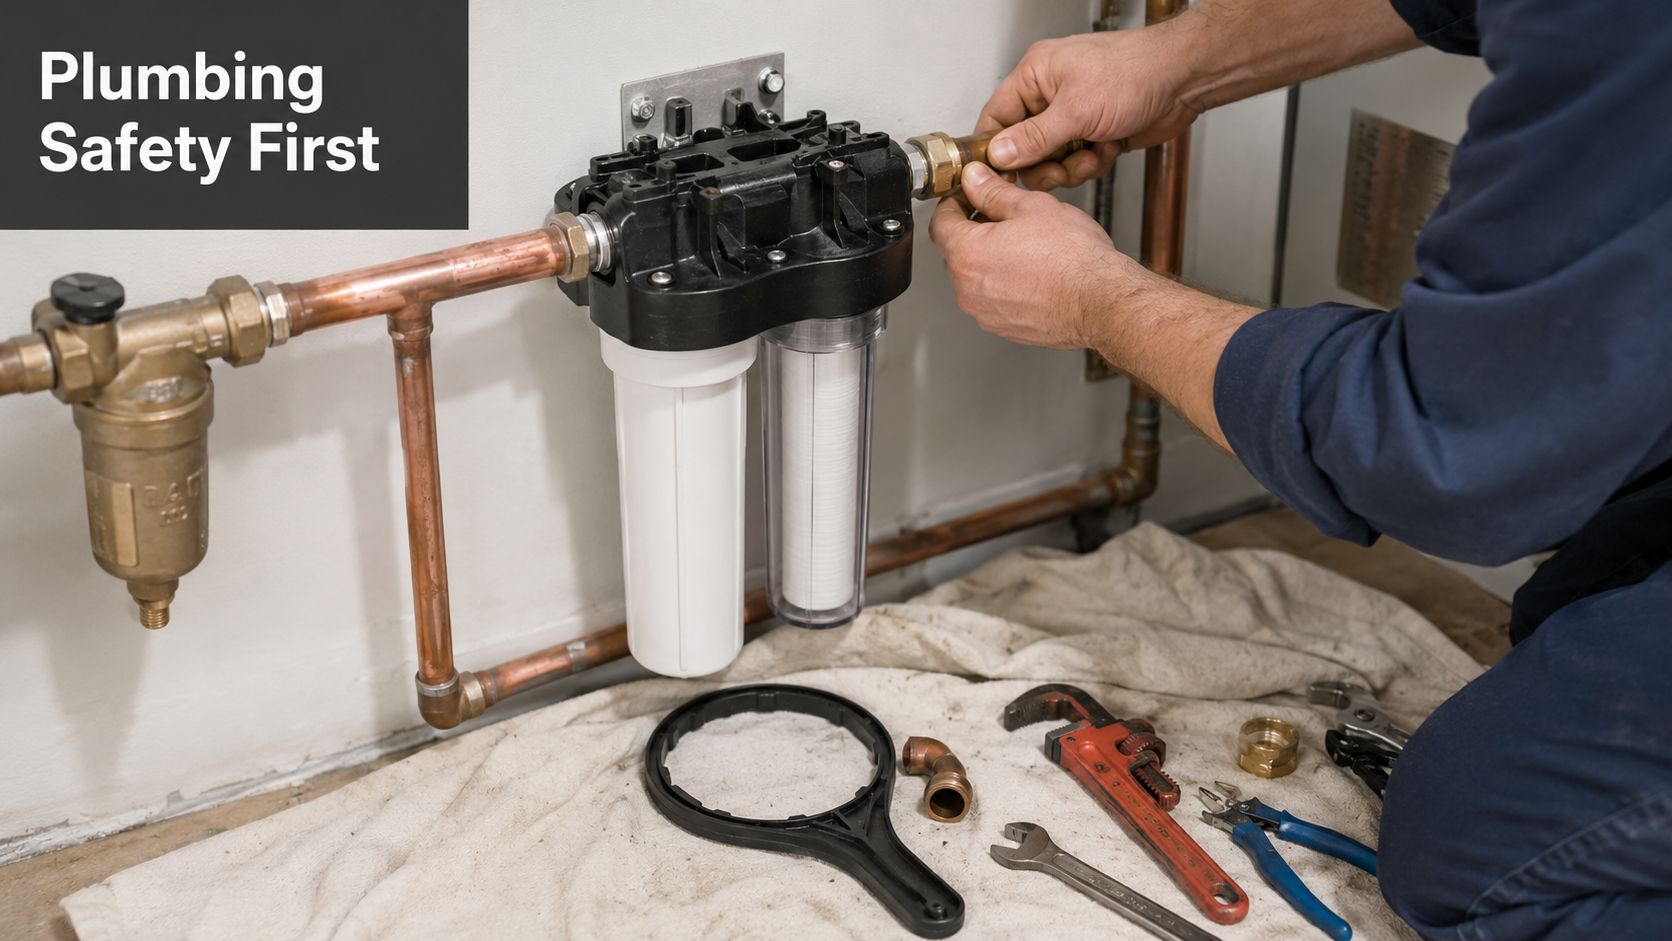
It's filter change day. You shut water off, crack open a housing, get a face full of pressure, and suddenly the whole house is out of water while you're standing in a puddle wondering why this tiny plumbing detail got skipped. That's when homeowners realize a whole house water filter with bypass valve isn't a luxury add-on. It's the part that makes the system livable.
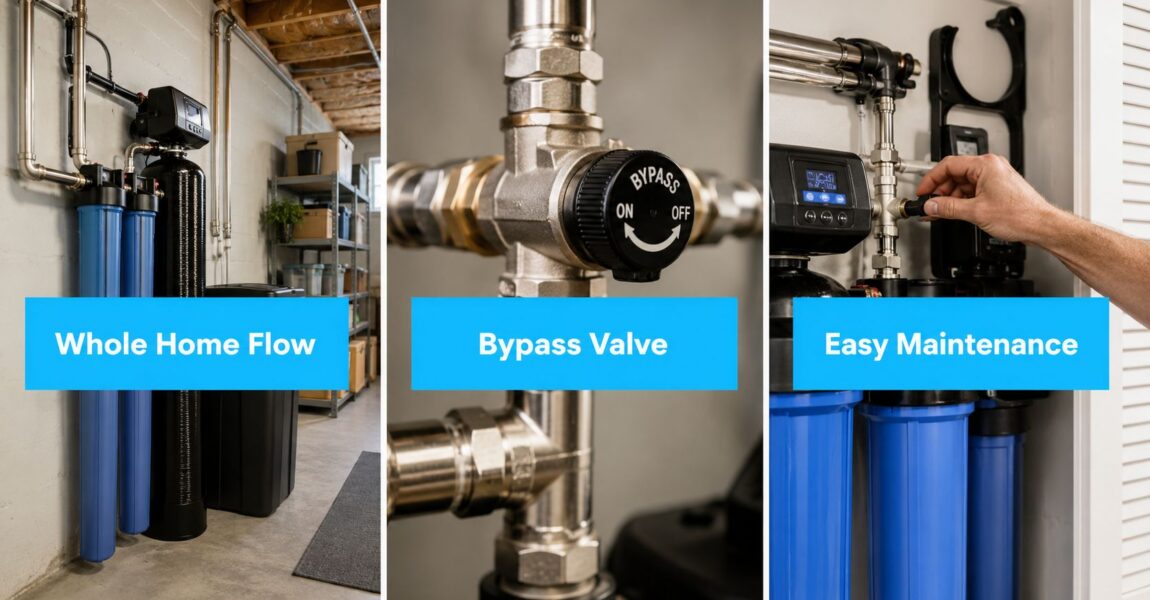
A bypass valve is the off-ramp for your home's water supply. In normal use, water stays on the main route and runs through the filter. When you need to service the system, the valve diverts water around the filter so sinks, toilets, and showers still work while the filter is offline. That one function changes maintenance from a disruptive house-wide event into a routine task.
Generic guides tend to focus on the filter media, the housing size, or the contaminant list. Those matter. But the bypass is what keeps the system practical in a real house with real people using water at inconvenient times. If you want a deeper reference library on system choices and upkeep, Water Filter Advisor's advice section is useful for comparing home filtration setups without getting lost in sales copy.
The Unsung Hero of Your Home Plumbing
A lot of plumbing parts only matter when something goes wrong. The bypass valve matters before that.
When a whole-house filter is in service mode, every gallon entering the home runs through treatment first. That's what you want for day-to-day use. But every filter eventually needs attention. Cartridges load up. Carbon media needs service. Housings need to be opened. If there's no bypass, your only option is shutting water down and hoping the job goes quickly.
Why the bypass changes everything
Think of your plumbing like a highway feeding the entire house. The filter is a checkpoint on that highway. A bypass valve creates a side road. When the checkpoint needs work, traffic keeps moving.
That matters in ordinary situations:
Routine filter changes: You can isolate the unit without taking the whole house offline.
Unexpected leaks: If a housing or fitting starts dripping, you can route water around the system while you sort it out.
Winterization or seasonal shutdowns: Vacation properties and cabins especially benefit from being able to take equipment offline cleanly.
Service calls: A plumber can work on the filter assembly without disrupting everything downstream.
Practical rule: If the system serves the whole home, the bypass should be treated as part of the system, not an optional extra.
Homeowners often spend most of their time comparing micron ratings and contaminant claims. Those are important, but usability decides whether maintenance gets done on time. A system that's hard to service gets postponed. Postponed service turns into pressure complaints, nuisance leaks, and stressed appliances. A bypass valve helps prevent that spiral before it starts.
How a Bypass Valve Puts You in Control of Your Water
The easiest way to understand a bypass valve is to follow the water.
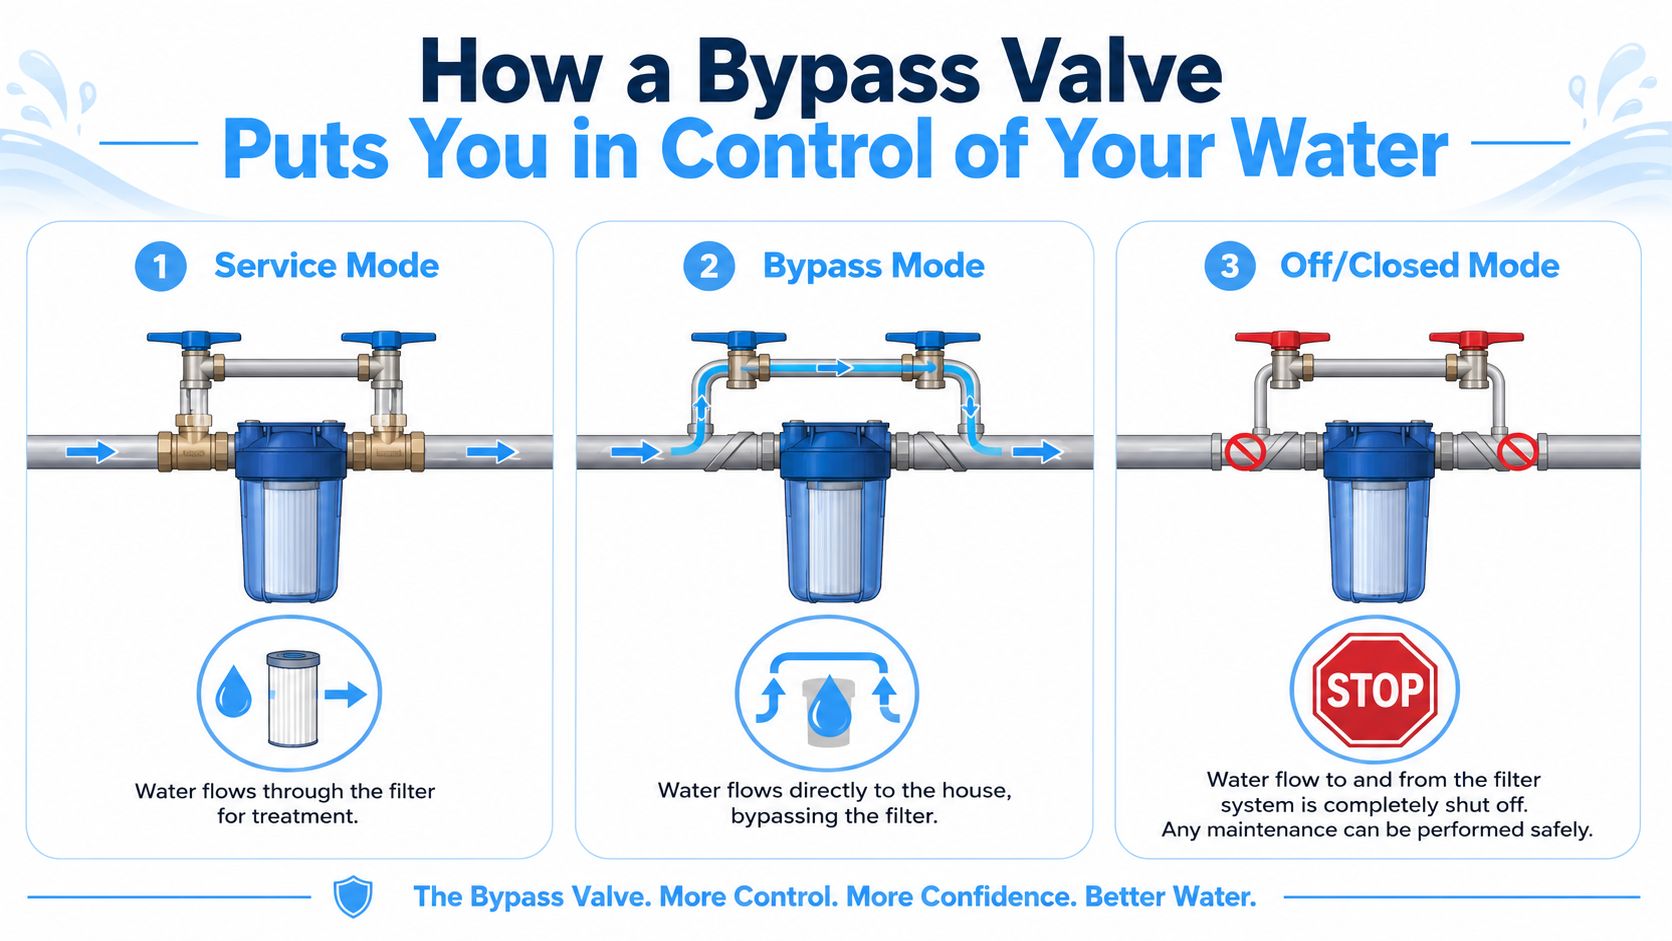
In one position, water enters the filter, gets treated, and moves on to the house. In another, the valve reroutes that same water path so it skips the filter completely. The house still has water. The filter is isolated. That's the whole job.
A lot of assemblies are more capable than homeowners realize. The bypass valve in whole-house water filters typically operates as a 1-inch full-flow assembly with four positions, Service, Bypass, Off, and Diagnostic, enabling isolation of the control valve from system pressure (20–125 psi) during maintenance while permitting untreated water flow for diagnostic testing according to the A. O. Smith ClearHome manual summary.
What each valve position does
Position
What happens
When you use it
Service
Water flows through the filter system
Normal daily operation
Bypass
Water goes around the filter
Filter changes, repairs, leak isolation
Off
Water flow to and from the filter assembly is shut down
Full isolation before certain service tasks
Diagnostic
Untreated water can be evaluated without committing the system to normal service
Troubleshooting flow or water quality behavior
That diagnostic position is one many people never hear about. It gives a plumber a controlled way to check untreated water behavior while keeping the rest of the system organized. That's useful when you're sorting out whether a pressure problem belongs to the filter, the plumbing, or the incoming supply.
Service mode versus bypass mode
Here's the simple contrast:
In service mode, you're prioritizing treatment.
In bypass mode, you're prioritizing continuity.
Neither one is “better.” They solve different problems. Trouble starts when a homeowner forgets which mode the system is in. If the valve stays in bypass after maintenance, the house has water but no filtration. If someone opens a housing without isolating pressure first, that's when cartridges, O-rings, and tempers start flying.
If you're not confident about where to shut water off before touching the filter assembly, review how to find and use your shutoff before starting. It's one of those things you want sorted out before a fitting starts leaking.
A quick visual walkthrough also helps:
Why a Bypass Valve Is a Non-Negotiable Feature
It usually becomes clear at the worst time. A cartridge is clogged, the housing needs to come off, and someone in the house still needs to shower, flush toilets, or run a load of laundry. Without a bypass, a routine filter service can turn into a whole-house shutdown.
That is why a bypass valve belongs on a whole-house filter system. It gives you a controlled path for water when the equipment needs service, and that control prevents a lot of avoidable trouble.
The big benefit is not convenience alone. It is containment. If a housing cracks, an O-ring rolls, or a fitting starts weeping after a cartridge change, the bypass lets you isolate the filter and keep the rest of the house supplied. In real plumbing work, that difference matters. It buys time to fix the problem correctly instead of rushing because the whole home is out of water.
It also helps prevent a mistake generic guides skip over. A bypass section or extra branch line can create a short dead leg if the piping is laid out poorly. Water sitting in that unused pocket can stagnate, then get pushed back into the line later. Good installation keeps those unused sections short and serviceable. Good maintenance includes a proper flush after the system goes back online, not just turning valves and calling it done.
What homeowners actually gain
Service without shutting the house down: You can isolate the filter while keeping basic water use available.
Safer maintenance: Pressure stays under control, which lowers the chance of damaged housings, blown O-rings, and cross-threaded parts.
Fewer delayed cartridge changes: Homeowners are more likely to keep up with maintenance when it does not disrupt the whole house.
Cleaner troubleshooting: A bypass helps separate a filter problem from a broader plumbing or supply issue.
Better recovery after service: You can flush the filter properly before sending water through every faucet and appliance.
That last point gets overlooked all the time. After maintenance, the filter and nearby piping should be flushed long enough to clear trapped air, fines, and any stale water that sat in isolated sections. Skip that step and the first place that debris goes is into fixture aerators, appliances, or a customer complaint about cloudy water and sputtering taps.
What goes wrong without one
A whole-house filter can run without a bypass. It is just less forgiving.
The pattern is familiar. Service gets postponed because nobody wants to shut water off to the whole house. Flow drops. Someone opens the housing in a hurry. Then you end up with a pinched gasket, a leak that could have been avoided, or untreated water being restored without any flushing or checks.
I tell homeowners the same thing I tell apprentices. Plumbing systems stay manageable when you keep options open. A bypass gives you one more safe way to isolate, test, flush, and restore service in the right order.
For homeowners comparing treatment equipment, Pipeline On water softener solutions gives a useful look at how serviceability affects the day-to-day use of softeners and related water treatment gear. That same logic applies here. If the system is hard to service, maintenance gets skipped, and skipped maintenance always shows up somewhere else.
Choosing the Right Filter System and Bypass Setup
A homeowner usually notices sizing mistakes at the worst time. One person is in the shower, the dishwasher is running, a second faucet opens, and the house pressure falls off. If the filter or bypass path is too restrictive, the system becomes the choke point.
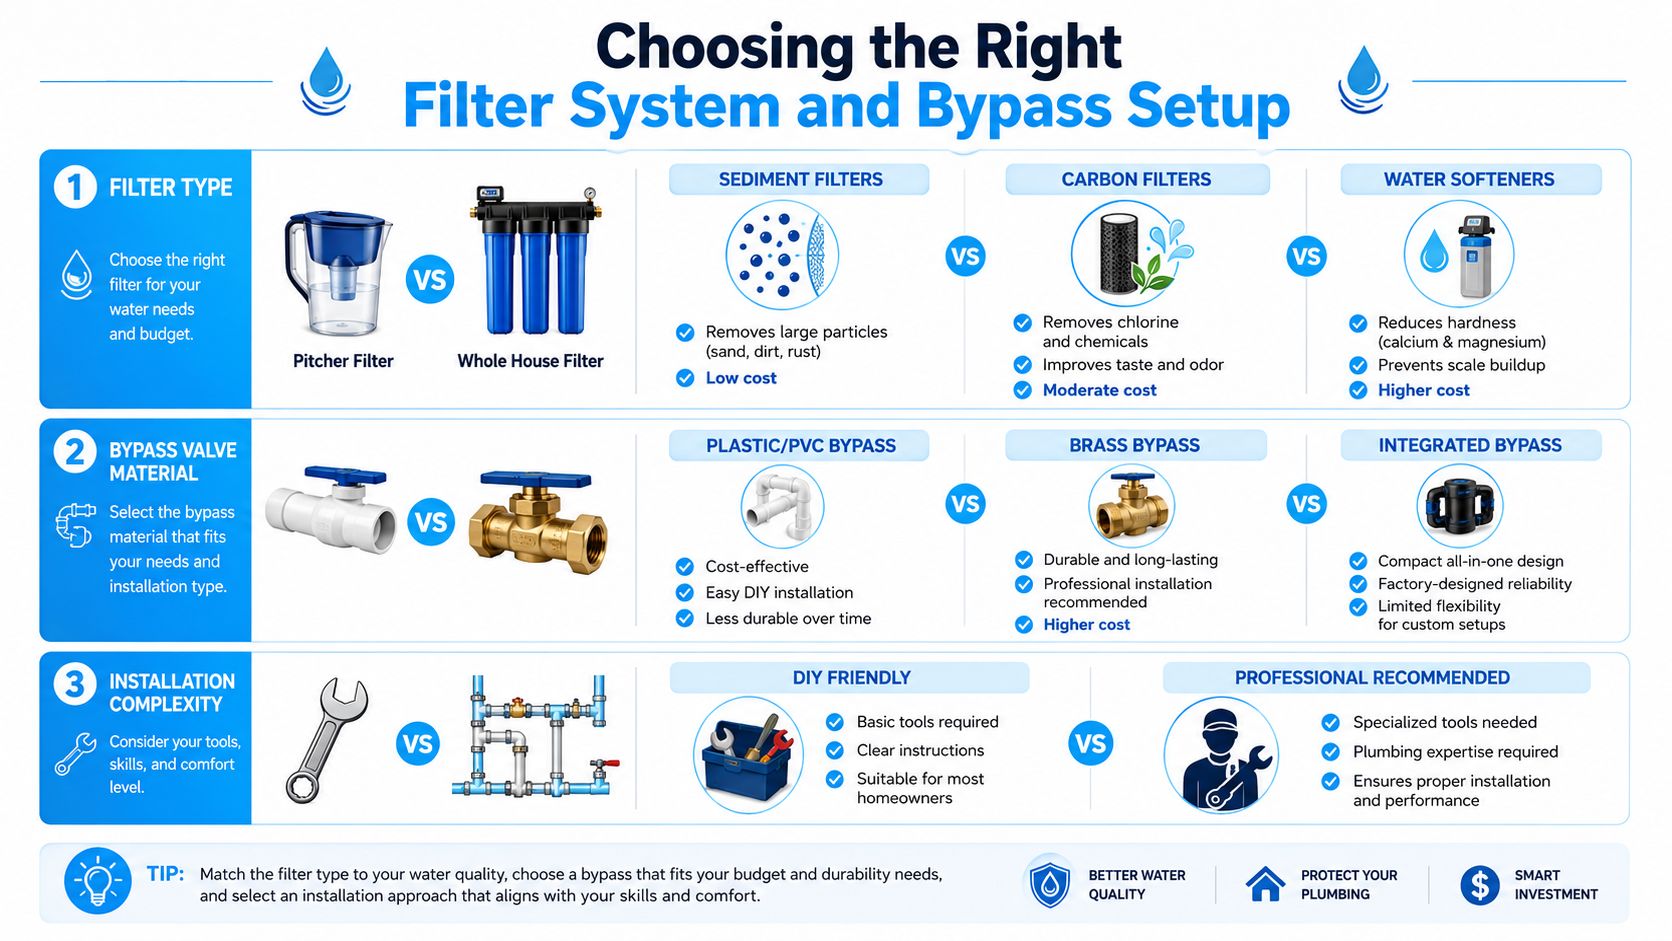
The right setup starts with the house, not the box. Pipe size, fixture count, service space, and the actual water problem should drive the decision. A bypass valve matters here because it affects pressure, service access, and how cleanly the system can be isolated when something needs attention.
Easier to adapt to older plumbing and custom layouts
More decisions during installation, more room for installer error
Integrated bypasses work well in tight utility areas and on packaged systems where the manufacturer has already matched the valve to the unit. That usually means fewer parts and fewer connection points to leak.
Standalone bypass assemblies make more sense on older homes, multi-stage filter builds, or any job where the piping does not line up cleanly with the equipment. They also give an installer more freedom to leave enough room for housing removal, pressure gauges, or a future softener. The trade-off is simple. More flexibility means more chances to create a bad layout if the installer crowds the pipes or leaves stagnant sections that do not flush well.
Match flow to the home, not the brochure
Flow rate should be sized for overlapping use. A filter may look fine when you test one bathroom sink. Real houses stack demand. Showers, toilets, laundry, hose bibs, and kitchen fixtures can all pull at once, and the bypass path has to handle that load too.
I tell homeowners to picture flow like traffic through a narrow lane. If the filter body, bypass valve, or undersized fittings reduce the opening, pressure drop shows up fast at the fixtures. The complaint usually sounds like low pressure, but the root problem is often undersized treatment equipment or a bypass assembly necked down with the wrong valve or fittings.
Check the service flow rating, not just the peak number on the label. Then compare it with the busiest hour your household experiences.
Capacity and maintenance rhythm
Long service life still matters, but only if the system stays practical to maintain. Some whole-house systems are built for extended media life and relatively modest annual replacement costs, including models listed in Aquasana product data summary. That can pencil out well over time, especially for homeowners who want fewer service intervals.
The bypass is what keeps that long-life system livable. A filter that lasts years is still a poor choice if cartridge changes are awkward, the housings cannot be isolated cleanly, or the piping leaves no room to flush sediment after service.
If hardness is also part of the water quality problem, Pipeline On water softener solutions gives a useful overview of where softening fits alongside filtration in the treatment sequence.
Buying shortcut: Choose the filter for the water problem, size the flow path for the busiest hour in the house, and choose a bypass layout that leaves room to service and flush the system correctly.
One useful planning tool is the product research and setup guidance available through Water Filter Advisor, especially if you're comparing packaged systems with different bypass layouts, replacement schedules, and service clearances.
Proper Installation and Avoiding Hidden Plumbing Hazards
A clean installation does more than stop leaks. It protects water quality, keeps service simple, and avoids creating plumbing problems that don't show up until later.
The basic placement rule is straightforward. The bypass valve belongs close to the filter at the home's water entry point and upstream of the water heater, which is described in this guide on how to bypass a whole-house water filter. That location lets the valve divert flow before water branches off to the rest of the house.
The core installation sequence
The physical hookup also needs to be done in the right order. Manufacturer-style instructions call for shutting off the main supply, cutting the pipe cleanly near the marked location, cleaning the cut edges, and then connecting the incoming line to the valve inlet side and the outgoing line to the outlet side before slowly restoring water and checking for leaks, as outlined in the Home Depot valve installation sheet.
That sounds simple, but a lot rides on the details:
Clean cuts matter: Rough or burred pipe ends can create poor seals and future leaks.
Orientation matters: Reverse the inlet and outlet and the system won't behave the way it should.
Slow repressurization matters: Bringing water back too fast can shock fittings and expose sloppy work immediately.
The hidden problem called a dead leg
This is the issue most homeowner articles skip. The underserved angle of dead leg hydraulic stagnation in bypass loops is rarely addressed in mainstream content, despite direct homeowner concern on plumbing forums where people ask whether adding a bypass creates a stagnant zone that promotes bacterial growth or traps sediment, as noted in this discussion about bypass dead legs.
A dead leg is a section of pipe where water doesn't move much or at all. In bypass plumbing, that can happen if the loop is oversized, awkwardly routed, or built with little pockets where water just sits. Stagnant water is never what you want in a domestic plumbing system.
What good bypass plumbing looks like
Good bypass piping is compact and purposeful. Bad bypass piping looks like someone had extra fittings and too much optimism.
Use this checklist when reviewing a design:
Keep the loop tight: Shorter paths leave less water sitting in idle sections.
Avoid unnecessary elbows and long offsets: Every extra turn creates more places for sediment to settle.
Make service access obvious: If the valves can't be reached comfortably, maintenance gets sloppy.
Ask how the bypass line gets refreshed: If water can sit in the loop indefinitely, discuss how it will be flushed during service.
Check for downstream leak risk after startup: If a hidden seep develops inside a wall or utility area, you'll want to know early. Homeowners who suspect that kind of problem can learn more about understanding hidden leak detection and why small leaks shouldn't be ignored.
Poor bypass design doesn't usually fail loudly on day one. It creates little water-quality and maintenance headaches that build quietly.
If you're hiring the job out, ask the plumber one specific question: How are you preventing a stagnant bypass loop? A good installer won't be annoyed by that question. They'll answer it clearly.
Mastering Maintenance with Proper Bypass Protocols
Most maintenance advice for whole-house filters is too vague to be useful. “Run water for a few minutes” sounds fine until you've got carbon fines in fixtures, cloudy water at the tap, or a downstream sediment filter that plugs up right after service.
The overlooked issue is the exact flushing sequence after moving from bypass back to service. Verified data specifically notes that the precise flushing protocol right after switching a whole house filter from bypass to service mode is often glossed over by generic guidance, as discussed in this maintenance thread on flushing practice.
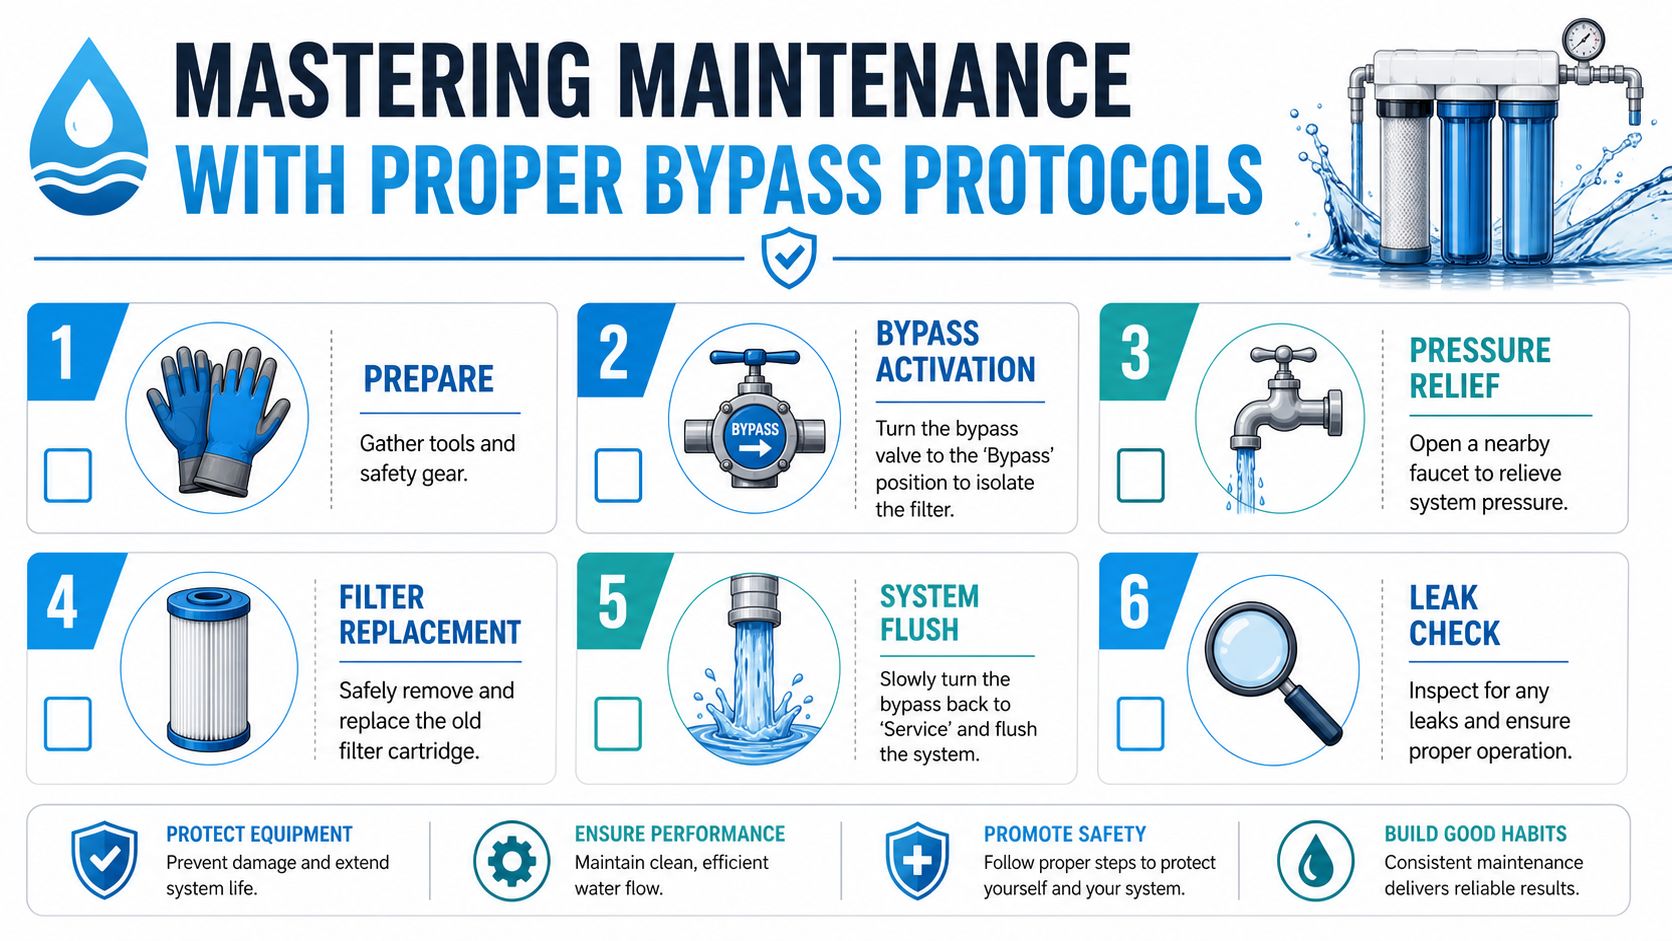
A practical maintenance sequence
For routine cartridge or housing service, the working rhythm should be controlled and repeatable:
Put the system in bypass so the house keeps water while the filter is isolated.
Relieve pressure before loosening housings or fittings.
Complete the filter service and reassemble carefully.
Return toward service slowly, not all at once.
Flush the system properly before assuming the job is done.
Check fixtures and fittings for leaks, sputtering, or sediment carryover.
The exact pressure-relief method depends on the equipment. Some assemblies are designed to isolate the vessel and release pressure in a controlled way before disassembly. That's much safer than cracking a housing and hoping pressure is gone.
New media needs conditioning, not just a quick rinse
Carbon media is where many homeowners get tripped up. Verified setup instructions state that after installing or replacing carbon media, the tank should be filled with water and allowed to soak for a minimum of 48 hours, then rinsed for 30 minutes through the inlet side to expel carbon fines, followed by 3 minutes on the outlet side to reset the carbon bed, according to the carbon tank conditioning instructions.
That's very different from casually opening a faucet and calling it good.
Flushing the system versus flushing the bypass
These aren't the same task.
Conditioning the media prepares new carbon or other filter media for use.
Flushing the system clears air, loose fines, and disturbed sediment from the plumbing after service.
Refreshing the bypass path helps move out water that may have been sitting in that loop during maintenance.
If you skip that distinction, the house may technically have water back on, but the water quality at the fixtures can be messy for a while.
Field note: If a house has high sediment, don't be surprised if the post-service flush takes longer than you hoped. Rushing this step just moves the problem downstream.
A careful return-to-service process protects faucet aerators, appliance valves, and any downstream treatment stages. It also gives you an early chance to catch a small leak before it turns into floor damage.
The Smart Choice for a Healthier Home
A bypass valve earns its keep on the day something goes wrong. A cartridge housing cracks on a Saturday. A pressure drop shows up the morning guests are arriving. The filter needs service, but the house still needs water. In that moment, the value of the bypass is not theory. It is whether the plumbing was set up to keep the home running without turning a maintenance job into an outage.
A well-designed whole house water filter with bypass valve does more than make service convenient. It gives the system a controlled way to come out of service and a controlled way to go back in. That second part gets overlooked. If the bypass loop is oversized, poorly located, or left with a long dead leg, water can sit there longer than it should. If the return-to-service process is sloppy, that stale water, trapped air, or loose debris gets pushed into fixtures and appliances.
That is why the best setup on paper is not always the best setup in a real house. Good contaminant reduction matters. So do cartridge cost and flow rate. But the long-term difference often comes down to plumbing details. Short bypass runs. Clear valve positions. Enough access to service the unit without forcing bad body position or rushed work. A layout that lets you flush the right path before sending water back through the whole house.
Homeowners who ask one extra question usually end up with the better system: What happens on maintenance day? If the installer cannot explain how to isolate the filter, refresh the bypass line, and bring the system back online without sending a mess downstream, the design is not finished yet.
That is the smart choice. Buy filtration you can service properly, inspect easily, and return to use without guessing. Clean water depends on media and certifications, but reliable water quality also depends on what happens in the valves and piping after every service call.
If you're comparing systems, troubleshooting bypass layouts, or trying to understand which filtration approach fits your home, Water Filter Advisor is a practical place to keep researching. It covers whole-house filters, replacement schedules, certifications, and maintenance decisions in plain language so you can choose equipment that works in an actual home, not just on a product page.
You fill a glass from the refrigerator door, hear the ice clink, take a sip, and think, “Good. Filtered.”
That word does a lot of work in most kitchens.
For some people, “filtered” means safer. For others, it means cleaner, colder, better tasting, or somehow more trustworthy than straight tap water. And that's where the confusion starts. A refrigerator filter can absolutely improve your water, but the actual answer to what refrigerator water filters remove is narrower than most box labels and product pages make it sound.
I've spent enough time around filter media, certification sheets, and water test reports to tell you this plainly. A fridge filter is usually a specialist, not a superhero. It's often very good at handling the things that make water taste or smell off. It's usually not built to solve every water quality problem in a home.
If you've ever seen marketing that says a filter removes “70+ contaminants,” while another listing for what looks like the same style cartridge only talks about chlorine and odor, you're not imagining things. Both claims can exist in the same market, and both can be technically true for different filters. The trick is knowing how to tell which one applies to your refrigerator.
That Crisp Glass of Water From Your Fridge
A neighbor once asked me a question I hear all the time in one form or another: “If my fridge water tastes better, does that mean the filter removed the bad stuff?”
Sometimes yes. Sometimes only some of it.
That cold glass from the dispenser feels reassuring because the experience is so polished. The water is chilled. The dispenser is built into a major appliance. There's a filter hidden neatly inside the fridge, so it seems reasonable to assume serious cleanup is happening. But your refrigerator cartridge is usually designed for a fairly specific job.
What people expect
Most households expect a fridge filter to do at least three things:
Make water taste better by cutting the pool-like or chemical taste many city water users notice
Reduce odor so the water smells fresher
Catch visible particles such as rust or grit that can sneak in from older plumbing
Those are fair expectations. In many homes, the filter does help with exactly that.
Where the misunderstanding happens
The problem starts when “better tasting” gets confused with “broadly purified.”
A standard refrigerator filter often works like a cleanup crew for nuisance issues, not like a full treatment plant for every contaminant category. If your water already comes from a treated municipal source, that may be enough for your daily drinking water preferences. If you have a specific concern, such as lead, cysts, PFAS, well-water contamination, or microbiological risk, the answer depends on the exact filter certification, not on the fact that it lives inside a refrigerator.
A fridge filter can make water much more pleasant to drink without being a complete solution for every health-related contaminant.
That's the mindset worth keeping as you read any label, online listing, or replacement cartridge description.
What Fridge Filters Are Designed to Remove
You fill a glass from the fridge, take a sip, and it tastes cleaner than the tap. That quick improvement leads many homeowners to assume the filter is handling a long list of contaminants behind the scenes. Sometimes it is. Often, it is doing a much narrower job.
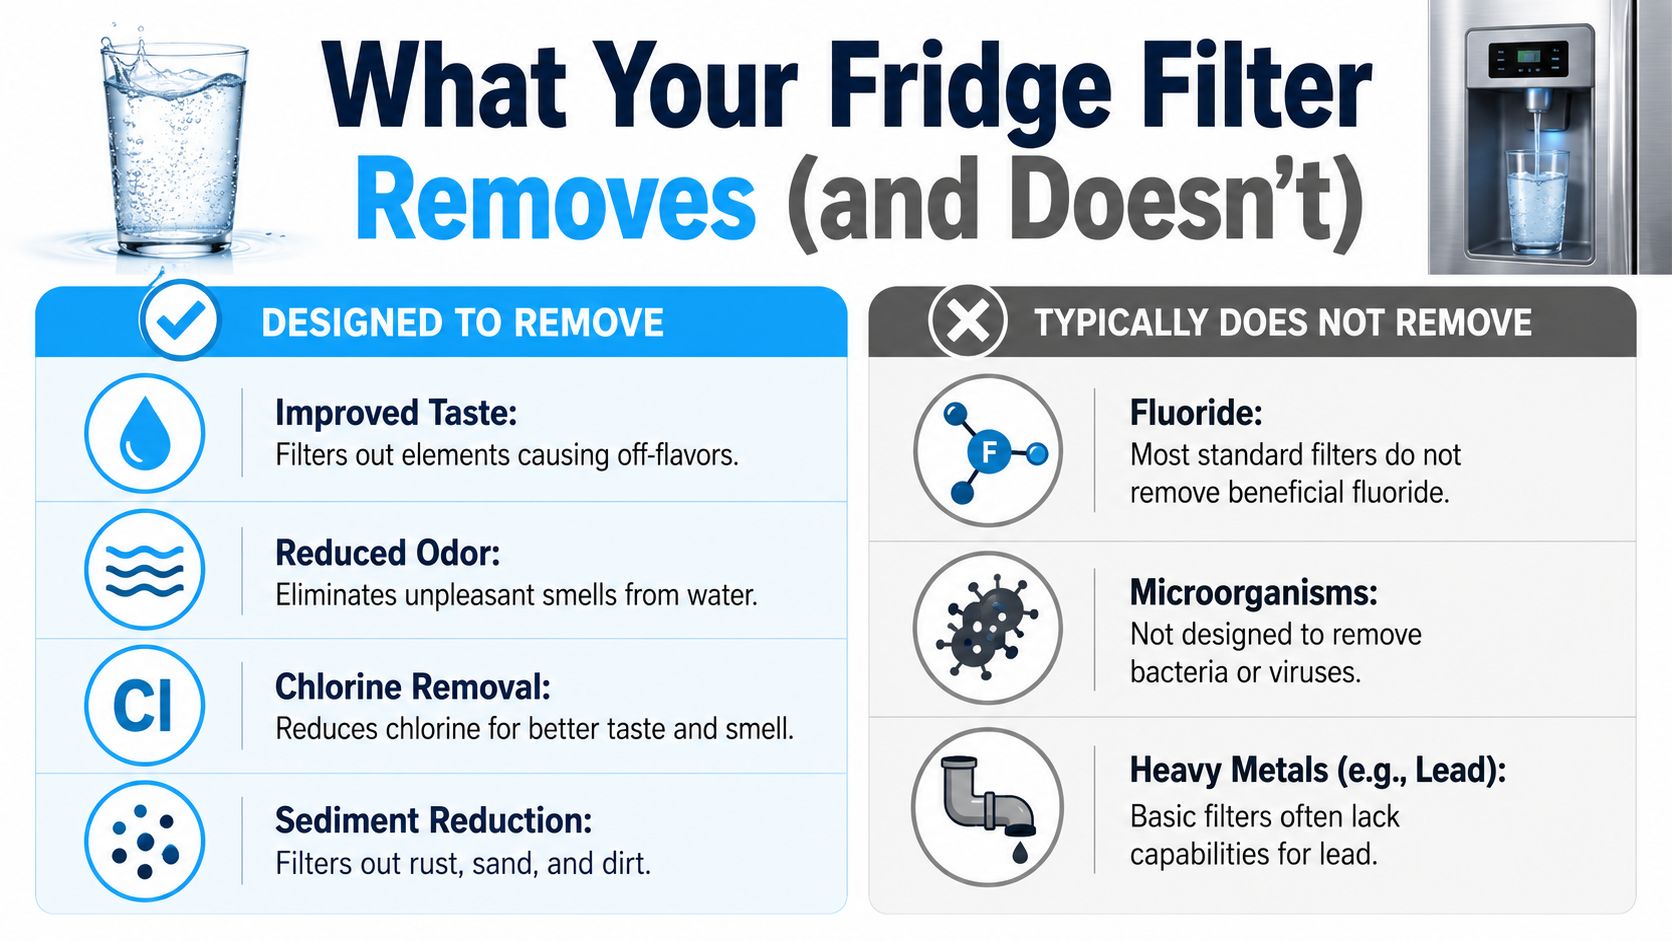
A standard refrigerator filter is usually built to improve the water you notice with your senses first. That means chlorine taste, chlorine odor, and small bits of sediment are the usual starting targets. In plain terms, many fridge filters act more like polishers than full treatment systems.
That gap matters because marketing language can blur it. A box may promise that a filter "reduces 70+ contaminants," but that claim only means something if that exact cartridge was tested and certified for those specific reductions. Two filters can look nearly identical on a shelf and do very different work once water flows through them.
What a typical fridge filter usually handles well
For many households on municipal water, a common off-the-shelf refrigerator filter is designed to reduce:
Chlorine taste and odor, which is why water often tastes less like a swimming pool
Sediment, such as tiny bits of rust, dirt, or grit from aging pipes
Some nuisance compounds that affect flavor, which can make water seem fresher or "crisper"
That last point trips people up. "Crisper" does not automatically mean "safer against every contaminant category." It usually means the filter removed compounds that were easy to taste or smell.
To make that easier to visualize, here's a simple comparison.
Where the big claims can mislead
The broadest claims in fridge filter marketing usually combine several possible contaminant categories into one impressive headline. The fine print is what tells the true story. One model may be certified for chlorine reduction only. Another may also be certified for lead, cysts, or a short list of additional contaminants.
A good way to read those claims is to ask a simple lab-style question: What was this exact filter tested to reduce? If the product page does not clearly name the certification and the contaminant list, treat the headline as advertising, not proof.
You can see the same problem in other small-appliance filtration products. PureHQ's coffee filter guide is a helpful example of how appliance-specific filter claims can vary by design and use case. If you want a broader reference point while comparing systems, our guides for choosing home water treatment options can help you sort taste-improvement claims from health-related reduction claims.
The practical takeaway is simple. Most fridge filters are designed to make water more pleasant to drink. Some go further, but only the certification for your exact cartridge tells you whether it does.
A short visual walk-through helps here too:
How Your Refrigerator Filter Works
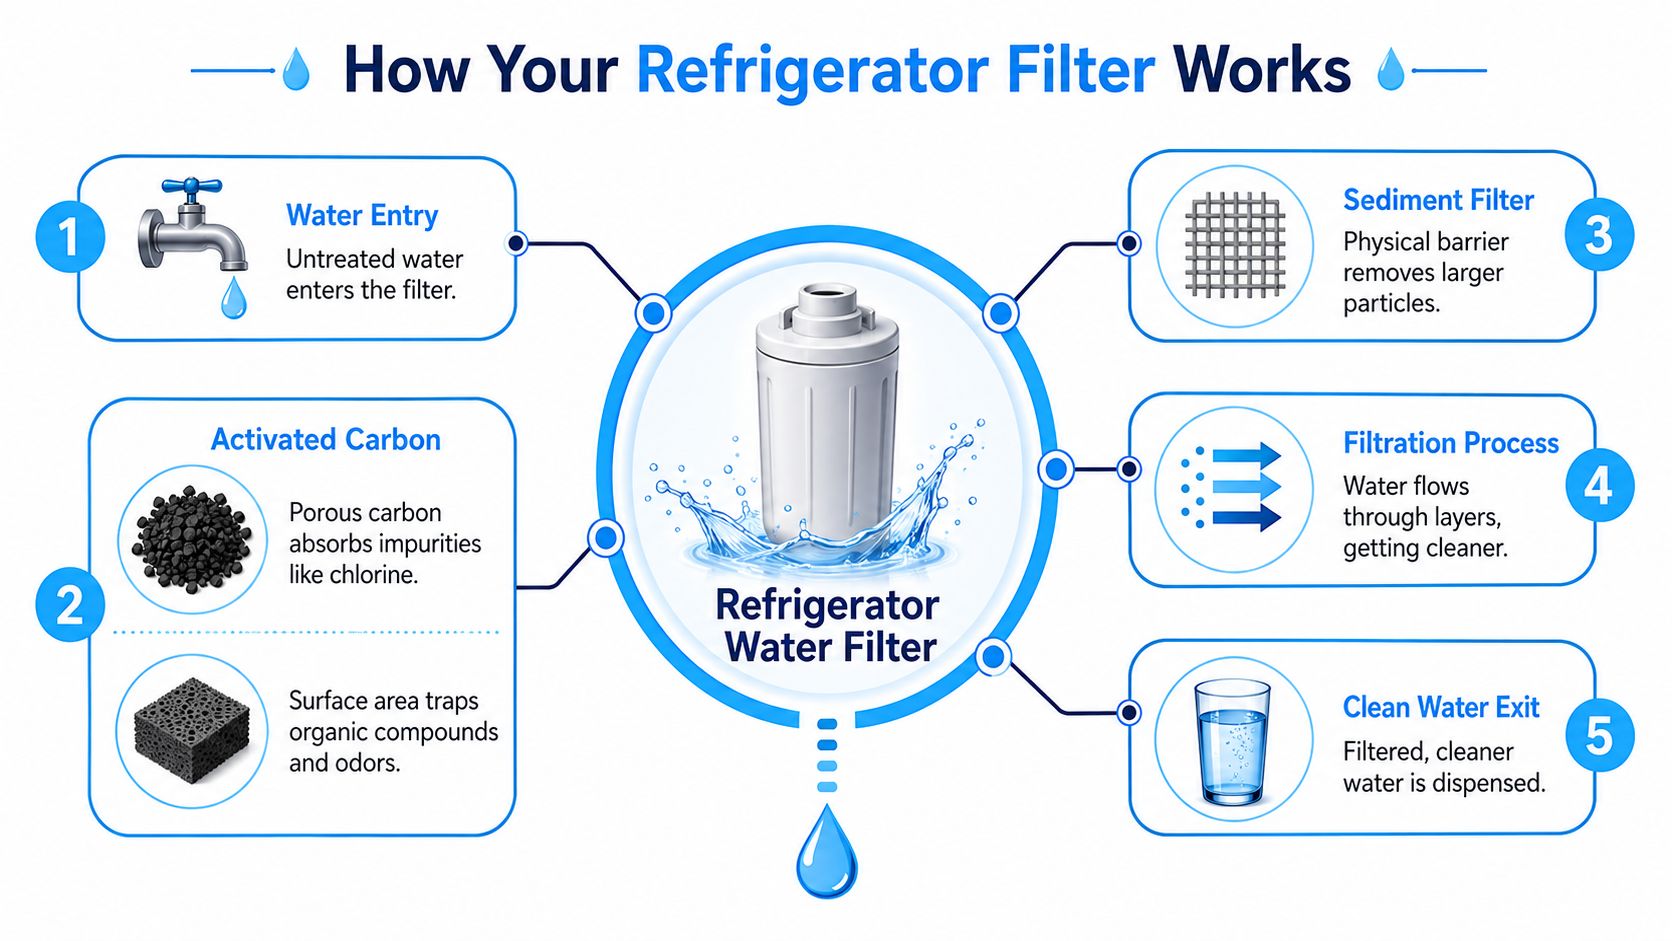
Most refrigerator filters rely on activated carbon. If you sliced one open, you wouldn't find a tiny water treatment plant with a dozen advanced stages. You'd usually find a compact cartridge built around carbon and a structure that forces water through it.
Think of activated carbon as a sponge made of tunnels, pores, and hiding places. Water passes through. Certain compounds cling to the carbon surface. That sticking process is called adsorption.
The easiest way to picture it
If absorption is a towel soaking up a spill, adsorption is more like dust sticking to a strip of tape.
That distinction matters. The filter doesn't “destroy” chlorine taste compounds or magically neutralize every contaminant. It provides a huge internal surface where certain unwanted compounds can latch on while water keeps moving.
What happens inside the cartridge
A basic refrigerator filter usually works in a sequence like this:
Water enters the cartridge from your household supply line.
A physical barrier catches larger particles such as sediment or rust.
Activated carbon interacts with dissolved compounds that affect taste and smell.
Water exits cleaner-looking and better tasting than it entered.
The dispenser or ice maker receives the treated water for daily use.
Why some filters do more than others
Not all cartridges use the same media mix. Some advanced filters include materials meant to target a narrower set of contaminants beyond chlorine and sediment. That's one reason two filters with similar shapes and brand language can perform very differently.
The cartridge itself is also tiny compared with an under-sink reverse osmosis unit or a whole-house treatment system. Size matters. Contact time matters too. The less time water spends moving through the right media, the fewer opportunities the filter has to catch or reduce difficult contaminants.
Lab shortcut: When you want to understand a filter, stop looking at the plastic shell and start looking for the media type and certification sheet.
That one habit will save you from most marketing confusion.
What Most Fridge Filters Leave Behind
This is the part many shoppers need most. A fridge filter can improve your water and still leave behind contaminants you care greatly about.
That isn't a defect. It's a design limit.
The big gap between marketing and performance
Some refrigerator filter pages use broad language that makes the cartridge sound almost universal. In practice, standard fridge filters usually do not remove PFAS, viruses, bacteria, or fluoride, according to major-brand and independent explanations summarized in Whirlpool's refrigerator filter FAQ.
That gap matters because people often buy a replacement cartridge to solve a problem it was never built to address.
What standard fridge filters commonly miss
A standard filter is often not the right tool for these concerns:
Bacteria and viruses. Most fridge cartridges are not designed for microbiological protection.
PFAS. These “forever chemicals” generally call for more specialized treatment.
Fluoride. Standard refrigerator cartridges usually let it pass through.
Many difficult dissolved contaminants. Some chemicals need different media or a more intensive process.
Well-water safety issues. If the water source itself may be microbiologically unsafe, the fridge filter isn't your main line of defense.
For people looking at broader household treatment, this overview of the benefits of whole home water filtration is helpful because it shows how point-of-entry systems solve different problems than a single refrigerator cartridge.
Why well-water homes need extra caution
Municipal water users and well-water users are not playing the same game.
A refrigerator filter usually assumes the incoming water is already disinfected and generally safe from a microbiological standpoint. That assumption often fits treated city water. It may not fit private well water, especially if testing has flagged contamination concerns.
If your household has received a contamination advisory, if you rely on untreated or inconsistently treated well water, or if you're worried about emerging contaminants, a fridge filter may improve taste while leaving the safety question unanswered.
If your concern is “Does this water taste better?” a fridge filter may help. If your concern is “Is this water safe from difficult contaminants?” you need model-specific proof or a different treatment method.
That's the most important distinction in the whole article.
Decoding NSF Certifications for Filters
You swap in a new fridge filter, pour a cold glass, and the box says it removes dozens of contaminants. That sounds reassuring until you look closer and realize those big promises usually rest on a few small certification numbers.
Those numbers matter more than the headline.
A standard refrigerator filter is not a magic catch-all. In lab terms, it is a cartridge tested for specific reduction claims under specific conditions. If you want to know what your filter does for your family, read the certification like a test result, not like an advertisement.
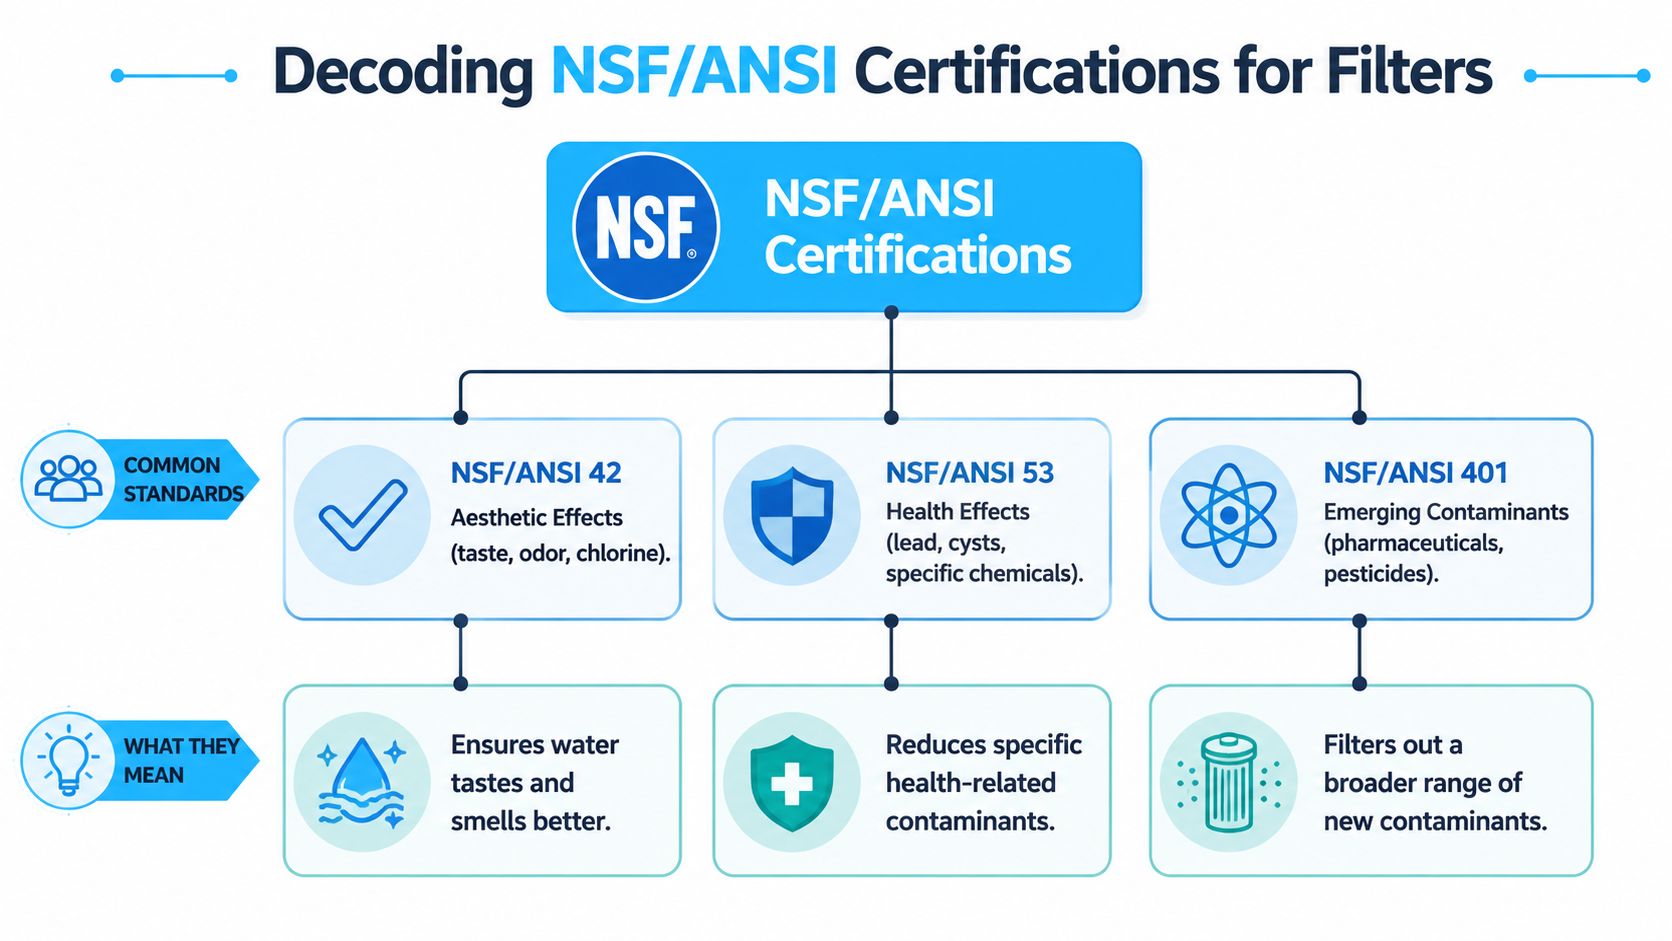
NSF 42, NSF 53, and NSF 401 in plain English
The broad idea is simple. Different NSF standards point to different kinds of claims.
NSF 42 usually covers aesthetic improvements, such as reducing chlorine taste and odor
NSF 53 covers certain health-related contaminant reductions, but only for the contaminants specifically listed for that filter
NSF 401 applies to some newer or "emerging" contaminants on certain models
Here is the practical translation:
Standard
What it usually tells you
What that means at home
NSF 42
Aesthetic effects
Better taste and smell, especially from chlorine
NSF 53
Health-related reductions
The filter was tested for certain contaminants, such as lead or cysts, if those are named
NSF 401
Emerging contaminants
Some filters are tested for a limited list of newer contaminant categories
The part that confuses shoppers
A filter can say NSF 53 certified and still not be certified for every health-related contaminant people worry about.
That is the gap between marketing and reality.
Manufacturers often spotlight the category because it sounds broad. The actual certification is narrower. It works like a student report card. Seeing "science" on the report does not tell you whether the student studied chemistry, biology, or physics. In the same way, seeing "NSF 53" does not tell you which contaminants were reduced unless the package or product sheet names them.
So if your concern is lead, look for lead. If your concern is cysts, look for cysts. If the contaminant is not named, do not assume the filter handles it.
A simple way to read the box
When you are standing in a store aisle or comparing filters online, check the label in this order:
Find the NSF standard number. This tells you the type of claim being made.
Find the contaminant list. This tells you what that specific filter was tested to reduce.
Match the list to your concern. A good filter for chlorine taste is not automatically a good filter for lead.
Check the exact model compatibility. A cartridge has to fit and seal correctly to do its job.
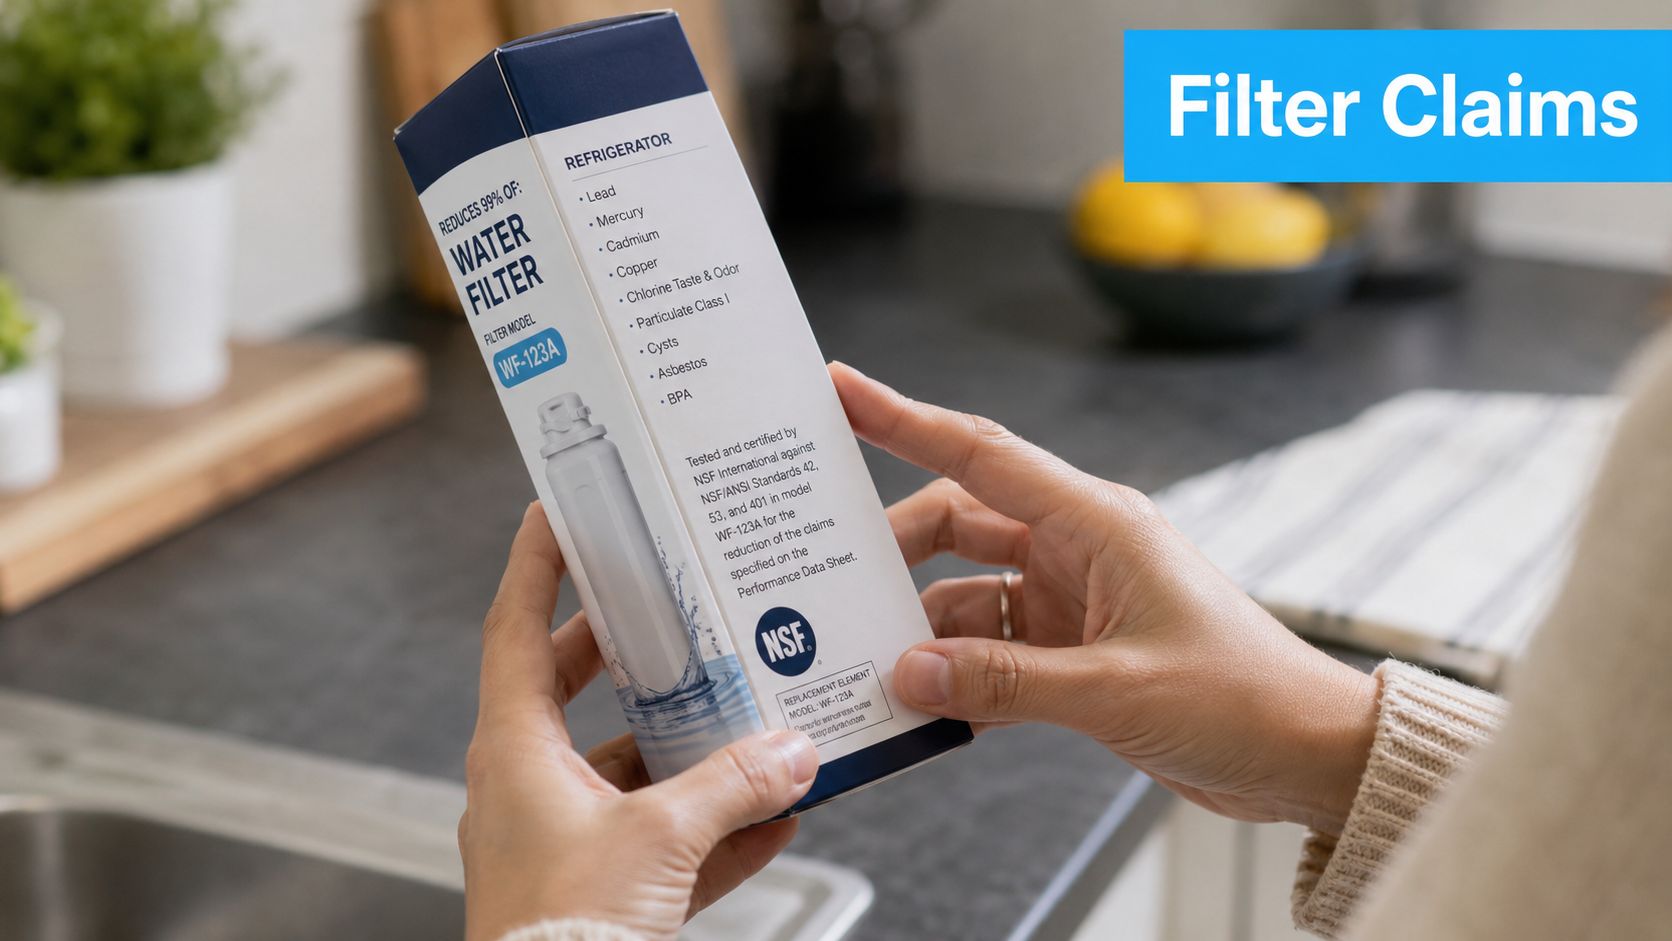
One more detail matters. Some boxes use phrases like "tested to NSF standards" or "made with NSF-certified materials." Those phrases are weaker than a clear statement that the finished filter is certified for named contaminant reductions.
Plain rule: Treat NSF numbers as the table of contents. Treat the named contaminants as the real answer.
That small shift in how you read the label helps you sort out a realistic fridge filter from one that only sounds impressive.
How to Read Filter Claims and Avoid Scams
Filter packaging often mixes useful facts with fluffy language. The safest move is to treat every claim like a label on a toolbox. You want to know exactly what tool it is, exactly what job it does, and exactly what job it does not do.
What a trustworthy claim looks like
A reliable listing usually includes these details:
Specific certification language instead of vague promises
Named contaminants rather than “impurities” or “harmful substances”
Exact refrigerator compatibility so you know the cartridge fits and seals correctly
Brand transparency about whether it's an original manufacturer part or a third-party replacement
What should make you pause
Be careful when a product page leans on phrases like these:
“Removes contaminants” with no certification shown
“Comparable to major brands” without naming tested standards
“Advanced coconut carbon technology” with no actual reduction list
Very low-price listings from unclear sellers where packaging, model numbers, or photos look inconsistent
Counterfeit and poorly documented replacement filters are a real concern because the cartridge can look convincing while giving you little proof of performance.
A quick gut check helps. If a listing sounds sweeping but avoids naming standards, named contaminants, and compatible refrigerator models, keep scrolling.
Why and When to Change Your Refrigerator Filter
A refrigerator filter isn't a permanent part. It's a consumable. Once the media is used up or the cartridge has sat wet for too long, performance drops.
Two things happen as a filter ages. First, it can lose its ability to hold the compounds it was meant to reduce. Second, buildup inside the cartridge can restrict flow or create pathways where water doesn't interact with the media as evenly as it should.
Replacement is about performance, not just reminders
People often treat the change light like a gentle suggestion. It's better to think of it as a maintenance warning.
Change your fridge filter when the manufacturer says to, and sooner if your water flow drops, your ice tastes off, or the water develops the same smell the filter used to remove. An old carbon cartridge can stop improving the water in any meaningful way, and a damp, neglected filter is not something you want to keep in service indefinitely.
If your household uses a lot of dispenser water or if your incoming water carries more sediment than average, the filter may wear out faster in practical terms, even before the reminder becomes impossible to ignore.
Frequently Asked Questions About Fridge Filters
Can a refrigerator filter make unsafe water safe to drink
Usually, no. A standard fridge filter is not a universal safety device. If the concern is bacteria, viruses, PFAS, or another difficult contaminant, you need a filter specifically certified for that concern or a different treatment system.
If my water tastes fine, do I still need the filter
That depends on why you're using it. Some people want better ice quality and less chlorine taste. Others are trying to reduce a specific contaminant. Taste alone doesn't tell you what is or isn't in the water.
Is an original brand filter always better than a third-party one
Not automatically. What matters is fit, certification, and trustworthy documentation. A third-party filter can be a reasonable choice if it clearly lists the right certifications and matches your refrigerator model correctly.
Will a fridge filter help if I already have a whole-house system
It can. A whole-house system and a fridge filter do different jobs. Some homes use whole-house filtration to treat the supply broadly, then rely on the fridge cartridge for final taste improvement at the dispenser.
Why does my filtered water still leave mineral spots
Because a standard refrigerator filter usually isn't built to remove the minerals that cause spotting or hardness residue. If spotting is your main complaint, you may be dealing with a different water treatment issue than what the fridge cartridge was designed to fix.
What's the smartest way to answer what refrigerator water filters remove for my home
Look up your exact filter model and read its certification sheet. That's the most reliable answer. Not the brand family, not the refrigerator ad, and not a generic marketplace bullet list.
If you want help comparing filter types, understanding certifications, or figuring out whether your home needs a refrigerator filter, under-sink system, or broader treatment, Water Filter Advisor is a useful place to start. It breaks down filtration options in plain language so you can make a decision based on your actual water concerns, not marketing shortcuts.
Most review tankless electric water heater articles start with the same sales pitch. Smaller box. No standby heat loss. Endless hot water. That advice ...
You fill a glass from the kitchen tap, take a sip, and pause. Maybe it tastes a little like a swimming pool. Maybe it smells faintly chemical. Maybe the water looks clear, but you still don't feel fully settled about what's in it.
That moment matters more than people think.
A lot of homeowners start caring about filtration the same way. Not from a big disaster, but from a tiny moment of doubt at the sink, in the shower, or while filling a baby bottle. You're not being picky. You're paying attention to something your family uses every day.
That First Sip of Doubt
One customer at a hardware counter once described it perfectly. “I don't know what's wrong with my water,” she said, “but I don't like wondering every time I drink it.” That's where many people are right now. The water may be legal to drink, but “safe enough” and “something I trust” aren't always the same feeling.
That concern is common. As of 2023, 91% of Americans reported using a water filter, a 25% increase since 2020, and EPA data showed that 27% of public water systems violated at least one drinking water standard in 2022, according to NSF's water filter research summary.
What your senses are telling you
Your eyes, nose, and tongue can't identify every contaminant, but they often notice clues:
Taste changes can point to chlorine, minerals, or old plumbing.
Odor problems often show up before you ever see an issue in the glass.
Cloudiness or particles may suggest sediment, rust, or disturbed pipes.
Skin and hair complaints after showering can make people realize the issue isn't only about drinking water.
The tricky part is that clean-looking water can still contain things you'd rather remove. Clear water isn't the same as filtered water.
Practical rule: If you've started wondering about your tap water more than once, that's enough reason to look into filtration.
Why filtration feels confusing
Home water treatment has a jargon problem. You start searching for a water filtration system home setup and suddenly you're buried in terms like carbon block, KDF, RO, UV, micron rating, NSF 42, NSF 53, point-of-entry, and point-of-use. It sounds more complicated than it is.
The job is simple. You're trying to match a water problem to the right tool.
Some systems improve taste. Some protect pipes and appliances. Some target lead. Some handle a broad mix of dissolved contaminants. Some do one job at one faucet. Others treat every drop that comes into the house.
Once you sort those categories out, the whole subject gets much easier to live with and much easier to shop for.
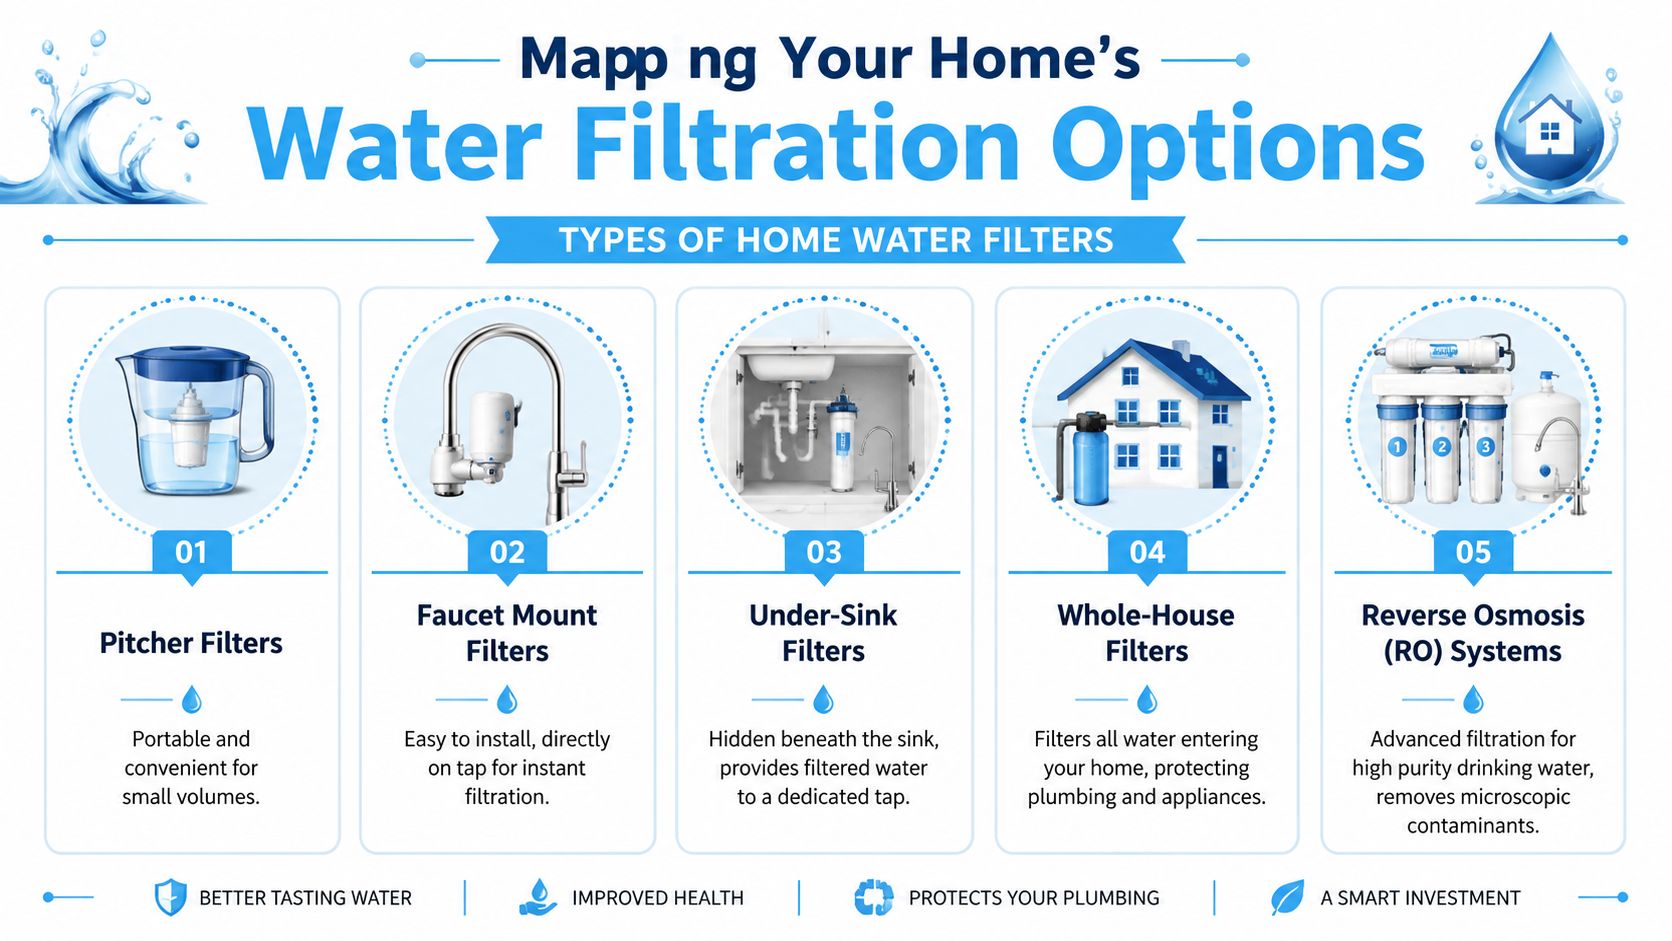
Mapping Your Home's Water Filtration Options
Think of home filtration like tools in a garage. You wouldn't use the same tool to hang a picture, rebuild a fence, and tighten a loose cabinet hinge. Water filters work the same way. The right system depends on where the problem is and what outcome you want.
Point of use versus whole house
The first split is simple.
A point-of-use filter treats water at one location, like a kitchen faucet, under-sink tap, or pitcher. A whole-house system, also called point-of-entry, treats water where it enters the home. That means the kitchen sink, shower, washing machine, and water heater all get filtered water.
If your main complaint is drinking water taste, a point-of-use filter may be enough. If you care about showers, laundry, scale, plumbing protection, and chlorine smell across the whole house, you're looking at a bigger system.
The main filter types people actually buy
Here's the plain-English version of the common options:
Pitcher filters are the easiest entry point. Fill, wait, pour. Good for renters, small households, and people who want a no-tools solution.
Faucet-mount filters snap onto a kitchen tap. They're convenient when you want filtered water on demand without opening a cabinet.
Under-sink filters hide below the counter and usually feed a dedicated drinking-water faucet. They keep the counter clear and feel more permanent.
Reverse osmosis systems are usually installed under the sink. They use multiple stages and are chosen when people want very high-purity drinking and cooking water.
Whole-house filters sit near the main water line and treat all incoming water before it reaches fixtures and appliances.
Shower and refrigerator filters are specialty tools. They target one use case rather than the whole home.
What whole-house systems do differently
A whole-house filter changes the character of water throughout the building. That matters when the problem isn't only the taste in a glass. It matters when chlorine smell rises in hot showers, when sediment clogs fixtures, or when you want to protect water-using appliances.
Modern systems are better at this than many people expect. Some whole-house systems maintain flow rates of 12 to 15 GPM, and the first sediment stage can process up to 1,000,000 gallons, helping protect the later media stages and reduce pressure-drop issues, based on the lab-test summary from Just Plumbing AZ.
That means “whole-house” doesn't automatically mean weak showers. A properly sized system can keep up.
A whole-house filter is less like a Brita pitcher and more like changing the quality of the water supply your home lives on.
Home Water Filter Types at a Glance
System Type
Where It's Installed
Typical Cost
Best For
Primary Benefit
Pitcher filter
Countertop or refrigerator
Lower upfront cost
Renters, small households
Simple improvement in drinking water taste
Faucet mount
On the kitchen faucet
Lower upfront cost
Quick kitchen upgrades
Instant filtered water without major installation
Under-sink filter
Beneath the sink
Moderate upfront cost
Cooking and drinking water
Hidden setup with dedicated filtration
Reverse osmosis system
Usually under the sink
Higher upfront cost than basic POU filters
High-purity drinking water
Broad contaminant reduction at one tap
Whole-house filter
Main incoming water line
Highest upfront cost
Full-home treatment
Protects fixtures, appliances, and every tap
Which option fits your home
A few simple examples make this easier:
If you own a house and hate chlorine smell in every shower, a whole-house setup makes more sense than a pitcher.
If you live in an apartment and only care about drinking water, a faucet filter or under-sink unit is usually the practical move.
If you want broad home protection plus better-tasting water at the kitchen sink, many households combine a whole-house filter with a separate drinking-water system. Homeowners comparing larger systems often browse guides like this roundup of best whole-house water filtration systems to narrow down sizes and media types before talking with an installer.
And if you're not sure whether your plumbing layout can handle a main-line install, local pros who offer dependable plumbing services can usually tell you quickly what's realistic in your home.
Decoding Your Water The Villains and The Heroes
Water filters make more sense when you stop thinking in brand names and start thinking in matchups. Something in the water causes a problem. A certain filtration method is built to tackle it.
That's the whole game.
The usual villains in household water
Some water issues are annoying. Some are costly. Some raise health concerns. A few common categories show up again and again.
Sediment is the easy one to picture. Think sand, rust, grit, or silt. It can make water look cloudy and can wear on valves, cartridges, and appliance parts.
Chlorine and chemical odors often show up as taste and smell complaints. If your shower smells like a pool when hot water runs, that's usually what people notice first.
Lead and other heavy metals are less dramatic to the senses, which is part of what makes them unsettling. Water can look and taste normal and still be something you want to treat more carefully.
Dissolved solids and microscopic contaminants are where many shoppers start hearing about reverse osmosis. These are often too small for basic sediment filters.
The heroes and how they work
A filter is only useful if you know what job it's doing.
Carbon works like a sponge for chemicals
Activated carbon is one of the most common media in home filtration. The easy analogy is a sponge with an enormous amount of surface area. It attracts and holds many compounds that affect taste and odor.
If your water smells chemical or tastes flat, carbon is often the first hero on the scene. For a homeowner, the outcome is easy to notice. Water tends to taste cleaner, smell better, and feel more pleasant to drink and cook with.
Sediment filters are the doormat
A sediment filter doesn't do the glamorous work. It does the necessary work. It catches the visible grit before that grit reaches more specialized media farther downstream.
That's why multi-stage systems often start with sediment. It's the doormat at the front door. If you let mud into the house, everything else has a harder day.
RO is popular because people understand what they're buying: very thorough filtration for drinking water. The simple analogy is a super-fine sieve that pushes water through a membrane while leaving many unwanted dissolved contaminants behind.
What this means in daily life is straightforward. RO water often tastes noticeably “lighter” and cleaner, especially if your tap water has mineral heaviness or a stubborn aftertaste.
For a quick visual explanation of how filtration stages work together, this overview is helpful:
UV is the quiet guard
Ultraviolet treatment doesn't trap particles like a sediment filter or adsorb chemicals like carbon. It works more like a silent security light. It targets microorganisms using light rather than a physical barrier.
Homeowners sometimes get confused here because UV doesn't usually fix taste or odor. It has a different mission. It's about microbiological control, not flavor.
If a filter promises to do everything, slow down and read the details. Good filtration is usually a team effort, not a magic trick.
Why multi-stage systems exist
No single media is the hero for every problem. That's why you see combinations such as sediment plus carbon, or carbon plus RO, or sediment plus KDF plus carbon in larger home systems.
Cleaning a muddy window requires a multi-step approach. You would not use only a squeegee. First you rinse off grit, then you scrub, and finally you polish. Water treatment works the same way. Each stage handles a different part of the mess.
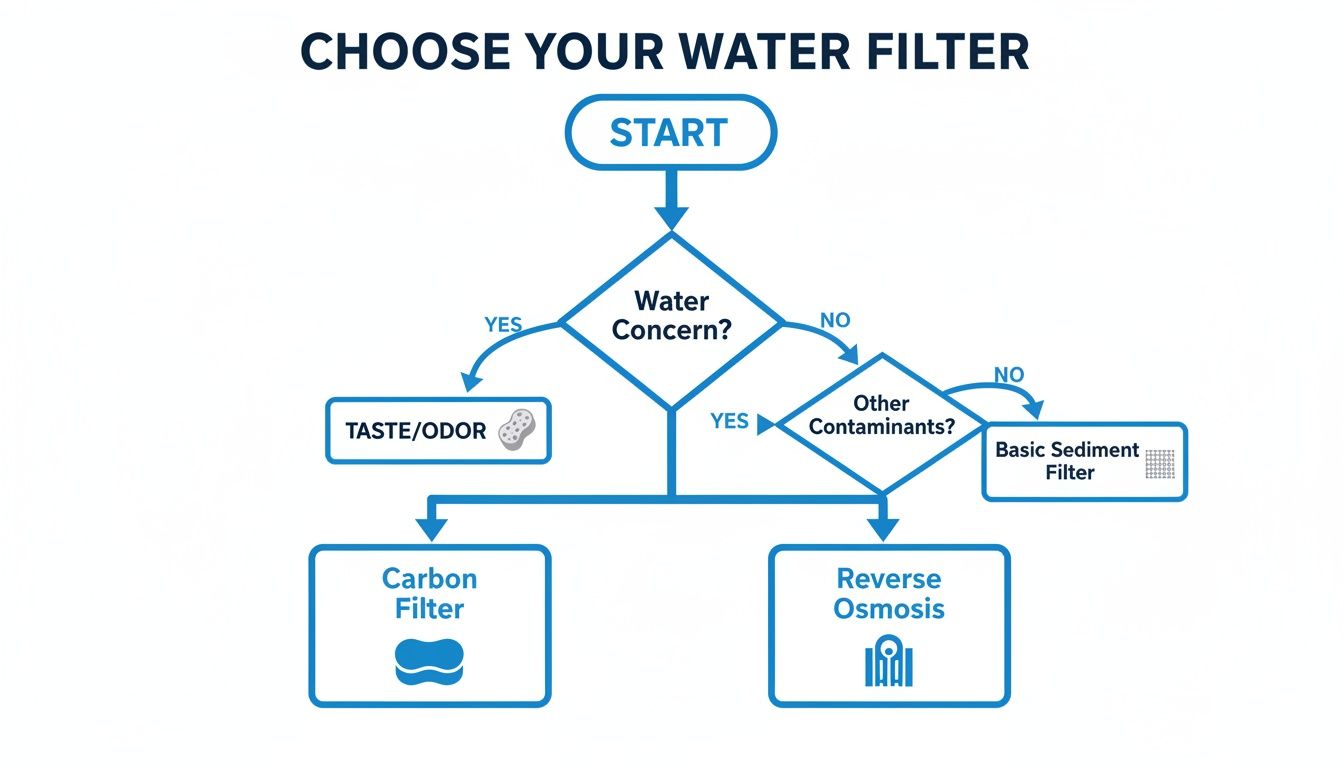
How to Choose Your Perfect Water Filtration System
Buying a filter gets easier when you answer four questions in order. Not brand first. Not price first. Start with your water, then your house, then your habits.
Start with the water source
Municipal water and private well water create different shopping lists.
City water users often complain about chlorine taste, odor, sediment from older distribution lines, or concerns tied to aging plumbing. Well water owners usually need a more customized approach because well conditions can vary widely from one property to the next.
If you don't know what you're targeting, test first. A water filter should solve a known problem, not just give you a comforting box under the sink.
Decide what outcome matters most
A lot of people say they want “clean water,” but that can mean very different things.
Use this short checklist:
Better taste and smell: Look first at carbon-based systems.
Lead reduction: Check the certification details, not just the marketing.
Whole-home comfort: Think about showers, laundry, and appliance protection, not only the kitchen tap.
High-purity drinking water: RO usually belongs on your shortlist.
Visible particles: Sediment filtration should be part of the setup.
Learn the labels before you buy
Certification labels matter because they tell you what a filter has been tested to reduce.
NSF/ANSI 53 is one of the labels homeowners should know. NSF notes that NSF/ANSI 53 certification means a filter reduces specific health-related contaminants like lead by at least 99%, and certified systems that reduce chlorine below 0.5 ppm can help extend pipe life by 5 to 10 years while lowering disinfection byproducts linked to health risks, as explained in NSF's guide to home water treatment.
That sounds technical, but the practical takeaway is simple. Don't buy a filter because the box says “premium.” Buy it because the certification tells you what it's been tested to handle.
Know what each certification means to your house
A label isn't just paperwork.
For your drinking glass, a health-related certification can mean greater confidence about lead reduction.
For your plumbing, chlorine reduction can mean less wear on pipes and fixtures.
For your wallet, a well-matched certified system is less likely to become an expensive guess.
Buying advice: Read the contaminant reduction claims as carefully as you'd read the ingredients on food for your family.
Don't ignore flow rate and daily use
People often focus so hard on contaminant claims that they forget how the system will feel to live with.
If your home has multiple bathrooms and people shower, run laundry, and use sinks at the same time, whole-house sizing matters. If you hate countertop clutter, that rules out some point-of-use options. If you rent, anything requiring permanent plumbing changes may be a poor fit no matter how good the performance sounds.
A good choice isn't only about what the filter removes. It's also about whether your household will enjoy using it.
Build your own filtration profile
Here's a practical way to narrow the field:
Water source City or well.
Main complaint Taste, odor, particles, lead concern, or whole-home treatment.
Coverage area One tap, one room, or every fixture.
Installation tolerance DIY only, light plumbing, or professional install.
Maintenance style Are you fine changing cartridges often, or do you want longer-service media?
That profile usually points you to the right category quickly. Then you can compare systems inside that category without getting lost in marketing noise.
Installation and Upkeep A Guide to Long-Term Ownership
A water filter isn't a one-time purchase. It's more like owning a furnace filter, only with more direct effect on what you drink, cook with, and bathe in. The best system is the one you'll maintain properly.
What you can install yourself
Pitchers and faucet-mount filters are straightforward. These units can be installed in minutes. Many under-sink filters are also manageable for a confident DIYer if the plumbing is accessible and you're comfortable tightening fittings carefully.
Whole-house systems are a different animal. They connect near the main line, need enough physical space, and have to be sized and oriented correctly. If you're thinking about a main-line system, a step-by-step guide like this overview on how to install a whole-house water filter can help you understand the job before deciding whether to DIY or call a pro.
What maintenance actually looks like
Filter ownership is mostly about staying on schedule.
Sediment pre-filters usually need more frequent attention because they catch the visible dirt first.
Carbon stages last longer, but they don't last forever. Once exhausted, they stop doing the job you bought them for.
Multi-stage systems need each stage changed according to its role, not all by guesswork on the same day.
If you ignore maintenance, the system doesn't “sort of work.” It gradually stops protecting your water the way you expect.
When professional help makes sense
Call for help when you're dealing with the main line, limited clearance, unusual pipe materials, or a setup that affects multiple fixtures. It also makes sense when your water issue is more complex than “I want it to taste better.”
If you want a local example of the kind of specialist profile worth checking, a listing like the Amber Pump local service profile shows the type of water-treatment-focused provider homeowners often look for when installation goes beyond a simple cartridge swap.
A good installer doesn't just mount equipment. They help make sure the system matches the water and the house.
The ownership mindset
The easiest way to stay happy with a filtration system is to think ahead about cartridge changes, access, and replacement parts before you buy. A compact filter tucked into an impossible corner becomes annoying fast. A larger system with simple service access may be easier to live with for years.
The goal isn't only cleaner water today. It's cleaner water without headaches six months from now.
Your Top Water Filtration Questions Answered
Do water filters remove everything good and bad
Not all filters work the same way. A simple carbon filter mainly targets things that affect taste, odor, and certain contaminants. Reverse osmosis is more aggressive. That's why you should choose based on your water issue, not assume every filter behaves the same.
What's the best option if I rent
Renters need flexibility. There's a real gap here, because 15% of U.S. renters face higher lead exposure from aging pipes in multi-family units, and non-permanent point-of-use options such as certified pitchers or faucet mounts can reduce contaminants like lead by 99% under NSF/ANSI 53, based on the renter-focused guidance from Antunes residential water filtration.
That makes pitchers, faucet filters, and some countertop systems practical choices when lease rules prevent plumbing changes.
Do I need whole-house filtration and a drinking-water system
Sometimes yes. They do different jobs. A whole-house filter helps with water used for showering, cleaning, and appliances. A separate drinking-water filter, often under the sink, can provide extra treatment where you cook and drink.
How do I know what I'm paying for
Check three things: the contaminants named on the certification sheet, the installation type, and the replacement schedule. If a product talks more about “refreshing water” than tested reduction claims, keep shopping.
Will filtration change how water feels in daily use
Usually, yes. People often notice the practical stuff first. Better taste. Less odor. Cleaner ice. Showers that smell less chemical. Fixtures and appliances that deal with less sediment and less untreated water stress.
If you're ready to compare systems without getting buried in marketing language, Water Filter Advisor is a solid place to start. It's built for households that want clear guidance on filter types, certifications, maintenance, and real-world buying decisions, whether you're choosing a pitcher for an apartment or a full water filtration system home setup for every tap.
When you have a private well, you're not just a homeowner—you're your own water manager. A water filtration system for well water is a combination of technologies that removes contaminants, improves taste, and makes your water safe. It's your home's personal water treatment plant.
Your Guide to Pure and Safe Well Water
Owning a home with a private well means you don’t have to deal with municipal water bills or the chemicals used in city treatment. But this also means you carry a critical responsibility: ensuring the water from your taps is safe and clean.
Unlike city water, no public utility is monitoring your well. The quality is entirely in your hands. This guide gives you the expert information you need to turn your well into a reliable source of pure water.
What This Guide Covers
We're here to give you the knowledge to make the right decisions for your water. We will show you how to solve the most common issues well owners face.
Safety: We’ll show you how to identify and get rid of harmful bacteria, viruses, and chemicals you can’t see, smell, or taste.
Taste and Odor: Learn how to eliminate "rotten egg" smells from sulfur or the metallic tastes that make water unpleasant.
Staining and Damage: Find out how to stop minerals like iron and manganese from leaving ugly orange or black stains on sinks, tubs, and laundry.
A well water filtration system should use a multi-barrier approach. Think of it as layers of defense. Different stages work together to stop different threats before they get to your faucet.
The Multi-Barrier Approach
No single filter can solve every water problem. A complete system uses a team of filters working in sequence.
One filter might remove large particles like sand and sediment. Another filter might be a specialist, targeting specific chemicals or minerals. A final stage, like a UV light, can neutralize any bacteria or viruses that got through the other defenses.
This guide will walk you through this strategic approach. We will help you build a system that matches your water's specific chemistry. By the end, you'll have the confidence to choose, install, and maintain the right equipment to protect your family, your plumbing, and your peace of mind.
Understanding What's Really in Your Well Water
Let’s pull back the curtain on the world hiding inside your well water. Unlike city water that gets tested and treated before it ever reaches your faucet, well water is a direct pipeline from the ground to your glass. That means you’re getting water in its most natural state—which can also include a whole cast of uninvited guests.
This isn't to scare you; it’s to empower you. Knowing exactly what you’re up against is the first step in choosing a filtration plan that actually works for your home. You're not alone in this—over 13 million households across the country rely on private wells. That’s a huge number of families who could be dealing with contaminants that sneak into groundwater from all sorts of places. If you want to dive deeper, you can explore Frizzlife's complete 2026 guide for well water filters.
The "Nuisance Crew": Annoying but Mostly Harmless
Some contaminants are more of an annoyance than a real danger. I call them the "Nuisance Crew," and you'll know they're around by the headaches they cause. They’re often the reason you started looking for a water filtration system for well water in the first place.
Iron: The classic rusty stain artist. If you’re seeing reddish-brown streaks in your sinks, toilets, and even on your laundry, you’ve met iron. It also gives your water a distinct metallic taste.
Manganese: Think of manganese as iron's darker cousin. It leaves behind blackish or dark brown stains and can make your water taste bitter or metallic.
Hydrogen Sulfide: This is the prankster of the group, responsible for that unmistakable rotten-egg smell. While the smell is awful, the gas itself is typically not a health risk at the low levels found in residential wells.
Hardness Minerals: This is the duo of calcium and magnesium that causes hard water. They don’t stain like iron, but they leave behind a chalky scale buildup on faucets, showerheads, and inside your appliances, which slowly strangles their efficiency and shortens their lifespan.
The Invisible Invaders: The Real Health Threats
Much more serious are the contaminants you can’t see, smell, or taste. I call these the "Invisible Invaders" because they pose genuine health risks, and their presence is the number one reason why testing your water is non-negotiable.
The most dangerous contaminants are often undetectable by your senses. Relying on clear, good-tasting water as a sign of safety is a gamble. Professional testing is the only way to be certain.
These invaders can come from anywhere. Agricultural runoff can introduce nitrates and pesticides. A neighbor’s failing septic system can leach bacteria into the groundwater. Even the natural geology of your area can be a source of heavy metals. To grasp the severity, it's useful to know what professionals consider truly contaminated water—like Category 3 water damage, also known as 'black water', which illustrates the worst-case scenarios that good filtration helps you avoid.
Here are the main threats you need to be aware of:
Bacteria and Viruses: Pathogens like E. coli and coliform bacteria are major red flags. Their presence usually means sewage or animal waste has contaminated your water, and they can cause serious gastrointestinal illnesses.
Nitrates: Often found in agricultural areas from fertilizer runoff, high levels of nitrates are especially dangerous for infants and pregnant women.
Heavy Metals:Arsenic and lead are two of the most concerning. They can leach into groundwater from natural mineral deposits or old industrial sites and are linked to severe, long-term health problems.
To make this easier to spot, I've put together a quick reference table. It connects the dots between what you're seeing, smelling, or tasting and what might be causing it.
Common Well Water Contaminants and Their Telltale Signs
Contaminant
Potential Sign
Primary Concern
Iron
Rusty/orange stains, metallic taste
Staining, pipe buildup, metallic taste
Manganese
Black/dark brown stains, bitter taste
Staining, appliance damage, unpleasant taste
Hydrogen Sulfide
Rotten egg smell
Unpleasant odor and taste
Hardness (Calcium & Magnesium)
White, chalky scale; soap scum
Appliance inefficiency, pipe blockage
Bacteria (e.g., E. coli)
Often no sign (sometimes slight odor)
Gastrointestinal illness, serious infection
Nitrates
No sign (tasteless, odorless, colorless)
Developmental issues in infants ("Blue Baby Syndrome")
Arsenic
No sign (tasteless, odorless, colorless)
Long-term health effects, including cancer
Lead
No sign (tasteless, odorless, colorless)
Neurological damage, developmental delays
Remember, this table is a starting point. While these signs are good clues, the only way to know for sure what's in your water is to get it professionally tested.
Know Your Water Before You Filter
You can't choose the right water filtration system for well water until you know what's in your water.
Buying a filter without a water test is a guess. This is the first and most important step to getting clean, safe water from your well.
A water test gives you a detailed report on every contaminant in your well.
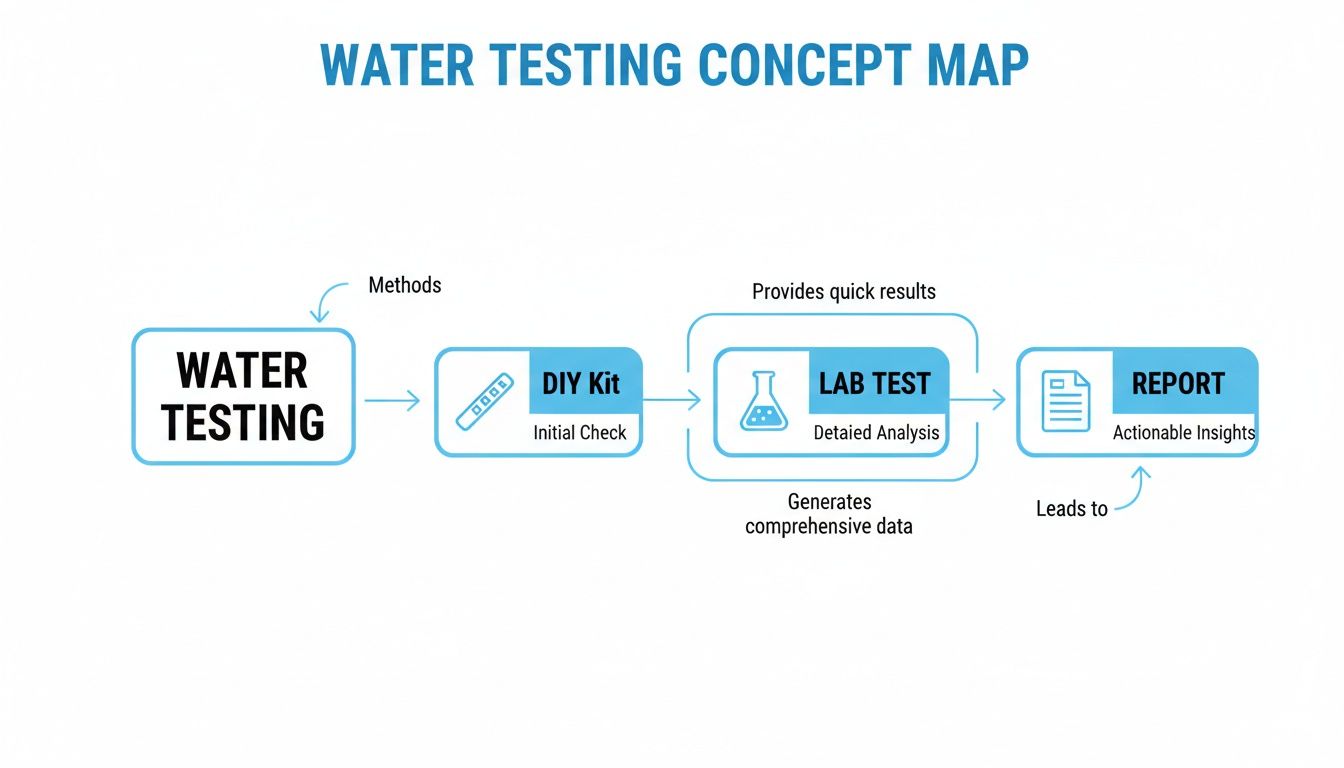
DIY Strips vs. Professional Lab Testing
You have two options for testing. They serve different purposes.
DIY Test Strips: These give you a quick look. You can buy them at hardware stores or online. Dip them in water for instant results on basics like pH, hardness, and chlorine. They are good for a quick check but are not accurate enough to base your filtration system choice on.
Professional Lab Testing: This is a full diagnosis and is non-negotiable for well owners. A state-certified lab provides a highly accurate, detailed analysis. This is the only way to find dangerous contaminants like bacteria, arsenic, lead, and volatile organic compounds (VOCs).
A professional lab report is the blueprint for your entire water filtration system. Without it, you are buying a system blind and may not be removing the most serious threats in your water.
How to Use a Certified Lab
Getting a professional test is a straightforward process.
First, find a state-certified laboratory. Search online for "[Your State] certified water testing lab" or check your state's Department of Environmental Protection (DEP) or Department of Health website for a list.
Next, request the right tests for a well owner. This should include:
Total Coliform and E. coli: Checks for bacterial contamination.
Nitrates/Nitrites: Important for wells near agricultural areas.
pH Level and Hardness: Tells you if your water is acidic or alkaline and the level of minerals like calcium and magnesium.
Iron and Manganese: These are what cause staining on fixtures and laundry.
Lead and Arsenic: Critical tests for heavy metals with serious health risks.
The lab will give you a special collection kit with strict instructions. Follow them exactly. Use their bottles, do not touch the inside of the cap, and return the sample to the lab quickly. This ensures your results are accurate.
Your report will show results with terms like "mg/L" (milligrams per liter) or "CFU/100mL" (colony-forming units per 100 milliliters). The report will list your results next to the EPA’s maximum contaminant levels (MCLs). If your water exceeds an MCL, you need to address it. This data will point you directly to the correct filtration solution.
Assembling Your Filtration Dream Team
Choosing the right water filtration system for well water isn't about finding one magic bullet. It’s more like building a team where every player has a key role. No single filter can solve every problem, so the goal is to create a strategic lineup that guarantees pure, safe water for your home.
Your lab report is your playbook. It tells you exactly what you’re up against—sediment, iron, bacteria, you name it. Now, let’s go over the key players you can recruit for your home's water defense.
The Bouncer at the Door: Sediment Filters
Every great system starts with a solid front line. For water filtration, that's your sediment filter. It's almost always the very first stage in a whole-house system for a good reason: its job is to act as a bouncer.
Think of it this way: your water is a stream carrying all sorts of debris. The sediment filter is the screen that catches all the big stuff—dirt, sand, rust, and silt. It doesn't handle dissolved chemicals or bacteria, but it stops the grit that clouds your water and would otherwise clog up every other filter down the line.
How It Works: A physical barrier, often a pleated or wound-string cartridge, uses microscopic pores to trap physical particles.
Pros: Protects all your other filters and appliances, makes water clearer, and is cheap to install and maintain.
Cons: Doesn't remove anything you can't see, like dissolved contaminants, bad tastes, odors, or bacteria.
This is how you go from suspecting a problem to knowing exactly what to fix. From a simple DIY test to a full lab analysis, you get the data you need to build the right filtration plan. Once you have that detailed lab report, you can start picking the right players for your team.
The Chemical Sponge: Activated Carbon Filters
Next up is your team's workhorse, the activated carbon filter. The best way to picture it is as a massive sponge with millions of tiny, porous pockets. Its job is to grab all the things that make your water taste and smell off.
Activated carbon uses a process called adsorption, where contaminants literally stick to its surface. It's incredibly effective against chemicals like chlorine, pesticides, and many volatile organic compounds (VOCs). This is the filter that takes water with a funky chemical or earthy smell and makes it taste crisp and clean.
The Heavy Lifters: Water Softeners and Iron Filters
Some problems just need brute force. That's where water softeners and iron filters come in—they are the heavy-lifters on your team, built to tackle the minerals that cause the most obvious headaches around the house.
A water softener goes after one thing: hardness minerals like calcium and magnesium. Through a process called ion exchange, it swaps out those scale-forming minerals for sodium ions. This is what stops that chalky buildup that destroys appliances and leaves spots all over your dishes.
An iron filter is even more specialized. It's designed specifically to get rid of iron. It oxidizes the dissolved iron in your water, turning it into a solid particle that can then be easily filtered out. This is your go-to defense against those ugly rusty-orange stains that plague so many homes with well water.
The Silent Assassin: UV Purifiers
For the threats you can't see, you need a silent assassin. A UV purifier is your final line of defense against the nasty biological stuff. It's unique because it doesn’t add any chemicals to the water, nor does it remove anything.
Instead, a UV light chamber bombards the water with powerful ultraviolet rays, scrambling the DNA of bacteria, viruses, and protozoa like E. coli and Giardia. This neutralizes them, making it impossible for them to reproduce and make your family sick. It’s a simple, set-it-and-forget-it solution for microbiological safety.
A UV purifier is a must-have for well owners. Bacteria can get into your well without changing the water's taste or smell, and a UV system provides a constant guard against illness-causing pathogens.
The Perfectionist: Reverse Osmosis (RO) Systems
Finally, for the absolute purest drinking water right from the tap, you bring in the perfectionist: a reverse osmosis (RO) system. This is typically a point-of-use system installed right under your kitchen sink.
An RO system works by forcing water through a special semi-permeable membrane, which strips out up to 99% of all dissolved solids at a molecular level. We’re talking about nitrates, arsenic, lead, fluoride, and so much more. For the 15% of Americans on private wells, this technology can be a lifesaver. In the Flint water crisis, for instance, certified RO filters reduced lead to safe levels, with filtered water showing over 20 times less lead than unfiltered tap water. For well owners, an RO system is the final word in purity.
Getting a system like this installed properly is key to making sure it works right from day one. If you're not comfortable doing it yourself, finding a qualified plumber is a smart investment to protect your system and your home.
Alright, you've gotten your water test results back and you have an idea of what needs to be filtered out. Now comes the big decision: choosing the right hardware for the job.
Picking the best water filtration system for well water isn't about buying the most expensive gear you can find. It’s about matching the right equipment to your well, your home, and your family. The goal is to get clean, safe water without creating new headaches, like a sudden drop in water pressure every time someone starts the dishwasher.
Let's break down the technical specs you'll see on the box and translate them into what they actually mean for your day-to-day life. This way, you can feel confident you’re getting a system that’s a perfect fit.
Matching Flow Rate to Your Family's Needs
Have you ever been the last one to get in the shower, only to have the water pressure drop to a pathetic trickle? That’s what an undersized filtration system can feel like—all the time. This is why flow rate is the first thing you need to get right.
Flow rate, measured in gallons per minute (GPM), is simply how much water can move through the filter at once. If your system's GPM is too low, it creates a bottleneck for your entire home.
To figure out what you need, think about your family's busiest time of day. A shower might use 2.5 GPM, a dishwasher 1.5 GPM, and a washing machine 2 GPM. If all those are running during the morning rush, you need a system that can keep up.
A good rule of thumb is to budget 3-5 GPM for each person in your house. For a family of four, that means you should be looking for a system that can handle at least 12-15 GPM. This ensures you have plenty of water pressure, even when life gets hectic.
Filtration System Comparison for Well Water
With so many types of filters on the market, it can be tough to keep them straight. This table breaks down the most common options for well water, showing what they target, what they typically cost upfront, and what kind of maintenance you can expect.
System Type
Primary Target Contaminants
Typical Cost Range (Initial)
Ongoing Maintenance
Sediment Filter
Sand, silt, dirt, rust particles
$50 – $500
Cartridge replacement every 3-12 months.
Carbon Filter
Chlorine, pesticides, herbicides, VOCs, bad taste/odor
$100 – $1,500
Cartridge replacement every 6-12 months or based on gallon rating.
Water Softener
Hardness minerals (calcium, magnesium)
$800 – $3,000+
Replenishing salt regularly (monthly); resin media lasts 10-15 years.
Use this as a starting point. Your water test results will point you toward the right column, and from there you can begin to weigh the initial cost against the long-term upkeep.
Decoding Filter Capacity and Long-Term Costs
The sticker price is just the beginning. To understand the true cost of a system, you have to look at its filter capacity and lifespan. This is what determines how often you'll be pulling out your wallet for maintenance.
Filter Capacity: This tells you how much water a filter can clean before it's "full" and needs to be replaced. You'll often see this measured in gallons. For example, a whole-house carbon filter might be rated for 100,000 gallons.
Lifespan: This is the manufacturer's estimate of how long a filter or media will last, usually given in months or years. For systems that clean themselves, like backwashing iron filters or water softeners, this refers to the media inside the tank, which can last 5 to 10 years or even longer.
A cheap system with a filter you have to swap out every three months can easily end up costing more over time than a more expensive unit with a high-capacity filter that lasts a full year. Do the math on the long-term costs before you buy.
The Importance of NSF/ANSI Certifications
With well water, you can't just hope a filter is doing its job—you need proof. That’s where certifications from organizations like the NSF (National Sanitation Foundation) and ANSI (American National Standards Institute) come in. These aren't just fancy logos; they are a guarantee that the product performs as advertised.
Think of an NSF/ANSI certification as a promise that’s been independently verified. It means the filter has gone through rigorous testing to prove it removes the specific contaminants listed on the box, down to the percentages claimed.
For example, a filter with an NSF/ANSI 53 certification is certified to reduce health-related contaminants like lead or cysts. A filter with NSF/ANSI 42 is certified for aesthetic issues, like improving bad taste from chlorine. For any well owner, choosing a certified water filtration system for well water is the only way to be absolutely certain your family is getting the protection they need.
Keeping Your System Running Smoothly
Putting in a water filtration system for well water is a great move for any well owner. But it's not a "set it and forget it" kind of appliance. You have to think of it like your car—it needs regular, simple tune-ups to keep it performing at its best for years.
Consistent upkeep is what protects your investment and makes sure your family's water stays pure and safe. The good news is, most of this maintenance is straightforward and something any homeowner can handle.
DIY Tasks vs. Professional Help
Not every maintenance job requires a phone call to a pro. Some are quick DIY tasks you can do in minutes, while others are best left to a plumber to avoid a simple job turning into a costly mistake.
Most of the routine stuff is designed to be user-friendly. For instance, swapping a sediment or carbon cartridge is usually as simple as unscrewing a filter housing, popping in the new filter, and screwing it back on. That’s a perfect DIY job.
But for the bigger jobs—like replacing the filtration media inside a large backwashing tank or troubleshooting a finicky control valve—you’ll want an expert. If a task involves cutting pipes or messing with complex wiring, calling a pro is always the safer and smarter choice.
Your Fridge-Worthy Maintenance Checklist
The secret to staying on top of maintenance is a simple schedule. No need to memorize it all. Use this checklist as your guide and pop some reminders in your phone's calendar to stay on track.
Every 3-6 Months: Swap Your Sediment Filter This filter is your first line of defense against sand, silt, and grit. How often you change it really depends on how much sediment your well kicks up, but checking it every three months is a great habit to get into.
Every 6-12 Months: Replace Your Carbon Filter The carbon filter is what gets rid of bad tastes and smells, but it has a limited capacity. Once it's "full" of contaminants, it can't absorb any more. Most whole-house carbon filters are good for about a year.
Monthly: Check Your Water Softener Salt Level If you have a water softener, it's useless without salt. Just pop the lid once a month and make sure the brine tank is at least half-full. It’s a two-second job that prevents hard water from coming back.
Consistent maintenance does more than just keep your system running; it ensures the water quality you paid for. A clogged filter can't remove contaminants effectively, and an expired UV lamp offers a false sense of security against bacteria.
Annual System Check-Up
Once a year, it's time for a more thorough check-in. This is a critical part of keeping your system in top shape for the long haul.
Replace Your UV Lamp: This is non-negotiable. A UV lamp’s power to kill germs fades over time, even if the light still looks like it's on. You must replace the lamp every year to guarantee it's actually killing bacteria and viruses.
Clean the UV Quartz Sleeve: While you have the lamp out, take a minute to gently clean the glass sleeve it sits in. Any mineral buildup on the sleeve will block the UV light and make it less effective.
Following a simple schedule like this will keep your water filtration system for well water working perfectly for a decade or more. It’s a small bit of effort that delivers huge returns in water quality, appliance life, and your own peace of mind. For more expert tips, you can find helpful advice on all types of water filters to keep your home's water pure.
Frequently Asked Questions About Well Water Filtration
Here are answers to the most common questions from well owners about water filtration. Use this information to choose, install, and maintain the right system for your home.
Do I Really Need a Whole House System or Is an Under Sink Filter Enough?
For well water, a whole-house system is almost always the best choice. Under-sink filters like reverse osmosis systems are designed for a single faucet, primarily for drinking water.
A whole-house system protects your entire plumbing infrastructure. It is the only way to guard appliances like water heaters, washing machines, and dishwashers from sediment, iron, and hard water minerals. It also provides cleaner water for showering and laundry, preventing skin irritation and stains on clothes. An under-sink unit cannot provide this level of comprehensive protection.
How Often Should I Test My Well Water?
The CDC recommends a professional lab test for your well at least once a year. The annual test should check for total coliform and E. coli bacteria, nitrates, pH levels, and total dissolved solids (TDS).
Do not wait for the annual test if you notice any changes. You should test your water immediately if:
You notice a change in taste, smell, or color.
A household member has recurring gastrointestinal illness.
A flood, chemical spill, or major construction has occurred nearby.
You have performed any maintenance on the well, like replacing the pump.
Annual testing is the best way to identify problems before they become health risks. Many dangerous contaminants are undetectable by taste, smell, or sight.
Can I Install a Well Water Filtration System Myself?
Installation depends on the system type and your skill level. A simple single-cartridge sediment or carbon filter can be a straightforward DIY project with basic tools.
Complex multi-tank systems—including backwashing iron filters, water softeners, or UV purifiers—are different. These require precise plumbing work, and UV systems also involve electrical wiring. Incorrect installation can cause leaks, void the system’s warranty, or make the filter ineffective. When in doubt, hiring a qualified, insured professional is the safest investment.
What Does an NSF Certification Mean and Why Does It Matter for Wells?
NSF certification is independent, third-party proof from the National Sanitation Foundation that a filter performs as advertised. An NSF/ANSI mark means the system was tested against strict public health and safety standards.
This certification is critical for well owners. With the variable quality of well water, an NSF seal provides peace of mind. For example, a filter certified to NSF/ANSI 53 is proven to reduce specific health-related contaminants like lead or cysts. Choosing a certified product ensures your system is protecting your family from the specific contaminants found in your water test.
At Water Filter Advisor, we help you make decisions with clarity. Our guides and reviews are here to support you from understanding your water test to choosing the right system. Explore our resources at https://www.waterfilteradvisor.com to get started.
If you've ever side-eyed your tap water and wondered what's really in there, you're not alone. Even if your water is officially "safe" to drink, that doesn't always mean it tastes or smells great. Think of the best sink water filtration systems as your personal bodyguard, standing guard at your kitchen tap to stop common intruders like chlorine and lead that sneak past your city's treatment plant.
This guide will show you how to transform your kitchen faucet from a source of questionable liquid into a pristine spring of truly clean, great-tasting water.
Turning Your Tap Water Into Liquid Gold
The water reaching your faucet has been on an epic journey. It starts at a treatment plant and then travels through miles and miles of pipes, some of which could be older than your grandparents. While municipal treatment does a solid job of meeting legal standards, that long trip can add some unwanted hitchhikers.
It's like washing your car and then driving it home through a dust storm. It won’t be showroom-shiny when you arrive. Your water picks up contaminants from old pipes or absorbs byproducts from the disinfection process itself. That's exactly why your "safe" water might smell like a public swimming pool or have a funky metallic tang.
Why a Sink Filter Is Your Kitchen's Best Friend
A sink water filter offers a targeted solution right where you need it most: for drinking, cooking, and making that perfect cup of coffee. It’s a final checkpoint to ensure the water filling your glass is as pure and delicious as possible.
Here’s what these home heroes can tackle:
Bad Tastes and Odors: The most common complaint is that chemical zing from chlorine. A basic carbon filter can banish it, leaving your water tasting crisp, clean, and refreshing.
The Unseen Villains: Old plumbing can leach lead into your water, which is a major health no-no. More advanced filters can remove heavy metals, pesticides, and even emerging concerns like microplastics.
Peace of Mind: There's a priceless comfort in knowing your family is drinking water that's been through an extra layer of purification right at the tap.
People have strong opinions on water filters, but most agree on one thing: a good system makes a noticeable difference. It takes an everyday necessity—water—and elevates it, so you can stop worrying about what's lurking in your pipes.
Making Water Filtration Fun (Yes, Really!)
The world of water filtration can feel like a stuffy science lecture, full of confusing acronyms and technical jargon. But we're here to cut through the noise. We’ll break down the magic behind different sink filters, from the simple gadgets you screw onto your faucet to the powerhouse systems that live under your sink.
This guide will walk you through everything you need to know. We'll explore how different filters work and demystify the process of picking the right one for your home's unique water needs. By the end, you'll be ready to choose the perfect system for your kitchen and start enjoying cleaner, better-tasting water right away.
Comparing Under Sink and Faucet Mount Filters
When you start exploring sink water filtration systems, you’ll quickly discover two main contenders: under-sink filters and faucet-mount filters. The choice boils down to a classic showdown: out-of-sight power versus grab-and-go convenience.
Think of it like choosing your home audio. An under-sink filter is like a custom-installed surround sound system—powerful, completely integrated, and invisible. A faucet-mount filter is more like a top-notch Bluetooth speaker; it's a breeze to set up, affordable, and delivers great results without any renovation.
Both will give you better water, but they’re designed for different homes, different priorities, and different people. Let’s dive into what makes them tick so you can figure out which one is your perfect match.
Under-Sink Filters: The Out-of-Sight Powerhouse
Just as the name suggests, these systems are installed right in the cabinet beneath your kitchen sink. They tap directly into your cold water line, sending purified water to either your main kitchen faucet or, more commonly, a sleek, dedicated tap right on your countertop.
These systems are the heavy lifters of home water filtration. Because they have more space to work with, they use larger, more robust filter cartridges. This means they can target a much wider range of contaminants, and you won't have to change the filters nearly as often.
Here's why people fall in love with under-sink systems:
Superior Filtration: They can handle multi-stage filtration, including powerful methods like Reverse Osmosis (RO) that can remove up to 99% of nasty stuff like dissolved solids, heavy metals, and chemicals.
Longer Filter Life: Bigger filters mean less hassle. You might only have to swap them out every 6 to 12 months—sometimes even longer.
Uncluttered Countertops: Everything is tucked away. The only thing you see is a slim, elegant dispenser faucet next to your main one.
The trade-offs? The installation is more involved and might require a bit of plumbing know-how (or a call to a professional). They also carry a higher upfront cost. But if your goal is maximum purification and long-term convenience, an under-sink system is tough to beat.
Faucet-Mount Filters: The Convenient Clip-On
Faucet-mount filters are all about simplicity. These clever little devices screw directly onto the end of your faucet, usually without any tools, in just a couple of minutes. A small lever on the side lets you instantly switch between filtered water for drinking and regular tap water for washing dishes.
Their biggest advantage is their accessibility. They are very budget-friendly and the dead-simple installation makes them a perfect fit for renters or anyone who'd rather not mess with their plumbing.
While they are incredibly convenient, their compact size limits their filtration capacity compared to their under-sink counterparts. They are fantastic for improving taste and odor but may not be the best solution for more serious contamination concerns.
When looking at what attaches to your faucet, it’s also worth considering other add-ons like high-efficiency aerators for kitchen faucets, which can help you save on your water bill.
Under-Sink vs. Faucet-Mount Filters At a Glance
So, how do they really stack up head-to-head? This table breaks down the key differences to make your decision a little easier.
Feature
Under-Sink Systems
Faucet-Mount Systems
Filtration Power
High (can remove a wide range of contaminants, including lead, VOCs, and TDS)
Moderate (primarily removes chlorine, improves taste and odor)
Installation
Moderate to difficult (often requires plumbing work)
Very Easy (clips on in minutes, no tools needed)
Kitchen Space
Uses cabinet space, keeps counters clear
Attaches to faucet, visible on the sink
Filter Lifespan
Long (6-12+ months)
Short (2-3 months)
Upfront Cost
Higher
Lower
Best For
Homeowners wanting comprehensive filtration
Renters, budget-conscious users, and simple taste/odor issues
Ultimately, choosing your filter is about finding the right balance. You have to weigh your water quality needs against your budget and how much time you're willing to put into installation and maintenance.
How Sink Water Filters Actually Clean Your Water
Ever wondered what’s happening inside that filter under your sink? It’s not magic, but a series of smart, scientific steps that grab the gunk and let the good stuff—clean water—flow through to your glass.
Think of it like a bouncer at an exclusive club. Each filtration stage has a specific job, checking for and kicking out different types of unwanted contaminants. Once you understand who does what, you can pick the right system to protect your family's water.
Activated Carbon: The Contaminant Sponge
The workhorse of almost every sink filter is activated carbon. It’s the single best tool for making your water taste and smell better, fast. Imagine a sponge with a massive surface area, but instead of soaking up water, it’s designed to trap chemical impurities.
To make it, carbon granules are treated with oxygen, which creates millions of microscopic pores. When water passes over it, a process called adsorption kicks in. Nasty stuff like chlorine, pesticides, and volatile organic compounds (VOCs) that give water off-tastes and odors get stuck to the carbon’s surface, while the clean water passes by.
This is why even a simple faucet-mounted filter can make such a huge difference. It’s a master at getting rid of that “public pool” chlorine smell.
Bottom line: Activated carbon is like a magnet for the most common things that make water taste and smell bad. It’s your first line of defense for better-tasting water right from the tap.
Reverse Osmosis: The Ultimate Gatekeeper
Carbon is fantastic for improving taste, but what about the contaminants you can't see, taste, or smell? That’s where Reverse Osmosis (RO) takes over. This is one of the most powerful purification methods you can get for your home. If carbon is a sponge, RO is a high-security checkpoint.
An RO system uses your home’s water pressure to force water through a special semipermeable membrane. This membrane is incredibly fine—its pores are only about 0.0001 microns wide. That’s so small that pretty much only pure water molecules can squeeze through.
So what gets left behind? Just about everything else.
Dissolved Solids: Salts, nitrates, and even fluoride.
Heavy Metals: Lead, arsenic, chromium, and mercury are stopped in their tracks.
Other Contaminants: It's also highly effective against tiny things like bacteria and viruses.
Because it’s so thorough, RO is the go-to choice for anyone dealing with serious water quality issues. It's a technology that dominates the market, with its share expected to hit 38.7% by 2026, mainly because people trust its power to remove heavy metals and other tough contaminants. As more families invest in these systems, you can check out more data on water purifier market trends to see how the technology is evolving.
One thing to know is that the RO process is so fine it can also strip out beneficial minerals. To fix this, many modern RO systems add a remineralization stage at the end. This step puts back a small amount of healthy minerals like calcium and magnesium, which actually improves the water’s taste and brings it to a more natural pH.
Other Key Filtration Methods
Beyond carbon and RO, some systems use extra stages to tackle specific problems. One you'll often see is Kinetic Degradation Fluxion (KDF).
KDF is a filter media made from high-purity copper-zinc granules. When water flows through it, an electrochemical reaction happens that reduces heavy metals like lead, mercury, and iron. It also has another key job: it helps control the growth of bacteria and algae inside the filter itself. This protects the carbon filter that often comes after it, helping it last longer and work more effectively. You’ll frequently find KDF paired with carbon in multi-stage systems for a really solid, broad defense against contaminants.
How to Choose the Right Filter for Your Home
Figuring out the "best" sink water filter is a personal decision. There’s no one-size-fits-all answer.
If all you're trying to do is get rid of a slight chlorine taste, a powerful, multi-stage system is total overkill. On the flip side, a simple faucet filter isn't going to cut it if you're worried about lead from old pipes. The right choice always starts with one thing: knowing what’s actually in your water.
Think of yourself as a water detective. Your first job is to gather some evidence. This is the single most important step in the whole process because it ensures you buy a filter that actually solves your problem.
Start with a Water Quality Report
If your water comes from a city or town, your first clue is free. It’s called a Consumer Confidence Report (CCR). The EPA requires every community water supplier to give their customers this report every year.
It’s basically a scorecard for your water, showing what contaminants have been detected over the past year. You can usually find it right on your local water utility’s website. This report gives you a baseline for things like chlorine, lead, nitrates, and other regulated stuff your filter might need to tackle.
Got a private well? Then you're the one in charge of testing. You can grab an at-home test kit or, for a much more detailed picture, send a sample to a state-certified lab. This is a must-do, as well water can have surprises like bacteria or high iron levels that you won't find in treated city water. For more in-depth guidance, you can explore our collection of expert advice on water filtration to help you along.
Match the Filter to the Foe
Once you have your "evidence" from a water report or lab test, you can pick your weapon. It's all about matching the right filtration technology to the specific contaminants you're trying to get rid of.
Here’s how it usually breaks down:
Problem: Your water tastes and smells like a swimming pool.
Solution: An activated carbon filter is your best friend here. It’s fantastic at grabbing the chlorine and other chemicals that cause those bad tastes and odors. A simple faucet filter or a basic under-sink unit will do the job perfectly.
Problem: Your water report shows lead, arsenic, or nitrates are a problem, or you live near industrial areas.
Solution: This is a job for the heavy-hitter: a Reverse Osmosis (RO) system. Its special membrane is like a bouncer at an exclusive club, blocking an incredibly wide range of contaminants that carbon filters just can't handle.
Problem: You've got bad taste and you're worried about things like heavy metals.
Solution: A multi-stage under-sink system is a great middle ground. These combine different filter types, like activated carbon and sediment filters, to give you broad protection without going to a full RO setup.
This handy chart can help you visualize the decision process. You start with your main concern and follow it to the right technology.
The key is to identify your main problem first. That will lead you straight to the most effective and budget-friendly filter for your home.
Decode the Certifications
So how do you know if a filter really does what the box says it does? You look for proof from a third party. In the water filter world, the gold standard is a certification from the NSF (National Sanitation Foundation).
An NSF/ANSI certification is your guarantee that a filter has been rigorously tested by an independent lab. It proves the product meets strict standards for safety and performance, so you know it’s not just marketing fluff.
When you're shopping, keep an eye out for these key certifications:
NSF/ANSI 42: This one’s for aesthetic effects. A filter with this seal is proven to reduce things that affect taste and smell, like chlorine. It makes your water more pleasant to drink.
NSF/ANSI 53: This is the big one for health effects. If a filter has this, it's been tested and verified to reduce specific health-related contaminants like lead, mercury, or VOCs.
NSF/ANSI 58: This certification applies only to Reverse Osmosis systems. It confirms the system’s ability to reduce a long list of tough contaminants, including arsenic, nitrates, and total dissolved solids (TDS).
Don't just take a company's word for it. Look for that official NSF seal on the box or in the product manual. Taking an evidence-based approach is the best way to choose a system that delivers real protection and true peace of mind.
Understanding Installation and Long-Term Costs
Choosing the perfect sink water filtration system is a great first step. But the real journey begins when you get it home, and that involves both the initial setup and the ongoing upkeep. It's crucial to look beyond the sticker price and understand the total cost of ownership if you want to make a smart investment in your home's water quality.
This means factoring in everything—from getting the system installed to buying replacement filters down the road. Getting a clear picture of these expenses from the start ensures you can budget properly and pick a system that delivers both clean water and genuine value for years to come.
Navigating the Installation Process
The time, effort, and money it takes to install a sink water filter can vary wildly from one system to the next. On one end, you have what might be the easiest DIY project ever.
Faucet-Mount Filters: These are literally designed to be installed without any tools. You just unscrew the little aerator on your faucet, screw the filter on, and you're done. The whole thing usually takes less than five minutes.
Basic Under-Sink Systems: Many of the simpler single or dual-cartridge systems are also made with the homeowner in mind. They often come with color-coded hoses and quick-connect fittings, so all you might need is a basic wrench and a little bit of patience.
Complex RO Systems: This is where things get more involved. Reverse Osmosis systems are the heavy-lifters of water filtration, and their installation reflects that. You'll likely need to drill a hole in your countertop for a separate, dedicated faucet and also tap into your sink's drain line for the wastewater. While a handy person can definitely tackle this, it’s often a job best left to a professional.
If you're not comfortable with plumbing, calling in a pro ensures a clean, leak-free setup and gives you total peace of mind. The principles of quality plumbing work in Dubai are universal—a proper installation is key to a system working correctly from day one.
Calculating the True Cost of Ownership
The initial purchase price is a one-time thing, but the filters are a recurring cost. This is the single most important detail when you're trying to figure out the true, long-term price of your system. A cheap unit that needs new filters every other month can easily end up costing you more than a pricier system with long-lasting cartridges.
The real value of a sink water filtration system is found by looking at its annual cost. Calculate how much you'll spend on replacement filters per year to see the complete financial picture.
For instance, a $50 faucet-mount filter might look like a steal. But if its $20 replacement cartridge only lasts three months, you're actually spending $80 every single year. Compare that to a $200 under-sink system whose $60 filter lasts a full year. The more expensive system actually saves you money over time.
It's clear that homeowners are prioritizing clean water. The global water purification filters market was valued at a staggering USD 44.22 billion in 2024 and is expected to climb to USD 62.53 billion by 2034. This intense competition is great for us, as it pushes manufacturers to create filters that last longer and perform better. You can read more about these water purification market projections to get a sense of where the industry is heading.
Staying on Top of Filter Replacements
The number one way a water filter fails is simple: people forget to change the cartridge. An old, clogged filter doesn't just stop removing contaminants; it can also slow your water flow down to a frustrating trickle and even become a breeding ground for bacteria.
Most manufacturers suggest replacing standard filters every 6 to 12 months, but this can change based on how much water you use and how contaminated it is to begin with. RO membranes are the exception, typically lasting much longer—often 2 to 3 years.
Here’s how to make sure you never miss a change:
Look for an Indicator: Many systems now come with a small LED light that changes color or an audible timer that beeps when it's time for a new filter.
Use Your Calendar: If your system is low-tech, just use your phone. The day you install a new filter, set a recurring calendar reminder for its replacement date.
Watch the Water Flow: A noticeable drop in water pressure from the filtered tap is a dead giveaway. If the flow slows down, the filter is clogged and ready to be replaced.
Common Questions About Home Water Filtration
Deciding to add a water filter under your sink is a great move, but it's totally normal to have a few questions before you start. Let's clear up some of the most common things people wonder about. We'll give you straight, simple answers to help you feel good about your choice.
Will an Under Sink Water Filter Reduce My Water Pressure?
This is probably the most common worry we hear, and the short answer is: it depends on the system. For a standard under-sink cartridge filter, the impact on your water pressure is usually so small you won't even notice a change at your main faucet.
Reverse Osmosis (RO) systems are a different beast. They work by forcing water through an incredibly fine membrane to get the highest level of purity, and that process does slow things down quite a bit.
But don't worry, they've already solved for that. Almost every RO system includes a small storage tank. This tank holds a reserve of purified water, ready to go. When you turn on the special RO faucet, you get a strong, steady stream. The system then quietly gets to work refilling the tank so you're never left waiting.
How Do I Know When to Change My Filter Cartridges?
Forgetting to change your filters is the number one reason a system stops working well. A clogged filter doesn't just fail to remove contaminants; it can slow your water flow to a trickle and even become a place for bacteria to grow.
Thankfully, you don't have to rely on memory alone. Many modern sink water filtration systems have built-in reminders, from a simple sticker for the date to an LED light that switches from green to red when it's time for a change.
If your system is more basic, just watch for these tell-tale signs:
Check the Manual: Start with the manufacturer's suggestion. It’s usually every 6 to 12 months for carbon or sediment filters. RO membranes are tougher and can last 2 to 3 years.
Slow Water Flow: If your filtered water starts sputtering out, that's a classic sign the filter is packed with gunk and needs to be replaced.
The Bad Taste Comes Back: Notice that old chlorine or musty taste again? Your filter is officially tapped out. Time for a new one.
A pro tip? Just set a recurring reminder on your phone’s calendar. It’s a foolproof way to stay on top of it.
Can I Install an Under Sink Filtration System Myself?
Absolutely. Most sink filters today are designed so that a handy homeowner can install them. The difficulty really just depends on the type of system you choose. Faucet-mount filters are the easiest—they just snap onto your tap in a few seconds, no tools required.
A lot of the single-cartridge under-sink systems are also very DIY-friendly. They often come with color-coded tubes and quick-connect fittings that make the job much simpler. If you can handle a basic wrench and follow a set of instructions, you can probably get it done in less than an hour.
Reverse Osmosis systems are a bit more involved. The installation usually means drilling a hole in your countertop for the new faucet and connecting a line to your sink's drain pipe. Plenty of people with some basic plumbing confidence do it themselves, but there's no shame in calling a plumber to ensure it's done right and without any leaks.
Do Water Filters Remove Healthy Minerals?
That's a fantastic question, and it gets right to the heart of how different filters work.
Your standard activated carbon, sediment, and KDF filters are what you might call "smart" filters. They are designed to target specific troublemakers like chlorine, lead, and pesticides while letting beneficial minerals like calcium and magnesium pass right on through.
Reverse Osmosis, on the other hand, is a powerhouse. It's so thorough that it strips out nearly everything—including those healthy minerals. This can sometimes leave the water tasting a little flat or even slightly acidic.
To fix this, many top-tier RO systems now come with a remineralization stage. After all the intense purification, the water flows through one last cartridge that adds a balanced blend of healthy minerals back in. This does two great things: it makes the water taste crisp and refreshing, and it raises the pH to a more natural, alkaline level.
It’s the perfect finishing touch, giving you the best of both worlds: incredibly pure water that also tastes fantastic.
At Water Filter Advisor, our mission is to give you the knowledge you need to make the best choice for your home's water. We have everything from deep-dive guides to honest reviews to help you find the right filter for your family. Start your journey to better water by exploring our resources at https://www.waterfilteradvisor.com.
Ever wonder what’s actually in your water? A sediment filter acts as a physical gatekeeper, stopping party crashers like sand, silt, rust, and other debris from getting into your home's water. You can think of it as the bouncer for your water supply, catching all the big, visible gunk before it has a chance to cause any real trouble. It’s the crucial first piece of the puzzle in most home water filtration setups.
Your Home's First Line of Defense Against Gunk
If your home water system was a football team, the sediment filter would be the hard-working defensive lineman. Its job isn't flashy, but it's absolutely essential. Before your water ever gets to the more specialized filters—like carbon blocks that tackle chlorine taste or reverse osmosis systems that purify down to the molecule—it has to get past this checkpoint first.
This pre-filtration step is a must-have for protecting your entire plumbing ecosystem. Without it, those larger particles would quickly clog up and ruin the more sensitive and expensive filters down the line. That means your other filters would wear out fast, and your appliances could take a beating from all that grit and grime.
The Guardian Role of a Sediment Filter
A sediment filter works just like a screen door or a kitchen colander. It physically stops any particles that are too big to squeeze through its pores. The main job here is to get rid of suspended solids—all that gritty, insoluble stuff you might see floating in a glass of tap water.
This simple mechanical process does a few key things for your home:
Protects Your Plumbing and Appliances: It stops sand and rust from building up inside your pipes, water heater, dishwasher, and washing machine, helping them last longer and avoid costly repairs.
Improves Water Clarity: It grabs the tiny specks that can make your water look cloudy or "dirty," giving you crystal-clear water for drinking, cooking, and bathing.
Enhances Other Filters' Performance: By doing the heavy lifting upfront, it frees up your carbon and other specialty filters to do what they do best, like removing chemicals and making your water taste great.
You don't have to just take our word for it—the market shows how important this first stage of filtration is. The global sediment filter market is on track to become a $15.8 billion industry by 2025. This growth is mostly driven by homeowners who want to protect their appliances and enjoy better water quality. You can discover more insights about these market trends on datainsightsmarket.com.
What a Sediment Filter Does and Doesn't Remove
It's crucial to know what a sediment filter is designed to do—and what it's not. It has one job, and it does it very well: capturing physical particles. It's not built to handle invisible chemical or biological contaminants.
Here’s a simple breakdown to help you see the difference.
What It Removes (Physical Particles)
What It Does NOT Remove (Dissolved Contaminants)
Sand, dirt, and grit from wells or aging city pipes
Chlorine and chloramine (chemicals used for disinfection)
Silt and clay that cause cloudy water (turbidity)
Lead, mercury, and other heavy metals
Rust flakes from corroded plumbing
Bacteria, viruses, and other microorganisms
Small organic matter like tiny plant debris or insect fragments
Pesticides, herbicides, and Volatile Organic Compounds (VOCs)
Scale particles that break off from pipes and water heaters
Dissolved minerals that cause water hardness (calcium and magnesium)
Think of the sediment filter as the bouncer that keeps the obvious troublemakers out of the club, letting your other filtration systems focus on the more specialized work of purifying your water.
How a Sediment Filter Actually Works
It seems almost magical how a sediment filter can catch so much sand, rust, and silt without completely blocking your water flow. But it's not magic—it’s just smart engineering. The whole process boils down to two simple approaches: filtering like a sieve or filtering like a sponge.
Getting a handle on these two methods will show you exactly how your filter is keeping your water clean and help you choose the right one for your home.
The Sieve Method: Surface Filtration
First up is surface filtration. This is your classic sieve. Think of a pleated sediment filter, with its large, folded surface area. It works just like a screen door.
When water flows through, any particles bigger than the filter's tiny pores get stuck on the outside. The water passes right through, but the sand, dirt, and rust can't. It’s a simple, effective way to grab larger sediment without causing a big drop in water pressure right away.
One of the best things about this "sieve" design is that a lot of pleated filters are reusable. Since all the junk is just sitting on the surface, you can often just take the filter out, spray it clean with a hose, let it dry, and pop it back in. This makes them a great choice if you have a lot of visible sediment and want to keep your water flowing strong.
The Sponge Method: Depth Filtration
The other approach is depth filtration. This method is less like a screen and much more like a sponge. Instead of one flat surface, these filters use a thick web of fibers, like you'd find in a spun polypropylene or string-wound cartridge.
Picture water pushing its way through a dense, fibrous mat. There's no single barrier. Instead, particles get tangled up and trapped throughout the entire thickness of the filter. The bigger chunks get caught near the outside, while finer particles get lodged deeper inside.
This layered trapping is what makes depth filters so good at capturing a whole range of particle sizes. They create a 3D maze that sediment gets lost in.
The trade-off? Once this "sponge" is full, it's full for good. You can't clean it; you just have to replace it. You'll know it's time when you notice your water pressure starting to drop. That's your sign that the filter has done its job and is clogged with all the gunk it has successfully removed from your water.
At the end of the day, both the sieve and the sponge have the same mission: to physically block particles from getting into your home's water. The only difference is how they catch the debris, which in turn affects your water pressure and whether you can clean the filter or need to toss it.
Understanding Micron Ratings to Choose the Right Filter
Choosing the right sediment filter can feel a bit like cracking a secret code. The single most important clue you need to look at is the micron rating. This number tells you exactly how fine a particle the filter is designed to catch.
So, what’s a micron? It’s incredibly small—one-millionth of a meter.
To give you some real-world perspective, a single strand of human hair is about 70 microns thick. The smallest thing you can see with your naked eye is around 40 microns. Anything smaller than that is totally invisible unless you’ve got a microscope. Nailing down this scale is the key to matching a filter to your specific water problems.
What the Numbers Really Mean
Micron ratings on sediment filters aren't just arbitrary numbers; they translate directly to how that filter will perform in your home. A larger number means larger pores in the filter material, which lets more through. A smaller number means a much tighter filter that’s built to capture finer, almost invisible particles.
Here’s a quick guide to what these common micron ratings will actually pull out of your water:
100 Microns: This is a coarse filter, like a bouncer for big rocks. It’s your first line of defense, designed to catch large, visible gunk like sand, grit, and scale flaking off old pipes. It's a great starting point, especially if you're on well water.
25-30 Microns: Taking it a step finer, these filters are excellent for trapping smaller bits of sand, silt, and rust that a 100-micron screen might miss. This is a very common rating for pleated, reusable filters.
5 Microns: This is the go-to standard for solid, all-around sediment filtration for both city and well water. A 5-micron filter will remove most of the sediment you can see, including fine silt and clay, leaving you with noticeably clearer water. It's often the minimum rating you'll want to protect more sensitive equipment down the line.
1 Micron: Now we're talking about a fine filter that captures microscopic particles. It will remove nearly all suspended solids that cause cloudy water, including very fine silt and even some larger cysts (like Giardia).
Choosing the right micron rating is all about efficiency. You don't want to use a 1-micron filter to catch large grains of sand that a 50-micron filter could handle with ease. The finer filter will just clog up way too fast and crush your water pressure.
Nominal vs. Absolute Ratings
As you compare filters, you’ll bump into two terms that sound alike but have very different meanings: nominal and absolute. Getting this right is critical to making sure you're actually buying the level of protection you think you are.
A nominal 5-micron filter, for example, is rated to remove most particles that are 5 microns or larger. It might be designed to capture around 85% of particles at that size, meaning some 5-micron particles (and even a few slightly larger ones) might still slip through. Think of it as "mostly" getting the job done.
Absolute-rated filters offer a much higher level of certainty. An absolute 5-micron filter is guaranteed to remove at least 99.9% of all particles that are 5 microns or larger. No guesswork, no exceptions.
If you’re just trying to keep sand out of your sprinkler system, a nominal filter will do the job just fine. But if you're trying to protect a sensitive and expensive reverse osmosis system, an absolute-rated filter provides the guaranteed protection you need. This kind of pre-filtration isn't just a "nice-to-have." Unfiltered sediment can slash the life of an RO membrane from 3-5 years down to just 6-12 months. For the 15 million U.S. homes on private wells, a 5-10 micron sediment filter is often essential for making water safe and pleasant.
Once you understand micron ratings and the difference between nominal and absolute, you can cut through the technical jargon and make a smart choice. You're no longer just buying a filter; you're picking the exact level of protection your home's water system needs to run its best.
Comparing the Most Common Types of Sediment Filters
Alright, now that you’ve got a handle on how these filters work and what those micron numbers actually mean, let’s meet the main players. Walking into the world of sediment filters can feel a bit like wandering down the tool aisle—there are a bunch of different models, and each one is designed for a specific job.
They’re all built with different materials and designs, making them better suited for certain types of water, budgets, and how much maintenance you’re willing to do.
We’ll break down the four most common types you’re going to run into: Spun Polypropylene, String-Wound, Pleated, and Spin-Down filters. Knowing their strengths and weaknesses is the key to picking a filter that doesn't just work, but works perfectly for your home.
Spun Polypropylene (Melt-Blown) Filters
Think of a spun polypropylene filter as the trusty, all-purpose disposable option. These are made by melting and blowing polypropylene fibers into a dense, multi-layered cylinder. This creates a depth filter—that "sponge" we talked about earlier—which traps particles all the way through its core.
The outer layers are a bit looser to catch the big stuff, while the inner layers are packed tight to grab the finer silt. This gradient design is great because it can hold a lot of gunk before it finally clogs up.
Best For: General-purpose use with city water or well water that has pretty consistent, fine sediment. They’re a fantastic, low-cost first line of defense for protecting other systems like a carbon filter or water softener.
Pros: Super affordable, great at catching a wide range of particle sizes, and you can find them just about anywhere.
Cons: They are single-use only. Once they’re full, you have to toss them and put in a new one, which means ongoing costs and more waste.
String-Wound Filters
String-wound filters are the rugged, old-school workhorses of the sediment world. They’re made by winding a cord—usually polypropylene or cotton—very tightly around a central core. The crisscrossing pattern creates a tough depth filter that’s exceptionally good at trapping all sorts of sediment sizes.
Their durable build makes them a go-to for more challenging water, especially from wells that can kick up a random mix of sand, silt, and rust. They also tend to handle higher temperatures better than some of their counterparts.
We often recommend string-wound filters for well owners because they offer a fantastic balance of high filtration capacity and pure structural integrity. They're built to handle the tough, unpredictable stuff that wells can dish out.
To give you a sense of scale for what these filters are up against, this chart shows just how tiny these particles are.
As you can see, a filter rated to stop silt is capturing particles that are many, many times smaller than a single human hair. It really shows the precision involved in getting your water clean.
Pleated Filters
Pleated filters work more like a "sieve," using a large, folded sheet of material to catch particles on its surface. The accordion-like folds give them way more surface area than a standard filter of the same size. This design lets water flow through with less resistance, which means you get better flow rates and less of a drop in water pressure.
The biggest perk for most homeowners? They’re often reusable. Since all the sediment is just sitting on the outside surface, you can usually take the cartridge out, give it a good spray with a hose, and pop it right back in.
Best For: Homes where keeping strong water pressure is a big deal. They’re also perfect if your water has larger, more uniform sediment, since you can clean and reuse them several times.
Pros: High flow rates, low impact on water pressure, and being reusable makes them cheaper in the long run.
Cons: They cost more upfront than spun or string-wound types. They can also clog up faster if your water has a lot of fine, slimy gunk.
Spin-Down (Self-Cleaning) Filters
Spin-down filters are really in a class of their own. They use centrifugal force to create a vortex inside the filter housing, which slings the heavier sediment to the outside wall where it collects at the bottom. The cleaner water in the middle then passes through a screen (usually stainless steel) for a final polish.
The "set it and forget it" appeal comes from their super easy cleaning. You don’t have to shut off the water or take anything apart. You just open a little valve at the bottom, and the collected sediment flushes right out. This makes them a lifesaver for homes with very heavy sediment, like those on well water.
Choosing the right filter isn't just about convenience; it's a major public health decision. Sediment filters directly tackle turbidity, a risk factor the WHO has identified in the water supplies of 1.8 billion people. By capturing 98-99.9% of these particles, they help prevent health issues that can arise from cloudy, contaminated water. You can read more on the global importance of filtration at gminsights.com.
To make it even easier to decide, we’ve put together a quick comparison table breaking down the most common options for homeowners.
Sediment Filter Comparison for Homeowners
Filter Type
How It Works
Best For
Pros
Cons
Spun Polypropylene
Depth filter; traps particles throughout its multi-layered core.
General city or well water with fine sediment.
Very affordable, widely available, good all-around performance.
Single-use only; creates ongoing replacement costs and waste.
String-Wound
Depth filter; a wound cord creates a durable structure to trap varied sediment sizes.
Challenging well water with mixed sediment (sand, silt, rust).
Very durable, handles high flow and temperature well.
Can be less precise with micron ratings than spun filters.
Pleated
Surface filter; large, folded surface area catches particles on the outside.
Homes needing high flow rates and minimal pressure drop.
Reusable (can be cleaned), excellent flow, lower long-term cost.
Higher initial price, can clog with very fine or slimy sediment.
Spin-Down
Centrifugal force spins out heavy debris before water passes through a screen.
Water with very heavy, large sediment (like sand from a well).
Self-cleaning (just flush the valve), minimal maintenance.
Highest upfront cost, mainly for larger particles.
Ultimately, the best filter is the one that matches your water source and your lifestyle. Whether it's a cheap and easy disposable filter or a reusable, heavy-duty model, there’s a solution that will keep your water clear and your pipes protected.
Key Signs Your Sediment Filter Needs Replacing
Your sediment filter is a quiet workhorse, but it's not a "set-it-and-forget-it" part of your home. Just like the oil filter in your car, it eventually gets clogged with all the gunk it’s pulling from your water. Letting it go for too long can cause more headaches than the sediment you were trying to fix in the first place.
Manufacturers usually suggest swapping the filter out every 3 to 6 months, but that's just a starting point. The real factor is your water quality. If you're on a private well, for instance, sediment levels can swing wildly with the seasons. Luckily, your home gives you some pretty clear signals when it's time for a change.
The Slowdown: A Noticeable Drop in Water Pressure
This is the big one. It's the most common and annoying sign that your filter has clocked out. If your morning shower suddenly feels like a weak drizzle or it takes ages to fill a pot at the sink, a clogged filter is almost always the culprit.
Think of it this way: a new filter is like a freshly paved, wide-open highway for your water. As it traps sand, dirt, and rust, it’s like closing down lanes one by one. Eventually, you've got a full-blown traffic jam, and only a trickle of water can squeeze through. That's what causes that frustrating pressure drop you feel all over the house.
A clogged sediment filter literally chokes off your home’s water supply. This isn't just an inconvenience; it’s a direct sign the filter is so packed with debris that it has become the main bottleneck in your plumbing.
The Return of Cloudy or Gritty Water
Remember why you got the filter in the first place? To get rid of that nasty, cloudy water. If you start seeing little floaties in your glass again or find a film of silt at the bottom of your toilet bowl, your filter has probably thrown in the towel.
Once a filter cartridge is completely saturated with sediment, a couple of things can happen, and neither is good:
Bypass: The water pressure gets high enough to force a path around the filter media. Untreated water then flows right past it and into your pipes.
Unloading: A sudden surge in pressure can actually tear the filter or dislodge a concentrated burst of trapped gunk back into your water system.
This completely defeats the purpose of having a filter. You'll end up with clogged faucet aerators and gummed-up showerheads, which are just another chore to clean.
A Change in Taste or Odor
A standard sediment filter isn't built to remove chemicals like chlorine. Its job is to trap physical particles, including fine organic matter like dirt and silt.
When all that organic stuff gets trapped and sits in a wet, clogged filter, it can start to decay. This can breed a musty, earthy, or even swampy taste and smell in your water. If your water starts tasting "off" and you've ruled out other issues, your dirty filter is the likely source. It’s become a breeding ground for the very junk it was meant to remove.
A Homeowner's Guide to Filter Installation and Maintenance
Knowing how to install or change your own sediment filter can save you both time and a service call fee. Whether you're a seasoned DIYer or just want to know what the plumber is doing, it's a simple skill that puts you in control of your home’s water quality.
Most often, you'll find a sediment filter set up as a whole-house system at the point of entry—that's right where the main water line comes into your house. This is a great setup because it protects every single tap, shower, and appliance from grit and other gunk. Swapping out the cartridge in these systems is a quick job you can easily master.
How to Replace a Sediment Filter Cartridge
When your filter is spent, it’s time for a change-out. This is the most basic part of keeping your system running right. The exact steps might change a little depending on the brand, but the process is pretty much the same across the board.
Here's how to get your water flowing clean again.
Turn Off the Water: Find the main shut-off valve for your water line and crank it closed. This stops water from flowing into the system while you're working.
Relieve the Pressure: This is a crucial step! Look for a red pressure-relief button on top of the filter housing. Push it down and hold it until you don't hear any more hissing. Releasing this trapped pressure makes the housing way easier to unscrew.
Unscrew the Housing: Grab the filter wrench that came with your system and use it to get the housing (the big canister part) loose. After a good turn, you should be able to unscrew it the rest of the way by hand. Keep a bucket handy to catch the water that will spill out.
Swap the Filters: Pull out the old, dirty filter and toss it. It's a good idea to give the inside of the housing a quick rinse to get rid of any sediment that's settled at the bottom.
Inspect and Lube the O-Ring: At the top of the housing threads, you'll see a black rubber O-ring. This is what creates the seal. Check it for cracks or damage. A light coat of food-grade silicone grease will help it seal perfectly and make it easier to open next time.
Install the New Filter: Pop the new filter cartridge into the housing. Make sure it sits straight and is centered on the post at the bottom.
Tighten and Check for Leaks: Screw the housing back on by hand until it's snug. Then, give it one last quarter-turn with the wrench—be careful not to overtighten! Slowly turn your water back on. Press the relief button one more time to let any trapped air escape. Now, just watch for any drips around the seal to make sure it's tight.
Pro Tip: Keep a spare O-ring on hand. They’re cheap and can be a real lifesaver if the old one gets stretched or nicked during a filter change, saving you from a surprise leak.
This simple job is the key to keeping your filter system working perfectly. Following these steps will ensure your sediment filter provides clean, clear water for your whole house.
Frequently Asked Questions About Sediment Filters
Even after you’ve got the basics down, a few questions always seem to pop up. Sediment filtration sounds simple enough, but the practical side of things is what really matters for your home. Here are the straight answers to the questions we get asked all the time.
Will a Sediment Filter Alone Make My Water Safe to Drink?
No, and this is the most important thing to get straight. A sediment filter is a mechanical filter. All it does is grab physical junk like dirt, sand, and rust. Think of it like a bouncer at a club who only stops the people who look like they're going to cause a scene.
What it doesn't do is remove dissolved chemicals like chlorine or lead. It also can't touch microorganisms like bacteria or viruses. To get truly safe, drinkable (potable) water, your sediment filter needs to be the first step in a multi-stage system. That means pairing it with something like an activated carbon filter and a UV purifier or a reverse osmosis system.
Do I Really Need a Sediment Filter with City Water?
In most cases, yes, you absolutely do. It's a huge myth that city water arrives at your faucet perfectly clean. Sure, it gets treated at a municipal plant, but then it has to travel through miles of old underground pipes to get to you.
On that journey, it’s all too easy for the water to pick up rust from old iron pipes, sediment from a water main break, or all sorts of other debris.
Think of a sediment filter as an inexpensive insurance policy. It protects your pricey appliances—dishwashers, washing machines, and water heaters—from getting wrecked by that hidden grit. That little filter can save you a ton of money on repairs down the road.
What Happens if I Forget to Change My Sediment Filter?
Letting a clogged filter sit in the housing is a bad idea. Forgetting about it can lead to two big problems, and you might end up with water that's even worse than having no filter at all.
First, you'll notice a serious drop in water pressure all over the house. Your shower will feel weak and faucets will trickle. That’s because the filter is so jammed with gunk that water can barely squeeze through.
Second, a filter can get so overloaded that it might tear or "unload" all that trapped sediment back into your pipes in one big burst. This sends a concentrated shot of filth into your faucet aerators and showerheads, clogging them up. Keeping up with filter changes is a key part of any good home maintenance plan. If you want to stay on top of everything, an ultimate annual home maintenance checklist can be a lifesaver.
Can a Sediment Filter Fix Bad-Tasting or Smelly Water?
It really depends on what’s causing the issue. If your water has an earthy or musty taste from actual dirt or silt particles, then yes, a sediment filter will probably help a lot by removing the physical source of the taste.
However, it won't do a thing for chemical tastes or odors. It has zero effect on:
The taste of chlorine that’s so common in city water.
A "rotten egg" smell from hydrogen sulfide gas, often found in well water.
A metallic taste caused by dissolved iron or other minerals.
To tackle those problems, you’ll need an activated carbon filter. It’s designed specifically to adsorb those taste and odor compounds, which is why carbon filters are almost always placed right after the sediment filter in a complete system.
At Water Filter Advisor, our goal is to empower you with the knowledge to make confident decisions about your home's water quality. From choosing the right micron rating to understanding maintenance, we're here to provide clear, research-driven guidance. Explore our in-depth guides and reviews to find the perfect filtration solution for your family at https://www.waterfilteradvisor.com.
It usually starts with the water pressure dropping off. That sad little trickle from your faucet is more than just a morning annoyance—it’s a neon sig ...
When you’re hunting for the best inline filter for your home, the real question is: what problem are you trying to solve? A filter to stop your refrigerator’s ice from tasting funky has a totally different job than one installed under the kitchen sink to tackle serious contaminants. Think of it as hiring a specialist for a very specific task.
Top-tier options almost always feature multi-stage carbon block filters with a low micron rating—think 0.5 microns—and crucial NSF certifications. Those certifications are your golden ticket, the independent proof that the filter actually does what it claims, like kicking chlorine, lead, and sediment to the curb for water that just tastes, well, like water. Our guide will walk you through the best inline filter choices so you can find the perfect match for your home.
Your Quick Guide to the Best Inline Water Filters
Picture this: crisp, clean water flowing from your fridge or a separate tap, without you ever having to fill a clunky pitcher again. That's the magic of a good inline water filter. It's a small but mighty device that gets spliced directly into your water line, providing targeted filtration right where you need it most.
These filters are the quiet workhorses of home water treatment. They're usually tucked away behind an appliance or under a sink, silently ambushing water before it reaches your glass, ice cube tray, or coffee maker. Their main job is to strip out the uninvited guests—impurities that ruin the taste, smell, and quality of your drinking water.
Why Choose an Inline Filter?
So, why are these simple filters becoming such a popular home upgrade? It all boils down to their focused, efficient approach. Instead of treating every single gallon of water in your home (including the water your toilet uses), an inline filter concentrates its power on delivering high-quality water for you to drink and cook with.
You’ll notice the benefits right away:
Improved Taste and Odor: The biggest and most immediate change is the banishment of chlorine. That swimming pool taste from city water treatment? Gone. Your water will taste like… nothing. In the best way possible.
Contaminant Reduction: Properly certified filters go beyond taste, reducing harmful contaminants like lead, cysts, and certain volatile organic compounds (VOCs).
Appliance Protection: By blocking sediment and scale, these filters act as a bodyguard for the internal components of your refrigerator, icemaker, and coffee machine, which can extend their service life.
Cost-Effective and Convenient: They are a far more affordable and sustainable solution than bottled water and only need to be replaced once or twice a year in most cases.
An inline filter is an ideal solution for renters or homeowners who want targeted filtration without major plumbing surgery. It offers a significant step up from a basic pitcher filter with minimal installation hassle.
To help you get started, we've put together a quick comparison table of our top picks for 2026. This chart lays out our favorite filters for the most common uses around the house, highlighting what makes each one a solid choice.
Quick Comparison of Top Inline Filters for 2026
This table highlights our top-rated inline filters for common household uses, allowing you to quickly compare their key specifications and find the best match for your home.
Model / Type
Best For
Key Feature
Lifespan
EcoPure EP-INL30
Refrigerator & Icemaker
5-year/30,000-gallon lifespan
Up to 5 Years
CuZn ILFC-200
Under-Sink (Chloramine)
KDF-55 media for chloramine & heavy metals
Up to 12 Months
Woder 10K-Gen3
Dedicated Faucet (Lead)
Certified for lead, chlorine, and contaminants
Up to 3 Years
Culligan IC-EZ-4
All-Purpose / Easy Install
Twist-on design and NSF 42/53 certification
Up to 6 Months
This table gives you a high-level overview. Now, let's pull back the curtain and see what makes these filters tick.
How Inline Water Filters Actually Work
Ever wondered what’s going on inside that little tube hooked up to your fridge? It seems simple enough: your regular tap water goes in one end, and clean, crisp water comes out the other. It’s not magic, but it’s a brilliant bit of engineering that targets specific contaminants right at the point of use.
At its core, an inline filter is a tiny, self-contained purification plant. Water from your supply line gets pushed through a sealed cartridge that's packed with filter media. You can picture it as a microscopic maze where water molecules are allowed to pass, but all the unwanted gunk gets trapped.
This simple "point-of-use" convenience is why these filters are taking over. The global market was valued at $2.5 billion back in 2025 and is expected to hit $4.2 billion by 2033. People want an affordable, easy-to-install way to get rid of things like chlorine and lead, and many certified models can slash contaminants like total trihalomethanes (TTHMs) by up to 95%. You can check out the full market analysis on Data Insights Market to see how it’s changing household water quality.
The Core Components and Filter Media
An inline filter might look basic on the outside, but its power comes from what's packed inside. You've got two main parts doing all the work: the housing and the media.
The Filter Housing: This is simply the tough outer casing, usually made of food-grade plastic. Its job is to hold the filter media and connect to your water lines, all while withstanding constant water pressure without springing a leak. No drama, just containment.
The Filtration Media: This is where the action happens. Different types of media go after different contaminants, and the best inline filters will often layer a few kinds together for multi-stage cleaning.
The most common media you’ll find is activated carbon. Think of it as a super-powered sponge. A single gram of this stuff can have a surface area of over 3,000 square meters—that's about half a football field! It works through a process called adsorption, where things like chlorine, pesticides, and VOCs literally stick to its vast surface and are pulled out of the water.
Here’s a simple way to think about it: Activated carbon is like a contaminant magnet. As water rushes past, chemicals like chlorine are drawn to the carbon's surface and trapped, letting cleaner, happier water flow on through to your glass.
Understanding Micron Ratings
Another critical spec is the filter’s micron rating. This number tells you how big the pores in the filter media are. A smaller micron number means smaller holes, which means it can stop tinier particles.
Here’s a quick breakdown:
A 5-micron filter is good for catching bigger stuff like sand, rust, and silt. It's great for protecting appliances but won't catch microscopic troublemakers.
A 1-micron filter steps up its game, blocking smaller particles, including some cysts like Giardia and Cryptosporidium.
A 0.5-micron filter is the bouncer at an exclusive club. It gives you even finer filtration, capable of reducing contaminants like lead, asbestos, and some bacteria, which is why it's a common rating for high-quality drinking water filters.
While a lower micron rating is usually better for purity, there’s a trade-off. Tighter pores can slow down your water flow and clog up faster if your water is heavy with sediment. That's why choosing the right filter is all about balancing your purification goals with your home’s water pressure and quality.
Comparing Key Filter Specifications For Your Water
When you’re picking an inline filter, it’s easy to get lost in a sea of marketing jargon. To find the right one, you have to cut through the noise and look at the actual specs. Things like micron ratings, the type of carbon used, and flow rates are what really matter—they tell you if a filter can actually solve your water woes.
This flowchart is a great starting point. It helps you connect a common water problem to the right type of filter technology.
As you can see, different problems point to different solutions. Let's dig into the specs that make those solutions work.
Carbon Block vs. Granular Activated Carbon (GAC)
Most inline filters rely on activated carbon to make water taste and smell better, but how that carbon is constructed makes a huge difference. You'll mainly see two types: Granular Activated Carbon (GAC) and Carbon Block.
A GAC filter is just what it sounds like: a cartridge filled with loose carbon granules. Water meanders around the granules, which works well for reducing chlorine and improving taste. Because the media is loose, these filters usually have a higher flow rate.
A Carbon Block filter is different. It’s made of powdered carbon that’s been compressed into a solid brick. This forces water through a dense, torturous path of tiny pores, giving it way more contact time with the carbon.
While both will improve the taste of your water, a carbon block filter offers much more thorough filtration. Its solid form is better at removing a wider array of contaminants and prevents "channeling"—where water carves a lazy path through the loose media and bypasses the filtration process.
For a simple coffee maker where you just want better-tasting coffee, a GAC filter is probably fine. But if you're filtering drinking water from your kitchen tap, a carbon block is the superior choice.
To help you match the right filter spec to your specific water problem, we've put together this quick comparison table. It breaks down what each specification means and what it's best at targeting.
Inline Filter Specification Comparison for Common Contaminants
Specification
What It Means
Best For Targeting…
Good to Know
GAC Media
Loose carbon granules.
Chlorine, bad taste, and odors.
Higher flow rate but can be prone to "channeling."
Carbon Block Media
Solid, compressed carbon.
Chlorine, lead, VOCs, cysts, and sediment.
More comprehensive filtration, lower flow rate.
5 Micron Rating
Pores block particles 5 microns or larger.
Sediment, sand, silt, and rust.
Good for pre-filtration, not for health contaminants.
0.5 Micron Rating
Pores block particles 0.5 microns or larger.
Cysts (Giardia, Crypto), asbestos, and particulate lead.
Essential for filtering health-related contaminants.
NSF/ANSI 42
Certified for aesthetic improvements.
Chlorine taste and odor.
Your baseline for better-tasting water.
NSF/ANSI 53
Certified for health-related contaminants.
Lead, mercury, VOCs, cysts, and other specific contaminants.
The gold standard for safe drinking water.
This table should give you a clear idea of what to look for on a product's spec sheet based on the issues you've identified in your water.
Why The Micron Rating Matters For Your Safety
A filter's micron rating tells you the size of its pores, which determines the smallest particle it can stop. A lower number means finer filtration.
A 5-micron filter is great for catching larger particles like sand, rust, and sediment that you might see in your water. But for health-related contaminants, it just won’t cut it.
This is where a 0.5-micron rating becomes non-negotiable. Filters this fine are able to capture microscopic cysts like Giardia and Cryptosporidium, which are notorious for causing stomach illness and are resistant to chlorine. It’s also a must-have for reducing lead, which often exists as tiny particles. A 0.5-micron filter is far more effective at trapping lead than a 1-micron or 5-micron filter.
If the water is for drinking—especially for kids—you need a filter rated at 0.5 microns and certified for lead reduction. Period.
Flow Rate (GPM) What Your Appliances Need
Flow rate, measured in gallons per minute (GPM), is all about how fast water moves through the filter. This might seem like a boring detail, but it's critical for your appliances. A filter that's too slow can cause real problems.
Refrigerators and Icemakers: A low GPM can make your water dispenser trickle or your icemaker take forever to fill. It can even lead to a "water hammer" banging sound in your pipes. For these, you need a filter rated for at least 0.5 to 0.75 GPM.
Under-Sink Systems: For a separate drinking water faucet, 0.5 GPM is usually fine. But if you’re hooking the filter up to your main cold water line, you'll need a much higher flow rate—think 1.5 to 2.5 GPM—to avoid a major pressure drop at your sink.
Remember, a finer micron rating usually means a lower flow rate. You have to balance the need for high-level filtration with the flow rate your appliance demands.
Decoding NSF And ANSI Certifications
A certification from NSF/ANSI is the only way to know for sure that a filter does what it claims. These are independent, third-party tests that verify a manufacturer's performance claims. For inline filters, two standards are key:
NSF/ANSI 42 (Aesthetic Effects): This certification is for non-health-related contaminants. If you just want to get rid of that swimming pool chlorine taste and smell from city water, this is the certification to look for.
NSF/ANSI 53 (Health Effects): This is the one that really matters for safety. It's a tougher standard that certifies a filter can reduce specific health-related contaminants like lead, mercury, cysts, and certain chemicals (VOCs).
Always check the fine print to see exactly what a filter is certified to remove under NSF/ANSI 53. The best inline filter isn’t just one with a lot of marketing claims; it’s one with the specific certifications that match your water test results.
Practical Applications Where Inline Filters Shine
It’s one thing to understand the specs, but where do these filters really prove their worth? Their true value lies in their versatility. You can tuck these compact filters away to fix specific water problems right where they happen.
An inline filter is a simple upgrade with a surprisingly big impact on everything from your morning coffee to the ice in your drink. Let's look at the most common places to install one in your home.
Upgrading Your Refrigerator and Icemaker
This is probably the #1 reason people start looking for the best inline filter. The filter that comes with your fridge is often absurdly expensive, doesn't last long, and might only handle basic chlorine taste. Even worse, people often forget to change them, leading to cloudy, awful-tasting ice cubes that ruin a perfectly good drink.
Placing an external inline filter on the water line that feeds your fridge is a total game-changer.
Better Tasting Water and Ice: A good carbon block inline filter does a much better job reducing chlorine and other chemicals than most stock filters. No more off-tastes or weird smells.
Appliance Protection: These filters grab sediment and scale before they can clog the tiny, delicate valves and tubes inside your icemaker and dispenser.
Cost Savings: One high-capacity inline filter can last for years and costs less than just one or two of the refrigerator's brand-name cartridges. It's a no-brainer.
Installation is usually a walk in the park. You just cut and splice the filter into the 1/4-inch water line behind your fridge. Most come with quick-connect fittings that just push on, so you don't need a toolbox full of special equipment.
For refrigerators, your main goal is improving taste and odor. You'll want an inline filter with a quality carbon block and an NSF/ANSI 42 certification. A 5-micron rating is plenty for this job.
Dedicated Purity for Under-Sink Faucets
If you want purified water on tap just for drinking and cooking, an inline filter hooked up to its own dedicated faucet is a fantastic setup. You get a steady supply of clean water without filtering all the cold water you use for washing dishes.
Under-sink systems are perfect for tackling more serious contaminants. Since it's for a dedicated faucet, you can choose a filter with a much finer micron rating (like 0.5 microns) and higher-level certifications without worrying about slowing down your main kitchen faucet.
This is where it really shines for specific water issues:
Lead Reduction: An NSF/ANSI 53 certified filter is a must-have if you live in an older home with potential lead pipes or fixtures.
Cyst Removal: A 0.5-micron filter is what you need to remove microscopic parasites like Giardia and Cryptosporidium.
Chemical Contaminants: Check your local water quality report and look for filters certified to reduce VOCs or other specific chemicals you see listed.
Installation is a bit more involved here since you have to tap into your cold water line and run a new, smaller line to a separate faucet. The most common connector size is 3/8-inch, but always double-check your plumbing before you buy.
Enhancing Coffee and Espresso Machines
If you're serious about coffee, you already know water quality is everything. The minerals and chemicals in your tap water can completely sabotage the flavor of your expensive, single-origin beans. On top of that, scale buildup from hard water is the number one killer of coffee and espresso machines.
An inline filter is the perfect fix. You can install it on the water line of a plumbed-in machine or simply use it to fill the reservoir of a countertop model. The commercial inline water filters market is growing fast, projected to reach $1.85 billion by 2025. Businesses know that pure water equals happy customers and longer-lasting equipment—a trend largely driven by the $4.78 billion North American market. For more on this, you can review the commercial water filter market insights on Data Insights Market.
For coffee lovers, an inline filter delivers two key victories:
Flavor Enhancement: It removes chlorine and helps balance minerals, allowing the true, nuanced notes of your coffee to shine through.
Scale Prevention: Many inline filters designed for coffee makers include media that inhibits scale formation. This protects the heating elements and internal parts of your expensive machine from a slow, crusty death.
Look for a filter that specifically mentions scale control. These are often the best inline filter choices for protecting both your brew's taste and your appliance's lifespan.
Our Top Inline Filter Picks for 2026
Alright, we've waded through the technical details—micron ratings, certifications, and flow rates. Now it's time to put that knowledge to work and pick the right filter for your home.
Instead of just giving you a list, I'm going to show you which filters make the most sense for specific jobs, like your fridge's icemaker or the tap you use for drinking water. We'll look at the best filter for simply better-tasting water, and the top choice if you're worried about serious contaminants like lead.
There's a reason these little filters are getting so popular. The home water filtration market is projected to hit $7.13 billion by 2026, and inline filters are a huge part of that. They can slash contaminants like hydrogen sulfide by up to 95%, getting rid of that rotten-egg smell instantly. Plus, with replacement costs often 70% lower than whole-house systems, they just make financial sense. For many families, switching from bottled water saves over $1,000 a year. You can dig into the numbers in these home water filtration market trends on Arizton.
Best for Refrigerator Ice and Water
When you just want better-tasting water and clearer ice from your fridge, the goal is simple: get rid of chlorine and other funky tastes. You need a filter that lasts a long, long time and doesn't need constant changing.
Our Pick:EcoPure EP-INL30
Why It Wins: This thing is an absolute marathon runner when it comes to longevity. It’s rated for an incredible 5 years or 30,000 gallons. That's a true set-it-and-forget-it filter.
Analysis: The EP-INL30 is all about improving taste and smell. It uses carbon to pull out the chlorine that makes tap water unpleasant. It's not designed for health contaminants (it doesn't have an NSF/ANSI 53 cert), but that's not its job. With simple 1/4" quick-connect fittings, it's the perfect, low-maintenance upgrade for any fridge.
If your main goal is just getting rid of that chemical taste in your fridge's water and ice, a long-lasting aesthetic filter is your best bet. It saves you from buying expensive, proprietary fridge filters every six months.
Best for Removing Lead Under the Sink
If you're dealing with a serious health concern like lead, especially from a dedicated drinking water tap, you have to get serious about your filter choice. Certification and a fine micron rating are non-negotiable here.
Our Pick:Woder 10K-Gen3
Why It Wins: This filter comes with both NSF/ANSI 42 and 53 certifications. It's been independently tested and proven to reduce lead, heavy metals, chlorine, and a whole list of other nasty stuff.
Analysis: The Woder 10K-Gen3 is built to be installed on a single cold water line, usually for a separate drinking faucet. It provides a solid flow rate and can last up to 3 years or 10,000 gallons. What’s really impressive is its selective filtration, which removes over 99.9% of contaminants but leaves in healthy minerals like calcium and magnesium. For anyone living in a home with older pipes, this is a fantastic choice for peace of mind.
DIY Installation and Long-Term Maintenance
Getting the most out of your inline filter really comes down to two things: a solid installation and proper upkeep. The great news? You probably don’t need to call a plumber for this one. Most inline filters are designed for a quick and simple DIY install.
With just a few basic tools and a bit of focus, you can have cleaner, better-tasting water flowing in less than an hour. We’ll walk through the essentials right here, from getting started to handling the long-term care that keeps your water pure and your appliances protected.
Pre-Installation Checklist
Don't just jump in. Taking a few minutes to prep will save you a world of headache and a soggy floor. Make sure you knock these out before you ever think about cutting a water line.
Shut Off the Water: Find the shutoff valve for the line you’re tapping into—it's usually under the sink or behind the fridge—and turn it completely off.
Grab Your Tools: You’ll want a clean pipe or tube cutter, maybe an adjustable wrench or two, and definitely a towel or bucket for any leftover drips.
Flush the New Filter: This is a critical step, so don't skip it. Before you install it, connect the filter to a hose and run water through it into a bucket for about five minutes. This clears out all the loose carbon dust from manufacturing.
Flushing your new filter is the single best way to avoid cloudy water or a clogged faucet aerator right after installation. It gets rid of all the harmless but messy black carbon fines that are normal in a brand-new filter.
Installing Your Inline Filter: A Step-by-Step Guide
Most inline filters with quick-connect fittings install the same way. The instructions might look a little different from brand to brand, but the core process is simple. Let’s use a standard refrigerator water line as our example.
Step 1: Find Your Spot Pick a spot on the 1/4" water line behind the fridge where the filter will be easy to get to. Remember, you'll have to change it later, so don't bury it in a spot you can't reach.
Step 2: Cut and Connect With the water off, use your tube cutter to make a clean, square cut in the plastic tubing. Push one end of the line firmly into the filter's "inlet" port and the other into the "outlet" port. There’s always an arrow on the filter showing the direction of water flow—make sure you follow it.
Step 3: Check for Leaks Slowly turn the water back on. Now, watch the connection points closely for any signs of a drip. If you spot one, shut the water off again. Usually, it just means the tube isn't pushed in all the way or the cut wasn't perfectly straight.
Troubleshooting Common Installation Issues
Even the pros hit a snag now and then. If you run into trouble, it’s almost always one of these two things.
Problem: Drips or Leaks at the Connection
Solution: This is nearly always caused by a sloppy cut on the water line. Quick-connects need a perfectly flat, square edge to seal properly. Turn off the water, pull the tube out, and make a fresh, clean cut. Push it back in firmly.
Problem: Low Water Pressure After Installation
Solution: Did you flush the filter first? If you did, the next thing to check for is a kink in the water line. Pull the appliance out and make sure the tubing hasn't gotten pinched or bent behind it. For more tips on keeping your whole home in working order, you can explore resources on general home maintenance.
For a deeper dive into filter maintenance and other expert tips, our library has plenty of guides to help you out. You might be interested in our article which provides more water filter advice.
Frequently Asked Questions About Inline Filters
Even after you've done your homework, a few nagging questions can pop up. Let's walk through the most common ones we hear from people trying to pick the right inline filter.
How Much Will an Inline Filter Reduce My Water Pressure?
Any filter will cause a tiny drop in pressure, but it should be so small you don't even notice. For a properly sized inline filter, we're talking a drop of only 2-5 PSI. If you suddenly feel like your water is just trickling out, something's wrong.
The usual suspect is a mismatch between the filter and your water. Trying to use a very fine 0.5-micron filter on a line that's heavy with sediment is a classic mistake. The filter just clogs up instantly. Always match the filter's GPM to what your appliance actually needs, and if your water is full of gunk, put a simple sediment pre-filter in front of it.
How Long Does an Inline Filter Actually Last?
The timeline on the box? Think of it as a suggestion, not a rule. A filter’s true lifespan comes down to two things: what’s in your water and how much of it you use.
If your city goes heavy on the chlorine, that carbon media is going to get used up fast. The same goes for high sediment levels—they'll clog the works long before the "official" replacement date.
Forget the calendar. Pay attention to your water. The moment you start tasting chlorine again or notice the flow from your fridge slowing down, it’s time for a change.
Do I Need a Plumber to Install an Inline Filter?
Not usually. For most jobs, like hooking a filter up to your refrigerator’s 1/4-inch water line, it's a simple DIY project. Most people with quick-connect fittings can get it done in less than an hour.
That said, know your limits. If the job involves cutting into a main copper pipe or if you’re just not comfortable with plumbing, call a pro. A small mistake can cause a huge, expensive mess from water damage. It's always better to be safe than sorry.