
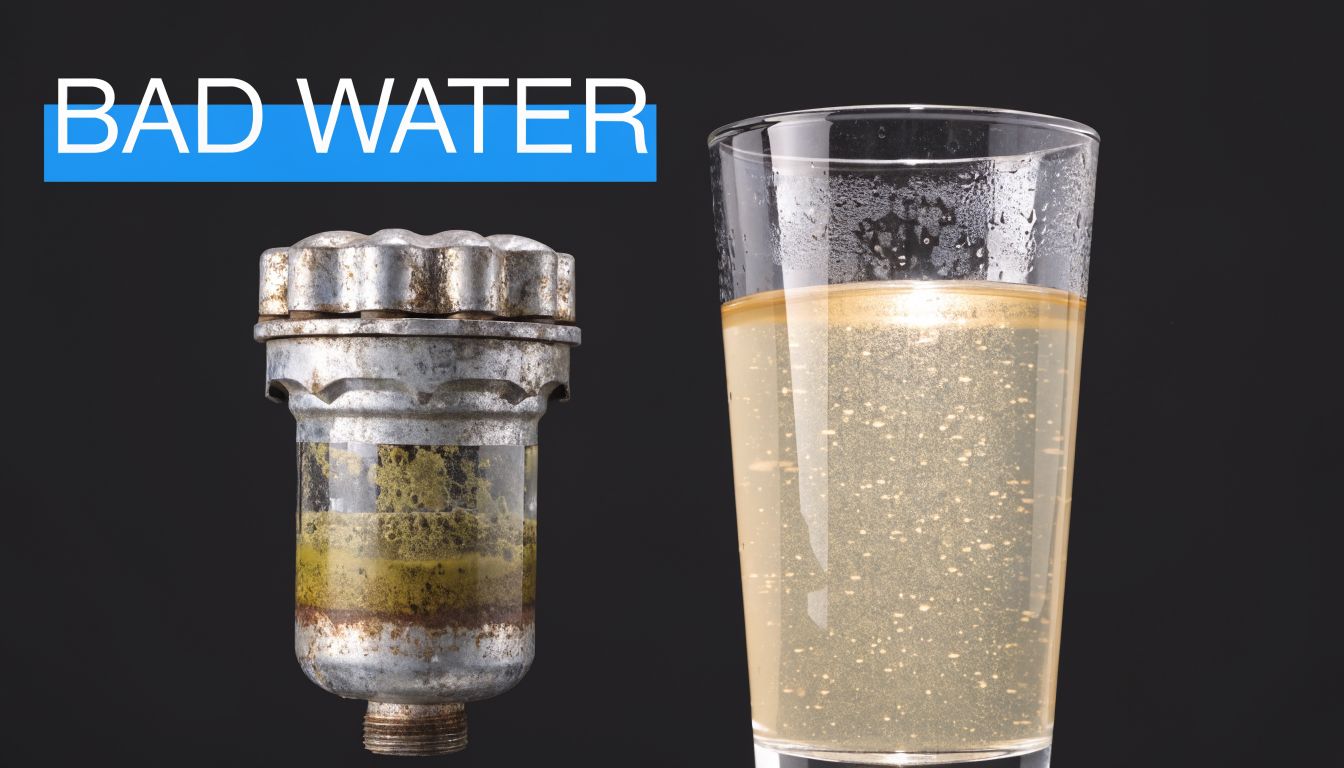
You usually notice a whole house filter problem in the least scientific way possible.
The shower loses some punch. A glass of water smells a little earthy. Coffee tastes flat, and you find yourself blaming the beans. Then somebody in the house says, “Did the water always taste like this?” That’s when one finally looks at the filter housing and remembers the cartridge hasn’t been changed in a while.
A whole house replacement water filter cartridge isn’t exciting. It sits there, does its job, and gets ignored until the signs get annoying. But that cartridge is carrying a lot of weight. It helps protect taste, odor, flow, fixtures, and the money you already put into your filtration setup. Whole house systems often cost 10,000 to 50,000 yuan, or about $1,400 to $7,000 USD, with premium brands running higher, and the total cost keeps going with routine replacements and maintenance, as outlined in this cartridge cost and maintenance overview.
I’ve seen the same mistake again and again. People spend good money on the system, then treat the cartridge like it’s optional. It’s not. The cartridge is the working part. Ignore it long enough and the system stops acting like protection and starts acting like a restriction.
That Slowing Shower and Funky Taste
It usually starts small.
One bathroom still feels fine, but the shower at the far end of the house seems weaker than it used to. The kitchen tap runs a little slower. Cold water tastes dull, or maybe there’s a smell you can’t quite place. Nothing dramatic. Just enough to make you suspicious.
That pattern matters because whole-house filtration problems rarely announce themselves with one big failure. More often, the system slowly chokes down as the cartridge loads up with whatever your water brings in. If you’re on sediment-heavy water, that slowdown can show up in pressure first. If chlorine or odor reduction is the main job, your nose and taste buds often catch the problem before a wrench ever comes out.
The signs people miss
Homeowners tend to wait for obvious trouble, like a total pressure drop or visibly dirty water. In real homes, the first clues are usually more ordinary:
- The shower feels weaker: Not dead, just not right.
- Taste slips: Coffee, tea, and plain drinking water lose that clean neutral taste.
- Odor creeps back in: Earthy, chemical, or stale smells can return.
- Fixtures seem uneven: One tap feels normal, another doesn’t.
- The system gets forgotten: Nobody remembers the last replacement date.
A filter doesn’t have to look terrible from the outside to be overdue inside.
That’s why smart filter maintenance is less about reacting to one dramatic symptom and more about paying attention to small changes before they turn into a messy Saturday.
Why this matters beyond convenience
A lot of people treat cartridge replacement like changing an air freshener. If the water still comes out, they assume it’s fine. That thinking costs you.
When the cartridge is spent, you don’t just lose performance. You also put stress on the rest of the system, make daily water use less pleasant, and risk buying the wrong replacement in a rush. That last one gets expensive fast, especially when you end up with a cartridge that technically “fits” but doesn’t match the housing, flow needs, or treatment goal.
The fix is usually simple. Identify the right cartridge, change it properly, and keep a basic replacement routine. The trick is doing it before that weak shower becomes a bigger water quality problem.
When to Replace Your Filter and The Risks of Waiting
Most whole house filter cartridges should be changed on a schedule, not just when the water gets bad. Experts recommend replacing most whole house water filter cartridges every 6 to 12 months, but that window changes with water conditions and system design, according to Aquasafe’s replacement guidance.
If your water carries more sediment or the house uses a lot of water, the cartridge won’t last as long as the label suggests. That’s especially true in multi-stage systems, where each stage has its own job and its own service life. Aquasafe notes that PP cotton pre-filters may need replacement every 3 to 6 months, activated carbon filters every 6 to 12 months, and reverse osmosis membranes every 2 to 3 years in systems that use them.
Go by the calendar and your senses
A cartridge can be overdue even if the water still looks clear. Not every exhausted filter announces itself with brown water or a dramatic drop in pressure. Some just lose treatment performance little by little.
Use both of these checks:
- The calendar check: If you’re at the end of the recommended interval, assume it’s time to inspect or replace.
- The household check: Notice lower pressure, changed taste, new odor, or fixtures that seem slower than usual.
- The water source check: Well water with sediment or rusty water usually shortens replacement intervals. Cleaner municipal water may be easier on cartridges, but it still doesn’t make them permanent.
What waiting actually does
The biggest mistake is thinking an old cartridge merely stops helping. In reality, overdue cartridges can become part of the problem. Aquasafe warns that failure to replace cartridges on schedule can transform the filter into a source of bacteria, mold, and pollutants in the water.
That’s the part too many people miss. An exhausted cartridge isn’t just passive. It can become a dirty place in a wet, dark system, and that’s not something you want tied into every shower, faucet, and appliance line in the house.
Practical rule: If your water quality is questionable and your replacement date is fuzzy, replace the cartridge sooner, not later.
A simple timing guide
Here’s the clean version most homeowners can use:
| Filter part | Typical replacement timing |
|---|---|
| Sediment pre-filter | 6 to 12 months in many whole-house systems |
| Main drinking water filter cartridge | 6 to 12 months as a common recommendation |
| PP cotton pre-filter in multi-stage systems | 3 to 6 months |
| Activated carbon filter | 6 to 12 months |
| Reverse osmosis membrane | 2 to 3 years |
Schedules like these are a starting point, not a permission slip to ignore symptoms. If the shower softens, the taste slips, or the water starts smelling wrong, trust what the house is telling you.
Finding Your Perfect Cartridge Match
A lot of bad cartridge buys happen the same way. The old filter comes out, the label is stained or missing, the homeowner grabs something that looks close, and the housing still screws shut. Then the pressure drops, the taste stays off, or the filter never seals quite right.
Buying the right whole house replacement water filter cartridge starts with compatibility, not price. Shelf price matters, but the expensive mistake is buying twice, or starving the house of flow because the cartridge was never a match for the system.
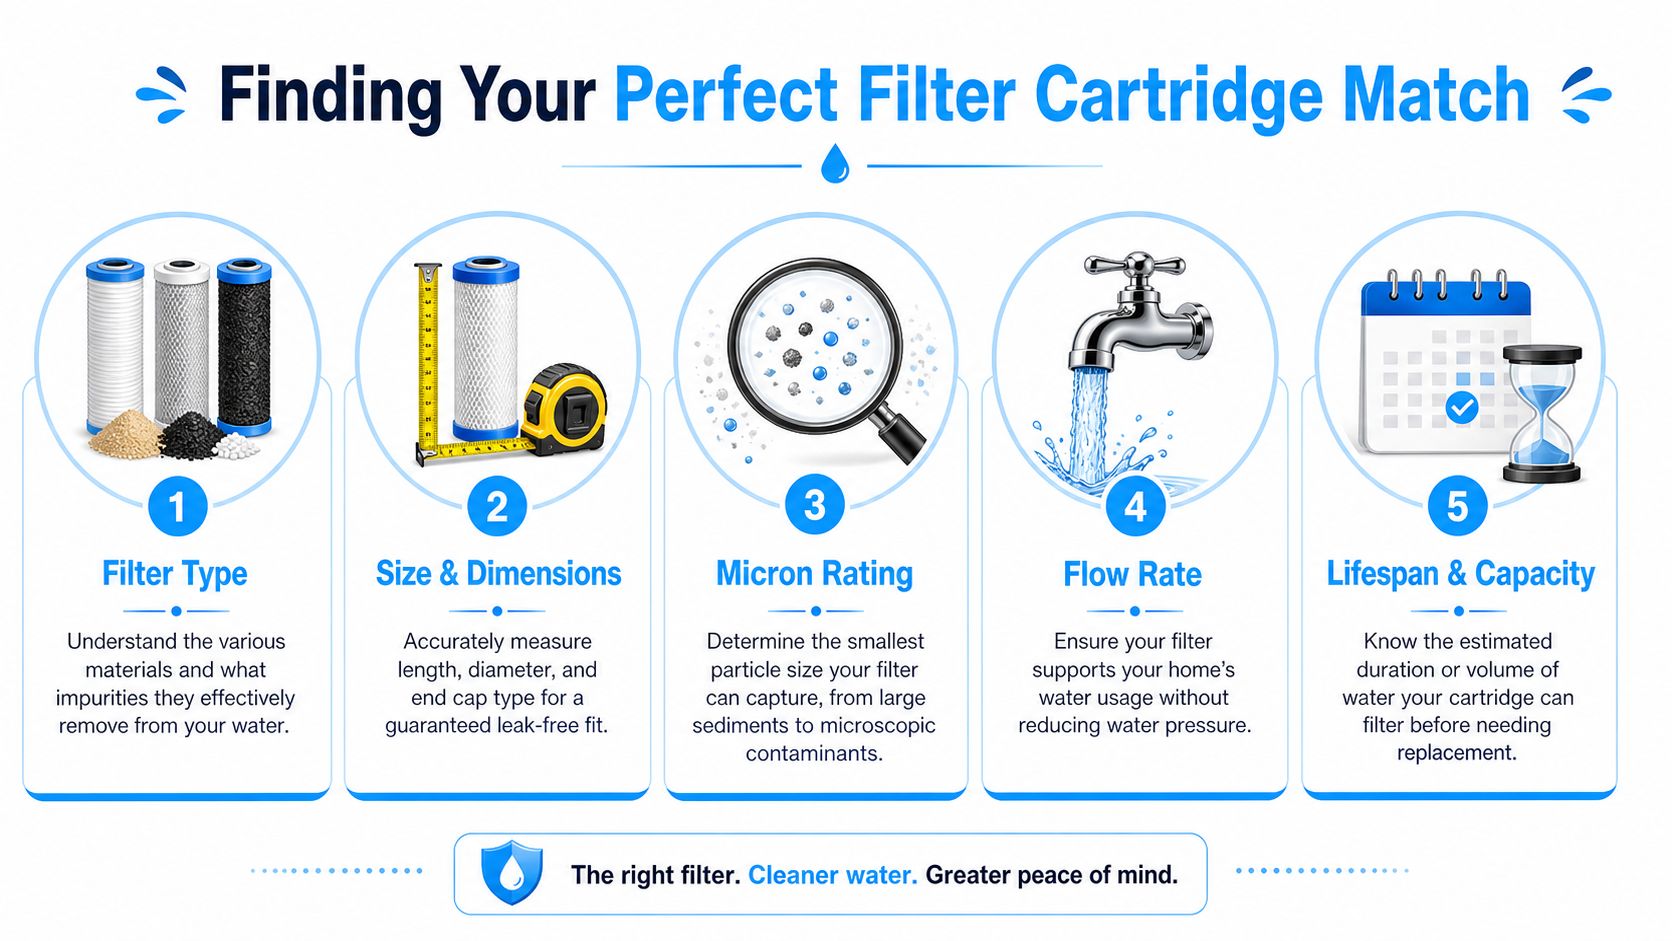
Start with the part you already have
Before you pull out a tape measure, look for an exact ID.
Check these spots first:
- The old cartridge label: Part number, brand, micron rating, and media type are often printed right on it.
- The housing head or bracket: Many systems have a model sticker on the cap, sump, or mounting plate.
- Old receipts, order emails, or install paperwork: This is often the fastest way to avoid buying the wrong cartridge.
If the system came with the house and there is no paperwork, take the old cartridge to the bench and inspect it closely. A blurry phone photo helps too. Guessing from memory at the supply counter is how people come home with the wrong diameter.
Measure the cartridge, not just the canister
If you cannot find a part number, measure the cartridge you removed.
Length and diameter come first. Close is not good enough here. A cartridge that is a little short, a little narrow, or built with the wrong end style can let water slip past the media or fail to seat properly.
Look at four things:
- Length
- Diameter
- Open ends or end caps
- Housing style, including standard slim housings and Big Blue housings
That last one trips people up all the time. Two housings can look similar on the wall and still take different cartridges.
Shop-floor rule: Bring the old cartridge with you if you can. A two-minute side-by-side check beats a second trip to the store.
Match the media to the job
A cartridge can fit perfectly and still be the wrong filter.
Sediment cartridges catch dirt, rust, and grit. Carbon cartridges help with chlorine, taste, and odor. Some systems use both because they are solving two different problems. Putting a carbon cartridge where a sediment stage belongs can clog the system early. Putting in sediment only will not do much for chlorine taste.
The right question is not “Will this fit?” It is “What is this stage supposed to remove?”
That is the step many guides skip, and it is where ownership cost starts. If you put the wrong media in the first housing, the next cartridge down the line gets hit harder and wears out sooner.
Understanding Micron Ratings
Micron rating tells you how fine the filter is. Lower numbers catch smaller particles, but they also restrict flow faster if your water carries a lot of sediment.
That trade-off matters in real houses. A very fine cartridge can sound great on the package and still be a poor choice for a home with heavy sediment, multiple bathrooms, or a high-demand morning routine.
| Cartridge trait | What it affects |
|---|---|
| Micron rating | How fine the particle capture is |
| Media type | What kind of contaminant the cartridge targets |
| Flow compatibility | Whether the house keeps acceptable pressure |
| Lifespan | How often you will replace it |
If your water is dirty, a staged setup usually works better than asking one tight cartridge to do everything. Let a sediment filter catch the bigger debris first, then let the finer or carbon stage do its job without getting packed up early.
OEM or generic
Generic cartridges can work fine if the dimensions, end style, and media specs exactly match the original. The problem is that “fits most” is not the same as “fits your housing correctly.”
Cheap cartridges turn expensive. The lower shelf price looks good until the filter life is short, the pressure is disappointing, or the fit is sloppy enough to risk bypass. Then you buy another cartridge, or you spend time chasing a problem that started with the wrong part.
Certified OEM replacements are usually the safer pick for whole-house systems, especially when the housing uses a less common cartridge style. If you do buy generic, compare specs line by line, not just the headline size.
Count the real cost, not just the checkout total
A cartridge that costs less up front is not always a real bargain, it's just a lower price at checkout.
The true cost sits in three places:
- How long the cartridge lasts in your water
- Whether it keeps flow where the house needs it
- Whether it protects the next filter stage instead of overloading it
I always tell people to keep a simple record on the wall or in their phone. Write down the cartridge model, install date, and how the water was behaving when you changed it. After one or two cycles, you stop buying blind. You know what fits, how long it lasts in your house, and whether the “cheaper” option saved money or just created another Saturday job.
Your Leak-Free Cartridge Replacement Guide
Most cartridge changes are straightforward. The trouble starts when people rush, skip pressure relief, or crank the housing down like they’re tightening a truck wheel.
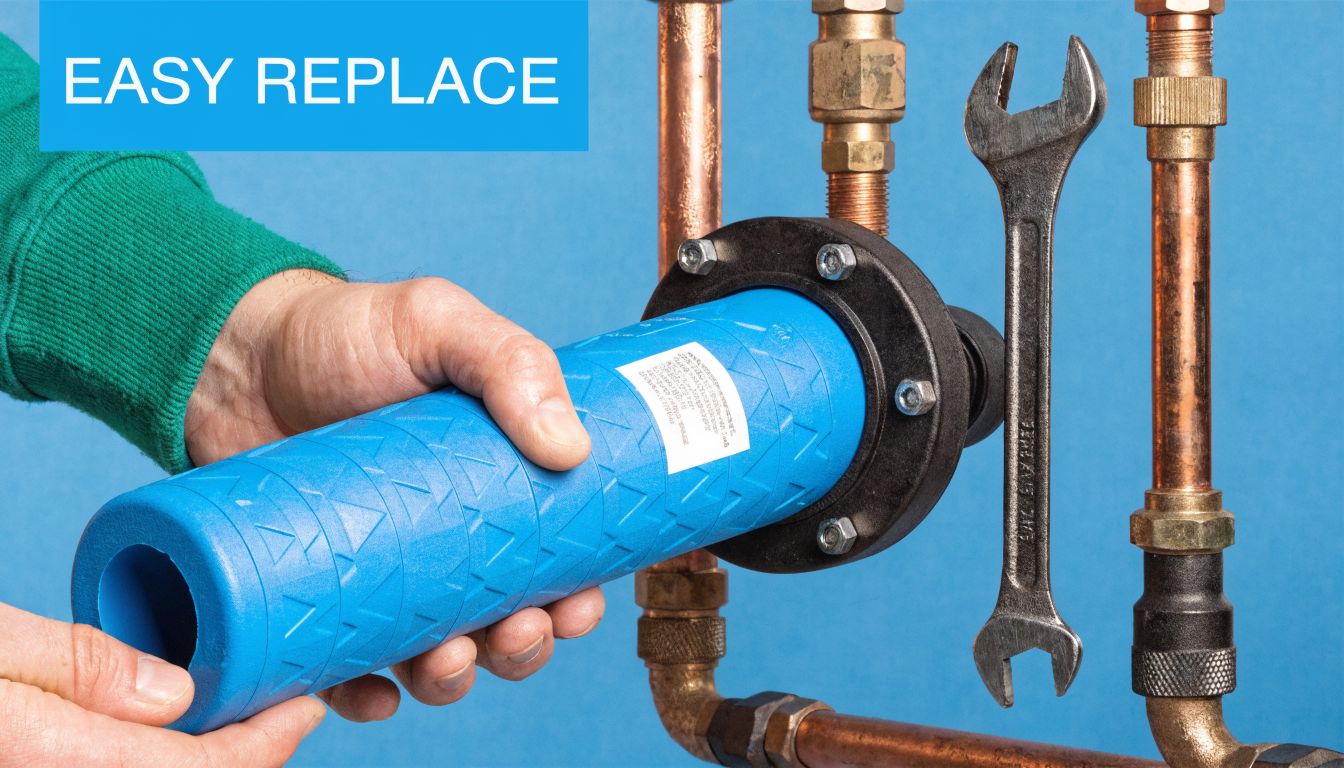
The replacement flow is well established. Shut off the water, relieve pressure, open the housing, inspect and clean, check the O-ring, install the new cartridge, tighten correctly, then bring the water back on slowly. SpringWell’s cartridge replacement instructions also note that 30% to 50% of failures stem from O-ring degradation, which is why experienced installers never skip that tiny gasket.
Tools that make the job easier
You don’t need a fancy truck full of gear. You do need a few basics:
- Filter wrench: Best tool for stubborn housings.
- Bucket or towels: There will be leftover water.
- Silicone gel: For lubricating the O-ring.
- Clean rag or sponge: For wiping out the sump housing.
- Replacement O-ring if needed: Smart to keep on hand if yours looks tired.
If the housing has been overtightened in the past, the wrench stops this job from becoming an arm-wrestling match in your utility room.
The replacement sequence that works
Follow this order and you’ll avoid most common mistakes:
- Shut off the main water supply. If your filter setup has an isolation valve or bypass, use it.
- Relieve pressure. Open a downstream faucet before loosening the housing.
- Set a bucket underneath. Residual water will spill.
- Unscrew the housing counterclockwise. Use the filter wrench if needed.
- Remove the old cartridge and inspect the housing. Clean out sediment, slime, or carbon residue.
- Check the O-ring carefully. If it’s cracked, flattened, or nicked, replace it.
- Lubricate the O-ring with silicone gel. Dry O-rings twist and leak.
- Insert the new cartridge squarely. Make sure it seats properly.
- Reattach the housing hand-tight, then add a quarter turn. SpringWell notes this is the right finishing move, and it matters because over-tightening causes 20% of housing cracks.
- Turn the water back on slowly. Then check for leaks.
- Flush the system. SpringWell advises flushing 5 to 10 gallons to clear carbon fines after installation.
A slow restart is worth the extra minute. If you slam pressure back on immediately, small issues become wet issues fast.
Here’s a visual walkthrough if you like to watch the process before doing it yourself:
The two mistakes that cause the most grief
The first is skipping pressure relief. SpringWell reports that neglecting to relieve system pressure leads to 15% of splash-related mishaps. That’s the classic “why am I suddenly soaked” moment.
The second is treating the housing like it needs brute force. It doesn’t. Hand-tight plus a quarter turn is enough when the O-ring is seated and lubricated. If it only seals when you’re straining on the wrench, something else is wrong.
Tighten for the seal, not for revenge.
A couple of trade tips
If you’re working on a multi-stage system, lay the cartridges out in order before you start. Mixing stages is a simple mistake with annoying consequences.
If the old cartridge came out looking unusually collapsed, torn, or oddly dirty on one side, pay attention. That can hint at fitment issues, bad flow direction, or a cartridge that never seated correctly in the first place.
Troubleshooting Post-Installation Hiccups
A fresh cartridge is in, the housing is back together, and then you see a drip. Or the water looks cloudy. Or pressure still isn’t right. None of that automatically means you botched the job.
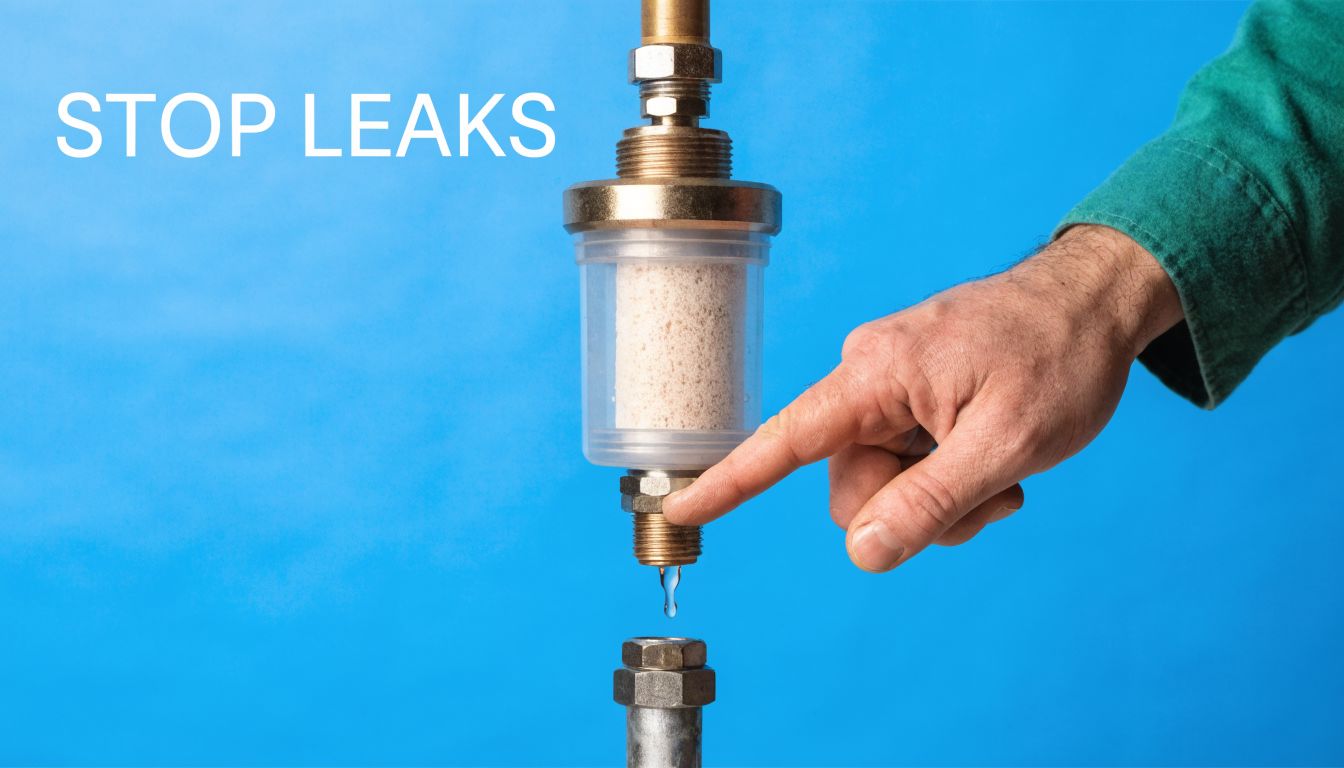
If the housing leaks
Start with the simple causes first.
- Check the O-ring seating: It may be twisted, pinched, dirty, or out of its groove.
- Back off and rethread the housing: Cross-threading can feel tight while still leaking.
- Confirm the cartridge is the correct match: Homeowners deal with hundreds of cartridge varieties, and a mismatched cartridge can affect fit, flow, and even warranty status, as noted in Home Depot’s whole-house replacement category guidance.
- Tighten correctly: Snug is right. Hulk-tight is not.
If the leak is coming from a nearby valve instead of the housing itself, that’s a different repair. In that case, this shut off valve leaking guide is a useful next step before you start blaming the filter.
If the water looks cloudy
New carbon cartridges often shed fine carbon dust at startup. That usually shows up as gray or cloudy water right after replacement.
The fix is simple. Flush the system thoroughly and check again. If the cloudiness clears as the water runs, it was likely startup residue. If it lingers or appears along with strange taste or odor, recheck cartridge seating and make sure the replacement media matches the application.
Cloudy water right after a carbon change is often a flushing issue, not a disaster.
If pressure is still poor
A new cartridge should improve flow if the old one was clogged. If pressure is still weak, work through this short checklist:
| Problem | Likely cause | What to do |
|---|---|---|
| Low pressure at the whole house | Wrong cartridge or blocked upstream issue | Verify cartridge specs and check valves |
| Low pressure at one fixture | Local aerator or fixture clog | Clean the fixture, not the filter |
| Pressure dropped after installation | Cartridge too restrictive or installed wrong | Reconfirm micron rating and seating |
The trap here is assuming every post-install problem is an installation mistake. Sometimes the filter change exposes another problem that was already there.
Smart Maintenance and Responsible Disposal
A whole-house filter runs best when replacement isn’t a surprise. The most practical homeowners don’t wait for bad taste or a weak shower. They build a simple routine and keep the next cartridge ready.
That matters because many people don’t have a good framework for the true lifecycle cost of a cartridge system. Replacement frequency changes with water quality, and flow rate affects how the system performs over time, which makes budgeting harder than it should be. That ownership-cost gap is spelled out in US Water Systems’ overview of whole-house cartridge system considerations.
Build a system you’ll actually follow
The best maintenance plan is the one you won’t forget.
Try this:
- Write the install date on the housing: A permanent marker beats a fuzzy memory.
- Set a calendar reminder: Put it on your phone for the next inspection or replacement window.
- Store the exact cartridge model: Keep a note in your phone, on the housing, or in your home file.
- Order before you need it: Having the next cartridge on the shelf keeps you from panic-buying the wrong one.
A house with changing water conditions may need adjustments over time. If your incoming water gets dirtier during part of the year, your replacement schedule may need to move up. That’s normal. The system should fit the water, not the other way around.
Disposal without the guesswork
Used filter cartridges are messy by design. They’ve collected the stuff you didn’t want moving through the house. Disposal depends on local rules and the cartridge materials, so check your municipal guidance first.
The practical approach is to let the used cartridge drain, bag it if it’s wet or dirty, and follow local disposal or recycling instructions where available. Some areas accept certain filter materials; others don’t. What matters is handling it deliberately instead of tossing a dripping cartridge into the garage corner for months.
If a delayed change or leak ever turns into wet drywall, flooring trouble, or a bigger cleanup problem, a solid reference like Restore Heroes' guide to water damage can help you understand what needs immediate attention.
Make better decisions next time
The biggest improvement most homeowners can make isn’t buying a fancier system. It’s keeping better records on the one they already own.
Track the cartridge used, the install date, how the water behaved before replacement, and whether that specific cartridge gave you good service life. Do that for one year and your next buying decision gets much easier. If you want more practical maintenance help and filtration explainers, keep a trusted bookmark to Water Filter Advisor’s advice library.
A whole house replacement water filter cartridge should be routine. When you know the exact part, understand the fit, and replace it before trouble starts, the whole job becomes cheaper, cleaner, and less stressful.
If you want straightforward help choosing, comparing, and maintaining home filtration systems, Water Filter Advisor is a solid place to start. It’s built for homeowners who want clear guidance on cartridges, system types, certifications, and real-world maintenance without the usual confusion.
- May 2, 2026
- Uncategorized