Best Filter for Arsenic in Water: A 2026 Homeowner Guide

A lab report that shows arsenic in your water can make your stomach drop. That reaction is justified. Approximately 140 million people across at least 70 countries are exposed to drinking water containing arsenic levels above the World Health Organization guideline of 10 micrograms per liter, a standard also adopted by the U.S. EPA according to the World Health Organization arsenic fact sheet.

What makes arsenic especially unnerving is how ordinary the water can seem. No strange smell. No metallic taste. No cloudy glass. You can pour a clean-looking cup from the tap and still have a problem that calls for a very specific fix.

Most homeowners get tripped up in the same place. They search for a filter for arsenic in water, see “reverse osmosis” repeated everywhere, and assume the job is simple. Sometimes it is. Sometimes that advice is incomplete enough to leave arsenic behind.

The right answer starts with three things. Test the water. Identify the arsenic form. Match the system to the chemistry. Once you know those pieces, buying a filter gets much less mysterious.

That Worrying Water Report Finding the Right Arsenic Filter

A water report rarely arrives with plain-English guidance. It gives you a contaminant name, a concentration, maybe a regulatory note, and then leaves you to figure out whether you need a pitcher, an under-sink system, or a full treatment setup.

Arsenic is where that confusion gets expensive. Homeowners often buy a popular under-sink filter, install it carefully, and assume the problem is solved because the water tastes the same as before. Taste tells you almost nothing here. Arsenic is the kind of contaminant that forces you to rely on testing and system design, not your senses.

Why arsenic triggers so much confusion

Part of the problem is that “arsenic” sounds like one thing. In practice, filtration performance depends on how arsenic appears in the water and what else is in that water chemistry. A good system for one home can be the wrong system for the next home down the road.

Practical rule: If a product page talks more about sleek faucet hardware than water chemistry, keep shopping.

A homeowner with city water and a modest arsenic reading may need a point-of-use system at the kitchen sink. A well owner may need pretreatment before the main filter can do its job. Another home may need to address multiple contaminants at once, which changes the media choice and maintenance schedule.

What a useful buying approach looks like

A practical filter for arsenic in water should be chosen in this order:

  • Start with a real water test: You need the arsenic level and, ideally, the arsenic form.
  • Check where the water is used: Drinking and cooking water are the first priority.
  • Verify treatment fit: Some technologies handle one arsenic form much better than the other.
  • Confirm post-install performance: Retesting is how you know the system is working.

That sequence saves money and avoids the most common mistake in this category. Buying the filter first and asking chemistry questions later.

The Invisible Threat in Your Tap Water

Arsenic in drinking water usually comes from two broad sources. It can occur naturally when water moves through arsenic-bearing rock and soil, and it can also enter water from industrial or agricultural activity. For many homes, especially private wells, the natural geology is the bigger issue.

The challenge is that arsenic doesn't announce itself. Chlorine has an odor. Iron can stain sinks. Sulfur can smell like rotten eggs. Arsenic often gives you none of those clues. That's why homeowners can live with it for years without realizing it.

Clean water pouring from a faucet into a clear glass with the text Invisible Threat overlaid below.

The number that matters at home

For home filtration, the target is straightforward. The U.S. Environmental Protection Agency has established a maximum contaminant level for arsenic in drinking water at exactly 10 parts per billion, which equals 0.010 mg/L or 10 micrograms per liter, as summarized in this arsenic standard reference.

That number gives you a practical benchmark when you read a lab result or compare filters. If your water is above that line, you need treatment. If a system can't reliably bring the water below that line in your conditions, it isn't the right choice.

Why long-term exposure matters

Arsenic isn't usually about sudden illness after one glass of water. The concern is repeated exposure over time. The risk builds subtly, which is exactly why a lot of families underestimate it.

A good analogy is sunlight. One afternoon outdoors may not seem important, but repeated exposure without protection adds up. Arsenic works more like that than like a dramatic spill event.

Water that looks clean can still need serious treatment. Arsenic is a testing problem first, and a filtration problem second.

What doesn't work

Homeowners often waste time. A standard carbon filter is a great tool for chlorine, taste, and odor issues. It is not the tool people should assume will handle arsenic. If a product only talks about improving flavor, it's probably aimed at aesthetic contaminants, not a toxic metal.

When you shop, ignore vague phrases like “advanced purification” unless the product spells out arsenic reduction and the certification behind that claim. In this category, marketing language is cheap. Verified performance is what matters.

Arsenic-3 vs Arsenic-5 The Detail That Matters Most

The biggest buying mistake in this category is treating all arsenic as if it behaves the same in a filter. It doesn't. Effective arsenic removal requires distinguishing between trivalent arsenic (Arsenic-3) and pentavalent arsenic (Arsenic-5), and Arsenic-3 often must be oxidized into Arsenic-5 before reverse osmosis or adsorptive media can remove it effectively, according to the Indiana Department of Environmental Management arsenic guidance.

That single detail explains why one homeowner praises a system while another says the same style of filter barely worked.

Why the forms behave differently

Think of Arsenic-5 as the version many treatment methods can grab onto more easily. Think of Arsenic-3 as the slippery version. It passes through treatment more readily unless you change it first.

That “change it first” step is oxidation. In plain terms, pretreatment converts the hard-to-catch form into the easier-to-remove form. If that step is missing, the system might be far less effective than the brochure suggests.

Why testing the type matters more than most people realize

A homeowner may know the arsenic concentration but still not know enough to choose the right system. The concentration tells you how much is present. The arsenic form tells you which treatment path makes sense.

If your water contains Arsenic-3, a reverse osmosis unit or adsorptive media filter may need help upstream. That can mean an oxidation step such as chlorine injection or another properly designed pretreatment method. Without it, you can own a technically “good” filter that is badly matched to your water.

Don't buy arsenic equipment based on contaminant name alone. Buy it based on contaminant name plus arsenic form.

What to ask before you buy

Bring these questions to any dealer, plumber, or product page:

  • Which arsenic form was the system tested against: If the answer is fuzzy, be cautious.
  • Is pretreatment required for Arsenic-3: A serious seller should answer directly.
  • What other water chemistry factors affect performance: Competing contaminants can matter.
  • How will I verify the result after installation: Retesting should be part of the plan.

That short checklist prevents the classic under-sink disappointment. The system was installed correctly, but it was never designed for the form of arsenic in the water.

Comparing Top Arsenic Filtration Technologies

Home arsenic treatment usually comes down to four categories: reverse osmosis, adsorptive media, ion exchange, and oxidation paired with filtration. Each can work. None should be treated as universal.
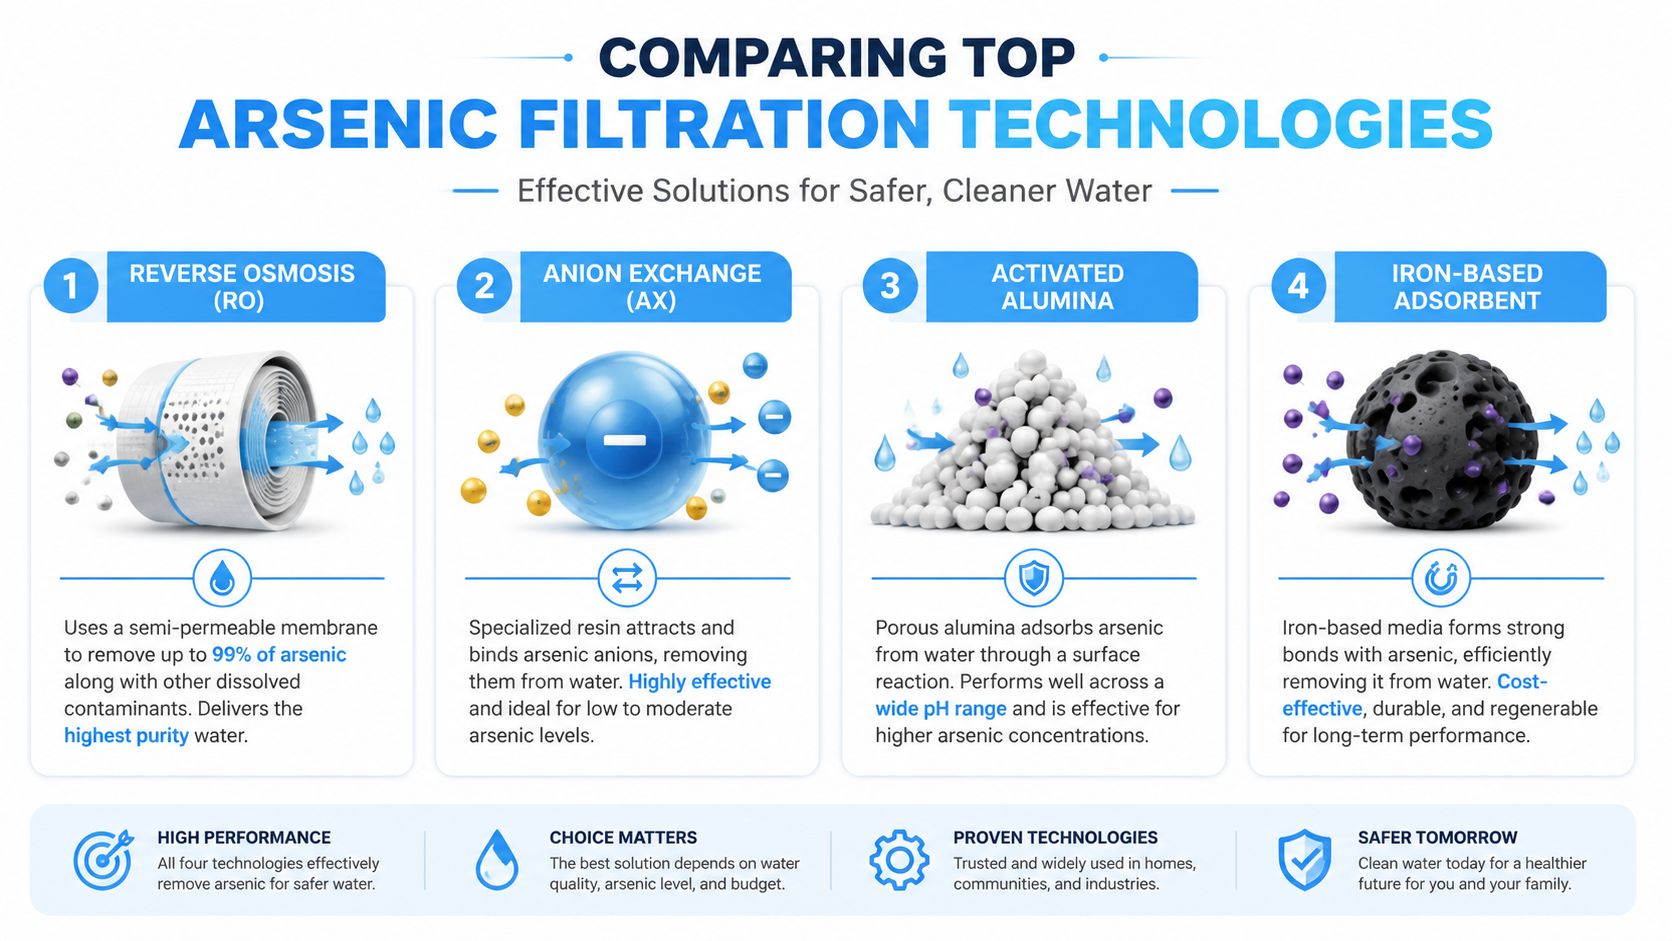
A comparison infographic detailing four common filtration technologies used to effectively remove arsenic from water supplies.

Reverse osmosis

Reverse osmosis pushes water through a semipermeable membrane. For many homeowners, it's the first serious option worth considering because under-sink RO systems are widely available, compact, and well suited to drinking and cooking water.

The catch is important. Standard reverse osmosis struggles with trivalent arsenic unless oxidation happens first, as explained in Pentair's arsenic treatment overview for homeowners. That's the reason some “certified” systems disappoint in private well applications.

RO makes the most sense when:

  • You want point-of-use protection: Kitchen sink treatment is the classic setup.
  • Your water has the easier arsenic form or proper pretreatment: Without that, results can vary too much.
  • You're comfortable with routine cartridge and membrane maintenance: Neglect hurts performance.

Adsorptive media

Adsorptive media systems use a media bed that binds arsenic as water passes through. Iron-based media are common in arsenic treatment discussions, and these systems can work well when they're matched to the water chemistry.

For homeowners, adsorptive media often feels simpler than RO because there's no reject water stream and many systems fit well as either point-of-use or point-of-entry designs. The trade-off is media exhaustion. Once the media is spent, the system's performance drops and replacement becomes the critical maintenance event that matters.

This option often suits people who want a dedicated filter for arsenic in water rather than a broader membrane system.

Ion exchange

Ion exchange swaps unwanted ions in the water for less problematic ones. It can be a useful arsenic treatment approach, but it is picky about water chemistry and usually benefits from careful design rather than off-the-shelf guesswork.

In practice, ion exchange tends to appeal more to homeowners working with a treatment professional, especially when the home already has other equipment in place. It's not usually the system I'd call the most intuitive for a first-time DIY buyer.

Oxidation plus filtration

Oxidation on its own isn't the final cleanup step. It's the setup move that makes downstream treatment more effective, especially when Arsenic-3 is present. In real homes, that often means adding an oxidant before RO or media filtration.

This approach is less glamorous than a sleek under-sink unit, but it solves a real problem. If the arsenic form is fighting your primary filter, oxidation can turn a poor match into a workable one.

A treatment train often beats a single magic box. For difficult water, pretreatment plus filtration is the smarter design.

Whole-house specialty media

Some whole-house media are built specifically for arsenic and related metals. For example, Titan-Ox media is described as removing both Arsenic-3 and Arsenic-5 while also targeting other heavy metals. That kind of product is worth considering when arsenic isn't the only contaminant on the report.

Another point-of-entry option comes from systems built around dedicated arsenic media. Some whole-house arsenic filter systems are marketed as capable of removing up to 99% of total arsenic. The practical lesson isn't that every home needs whole-house treatment. It's that whole-house arsenic treatment exists for situations where a kitchen-only system isn't enough.

Arsenic Filtration Technology Comparison

Technology Effectiveness (As-V) Effectiveness (As-III) Typical Cost Maintenance
Reverse Osmosis Strong choice for many homes Often needs oxidation first Moderate to high Cartridge and membrane changes, periodic retesting
Adsorptive Media Often a good fit when properly matched Usually improved by pretreatment when As-III is present Moderate Media replacement is the key task
Ion Exchange Can work well in the right chemistry Less reliable without careful design and pretreatment Moderate to high Resin monitoring, servicing, retesting
Oxidation plus Filtration Helps downstream systems perform better Strong option when Arsenic-3 is the issue Varies by setup Ongoing pretreatment monitoring plus filter upkeep

How to Read the Labels NSF Certifications Explained

A box can look reassuring without saying anything useful. Homeowners see phrases like “premium filtration,” “advanced contaminant reduction,” or “lab tested,” and assume that means arsenic has been specifically addressed. It might not.

The smart move is to look for standards language before you look at styling, faucet finish, or app features.
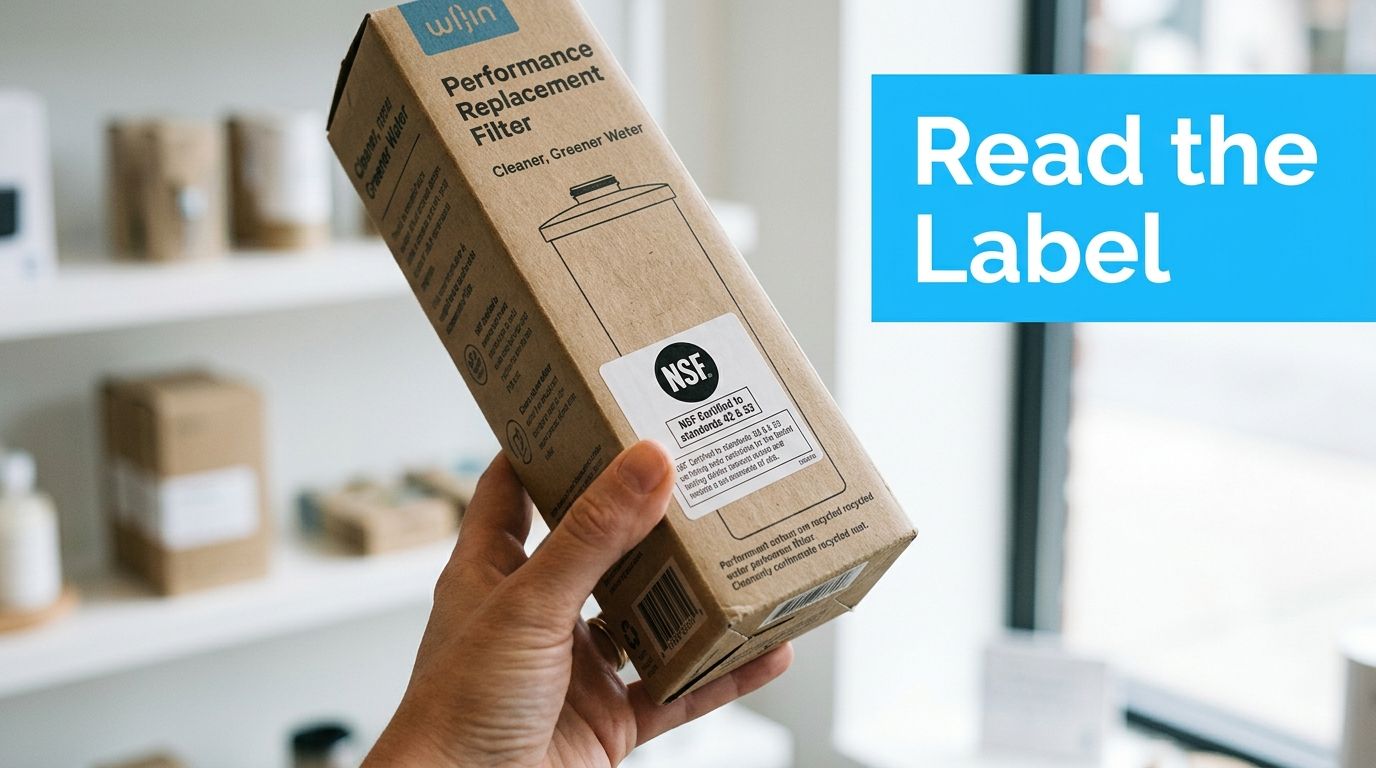
A hand holding a sustainable cardboard box for a performance water replacement filter in a store.

The two certification labels homeowners should know

For arsenic filters, the labels that matter most in shopping conversations are NSF/ANSI 53 and NSF/ANSI 58.

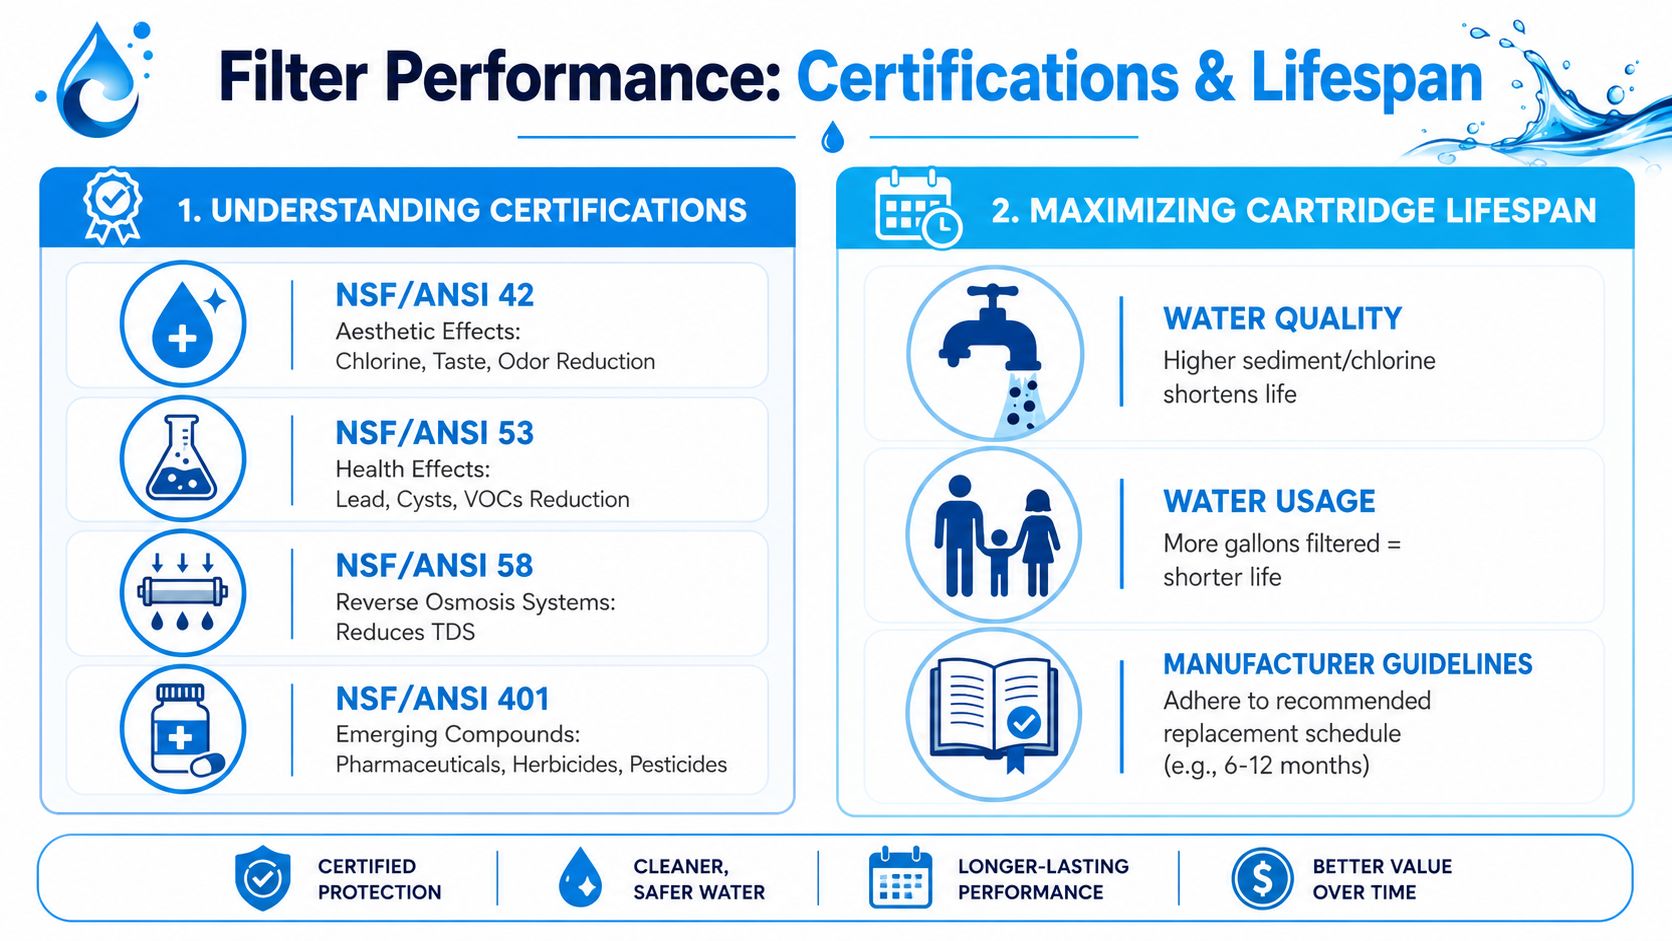
  • NSF/ANSI 53: This standard is commonly associated with systems that reduce contaminants with health effects. If a non-RO system claims arsenic reduction, this is one of the first places I'd look.
  • NSF/ANSI 58: This standard is specific to reverse osmosis systems. If you're considering under-sink RO, this is the standard you want to see discussed clearly.

A label alone still isn't enough if the seller never states which contaminant was tested. “Certified” has to be tied to arsenic reduction, not just to general material safety or structural integrity.

What to check on the product page

A strong product listing will usually tell you:

  • Which contaminant is reduced: It should say arsenic, not just “heavy metals.”
  • Which standard applies: 53 and 58 mean different things.
  • Whether the claim applies to the full system: Replacement components matter too.
  • What maintenance keeps the claim valid: Certification performance assumes proper upkeep.

If that information is buried, vague, or missing, I'd move on.

Here's a useful visual primer before you compare model numbers:

Red flags that should slow you down

Some warning signs show up again and again in this category:

“Removes all contaminants” is not a technical claim. It's advertising.

  • No mention of arsenic by name: That usually means the system was not built around this problem.
  • No certification standard listed: You're being asked to trust copywriting.
  • No replacement schedule guidance: Performance depends on maintenance, not just installation day.
  • No post-install testing advice: Serious arsenic treatment should always lead back to verification.

The goal isn't to become a certification expert. It's to read the label well enough to avoid buying a chlorine filter for an arsenic problem.

Your Practical Decision Guide Choosing the Right System

Most homes don't need the most complicated arsenic setup on the market. They need the right one. Point-of-use systems for drinking water are typically sufficient, and whole-house arsenic treatment is not generally necessary for most residential situations unless bathing exposure is a primary documented concern, according to Dartmouth's arsenic water treatment guidance.

That point saves homeowners from a common overcorrection. You find arsenic, panic, and assume every tap and shower in the house needs an expensive point-of-entry system. Sometimes that is justified. Often it isn't.
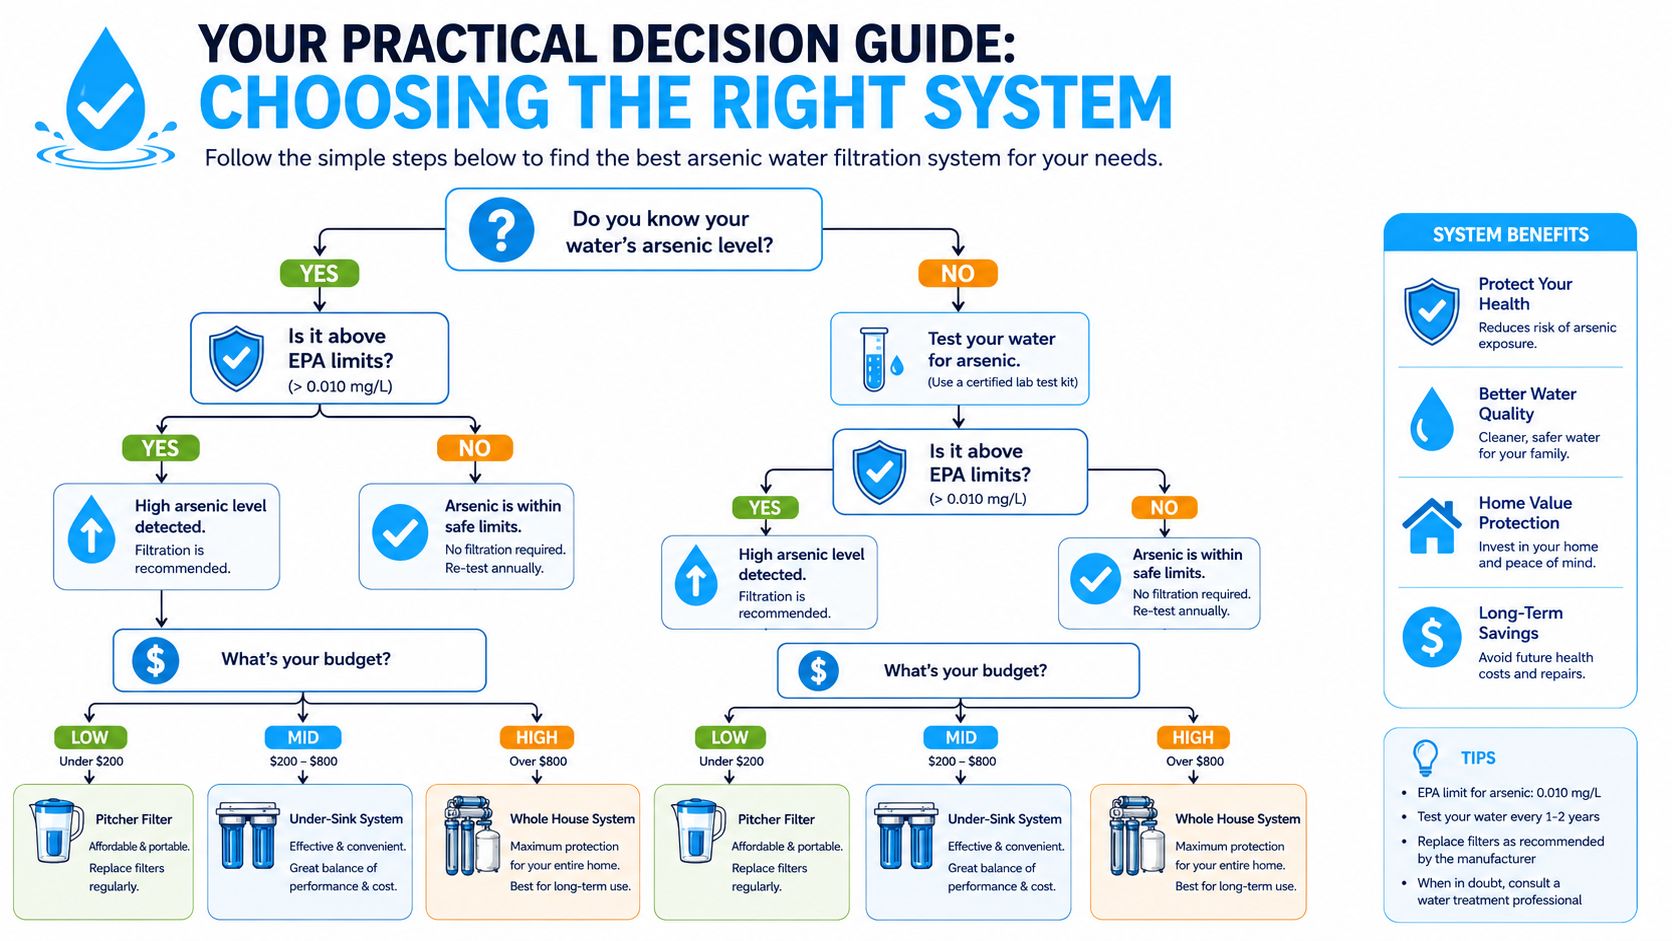
A decision guide flowchart helping homeowners choose the right water filtration system for removing arsenic contaminants.

A simple homeowner checklist

Use this sequence when choosing a filter for arsenic in water.

  1. Test first

    Get a proper water analysis before you compare products. You need more than “I'm on a well” or “my neighbor had arsenic.” You need your own water data.

  2. Find out which arsenic form is present

    If the report identifies Arsenic-3 and Arsenic-5 separately, that's valuable. If it doesn't, ask whether a more detailed lab analysis is worth doing before you buy equipment.

  3. Decide where you need protection

    For many households, drinking and cooking water are the practical first targets. That usually points to an under-sink or dedicated kitchen system.

  4. Match the technology to the chemistry

Reverse osmosis may be a good answer. Adsorptive media may be better. A pretreatment step may be the missing piece, marking the point where generic advice falls apart and real design starts.

When point-of-use makes sense

A point-of-use system is usually the cleanest solution when your main concern is what the family drinks and cooks with. It treats the water that matters most without forcing you to process every gallon used for toilet flushing, laundry, or outdoor hoses.

That approach also makes maintenance more manageable. One well-chosen kitchen system is easier to monitor than a whole-house installation that treats every fixture whether it needs treatment or not.

When whole-house treatment is worth considering

Whole-house treatment belongs in the conversation when arsenic is part of a broader contamination picture, when the home has a well with multiple water quality issues, or when a treatment professional documents a reason to address exposure beyond drinking and cooking water.

If you're comparing routes and want model-by-model consumer guidance, Water Filter Advisor keeps a broader water filtration advice library that can help you sort point-of-use and whole-house equipment categories before you narrow to specific arsenic-capable systems.

The practical buying mindset

Don't chase “zero arsenic” marketing language. Chase a verified system design that fits your water, your use case, and your maintenance habits.

A homeowner who installs a modest, properly matched, well-maintained kitchen system is usually better protected than someone who buys a large whole-house unit based on fear and never verifies performance after startup.

Conclusion Your Next Steps for Safe Water

The path is simpler than the product market makes it look. Test, identify, choose. Test the water so you know whether arsenic is present and how serious the problem is. Identify the arsenic form so you don't buy a system that looks right but performs poorly in your specific chemistry. Choose a treatment setup that targets the actual risk in your home.

If you remember one thing, remember this: reverse osmosis is not automatically the answer by itself. Arsenic treatment depends on matching the technology to the water, especially when Arsenic-3 is involved.

That's also why certification and follow-up testing matter so much. A filter isn't successful because the box sounded convincing. It's successful because the treated water tests the way it should after installation and during ongoing maintenance.

You can solve this problem. Start with the report in your hand, ask better questions than most product pages answer, and choose a system that's built for arsenic rather than one that merely sounds impressive.


If you're narrowing down a filter for arsenic in water and want plain-English comparisons, buying guidance, and maintenance advice, visit Water Filter Advisor. It's a practical resource for households sorting through under-sink, whole-house, and specialty filtration options without getting lost in marketing jargon.

Coliform Bacteria Test Method: A Homeowner’s Guide

You draw a glass from the kitchen tap, take a sip, and pause. Maybe the water tastes flat after a week of heavy rain. Maybe the well cap was disturbed during yard work. Maybe nothing seems wrong at all, and that's the problem. Coliform contamination usually doesn't announce itself with a dramatic smell or color change.

That's why homeowners get tripped up by water testing. They treat one clean result like a lifetime guarantee, or one positive result like proof the whole well has failed. In practice, a coliform bacteria test method is more like a diagnostic tool than a verdict. It tells you what was happening in that sample, at that moment, under those conditions.

For home water filtration, that distinction matters. You can't choose the right fix until you know whether you're dealing with a real contamination issue, a sampling mistake, or a short-term event that showed up after rain, plumbing work, or disturbance in the well system.

Why You Should Test Your Water for Coliform Bacteria

A common story goes like this. A homeowner has a private well, the water has always seemed fine, and then a stretch of wet weather rolls through. A few days later, the water feels “off.” Not necessarily dirty. Just different. That's often when coliform testing becomes urgent.

Coliform bacteria are best understood as an indicator. They are the warning light on the dashboard, not the engine problem itself. Their presence suggests there may be a pathway allowing contamination into your water system. That could mean surface water intrusion, a problem at the wellhead, a cracked casing, poor sealing, or contamination introduced somewhere in the home plumbing or filtration setup.

Why one test doesn't tell the whole story

Many homeowners want a simple pass or fail. Water doesn't always cooperate.

A single positive or negative result is merely a “snapshot” that can miss intermittent contamination. Coliforms in wells are most likely to appear during wet weather in late spring or early summer, which means tests taken during drier periods can create a false sense of security, as noted in this home water testing guidance.

Practical rule: If your water source is a well, treat one test result as one photograph, not the whole movie.

That matters for filtration decisions. If you install a treatment system after one bad sample without confirming the pattern, you may spend money solving the wrong problem. If you skip treatment because one winter sample came back clean, you may miss contamination that shows up when rainfall changes the groundwater conditions.

Testing comes before treatment

The first good move isn't buying equipment. It's getting a trustworthy sample and understanding what it means for the home system as a whole.

If you're sorting through treatment options, broad homeowner guidance from Water Filter Advisor's water advice library can help you compare next steps after testing, but the test itself is still the starting point. Filtration works best when it's matched to a known problem.

Understanding the Coliform Family

The term coliform refers to a broad group of bacteria, not one single organism. That distinction matters in practice because a lab report with "total coliform," "fecal coliform," or "E. coli" does not mean the same level of risk, and it should not trigger the same response.

A clear glass filled with fresh water sitting on a white table in a bright room.

What I tell homeowners is simple. Coliform results are less about naming one bad germ and more about locating where the water system may be vulnerable. A positive result can point to a cracked well cap, surface runoff getting where it should not, poor sampling technique, stagnant plumbing, or an actual waste-related contamination event. The label on the report helps sort those possibilities.

Total coliforms

Total coliforms are the broadest category. These bacteria are commonly found in soil, decaying vegetation, and other environmental sources, so a positive result does not automatically mean sewage or illness risk. It does mean the water system deserves a closer look.

In practice, total coliform works like a warning light on a dashboard. It tells you something is off, but not exactly which part failed. For a homeowner, that usually means checking the sampling process, inspecting the wellhead or plumbing entry points, and deciding whether a follow-up sample should be taken before spending money on treatment equipment.

This is also where timing causes confusion. A homeowner gets a positive result, shock chlorinates the well the same day, then retests too soon and gets a clean sample because chlorine temporarily suppressed the bacteria. That can hide the original problem rather than prove it is fixed. If a lab or local health authority wants confirmation sampling, follow their timing instructions closely so the retest reflects the water system, not leftover disinfectant.

Fecal coliforms

Fecal coliforms are a smaller subgroup associated more strongly with contamination from human or animal waste. This result raises the level of concern because it suggests a direct contamination pathway, not just a general system weakness.

That changes the response. Source protection and maintenance still matter, but the priority becomes safe water, faster investigation, and careful confirmation testing. I treat this as a signal to look hard at septic setbacks, runoff patterns, flooding history, and any route by which waste could reach the well or plumbing.

E. coli

E. coli is the clearest high-risk finding in this group. Its presence indicates fecal contamination and should be treated as an immediate health concern until proven otherwise.

Total coliforms warn you to inspect the system. E. coli tells you to stop using the water for drinking and food preparation until you have a safe alternative and a plan.

Home test kits and lab methods often identify E. coli by detecting enzyme activity after incubation, but the technical details matter less to a homeowner than the decision that follows. Use bottled water or another known safe source, contact your local health department or a qualified water professional, and document the sequence carefully if shock chlorination is performed. The order matters. Disinfect too early, or retest at the wrong time, and you can end up with a "good" sample that does not represent the usual condition of the well.

If you want a plain-language refresher on how microbes differ more broadly, including why bacteria behave differently from viruses, VirusFAQ's guide to microbial differences is a useful side read for non-specialists.

Comparing Coliform Bacteria Test Methods

A homeowner can get three different coliform tests on the same well and come away with three different levels of confidence. That does not always mean one test was wrong. It often means the methods answer slightly different questions, and all of them are still only a snapshot of the water at the moment you sampled it.

That snapshot problem matters more than many guides admit. If someone shock chlorinates first and tests later, the result may satisfy an immediate need for a cleaner sample, but it may also hide the condition that triggered the concern in the first place. If the goal is diagnosis, test timing matters almost as much as test method.

Membrane filtration

Membrane filtration is the method I prefer when the question is, "How much contamination are we dealing with, and is it changing?" A measured water sample passes through a very fine filter that traps bacteria. The lab places that filter on selective media and counts the colonies that grow, which gives a direct colony count rather than a statistical estimate, as described in this overview of membrane filtration and coliform enumeration.

That direct count has real value in the field. It helps compare samples before and after repairs, pressure tank work, casing fixes, or treatment changes. If a homeowner is deciding whether the problem was a one-time intrusion or an ongoing pathway, counted results usually give a clearer picture.

The trade-off is cost and handling. This method usually belongs in a certified lab, not on a kitchen counter.

MPN and presence absence methods

Most Probable Number, or MPN, estimates contamination from growth patterns in broth rather than counting colonies one by one. Presence-absence tests simplify the question even further. Is coliform detected or not?

For routine screening, that simplicity is useful. A homeowner who wants an early warning does not always need colony counts. A positive screening result is enough to stop treating the water as clearly safe and start asking the next question, which is whether the sample should be confirmed by a lab before making a large treatment purchase.

The limitation is resolution. A simple positive result can tell you there is a problem, but it does not show whether the result was barely positive or heavily contaminated. That matters if you are trying to judge severity, check whether corrective work proved effective, or document conditions before and after disinfection.

Defined substrate methods

Defined substrate tests, including products like Colilert-18, use indicator compounds that change color or fluorescence when target bacteria are present. In practice, the homeowner usually sees a straightforward readout, while the chemistry in the tray or vessel sorts total coliform signals from E. coli signals.

These tests are popular for good reason. They are faster and easier to run than older multi-step approaches, and many labs use them as well. For drinking water work, the method is standardized tightly enough that it can be a solid option when sampling and incubation are done correctly.

The caution is overconfidence. A clean result from an easy-to-run test can still be misleading if the sample was taken right after shock chlorination, after heavy flushing, or from a faucet that was not a good stand-in for normal household use. The method may be sound. The sample may still fail to represent the usual condition of the well.

What the lab does differently

Lab methods are not just "home kits, but better." The difference is control. Sample volume, incubation conditions, media, rinsing steps, and handling are all standardized so the result is more defensible, as shown in EPA Method 1604.

That matters when the result could affect treatment cost, a real estate transaction, a local health department follow-up, or a decision about whether shock chlorination worked. In those cases, I want a method that reduces avoidable error and gives a result I can compare across time.

It also helps with the timing conflict many homeowners miss. After a positive result, people often want to disinfect immediately. Sometimes that is appropriate for safety. But if a local authority, lender, or lab protocol expects a follow-up sample on a specific schedule, chlorinating too soon can muddy the record. You can end up with one sample showing the untreated condition, one sample showing the effect of fresh chlorine, and no clear picture of the baseline problem. Before doing anything, check what retesting timeline will apply.

Coliform Test Method Comparison

Method Typical Use Result Type Time Typical Cost Best For
Membrane Filtration Certified lab testing, follow-up investigation Direct colony count (CFU) Around a day under standard incubation protocols Usually higher than simple DIY screening Confirming contamination and comparing results across samples
MPN Basic screening, older lab workflows, some kit formats Statistical estimate Slower than the fastest rapid options Varies Homeowners who need an initial screen and can accept an estimate
Defined Substrate Rapid screening in labs and kits, including Colilert-style testing Presence, absence, or color and fluorescence-based interpretation Fast turnaround compared with many older methods Moderate Quick screening when sample collection is done carefully

Bottom line: Use a screening test to flag a problem quickly. Use a lab method, especially membrane filtration or a well-run defined substrate test, when the result will drive repairs, treatment spending, or post-chlorination confirmation. And treat every single result as a snapshot, not a lifetime guarantee of safe water.

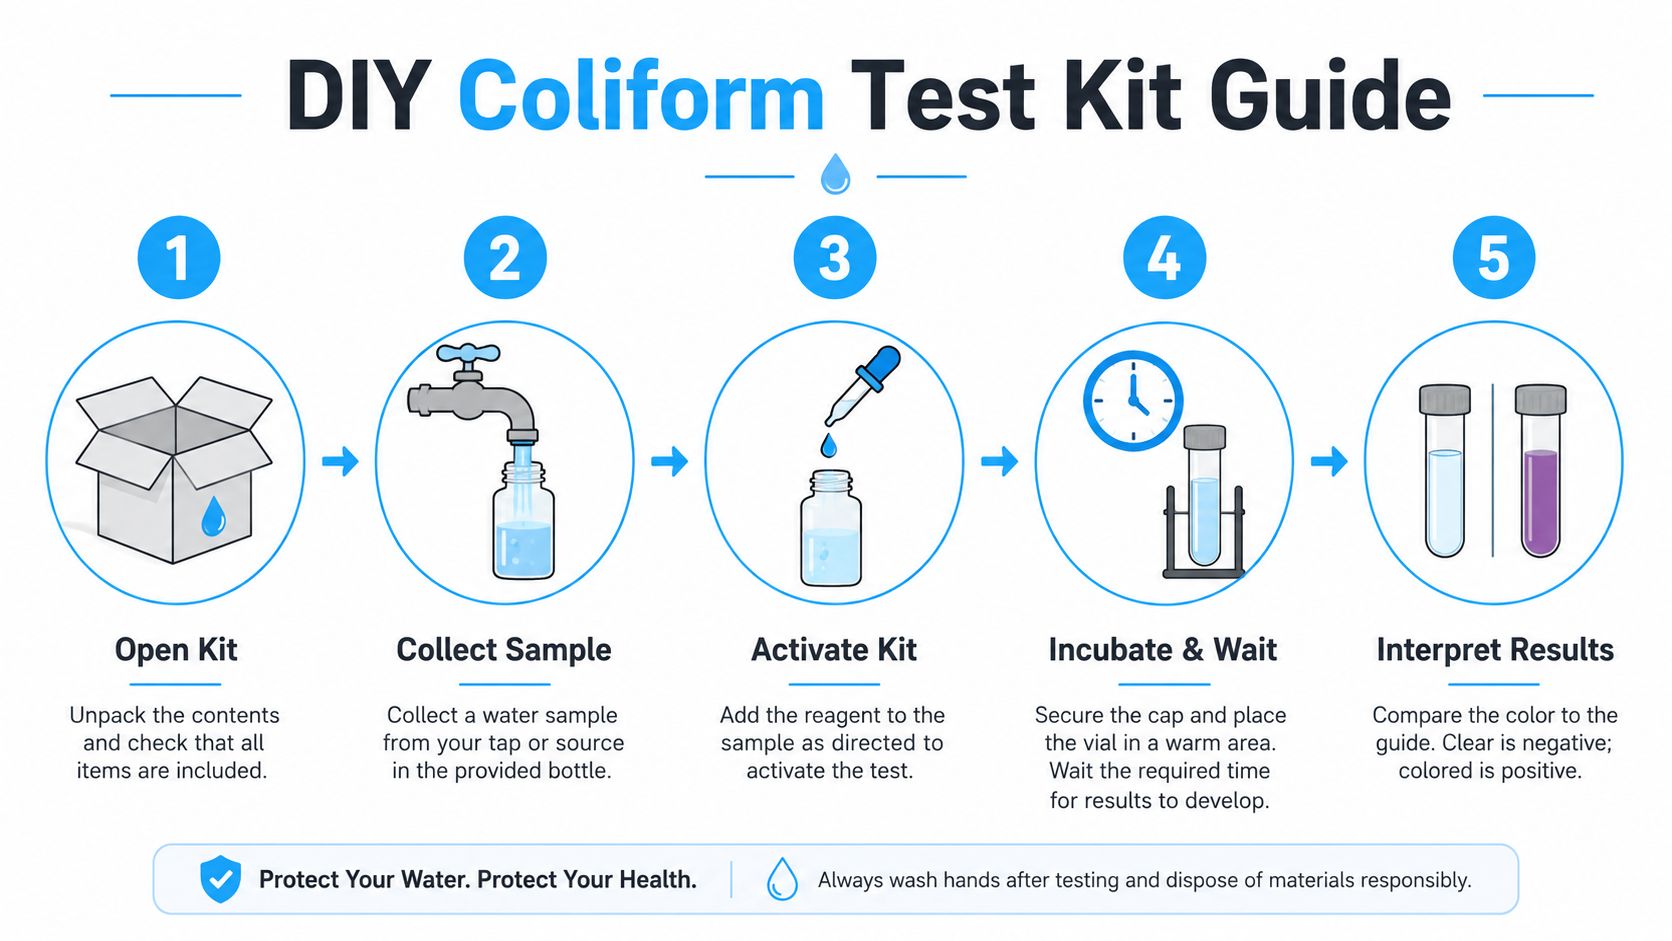
How to Use a DIY Coliform Test Kit at Home

DIY kits can be useful if you treat them like sterile lab work, not a kitchen project. Most in-house residential coliform kits report results within 24 to 48 hours and can include an incubator, pump, filtration manifold, nutrient medium, and sterile filters or pads, as described in this overview of in-house coliform testing kits.

The hard part isn't opening the kit. The hard part is avoiding contamination from your own hands, faucet, or collection point.

An infographic illustrating the five-step process for performing a DIY coliform bacteria water test at home.

The sampling steps that matter most

For an accurate sample, water should run for one hour to flush the system. The outlet should be sterilized with an alcohol swab, the sample should be collected from drip water without touching the spigot, and the sample should be refrigerated and delivered to a lab within six hours, according to these home coliform sampling guidelines.

If you're testing filtered water from a gravity system or similar setup, the same discipline applies. Don't touch the inside of the cap. Don't touch the bottle neck. Don't collect from a dirty spigot and assume the result represents the source water.

A practical DIY routine

  1. Read the whole kit first. Don't start opening sterile components while you're still figuring out the sequence.
  2. Flush the water path. If the instructions for your setup call for flushing before sampling, do it fully.
  3. Sanitize the outlet or collection area. False positives frequently arise from issues at this point.
  4. Collect carefully. Keep fingers away from the inside of the bottle and cap.
  5. Activate and incubate exactly as directed. Shortcuts ruin the test.
  6. Record what was happening that day. Rainfall, plumbing work, filter changes, and well disturbances all matter when you interpret the result later.

A short visual walkthrough can help if this is your first time with a kit.

What usually goes wrong

The most common DIY failure isn't the chemistry. It's the sample.

Field note: If the inside of the cap or bottle neck gets touched, the result becomes suspect. That's enough to trigger panic, unnecessary well chlorination, and sometimes the wrong filtration purchase.

If you want a fast screen at home, use the kit. If the result is positive, messy, or hard to trust, move to a certified lab before you commit to a major treatment plan.

How to Interpret Your Test Results

A test result only helps if you know what action it should trigger. Homeowners often overreact to one type of positive and underreact to another. The right response depends on which coliform category was detected and how reliable the sample was.

Negative result

A negative result is good news, but it isn't permanent protection. It means the sample did not show contamination at the time you tested under those conditions.

That's especially important for well owners. Water quality can shift with weather, runoff, repairs, or changes in the home plumbing and filtration train. If your well has a history of variability, a single negative result shouldn't be your only basis for feeling secure.

Positive for total coliforms

A total coliform positive is the water equivalent of a check engine light. It doesn't confirm the worst-case scenario, but it says the system deserves inspection.

Look first at the practical causes. Was the sample collected properly? Was the faucet or outlet sterilized? Did heavy rain, flooding, or plumbing work happen recently? In many homes, the next useful move is a careful repeat sample and a closer look at the well cap, casing, vent, pressure tank area, and filtration equipment.

Positive for E. coli

A positive E. coli result is different. Treat that as urgent. Don't keep using the water for drinking until you've switched to a safe source and started a proper follow-up process.

At that point, the question isn't whether you need a response. It's whether your response is organized enough to avoid making the diagnosis harder. Homeowners who jump straight to treatment can blur the evidence and make it tougher to identify where the contamination is entering the system.

A result should change your next decision, not just your stress level.

Build a pattern, not a single memory

The smartest homeowners keep simple notes. Test date. Weather. Recent plumbing work. Filter changes. Anything unusual around the wellhead or source.

That log turns random test results into a pattern. For home water filtration, that's powerful. It helps you decide whether you need source correction, point-of-use protection, whole-house disinfection, or just better sampling discipline.

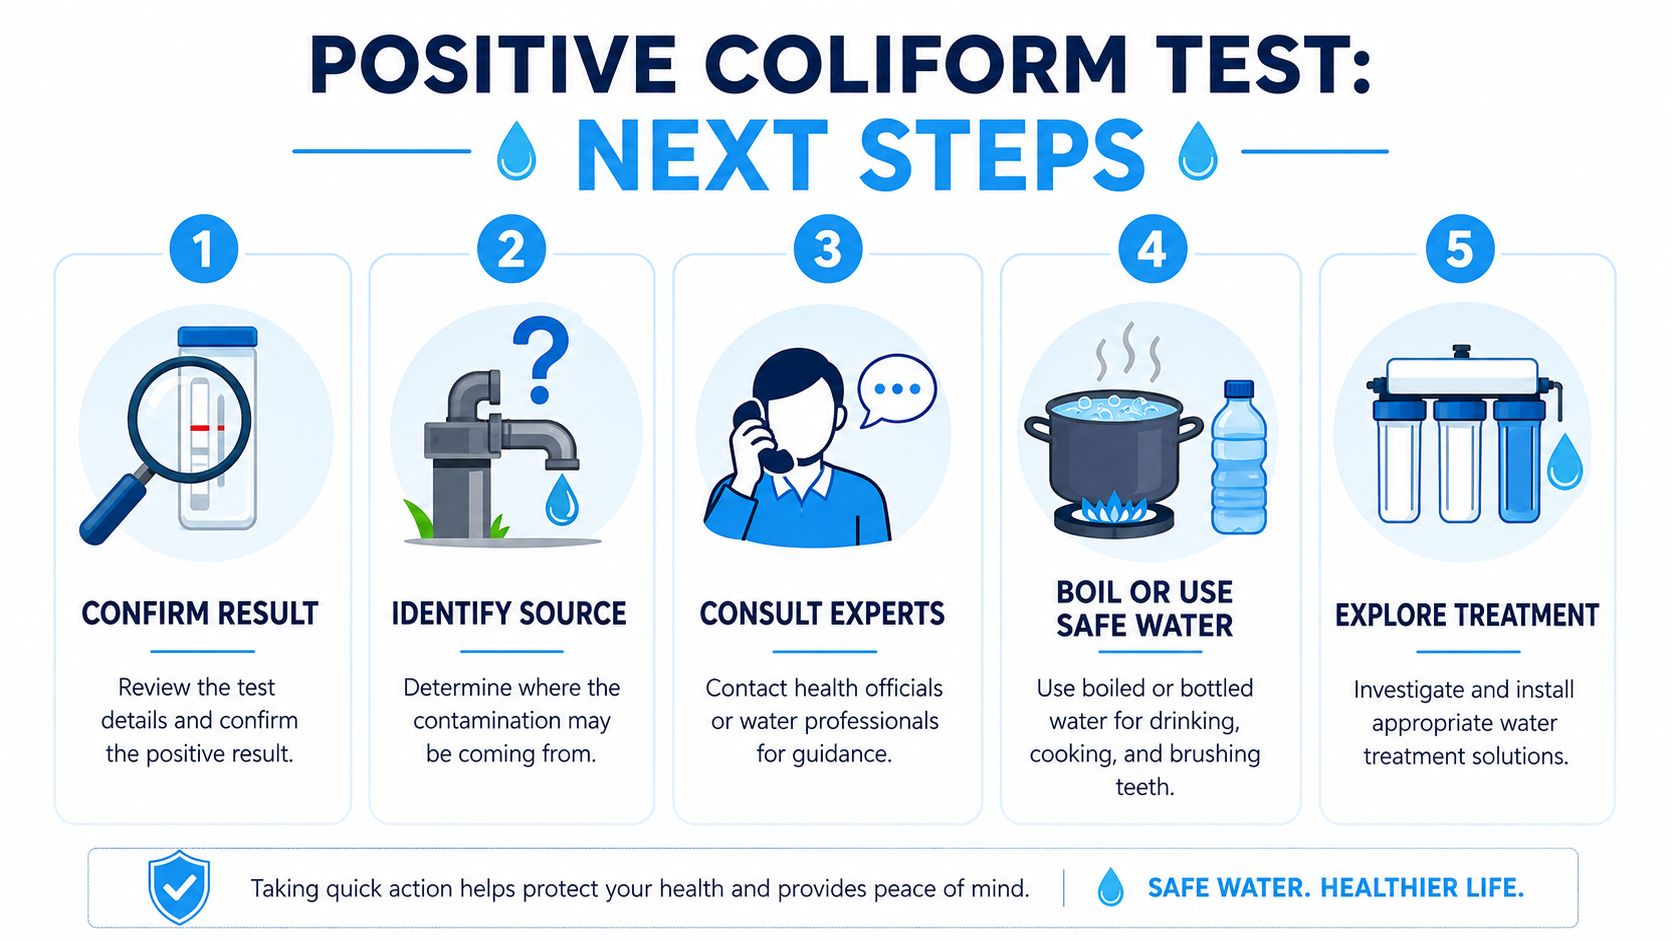
What to Do After a Positive Test Result

A positive result rattles people, and that's understandable. The mistake is acting fast in the wrong order. I've seen homeowners chlorinate first, ask questions second, and end up with a cleaner-looking sample that hides the original problem.

A 5-step infographic explaining the necessary actions to take after receiving a positive coliform water test result.

Don't shock chlorinate before repeat compliance sampling

A common mistake is to shock chlorinate a well immediately after a positive test. EPA guidance says that should not happen before required repeat samples because it can skew results and mask the true contamination source, preventing an accurate diagnosis, as explained in EPA Region 8 guidance on positive total coliform or E. coli samples.

This is one of the biggest gaps in homeowner advice online. People hear “positive bacteria result” and assume chlorine is always the immediate next step. For official retesting and source diagnosis, that can be exactly backwards.

A better response sequence

Use a calm checklist.

  • Protect drinking water first. If the result suggests meaningful contamination, switch to a safe water source for drinking and food preparation.
  • Verify the sample quality. Ask whether handling could have contaminated the bottle, cap, outlet, or collection point.
  • Repeat correctly. If a repeat sample is required, collect it before disinfecting in a way that masks the source.
  • Inspect the system. Look at the wellhead, seals, drainage around the well, recent disturbances, and filtration equipment.
  • Treat after diagnosis. Shock chlorination and filtration both have a place. They work best when you know what problem you're treating.

When filtration enters the picture

If contamination is confirmed, many homeowners need more than a one-time disinfection event. A filtration and disinfection barrier can provide ongoing protection, especially when the source is vulnerable to runoff or recurring intrusion.

But treatment should fit the cause. If the problem is a bad sample or a loose well cap, buying a large system first won't solve the root problem. If the issue is recurring contamination, relying only on occasional shock chlorination usually won't give a stable long-term answer.

Important: Chlorine can suppress evidence. Diagnosis comes before long-term equipment choices.

Choosing a Water Filter to Remove Coliform Bacteria

Once contamination is confirmed, the conversation shifts from testing to protection. For homeowners, the two practical approaches are physical removal and disinfection. Good systems often use both.

Removal and inactivation

Ceramic microfiltration removes bacteria by physically straining them out. UV systems don't remove organisms from the water. They inactivate them by exposing the water to ultraviolet light. Each approach solves a different part of the problem.

Certified filtration systems can be highly effective. One recent lab result on a ceramic gravity filter showed total coliform dropping from over 23 MPN per 100 mL to less than 1.1 MPN per 100 mL, achieving over 99% removal, provided the source water had low turbidity, as described in this guide to filters that remove coliform bacteria.

What works best at home

A few practical rules hold up well:

  • Use sediment prefiltration when water isn't clear. UV and fine filtration both perform better when turbidity is low.
  • Match the system to the risk. A kitchen-only filter may help with drinking water, while a recurring source issue may justify a whole-house approach.
  • Plan for maintenance. Any bacterial control system is only as reliable as its upkeep.

If contamination may be tied to a sewage event, backup, or flooding, homeowners should also understand the broader cleanup picture. A service page on sewage cleanup costs in Tampa Bay gives a useful example of how messy and expensive contamination problems can become when water intrusion isn't handled early.

The right filter is the one that fits the actual pathway of contamination, the clarity of your water, and the level of protection your household needs every day.


If you're comparing home water treatment options after a coliform result, Water Filter Advisor is a practical place to start. It helps homeowners sort through filtration types, replacement needs, and real-world setup choices so you can move from a confusing test result to a water filtration plan that makes sense.

High Iron in Water: Your 2026 Home Filtration Guide

You turn on the kitchen tap, fill a white mug, and notice a yellow tint that wasn't there before. The sink has orange streaks around the drain. Fresh laundry comes out looking a little tired, and your coffee has that metallic edge you can't ignore. That's the moment most homeowners start searching for answers, and it's also where a lot of expensive mistakes begin.

High iron in water usually looks worse than it is. For most homes, it's a filtration and maintenance problem, not a crisis. The hard part isn't figuring out that iron is present. The hard part is figuring out which kind of iron you have, because that's what determines whether a softener helps, a filter works, or a brand-new system fails in a week.

The Rusty Truth About High Iron in Water

Orange stains on the toilet bowl, reddish rings in the tub, and metallic-tasting water all point to the same broad issue. Iron has made its way into your household water, and once it starts showing up, it affects more than appearance. It can foul fixtures, stain fabrics, leave residue in appliances, and make ordinary water feel unpleasant to use every day.

The first thing to know is that this usually isn't a major health alarm for healthy adults. According to the U.S. Environmental Protection Agency, the Secondary Maximum Contaminant Level for iron in drinking water is 0.3 mg/L, and that limit is based on staining, taste, and other aesthetic issues rather than health risks (EPA iron standard explained here). That's why homeowners often discover iron because of what they can see, smell, and scrub, not because they felt sick.

If you've already got rust-colored marks outside the house from sprinkler overspray or runoff, this practical guide on how to remove rust stains from concrete can help with cleanup while you solve the water issue at the source.

Practical rule: If the symptom is staining, taste, residue, or repeated fixture cleanup, start with water testing before you buy equipment.

A lot of homeowners jump straight to “best iron filter” searches. That sounds sensible, but “iron filter” is too broad to be useful. Some systems are built for dissolved iron that looks clear at first. Others handle visible rust particles. Some are defeated by tannins and organic iron even when the product box says “iron removal.”

That's where this gets practical. The goal isn't to buy the most powerful-looking system. The goal is to match the water chemistry to the right treatment path so the fix works the first time.

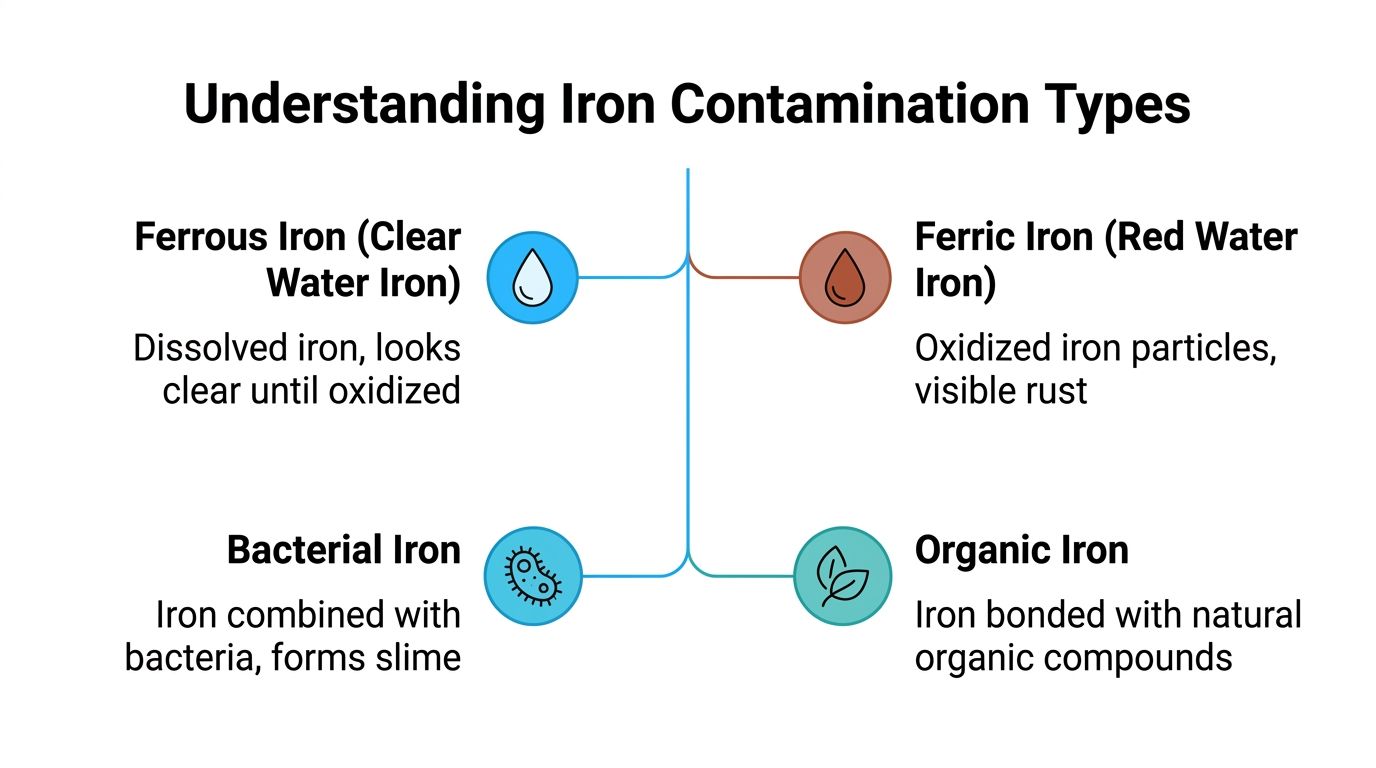
Understanding the Four Types of Iron Contamination

Most homeowners talk about iron as if it's one contaminant with one fix. It isn't. High iron in water can show up in four forms, and each behaves differently inside plumbing and filtration equipment.

A diagram illustrating the four common types of iron contamination in water, including ferrous, ferric, bacterial, and organic iron.

Ferrous iron

Think of ferrous iron as sugar dissolved in tea. You can't see it once it's mixed in, but it's there. Water with ferrous iron often comes out of the tap looking clear, then turns yellow, orange, or brown after it sits and meets air.

This is what many people call clear-water iron. It slips past basic sediment filters because it's dissolved, not solid.

Ferric iron

Ferric iron is the opposite. It's already oxidized and has turned into visible particles. If ferrous iron is dissolved sugar, ferric iron is sand in a glass of water.

You'll usually notice cloudiness, rust-colored water, or visible particulate staining. Ferric iron is often easier to understand because you can see it. It's also one reason some homes do well with sediment filtration or dedicated iron media when the contamination is mostly particulate.

Organic iron

Organic iron is where many home filtration plans go off the rails. This form is bonded with natural organic matter, often creating tea-colored or yellow-brown water that doesn't behave like ordinary rust.

It helps to think of it like a stain already mixed into the water. It doesn't always oxidize the way standard iron filters expect it to. That's why a homeowner installs a Birm or greensand unit, follows the instructions, and still gets discolored water. The equipment may not be broken. The water chemistry may be wrong for that technology.

Bacterial iron

Bacterial iron involves iron and microorganisms working together. Instead of just staining, this contamination can form slime inside pipes, tanks, and fixtures.

The warning signs are different:

  • Slimy buildup: You may find gel-like residue in toilet tanks or around filters.
  • Recurring fouling: Fixtures clog again soon after cleaning.
  • Persistent odor or film: The water may have a swampy or unpleasant character along with staining.

Iron bacteria complicate treatment because you're not just removing iron. You're also dealing with biofilm inside the plumbing system.

Why the type matters

Here's the practical takeaway. Two houses can both have “iron problems” and need completely different systems.

  • Ferrous iron: Often treated with softening or oxidation-based media, depending on level.
  • Ferric iron: Often treated with sediment removal or iron filtration.
  • Organic iron: Often needs chemical oxidation and a more specific approach.
  • Bacterial iron: Usually calls for disinfection plus filtration, not just a single tank.

If you don't identify the form first, you're guessing. In water treatment, guessing gets expensive fast.

How to Test for Iron and Read the Results

Starting with what's easy, many purchase test strips, dip one in a sample, and hope for a simple answer. Test strips can be useful as an early clue, but they rarely give enough information to choose a whole-house iron system with confidence.

A person testing discolored, potentially contaminated tap water with a chemical test strip in a glass.

What a basic test can miss

A strip may suggest iron is present, but it usually won't tell you the full story. It won't reliably sort out whether the problem is dissolved iron, oxidized iron, organic iron, or iron tied up with bacteria. It also won't give you the broader chemistry that affects filter performance.

That broader chemistry matters. pH, hardness, and tannins can decide whether a treatment method performs well or fails completely.

When iron concentrations rise above 0.3 ppm, the water is considered objectionable, often causing yellow, red, or brown discoloration and a strong metallic taste. Many wells have iron levels below 10 mg/L, so knowing your actual level is key to treatment (North Carolina iron guidance).

What to ask for in a proper water test

If you're shopping for a home filtration system, ask for a test that goes beyond “iron yes or no.” You want a report that helps you make a buying decision, not just confirm what your sink already told you.

Look for these items:

  • Iron level: This tells you how much contamination you're dealing with.
  • Iron form clues: Clear-water behavior, visible particles, or tea-colored water all point in different directions.
  • pH: Some iron filters depend on oxidation conditions that pH can affect.
  • Hardness: This helps determine whether a softener is even part of the conversation.
  • Tannins: This is the often-missed one, especially with yellow or tea-colored water.

If your water is discolored and a standard iron filter doesn't seem to make sense on paper, ask about tannins before you buy anything.

A good visual overview can help if you're trying to understand how field testing fits into the process:

How to read the result without overcomplicating it

Don't treat the lab sheet like a chemistry exam. Read it like a filter shopping guide.

If iron is above the aesthetic threshold, action makes sense. If the water stays clear in the glass and then turns rusty later, dissolved iron is likely involved. If the sample looks rusty right away, particulate iron is likely a bigger share of the problem. If the water looks tea-colored or yellow and common oxidation media has a poor track record in your area, organic iron and tannins move to the top of the suspect list.

That's the point where a homeowner stops buying hardware blindly and starts choosing equipment based on evidence.

Your Complete Guide to Home Iron Filtration Methods

There isn't one “best” iron filter for every house. There are only systems that match your water and systems that don't. The most useful way to compare them is by what type of iron they handle, how much complexity they add, and where they tend to disappoint.

The right treatment depends on the iron type: ferrous iron can be removed by a water softener if under 5 to 10 mg/L, but higher levels often require oxidation via manganese greensand filters. Organic iron and iron bacteria usually need more intensive treatment, typically chemical oxidation followed by filtration (iron treatment overview).

Iron filtration method comparison

Method Best For (Iron Type) Iron Capacity Key Advantage Key Disadvantage
Water softener Low-level ferrous iron Under 5 to 10 mg/L Can address hardness and mild dissolved iron together Not a good fit for tougher iron problems
Manganese greensand filter Ferrous iron after oxidation, moderate to higher iron loads Up to 10 to 15 mg/L in suitable applications Strong option for dedicated iron removal Can struggle when organic iron or tannins are present
Birm or similar oxidizing media Low to moderate dissolved iron in the right water chemistry Best for small amounts of iron Chemical-free operation appeals to many homeowners Water chemistry can make or break performance
Sediment or iron filter for ferric iron Ferric, particle-form iron Below 10 to 15 mg/L before stronger pretreatment is needed Straightforward for visible rust particles Won't solve dissolved iron by itself
Chemical oxidation plus filtration Organic iron, iron bacteria, mixed iron problems Suitable for severe or complex cases Handles difficult water and disinfects when needed More components, more maintenance
Aeration plus filtration Higher dissolved iron where oxidation is needed Used when simple media isn't enough Chemical-free oxidation route in some systems Not ideal for every flow pattern or water chemistry

Water softeners

A softener is often the first device homeowners ask about because it already has a place in many homes. That's fair. For mild ferrous iron, it can work.

The limitation is important. A softener is not a universal iron machine. It's most appropriate when dissolved iron is on the lower end and when hardness removal is already part of the plan. If the iron is heavier, mixed with other forms, or accompanied by staining that never lets up, a softener alone often turns into a maintenance burden.

Pros

  • Two jobs in one: It can soften hard water and reduce mild clear-water iron.
  • Familiar equipment: Plumbers and homeowners already understand the maintenance routine.
  • Good fit for mild issues: It makes sense when iron is present but not dominant.

Cons

  • Limited range: It isn't built for severe contamination.
  • Not for slime or tea-colored water: Organic iron and iron bacteria usually overwhelm this approach.
  • Resin fouling risk: Iron can load up the system and reduce performance over time.

For mild situations, this can be a smart move. For stubborn staining, it's often a detour.

Oxidizing media filters

This category includes systems built around media such as manganese greensand or Birm. These filters work by converting dissolved iron into particles and then trapping those particles in the media bed.

They're popular because they sound elegant. No one loves the idea of storing chemicals if a media tank can do the work. In the right water, they can be very effective. In the wrong water, they become a lesson in why pre-purchase testing matters.

A filter can be correctly installed and still be the wrong solution.

These units are usually strongest when the water contains the kind of dissolved iron that oxidizes predictably. They are much less forgiving when tannins or organic bonding interfere with oxidation.

Ferric iron filtration

If the water already carries visible rust particles, treatment can be more mechanical. Ferric iron is often handled with sediment filtration or a dedicated iron filter designed for particle removal.

This is the part many homeowners intuitively understand. If there are particles in the water, trap the particles. That logic works, but only if dissolved iron isn't also slipping through upstream.

A house with mixed iron forms may need more than one stage. Particle removal can clean up what's visible while oxidation or another pretreatment handles what you can't see yet.

Chemical oxidation systems

When iron gets more stubborn, chemistry usually enters the room. Chemical oxidation systems commonly use chlorine or hydrogen peroxide, then follow with filtration to remove the oxidized material. In the more difficult scenarios described in the verified guidance, the oxidant needs contact time before filtration can do its job.

This is often the right lane for:

  • Organic iron
  • Iron bacteria
  • Mixed iron and manganese problems
  • Repeated failure of standard media filters

If you're planning service work around your water entry point, shutoff location matters too. Homeowners doing broader plumbing upgrades often benefit from understanding expert guide to external stop taps, especially before adding tanks, bypass valves, or treatment loops.

Aeration systems

Aeration exposes water to air so dissolved iron oxidizes and can then be filtered out. It's attractive because it can reduce reliance on chemicals in some applications.

The trade-off is that aeration isn't magic. It still depends on the water being compatible with that oxidation path. If the contamination includes organic iron or tannins, air alone may not get you where you need to go.

How homeowners usually narrow the field

Start with the water result, not the equipment catalog.

  • Mostly mild ferrous iron plus hardness: A softener may be enough.
  • Moderate dissolved iron without complicating factors: Oxidizing media can make sense.
  • Visible rust particles: Sediment or ferric-focused filtration can be part of the solution.
  • Organic iron, tannins, or bacterial slime: Chemical oxidation plus filtration is usually the more dependable path.

If you want broader homeowner guidance on treatment choices and system upkeep, this water filtration advice library is a useful reference point while comparing options.

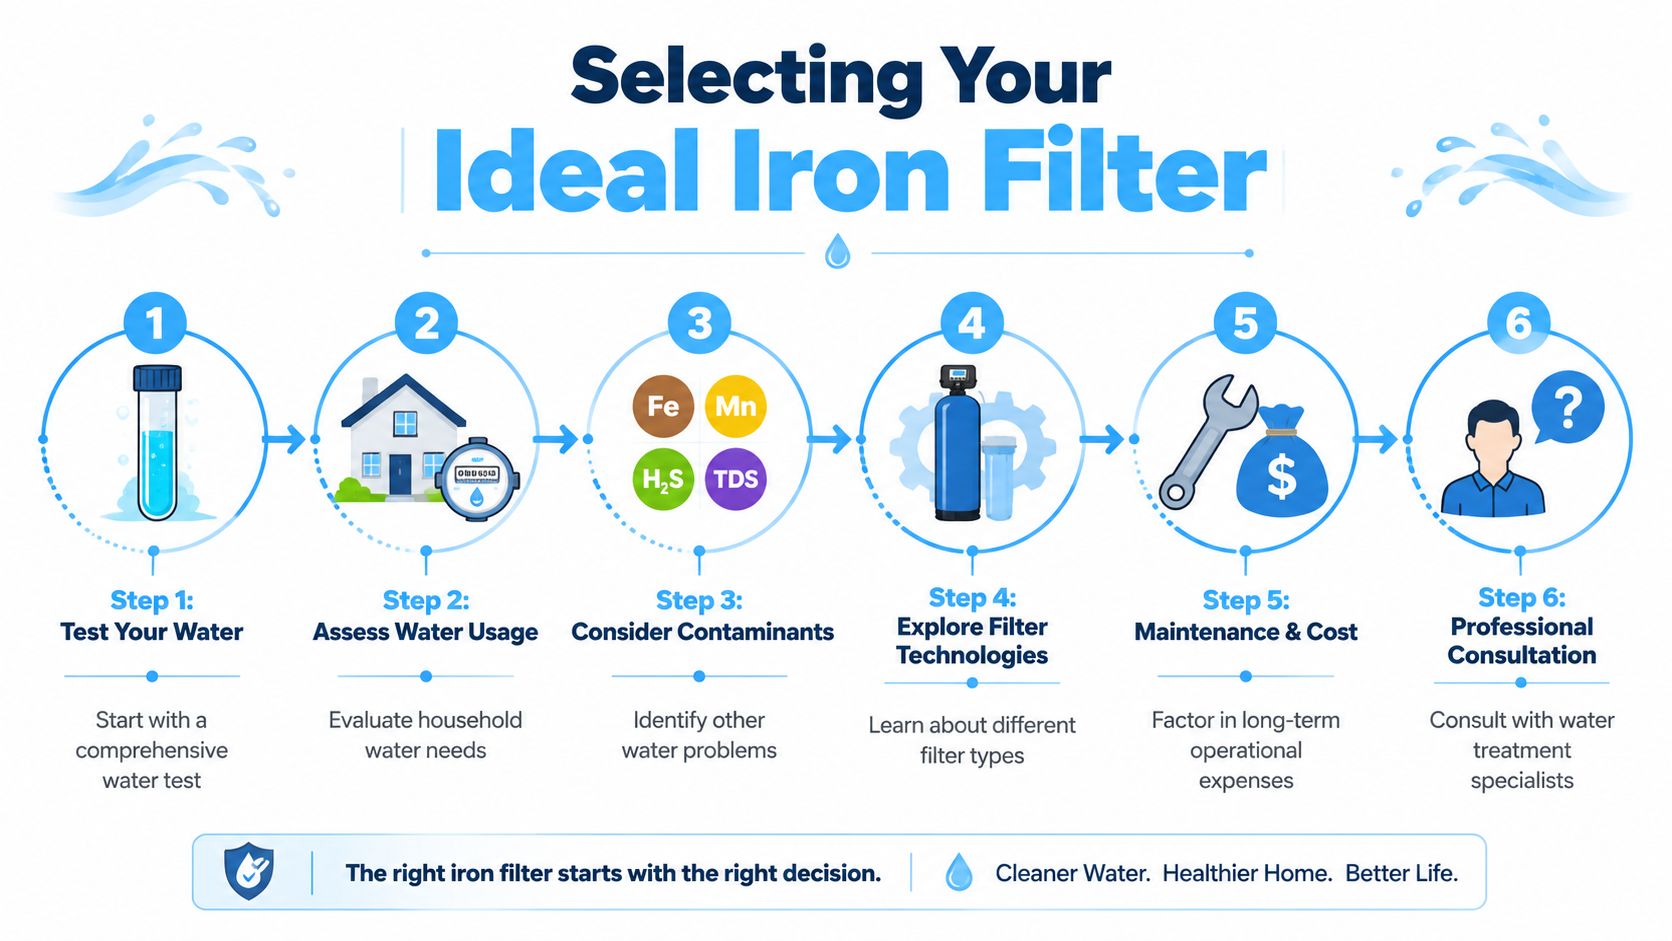
Choosing the Right Iron Filter System for Your Home

Buying the right iron filter isn't about finding the system with the biggest claims. It's about matching the system to your exact water profile. The homeowners who avoid buyer's remorse are the ones who work through the decision in order.

A six-step infographic guide for selecting an ideal water iron filter for your home.

If your iron is mild and dissolved

If the test points to ferrous iron and the level is still in the range where softening is appropriate, a water softener may be the practical answer. This is especially true when hard water is already annoying you with scale, soap performance, and spotty fixtures.

That's the simplest decision tree. Mild dissolved iron plus hardness often supports a simpler system.

If your water turns rusty after exposure

If the water looks clear at first and then oxidizes after sitting, an oxidation-based filter may fit. For such applications, many people compare greensand, Birm, and similar systems.

But this is also where the most common mistake happens.

A common cause of filter failure is the presence of organic iron and tannins, which prevent the oxidation process used by popular Birm or greensand filters. A water test for tannins is essential before purchase to determine whether advanced chemical oxidation or another method is required (Illinois iron fact sheet).

Don't buy an oxidation filter for yellow or tea-colored water until tannins have been ruled out.

That one step can save a homeowner from installing a perfectly respectable system that never clears the water.

If the water is tea-colored or filters keep “failing”

This is the red-flag scenario. If your water has a yellow-brown cast, looks like weak tea, or keeps defeating common iron filters, think beyond standard media tanks.

In many homes, that points toward organic iron, tannins, or both. At that stage, a stronger oxidation and filtration setup is often the safer investment than trying one more “chemical-free” unit and hoping for a different outcome.

If slime is part of the problem

Slime in toilet tanks, gelatinous residue, or recurring fouling suggests bacterial involvement. Once bacteria enter the picture, filtration alone is usually too narrow a solution.

You need treatment that addresses the biological component as well as the iron itself.

A simple selection framework

Use this checklist before you sign off on equipment:

  • Match the iron form first: Dissolved, particulate, organic, and bacterial problems don't belong in the same shopping basket.
  • Check for tannins: This is the step many homeowners skip, and it's one of the costliest mistakes.
  • Factor in flow needs: Whole-house treatment must keep up with showers, laundry, and fixtures running together.
  • Think about maintenance tolerance: Some people want low-touch equipment. Others don't mind refill and service routines if the results are dependable.

If you're curious how aeration concepts scale beyond the home, these aerobic units for industrial applications are a useful example of how retention and oxygen exposure become part of larger treatment designs. The home version is obviously much smaller, but the principle helps explain why contact time matters.

Estimating Costs and Planning for Maintenance

The biggest cost mistake with high iron in water isn't always overspending on equipment. It's buying the wrong category of equipment, then paying to service, replace, or supplement it when the water still stains.

Because systems vary so widely by plumbing layout, water chemistry, flow demand, and whether professional installation is needed, the smartest way to think about cost is by total ownership, not sticker price. A softener may look simpler at first, but if the water really needs oxidation and filtration, that “lower-cost” choice can become the expensive one.

What maintenance really looks like

Different systems ask different things from you:

  • Water softeners: Expect ongoing salt use and periodic attention if iron starts fouling the resin.
  • Oxidizing media filters: These need backwashing and eventually media service or replacement.
  • Chemical oxidation setups: You're taking on replenishment, contact time, and multiple components that need periodic checks.
  • Aeration systems: These can reduce chemical handling, but they still need cleaning and filter upkeep.

The severe end of the spectrum is less forgiving. For severe cases involving iron-eating bacteria in well water, the most reliable treatment involves chlorination, a retention tank for contact time, and a backwashing carbon filter to remove oxidized iron and residual chlorine (multi-stage bacterial iron treatment).

How to budget without guessing

Before you approve a system, ask these questions in plain language:

  1. What recurring supplies will I need?
  2. How often does this system need service or cleaning?
  3. What happens if my water chemistry changes seasonally?
  4. Does this setup treat the actual cause, or just the visible symptom?

The best iron system isn't the one with the fewest parts. It's the one you can maintain consistently and that actually matches the water.

High Iron in Water FAQs

Can city water have iron too?

Yes. Municipal water can still cause staining or metallic taste if iron is present in the supply or introduced through older plumbing infrastructure. Homeowners often associate iron with wells, but a city connection doesn't automatically rule it out.

Will a pitcher filter remove iron?

Usually, no. Pitcher filters are not a serious whole-house or high-iron solution. They don't have the treatment capacity or the right process for most dissolved, organic, or bacterial iron problems, and they won't protect fixtures, laundry, or appliances.

Why is my new iron filter not removing yellow water?

This is one of the most common complaints, and it often points to organic iron or tannins. Standard oxidation-based filters may be designed for more straightforward dissolved iron. If the water is tea-colored or stays yellow after treatment, the system may be mismatched to the water chemistry rather than defective.

Is a whole-house system better than point-of-use treatment?

For most iron problems, yes. Iron affects more than drinking water. It stains tubs, sinks, toilets, fabrics, and appliances. Whole-house treatment solves the problem where the water enters the home instead of trying to clean up after it fixture by fixture.

What's the first thing I should do if I suspect high iron in water?

Get the water tested with enough detail to identify the likely iron form and check for factors such as tannins, hardness, and pH. That single step saves more money than any coupon code or “top-rated” product roundup ever will.


If you're comparing treatment options and want neutral, homeowner-focused guidance, Water Filter Advisor is a solid place to start. It's built for people who want to understand what a filter does, what maintenance looks like, and how to choose a system that fits their water instead of buying on marketing alone.

Best Shower Head Filter Lowes Options: Your 2026 Guide

You're probably here because your shower feels backwards. You step in to get clean, then step out with tight skin, an itchy scalp, or hair that feels rough no matter what shampoo you buy. A lot of homeowners blame soap, weather, or age of the house first. Fair enough. But plenty of the irritation starts with the water hitting you every morning.

That's why the shower head filter aisle at Lowe's gets so much attention. It looks like an easy fix, and sometimes it is. The trouble is that the packaging often mixes real filtration with beauty promises, hard water claims, and a lot of shiny language that doesn't tell you what the filter removes.

I'm going to walk through this the way I would with a homeowner standing beside me in the store. We'll focus on what matters, skip the fluff, and sort out one big truth up front. A good shower filter can help a lot with chlorine and certain contaminants, but it won't magically solve every water problem in your house.

The Itchy Truth About Your Daily Shower

A common scene goes like this. You move into a new place, or your city changes something in the water, and suddenly your shower feels different. Your skin gets red around the neck or chest. Your hair color seems to fade faster. The bathroom smells faintly like a pool when the hot water kicks on.

That's usually the moment people start searching for the best shower head filter Lowes carries. They're not looking for a science project. They want the shower to stop feeling harsh.

I've seen homeowners stand in front of that display wall and grab the first box that says “purifies,” “revitalizes,” or “spa quality.” Then they install it, wait a week, and wonder why the white scale is still on the glass and the water still feels hard. The wrong filter isn't always a bad product. It's often just the wrong tool for the job.

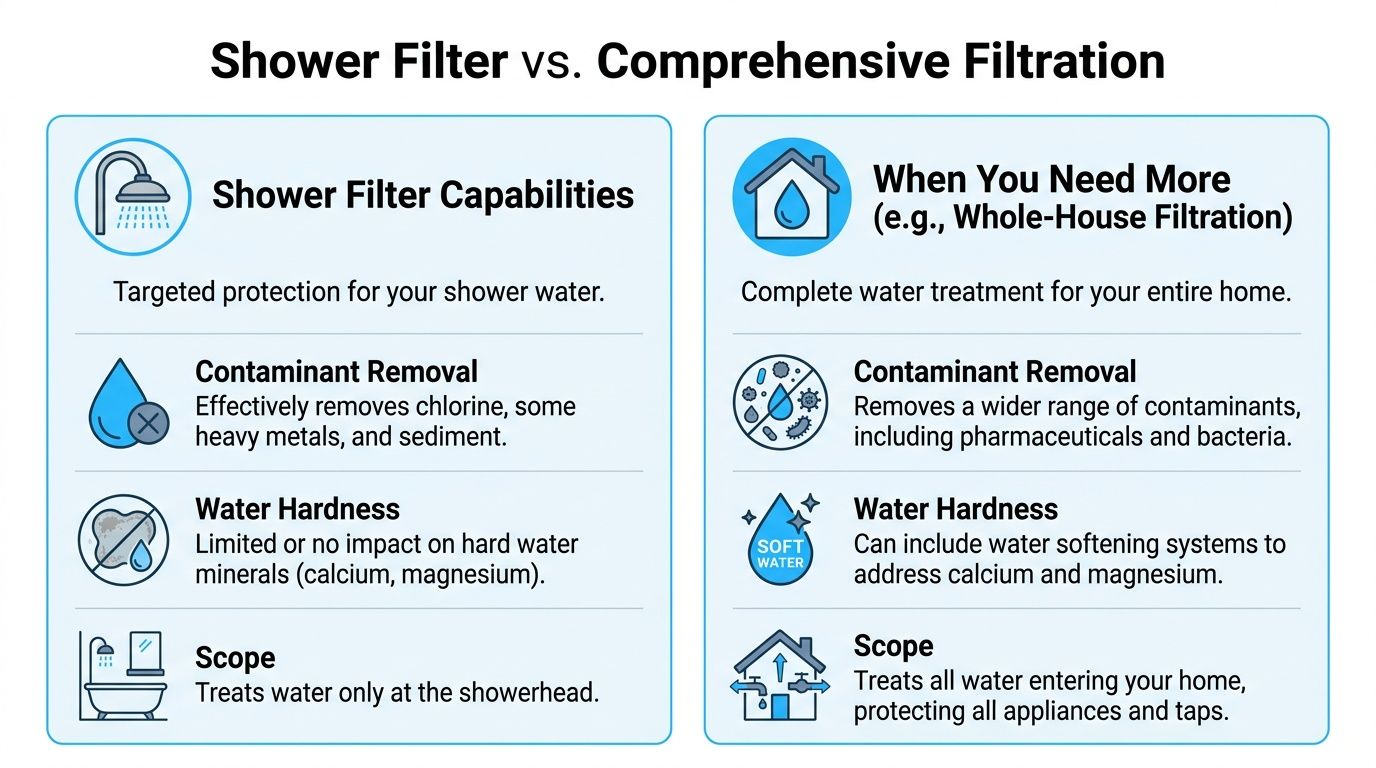
Practical rule: Buy a shower filter for contamination concerns, especially chlorine. Don't buy one expecting it to act like a whole-house softener.

The good news is that a shower filter is one of the easiest water upgrades you can make at home. It's compact, renter-friendly in many cases, and sold right where customers already shop for home fixes. The better news is that once you know what the labels mean, the aisle gets a lot less confusing.

A solid Lowe's shower filter choice usually comes down to a few simple things. What media is inside. Whether the performance is independently verified. How often you'll change the cartridge. And whether the unit keeps decent pressure while it filters.

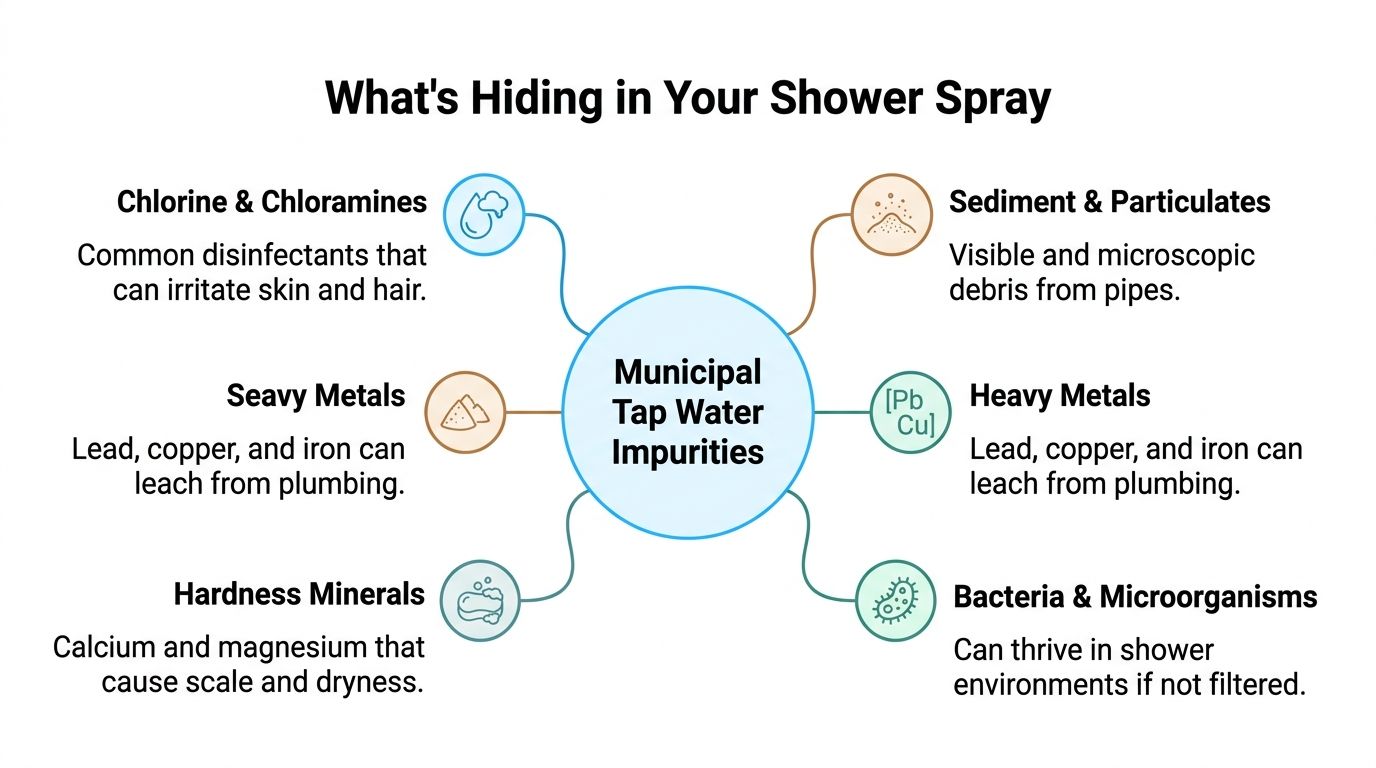
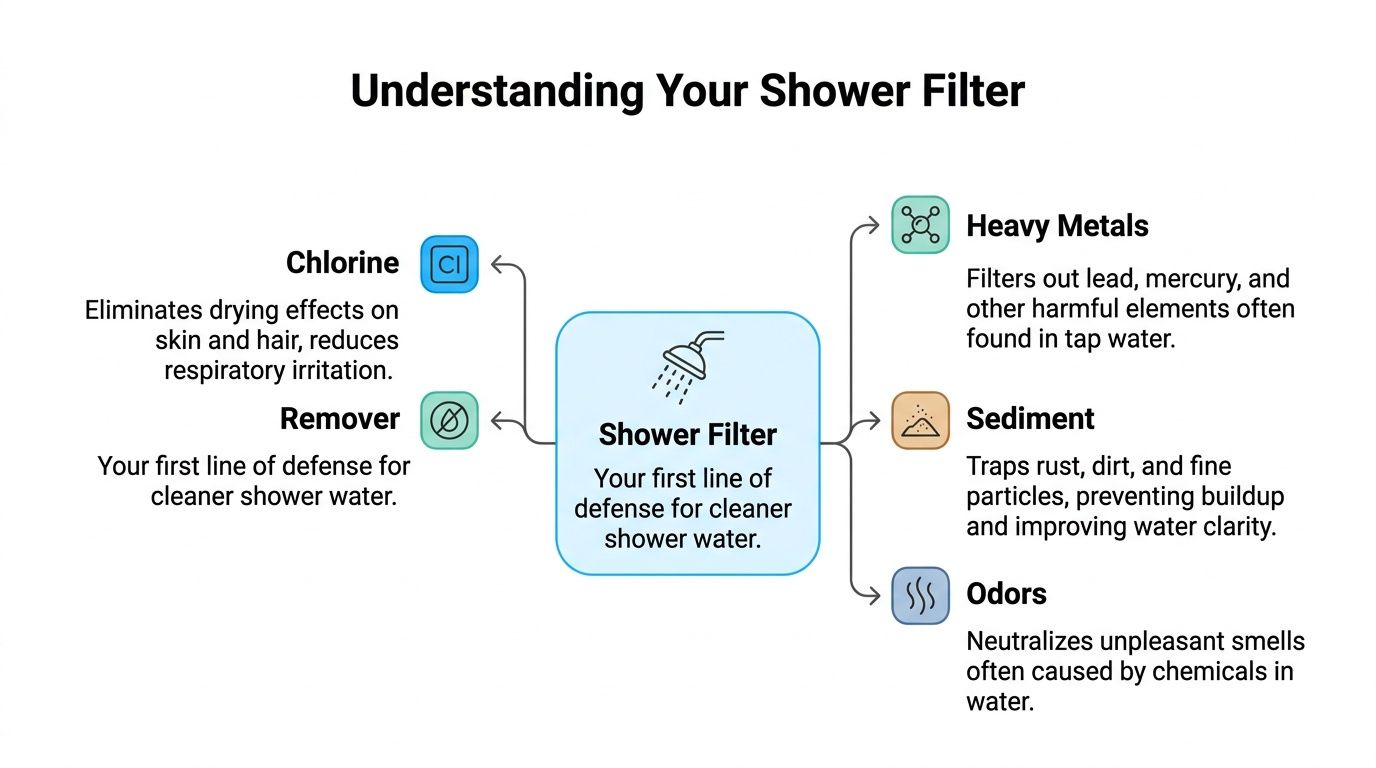
What's Hiding in Your Shower Spray

Clear water can still be rough on skin and hair. What comes out of the shower head often contains leftover disinfectants from municipal treatment, bits of sediment from pipes, and sometimes trace metals picked up on the way to your bathroom.

The chemical people notice first is usually chlorine. The U.S. Environmental Protection Agency sets a maximum residual disinfectant level of 4 milligrams per liter, or 4 parts per million, for chlorine in drinking water, which gives you a realistic sense of the range that can still be present at the tap before that water ever reaches your shower. Hot water can make the smell stand out more, which is why some bathrooms get that light pool odor the second the shower warms up.

A diagram illustrating common impurities in municipal tap water found in shower sprays and their potential effects.

Chlorine and its chemical tagalongs

Chlorine is there for a good reason. It helps keep public water safe as it moves through the distribution system. But by the time that treated water hits your shower, the same disinfectant can leave some people with dry skin, a cranky scalp, or hair that feels stripped.

Color-treated hair often shows the problem first. Skin can follow. If you notice the smell gets stronger with heat, that is a practical clue that chlorine is part of what you are reacting to.

Chlorine can also react with natural organic matter in water and form disinfection byproducts such as total trihalomethanes, usually shortened to TTHMs. You will not see those on the front of most shower filter boxes. You may see vague promises like “purifies” or “spa quality” instead. That is why it helps to know the target before you shop.

More than one kind of shower problem

Sediment is a different issue. Tiny particles from older plumbing or disturbed water lines can make water feel a little gritty and can build up inside fixtures over time.

Metals are different again. In some homes, plumbing conditions can introduce concerns that call for media aimed at metal reduction, not just chlorine reduction.

And then there is hardness. Calcium and magnesium are the minerals behind scale on the glass, soap scum, and that stubborn “squeaky but not clean” feeling. Those minerals are not the same as chlorine, and shower filters are not built to solve them the same way.

Here's the plain-English version:

  • Chlorine and disinfection byproducts: Often tied to odor, dryness, and irritation concerns.
  • Sediment: Small particles that can affect feel and clog parts over time.
  • Heavy metals: A separate target that depends on the filter media inside.
  • Hardness minerals: The scale-and-soap problem, which is not the same thing as filtration for chlorine.

A shower filter does not need to remove every contaminant to be useful. It needs to match the problem you have.

That is the part Lowe's packaging often muddies. One box talks about cleaner water. Another promises softer-feeling hair. Another is loaded with mineral bead language that sounds impressive but tells you very little. Once you separate chlorine reduction from hard water treatment, the shelf starts to make a lot more sense.

Decoding Shower Filter Media at Lowe's

At the shelf, the box can make every filter sound like it solves everything. It does not. The cartridge inside decides what the filter is designed to reduce, and that is the part worth your attention.

A good way to read shower filter media is to ask one plain question: what problem is this ingredient supposed to address? If the answer is fuzzy, the marketing is doing more work than the filter.

Activated carbon

Activated carbon works like a sponge for certain chemicals, which is why it is commonly used for chlorine reduction in water filtration. The U.S. Environmental Protection Agency explains that activated carbon can adsorb contaminants from water, including chlorine and some compounds that affect taste and odor, in its overview of granular activated carbon treatment.

For a homeowner, the practical takeaway is simple. If your shower water smells like a pool, or your skin and hair feel stripped after rinsing, carbon is one of the first media names to look for. Carbon is often strongest when the product clearly states chlorine reduction instead of hiding behind vague phrases like cleaner water or spa experience.

KDF-55

KDF-55 is a copper-zinc media. It is commonly included to help reduce chlorine and some water-soluble heavy metals, especially in mixed-media shower filters. KDF, Inc. describes KDF 55 Process Media as a redox media used for chlorine reduction and for reducing soluble metals in water treatment applications on its KDF 55 product page.

Packaging can be misleading. Some boxes mention KDF as if the name alone proves performance. It does not. KDF can be useful, but you still want to know what the filter claims to reduce, how long the cartridge lasts, and whether any certification backs up those claims.

Calcium sulfite and similar media

You will also see calcium sulfite listed on some shower filters. This media is often used because shower water is hot, and some filter materials perform differently as temperature rises. Calcium sulfite is commonly marketed for chlorine reduction in shower conditions, which is why it appears in many shower-specific cartridges instead of whole-house style filters.

That does not make a cartridge with more layers automatically better.

A filter with six or eight media types can still be mediocre if the brand never explains what each layer does or provides no testing. A simpler cartridge with clear chlorine-reduction claims is often the smarter buy.

Shower Filter Media Comparison

Filter Media Primary Target Best For
Activated carbon Chlorine and some odor-causing compounds Homes where shower water smells chlorinated or leaves skin and hair feeling dry
KDF-55 Chlorine and some soluble metals Homes with older plumbing or buyers who want mixed-media filtration
Calcium sulfite Chlorine in hot shower water Buyers focused on shower-specific chlorine reduction

A few real product examples help separate shelf talk from useful detail. The High-Output HOC model uses patented Chlorgon® media and is engineered to achieve a free-chlorine removal rate of at least 75% under standard service conditions, with replacement required every 10,000 gallons or annually, whichever occurs first, according to the manufacturer's Lowe's use and care guide. The cartridge is also reversible, which can temporarily expose fresh media surfaces.

The lesson is not that one media name wins. The lesson is that media should match the job. If your goal is chlorine reduction, look for a filter that says so plainly, names the media, and gives you something more solid than a long list of beads, stones, and mystery minerals.

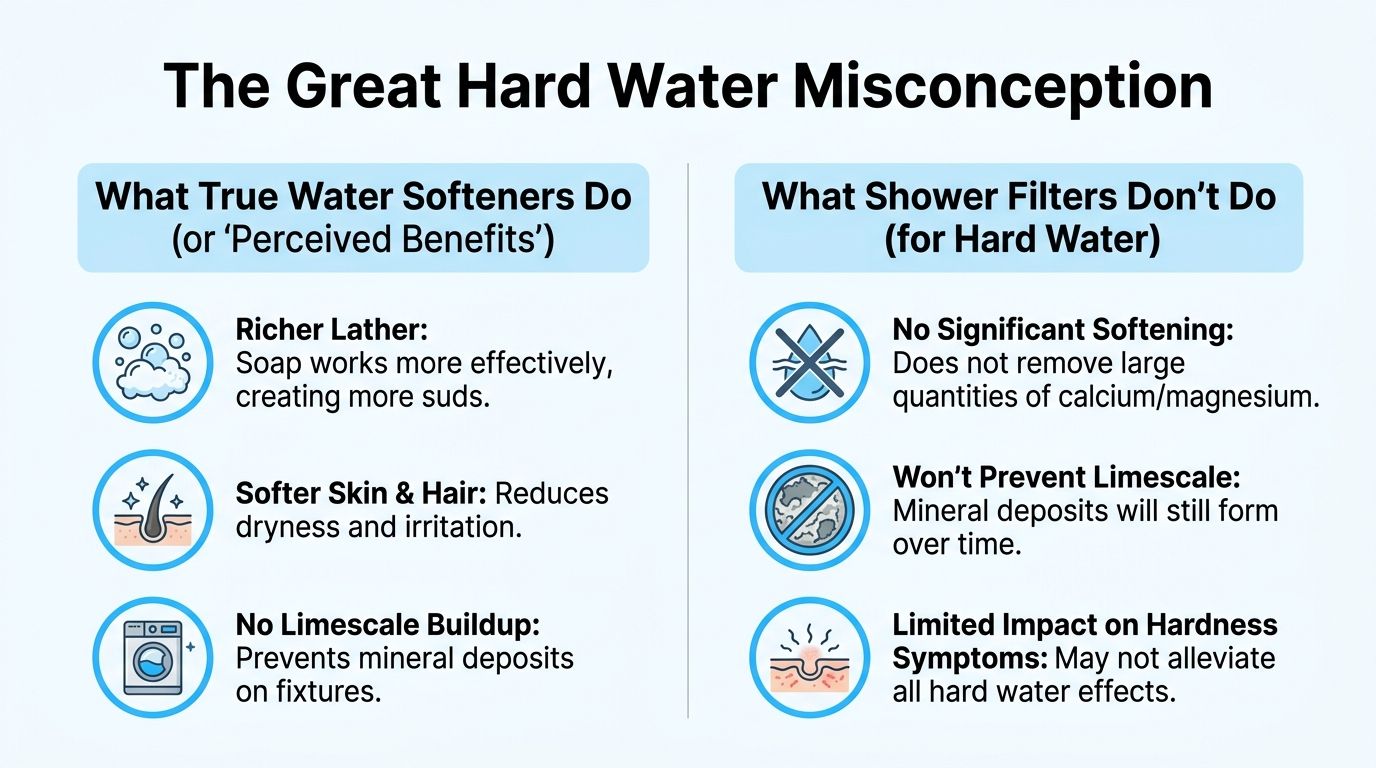
The Great Hard Water Misconception

This is the mistake I see more than any other. A homeowner points at a shower filter and says, “Good, this should soften my water.” Usually, no, it won't.

An infographic titled The Great Hard Water Misconception contrasting true water softeners with shower filters.

Filtration and softening are not the same job

A standard shower filter removes or reduces certain contaminants. A water softener uses ion exchange to remove hardness minerals like calcium and magnesium. Those are two different processes.

If scale keeps crusting around your shower door, faucet, and showerhead, that's a hardness issue. If soap won't lather well and you're constantly wiping white residue from fixtures, that's another hardness clue. A regular shower filter may improve the feel of the water by reducing chlorine, but it won't turn hard water into soft water.

Shower head filters are explicitly ineffective at removing dissolved minerals like calcium and magnesium, meaning they cannot soften water or prevent scale buildup. The only reliable solution for hard water is an ion exchange water softener according to this guide to shower head filter effectiveness.

Why so many people get fooled

A lot of product pages blur the line between “better for skin and hair” and “softened water.” Those are not identical claims. Sometimes a chlorine-reducing filter makes a shower feel gentler, and buyers interpret that as softening.

The confusion is widespread. Data from Reddit's HaircareScience community shows 68% of user queries confuse “softening” with “chlorine reduction” in this discussion about whether shower filters are a scam.

If your real goal is to stop limescale, a shower filter is the wrong purchase. If your goal is to cut chlorine exposure at the shower, it may be exactly the right one.

A smarter way to shop

When you're comparing a shower head filter at Lowe's, ask one question first. “Am I trying to remove chemicals, or am I trying to remove hardness minerals?” That answer will save you money and disappointment.

Use a shower filter when your concern is chlorine, odor, or certain contaminant reduction in the shower line. Use a water softener when your concern is calcium, magnesium, and scale throughout the home.

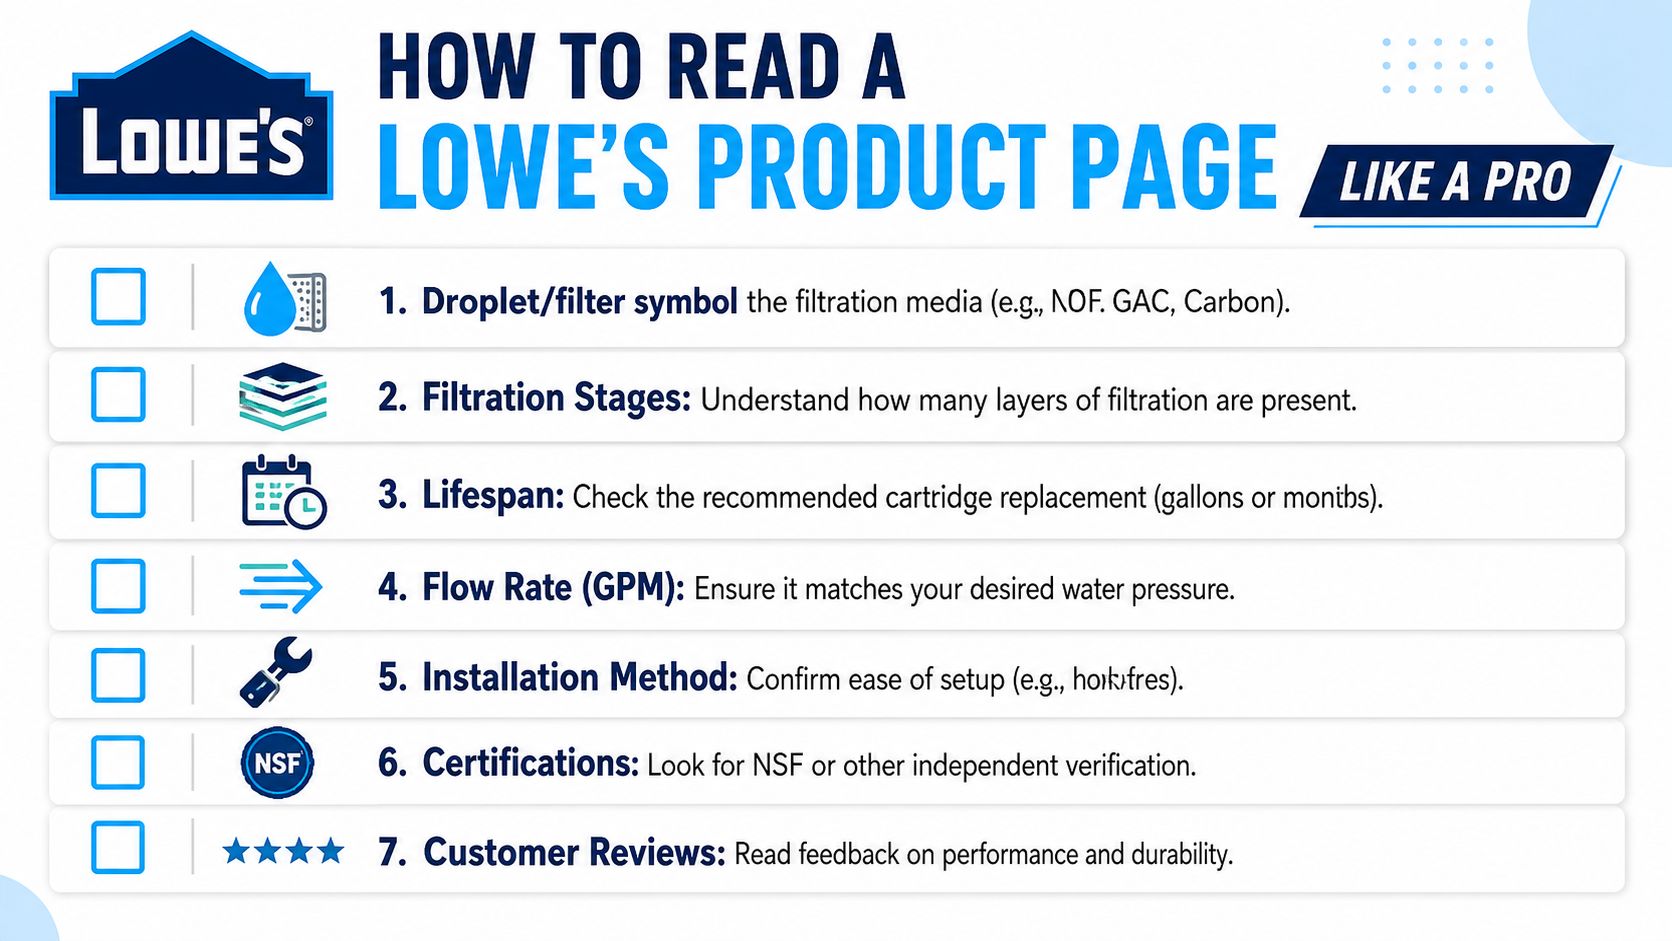
How to Read a Lowe's Product Page Like a Pro

You're standing in the Lowe's aisle, one box promises “spa-like skin,” another says “purifies,” and a third has a chrome finish that looks great under store lights. The useful product is usually the one making the fewest beauty promises and giving the clearest performance details.

An infographic showing seven key features to look for when selecting a water filter at Lowe's.

Start with the spec sheet, not the lifestyle photos.

Look for proof of chlorine reduction

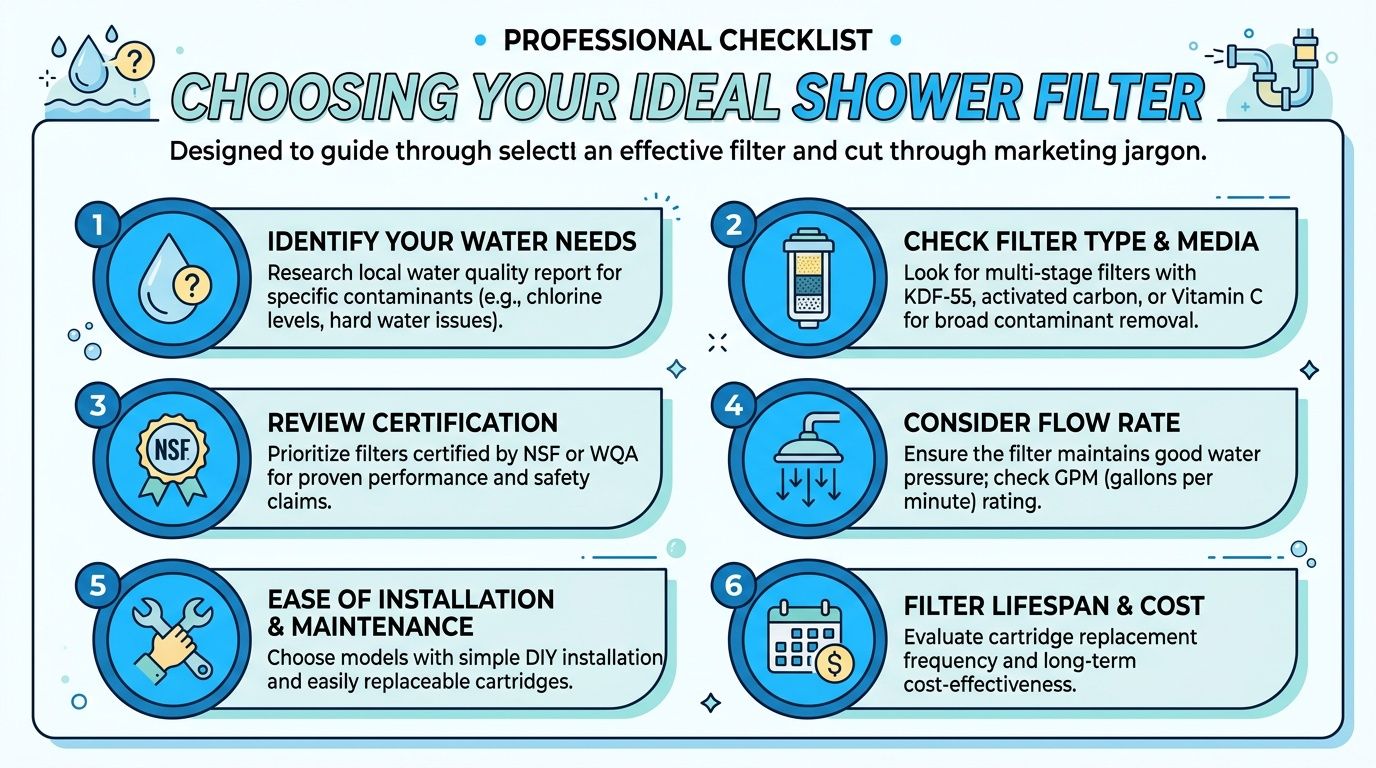
The first thing I'd scan for is NSF/ANSI 177. That standard is used for shower filtration products that reduce free available chlorine. If a Lowe's page clearly shows certification, you have something objective to work with. If it only says “improves hair and skin,” you're reading marketing, not performance.

Wirecutter's review of showerhead filters points buyers toward certification and independently verified results for the same reason plumbers do. Claims are cheap. Testing is harder to fake.

Then read the replacement schedule

A shower filter works a lot like a furnace filter. It does its job for a set period, then performance drops and the cartridge needs to be replaced. Lowe's product pages usually list that in the specifications, installation guide, or Q&A section.

Many shower filters need fresh media every few months, while some are rated for a longer service life. The exact timeline varies by water quality and household use, so the smart move is to compare replacement intervals before you compare finishes. If you want more help sorting through those details, this library of water filtration buying advice is a useful companion while you shop.

Check flow rate so the shower still feels good

Flow rate tells you how the shower will feel on Monday morning when you're half awake and just want decent pressure. Federal rules cap most showerheads at 2.5 gallons per minute, and the U.S. Department of Energy explains that limit in its guidance on water-saving fixtures. A filtered unit can sit under that cap and still feel fine, but a lower number may feel softer depending on your home's pressure.

One Lowe's example is the Sprite Model SLC, which lists a rated service flow of 1.75 gallons per minute and a cartridge life of 10,000 gallons or 6 months, according to the product document for the Sprite SLC.

That's the kind of detail you want. A real number beats a vague phrase like “high output.”

Read the page in this order

If I were walking you through a Lowe's listing, I'd check these five spots first:

  • Certification: Is NSF/ANSI 177 shown clearly?
  • Contaminant claim: Does the page specifically mention chlorine reduction, or is it using fuzzy language?
  • Filter media: Does it name the media, such as carbon or KDF?
  • Cartridge life: How often will you need to replace it?
  • Flow rate: Will the shower feel strong enough for you?

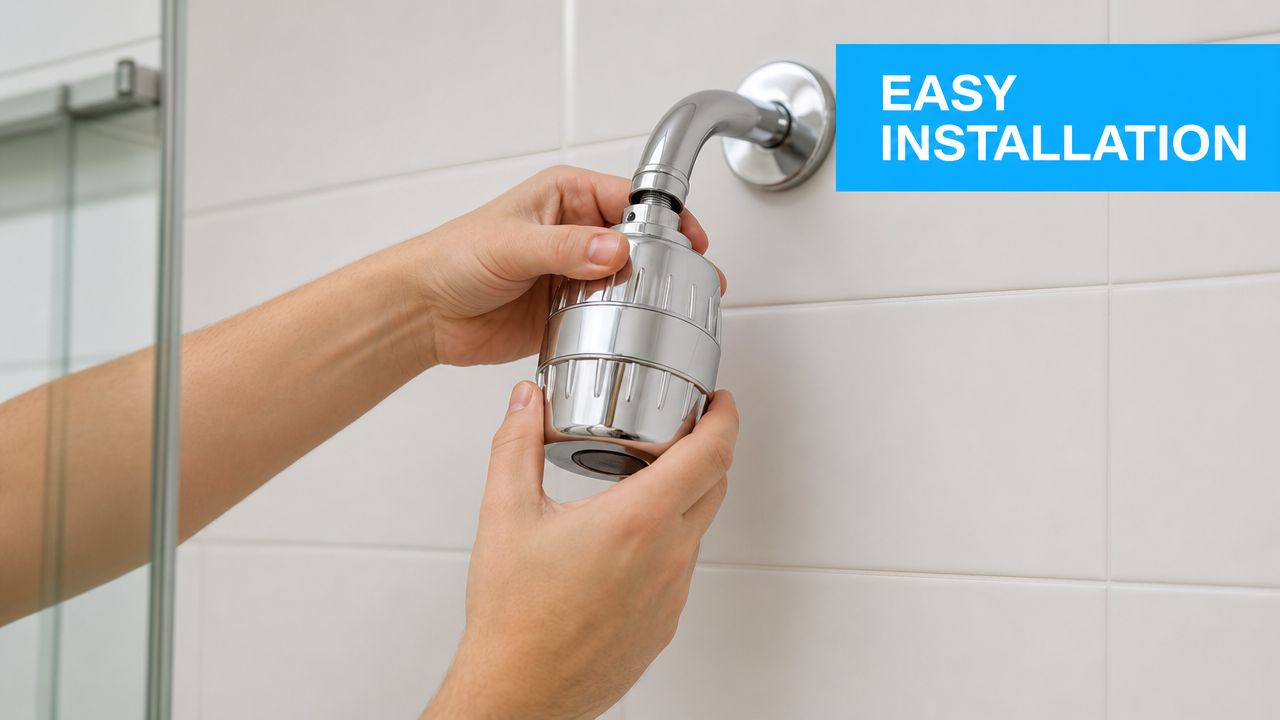
Included parts matter too, but they're lower on the list. Tape and adapters are nice. Verified performance matters more.

One more practical habit helps here. Homeowners who already keep up with basic fixture maintenance usually have an easier time spotting product-page fluff from useful specs. These plumbing tips for Florida homeowners are a good example of that mindset. Pay attention to how things perform, not just how they're advertised.

Shopping shortcut: If the product page talks a lot about glow, softness, and luxury but says little about certification, media, flow rate, or cartridge life, put it back on the shelf.

The goal is simple. Buy the filter with the clearest evidence that it reduces chlorine, fits your shower setup, and has replacement intervals you'll keep up with. That's how you separate a useful shower filter from an expensive chrome accessory.

Effortless Installation and Upkeep

A shower filter is one of the few bathroom upgrades that usually does not turn into a Saturday-long project. In many cases, you are just swapping parts at the shower arm, much like changing a showerhead.

A pair of hands installing a chrome shower head filter onto a bathroom shower arm pipe.

The basic install

Start with the showerhead you already have. Unscrew it from the shower arm, peel off any old thread tape, and wipe the threads clean. A dirty or taped-over thread is a common reason a new filter drips on day one.

Next, wrap fresh plumber's tape around the threads and attach the filter housing or the filtered showerhead, depending on the style you bought. Hand-tighten first, then test with the water on. If you see a slow drip, snug it a little more. You do not need to muscle it down like a pipe fitting in a basement.

Older bathrooms deserve a quick once-over while you are there. Corroded threads, a loose shower arm, or mineral crust around the connection can cause trouble that has nothing to do with the filter itself. A simple reminder list like these plumbing tips for Florida homeowners helps homeowners catch those small problems before they turn into leaks behind the wall.

Maintenance is where the filter proves itself

Installation takes minutes. Upkeep is what decides whether the filter keeps reducing chlorine or just hangs there looking polished.

The main job is replacing the cartridge on schedule. Lowe's carries models with different replacement intervals, and that timing matters more than fancy packaging. For example, some filtered showerheads sold at Lowe's include replacement instructions right in the product literature and call for periodic cartridge changes plus simple seal checks to prevent leaks. That is the part many homeowners skip.

A shower filter works a lot like a refrigerator water filter. It does useful work for a set period, then performance drops off. If your shower starts smelling more like pool water again, or the flow changes after months of use, check the cartridge age before blaming the whole unit.

A quick visual walkthrough can make the process feel even simpler:

Simple habits that prevent leaks and forgotten cartridges

You do not need a complicated routine. You need one you will follow.

  • Set a phone reminder: Use the replacement interval printed for your model and create a calendar alert the day you install it.
  • Keep a spare cartridge nearby: A filter waiting three extra months for an online order is not helping your shower.
  • Check the washer or O-ring during cartridge changes: A dirty or twisted seal causes plenty of “bad filter” complaints.
  • Rinse off visible buildup at the connections: Mineral crust can interfere with a good seal, especially in homes with hard water.
  • Save the instruction sheet: It usually shows the cartridge direction, seal placement, and any flushing steps after installation.

If you want help comparing replacement schedules, filter styles, and maintenance basics without getting lost in brand claims, this collection of water filtration advice for homeowners is a practical place to start.

Your Final Checklist for Cleaner Showers

When you're standing in front of the Lowe's shelf, don't try to decode every promise on every box. Narrow the decision down to a few points and the right choice usually becomes obvious.

The phone-note version

  • Know your goal: If you want less chlorine in the shower, a shower filter makes sense. If you want softer water and less scale, you need a softener instead.
  • Look for proof: NSF/ANSI 177 is the mark worth hunting for when chlorine reduction matters.
  • Check the cartridge life: A filter you forget to replace won't help you for long.
  • Read the media list: Carbon, KDF-55, and similar media each have a job. Match the media to your concern.
  • Watch the flow rate: Filtration shouldn't turn your shower into a drizzle.
  • Don't overpay for vague claims: If the package talks a lot about luxury and not much about verification, move on.

The best shower head filter Lowes shoppers can buy usually isn't the one with the loudest packaging. It's the one with the clearest filtration story.

A good shower filter won't solve every water issue in the house. But if chlorine is the thing making your daily shower feel rough, the right model can make the bathroom feel a lot more comfortable, fast.


If you want help comparing filter types, understanding certifications, or figuring out what kind of water treatment fits your home, Water Filter Advisor is a useful place to keep researching before you buy.

Shower Head Filter Benefits: Softer Skin & Hair

You shower, towel off, and instead of feeling clean, your skin feels tight. Your scalp itches by lunchtime. Your hair looks rough even though you used the same shampoo that worked fine somewhere else. Most homeowners call that “hard water” and stop there.

Sometimes that guess is right. Often, it's incomplete.

A lot of people are standing under municipal water every day without realizing that chlorine is part of the shower experience. It's added to public water for safety, but once that hot water hits your skin and hair, it can be a different story. That's where shower filters become useful. Not magical. Not a cure-all. But useful in a very specific, targeted way.

That Hard Water Feeling Might Just Be Chlorine

You step out of the shower and your skin feels tight before you even reach for the towel. Your hair dries flat, your scalp gets itchy, and the bathroom carries a faint pool smell. In plenty of city-water homes, that gets blamed on hard water by default.

Sometimes the better first suspect is chlorine at the showerhead.

That distinction matters because chlorine and hardness create different problems, and shower filters are built to handle one far better than the other. Municipal systems use chlorine for a good reason. It helps keep water safe as it travels through the distribution system. But once that heated water is hitting your skin and hair every day, the same disinfectant can feel harsh.

The clue many homeowners miss

Look at the symptoms and the bathroom itself. If you have dryness, a stripped feeling after showering, fading hair color, or a chemical smell, but you do not see much white scale on fixtures or stubborn soap scum, chlorine is a strong possibility.

That is a very different pattern from classic hard water.

The U.S. Environmental Protection Agency explains that chlorine is commonly used to disinfect drinking water in public systems, which is why it is so often part of the shower experience in municipal homes, as outlined in the EPA's overview of drinking water disinfection. A shower filter targets that point-of-use exposure. It is a focused fix for a focused problem.

Practical rule: If the shower smells chemical and your skin feels stripped, start with chlorine as the likely irritant before assuming you need a water softener.

Why hot showers tend to make it more noticeable

Heat changes the feel of the shower, even if it does not turn the water into a different category of problem. Long, hot showers tend to leave skin and hair more stressed, so chlorine exposure stands out more. Homeowners usually describe it as that squeaky, over-cleansed feeling that shows up right after rinsing.

I see this confusion all the time. People assume any uncomfortable shower must be hard water, then buy the wrong solution first.

A shower filter can help if chlorine is the trigger. It will not solve mineral hardness, and it will not stop scale from building up through the rest of the plumbing. But if the main complaint is chemical harshness at the point of contact, a filter is aimed at the right target.

What a shower filter changes

A shower filter does not rebuild your water system or treat every tap in the house. It changes the water that reaches your body during one of the highest-contact uses in the home.

Used in the right situation, that is the main benefit. Less chlorine exposure at the shower can mean a more comfortable rinse, fewer complaints about odor, and a clearer explanation for why the water feels bad in the first place. That is a better starting point than lumping every shower problem under “hard water” and hoping one product solves all of it.

Unpacking the Skin and Hair Glow-Up

A common shower complaint sounds cosmetic at first. Skin feels tight after rinsing. Hair turns rough, flat, or harder to manage. Homeowners often blame hard water right away, but in many bathrooms the bigger day-to-day trigger is chlorine touching skin and hair over and over.

That distinction matters because the fix changes with the cause. A shower filter can reduce chlorine exposure at the point of use. It does not soften water, and it does not solve every reason skin or hair may feel off.

What happens on skin

Skin relies on natural oils and a stable barrier to stay comfortable. Chlorinated water can leave that barrier feeling stripped, especially after hot showers or longer rinse times. People with dry, reactive, or eczema-prone skin usually notice this fastest.

Some shower filters are tested for chlorine reduction under shower conditions, including products covered by NSF/ANSI 177 shower filtration guidance from IAPMO R&T. In practice, lower chlorine at the showerhead often means less post-shower tightness, less itching, and less of that over-cleansed feel.

The key point is simple. Filters do not add moisture to skin. They reduce one source of irritation.

For homeowners trying to sort out whether they need a filter, softener, or something more targeted, this water treatment advice guide is a useful starting point.

What happens on hair

Hair shows the same pattern. Chlorine can leave it feeling drier and less smooth, and color-treated hair often loses that freshly-done feel faster under heavily chlorinated water. People usually describe the change in practical terms. More tangling. Less shine. More frizz. A rougher feel at the ends.

A filter helps by cutting down contact with the disinfectant itself. That can make hair easier to rinse, comb, and manage. It can also help preserve the look of dyed hair, though it will not undo damage that is already there.

Why people notice the change quickly

Showering is a repeated exposure. If chlorine is the irritant, reducing it can produce a noticeable difference within a fairly short stretch of time because you are removing the same stressor from a daily routine.

Homeowners usually report a few specific changes:

  • Softer-feeling skin after rinsing: Less tightness and less of the squeaky, stripped feeling.
  • A calmer scalp: Less itchiness for people who react to chlorinated water.
  • Improved hair feel: Hair may feel smoother, less brittle, and easier to detangle.
  • Better color retention at the shower: Useful for anyone paying to maintain salon color.

What this benefit does not mean

However, much marketing often takes a wrong turn. A shower filter does not treat acne, cure eczema, or replace good skin and hair care. It removes or reduces selected shower contaminants, mainly chlorine, that can make existing dryness or sensitivity worse.

That is the value. Better comfort, fewer irritant complaints, and a clearer understanding of what the filter can and cannot do.

What Contaminants Shower Filters Actually Remove

A shower filter works best when you understand what's inside it. Most of the meaningful performance comes from the filtration media, not the chrome finish, the number of “stages” printed on the box, or the luxury branding.

An infographic showing the key benefits of using a shower head filter for cleaner water quality.

KDF and calcium sulfite do the heavy lifting

Two materials show up repeatedly in better shower filters: KDF copper-zinc media and calcium sulfite. These aren't there for decoration. They target chlorine by changing it chemically rather than trapping it like dirt in a screen.

Shower head filters using KDF copper-zinc media and calcium sulfite achieve up to 96–99% chlorine reduction by electrochemically converting chlorine into harmless chloride ions. Laboratory testing also shows that filters certified under NSF/ANSI 177 eliminate 100% of detected chlorine and associated disinfection byproducts like chloroform, according to Pentair's explanation of NSF 177 chlorine reduction performance.

That's why the better filters don't just “screen out” chlorine. They neutralize it.

Carbon and other media play support roles

Many shower filters also use carbon-based media. Think of carbon as a chemical sponge. It can help with odor and with some organic compounds. In multi-stage designs, it often supports the main chlorine-reduction media rather than replacing it.

Other stages may help with:

  • Chloramines: Important in some municipal systems.
  • VOCs and odors: Useful when shower water smells chemical.
  • Trace heavy metals: Some filters are designed to reduce them at the point of use.
  • Sediment: Helpful for rust or fine particles from aging plumbing.

If you want a grounded way to compare media types and claims, Water Filter Advisor's water filtration advice library is a solid place to sort out the basics before buying.

Under the hood matters more than the marketing

A box that says “15-stage” or “20-stage” doesn't automatically outperform a simpler design with proven media. Stage counts are easy to advertise. Media quality and certification are harder to fake.

Here's the practical hierarchy I use when evaluating a shower filter:

What to check Why it matters
KDF or calcium sulfite These are proven chlorine-targeting media
NSF/ANSI 177 certification Shows verified chlorine reduction claims
Sediment prefiltration Helps protect media and improve water clarity
Clear replacement schedule Tells you the brand expects the unit to be maintained

A shower filter is a chemistry device disguised as bathroom hardware. Buy it for the media, not the finish.

Know the Limits When You Need More Than a Shower Filter

The fastest way to waste money on water treatment is to buy a shower filter when you need a water softener. This confusion is everywhere, and it leads to bad reviews from people who bought the wrong tool for the wrong job.

A comparison chart showing differences between a specific shower head filter and whole-house comprehensive water filtration systems.

Filtration is not softening

A shower filter is built to reduce contaminants like chlorine and chloramine. It is not built to remove dissolved hardness minerals from the water stream. Those minerals are mainly calcium and magnesium, and they cause the classic hard-water problems homeowners recognize in the bathroom and throughout the house.

Shower filters effectively remove chlorine and chloramine but do not address water hardness caused by dissolved calcium and magnesium minerals. For households with hard water, an ion-exchange water softener is the only reliable solution, according to The Water Professor's guide to shower filter effectiveness and hard water limits.

That's the dividing line. If your shower leaves scale on tile, soap won't lather well, or your fixtures develop crusty mineral buildup, a shower filter won't fix the root problem.

Signs you need more than point-of-use filtration

A simple self-check helps:

  • White scale on faucets and glass: That points to hardness minerals.
  • Soap scum everywhere: Also a hardness clue.
  • Laundry and dishes affected too: A whole-house issue, not just a shower issue.
  • Dry skin with chemical smell but little scale: More likely a chlorine-focused problem.

Those distinctions matter because homeowners often expect a shower filter to do both jobs. It won't.

Where a shower filter still fits

Even in a hard-water home, a shower filter can still be worthwhile if chlorine is part of the irritation. It just shouldn't be mistaken for complete treatment. Some homes need a softener for hardness and a separate filtration strategy for chemical contaminants.

Bathroom hygiene also matters once you improve the water itself. If you share facilities or use communal showers at a gym, these actionable tips for shower cleanliness add a practical layer of protection that filtration alone can't provide.

If your problem is mineral hardness, a shower filter can be helpful around the edges. It won't solve the center of the problem.

Will a Filter Ruin Your Water Pressure

This is the practical fear that stops a lot of homeowners from buying one. Nobody wants cleaner water if the shower turns into a weak dribble.

A person tests the water pressure from a handheld shower head in a tiled bathroom.

Some pressure loss is possible, but design matters

Any filter creates some resistance because water has to move through media. The question isn't whether there's resistance. The question is whether the unit is engineered well enough that you won't feel it much in daily use.

Non-certified models can cause a flow-rate reduction of up to 15%, at about 32.3 seconds per gallon versus a 27.5-second baseline, while NSF 177-certified units are designed to maintain flow efficiency while achieving over 95% chlorine removal, according to Cascada's comparison of certified and non-certified filtered shower heads.

That's the trade-off in plain terms. Cheap filter designs may slow the shower noticeably. Better-certified designs aim to preserve the experience while still doing useful filtration.

Why some filters feel worse than others

Three things usually affect performance:

  1. Media density
    A tightly packed cartridge can slow water more than a balanced design.

  2. Cartridge age
    A tired cartridge often performs worse than a fresh one.

  3. Base home pressure
    If your house already has weak pressure, any added restriction will be more noticeable.

A lot of complaints blamed on “all shower filters” are really complaints about poor product design or overdue cartridge changes.

Here's a useful visual explainer on what to look for in a practical setup:

How to avoid a disappointing shower

If strong spray matters to you, prioritize certified units and read product details carefully. Don't chase oversized claims about dozens of stages. Look for proof that the filter balances chlorine reduction with flow.

A well-made shower filter should feel like a normal shower with cleaner water. If it feels like a garden hose running out of patience, the design is probably the problem.

Keeping Your Water Pure with Proper Maintenance

A shower filter only works when the cartridge still has life left in it. After that, it's just a bulky attachment on your shower arm.

That's the part many homeowners underestimate. They focus on installation and forget that the cartridge is a consumable.

Replacement is not optional

Shower filters typically require replacement every 3 to 6 months to maintain effective chlorine removal because their filtration media degrade under continuous use. If you ignore that schedule, performance drops and the expected benefits fade with it, according to Culligan's overview of shower filter replacement timing.

That schedule isn't a suggestion from marketers trying to sell more cartridges. It reflects the finite capacity of the media inside the unit.

Maintenance reality: A shower filter past its service life usually doesn't fail dramatically. It just stops helping much.

What overdue maintenance looks like

Homeowners often miss the signs because nothing visibly “breaks.” The water still flows, so they assume the filter still works. But once the media are spent, chlorine reduction falls off.

Watch for these clues:

  • The old symptoms return: Skin feels tighter again, hair gets rougher, or the water smells more chemical.
  • Flow starts to change: Some cartridges clog or compact as they age.
  • You can't remember the install date: That alone is enough reason to check.

A smarter way to own one

The easiest way to get real shower head filter benefits is boring but effective:

  • Mark the install date: A small note under the sink works.
  • Buy replacement cartridges early: Don't wait until the old one is obviously overdue.
  • Factor ownership cost into the purchase: Cheap units can become expensive if cartridges are hard to find or replaced often.

A shower filter is a maintenance product, not a one-time upgrade. If you're willing to replace the cartridge on schedule, it can do its job well. If you want something you never have to think about, a shower filter isn't that kind of device.

How to Choose a Shower Filter That Actually Works

You step into a hot shower expecting relief, and within minutes your skin feels tight and your hair starts acting like straw again. That is the moment to ignore the packaging and look at what the filter is built to do.

A professional checklist infographic detailing six key steps for choosing the best shower head water filter.

A good buying decision starts with the water problem, not the brand. If chlorine or chloramine is the main irritant, a shower filter can help. If the underlying issue is hard water scale, soap scum, and mineral buildup, a shower filter usually will not solve it. That is where homeowners get disappointed. They buy a filter for the wrong job, then assume all shower filters are useless.

Start with proof, not promises

The fastest way to sort serious products from marketing fluff is to look for independent testing. Certification matters because shower filter brands love broad claims about cleaner water, better skin, and healthier hair, but those claims are only as good as the testing behind them.

For chlorine reduction, NSF/ANSI 177 is one of the more relevant standards to look for. If a brand does not show certification, test data, or a clear performance claim, treat it cautiously. Some uncertified filters still use decent media and can reduce chlorine. The problem is that you are being asked to trust the label.

Use this buying checklist

A practical evaluation process is simple:

  • Match the filter to the problem
    Buy for chlorine, odor, or sediment concerns. Do not expect meaningful softening from a standard shower filter.

  • Check the filter media
    KDF and calcium sulfite are common for chlorine reduction. Media type matters more than a long “stage count.”

  • Look for relevant certification or test results
    Independent verification carries more weight than skincare claims or before-and-after photos.

  • Read the replacement schedule closely
    A brand should tell you how long the cartridge lasts and under what conditions. Vague language is a warning sign.

  • Check flow rate and fitting type
    The filter needs to fit your setup and maintain a shower you will still want to use every day.

Ignore the flashy distractions

Stage count is one of the easiest ways to make an ordinary filter sound advanced. In practice, ten stages of weak media can perform worse than a simpler design with the right material and honest testing.

The same goes for wellness language. A shower filter should tell you what it reduces, what it does not reduce, how long the cartridge lasts, and what evidence supports those claims. If that information is missing, the polished product page is doing the heavy lifting.

I tell homeowners to judge these products the same way I would in the field. Start with your water. Match the media to the contaminant. Verify the claim if you can. Then look at cartridge cost, replacement frequency, and pressure performance before you buy.

If your water needs more than chlorine reduction, the better answer may be a softener or a whole-house water filtration system, not a fancier shower attachment.

If you're comparing shower filters, whole-house systems, or replacement cartridges and want plain-English guidance without the marketing fog, Water Filter Advisor is a useful next stop. It helps homeowners sort through certifications, media types, maintenance demands, and real-world trade-offs so you can choose a system that fits your water, your budget, and your bathroom.

How Can You Remove Salt from Water

You turn on the kitchen tap, fill a glass, take a sip, and stop halfway through the swallow. The water tastes wrong. Not metallic. Not swampy. Salty.

That usually sends people in two directions. One group assumes the water softener is acting up. The other starts worrying that something bigger is happening, especially if the house sits near the coast, relies on a private well, or uses brackish source water. Both reactions are understandable. Only one gets you to a fix.

Salt in water is a different problem from hard water. It needs a different toolset too. If you're trying to figure out how can you remove salt from water at home, the short answer is yes, but only with a few methods that separate dissolved salt from the water itself. A standard pitcher filter won't do it. A basic sediment filter won't do it. And in many cases, a conventional softener makes the situation worse.

That Salty Surprise in Your Tap Water

A salty tap usually shows up in a way people remember. Morning coffee tastes flat and strange. Pasta water seems seasoned before you add anything. Ice cubes carry a faint ocean note. If you've never dealt with it before, it's unsettling because it feels like something that should only happen on a boat, not in your kitchen.

For homeowners, there are a few common real-world scenarios. Coastal wells can pick up saltwater intrusion. Some private wells pull from groundwater with naturally high sodium and chloride. In emergencies, people may only have access to brackish water and want to know whether they can make it drinkable at home. The good news is that desalination isn't only an industrial plant problem. Some methods scale down well. Others don't.

What people usually get wrong first

The biggest mistake is treating salty water like hard water. Hard water leaves scale. Salt changes taste, raises sodium and chloride, and behaves differently in treatment equipment. A softener is designed to exchange hardness minerals, not remove dissolved salt from source water.

Salty water and hard water can show up in the same house, but solving one doesn't automatically solve the other.

I've also seen people chase the wrong symptom. They clean fixtures, flush heaters, or swap faucet filters, hoping the taste will disappear. Maintenance matters, but it doesn't solve dissolved salt. It only solves buildup from other contaminants. If you're already in deep-cleaning mode for household equipment, Altitude Cleaning Crew's iron cleaner guide is a good example of how mineral residue behaves in appliances. The key difference is that visible residue and dissolved salinity aren't the same problem.

What actually helps

Start with diagnosis, not shopping.

  • Check your water source: A municipal supply issue, a coastal well, and a naturally saline aquifer don't call for the same setup.
  • Separate taste from chemistry: Water can taste bad for many reasons. Salt has a distinct cause and needs specific treatment.
  • Think about volume: Daily drinking water is one problem. Whole-house desalination is another. Emergency water is a third.

Once you know which of those situations you're in, the treatment path gets much clearer.

The Basic Science of Making Saltwater Drinkable

Salt disappears into water so completely that it can feel impossible to remove. But the trick is simple. You either push water through something that blocks salt, or you turn water into vapor and leave salt behind.

Clear ocean water gently lapping onto a sandy beach under bright sunny daylight conditions

Filtration that works at the molecular level

When people hear "filter," they often picture a screen catching grit. Salt is much smaller than sand, rust, or sediment. So desalination needs a much finer barrier.

Reverse osmosis uses a semi-permeable membrane. Water molecules pass through. Salt ions mostly do not. The system uses pump pressure to force water the opposite direction of natural osmotic flow, which is why the method is called reverse osmosis. A useful analogy is a coffee filter designed for molecules instead of grounds. Water gets through. The dissolved salt gets left behind.

This approach isn't niche. Reverse osmosis is the most common membrane-based desalination technology nationwide, with more than two-thirds of all U.S. desalination facilities being brackish water reverse osmosis plants, according to the U.S. Department of Energy's desalination overview.

Evaporation and condensation

Distillation works on a different principle. If you've ever boiled a pot and seen steam collect on a lid, you've already seen the idea. The water turns into vapor first. The salt doesn't go with it. When the vapor cools and condenses, you collect water that has been separated from the dissolved salt.

Simple rule: If the salt is dissolved, you need either a membrane fine enough to reject it or a phase change that leaves it behind.

That makes distillation effective, but often slow for household use. You're moving heat, boiling water, managing condensation, and collecting only as much as the setup can produce.

Why common household filters don't solve salinity

A few methods help water quality without removing salt:

  • Sediment filters: Good for sand, silt, and rust. They don't desalinate.
  • Activated carbon filters: Helpful for taste, odor, and some chemicals. They don't remove dissolved salt effectively.
  • Water softeners: Useful for hardness. They aren't the right fix for natural sodium or chloride in source water.

If you're trying to answer how can you remove salt from water, the science narrows the field quickly. For most homes, the practical choices are reverse osmosis for everyday use and distillation for small-batch or backup use.

Reverse Osmosis Your Best Bet for Home Desalination

For most homeowners, reverse osmosis is the best home-scale answer. It exists in real products, it fits under sinks, and it has a long track record. It also addresses the main thing you're trying to fix, which is dissolved salt, not just bad taste.

A glass of clean water sitting on a marble countertop next to an under-sink filtration system

Reverse osmosis remains the most widely adopted technology for salt removal globally, with modern seawater RO systems capable of removing 99% or more of dissolved salts, including sodium and chloride ions, alongside other contaminants, as described in Frizzlife's RO desalination guide.

Under-sink RO versus whole-house RO

Most homeowners should first think in terms of point-of-use treatment. An under-sink RO system treats the water you drink and cook with. That's usually the smartest move because desalinating every gallon entering the home is much more demanding.

An under-sink setup typically includes:

  • Pre-filters: These handle sediment and often carbon-based reduction of taste and odor issues before water reaches the membrane.
  • RO membrane housing: This is the heart of the system.
  • Storage tank: Many systems store treated water so you don't wait for production one glass at a time.
  • Dedicated faucet: Treated water usually comes out of its own tap.

Whole-house RO exists, but it's a bigger project. It needs more planning, more space, more pretreatment, and careful attention to wastewater handling. That's usually the territory for severe salinity problems, special properties, or homes where the incoming source is so compromised that every fixture needs treatment.

What installation is really like

A DIY-capable homeowner can often handle an under-sink RO install if the cabinet has room and the plumbing is accessible. The work is usually about mounting the faucet, connecting the feed line, placing the drain saddle, setting the storage tank, and flushing the system before use.

What trips people up isn't usually the plumbing itself. It's the details.

Buy enough tubing, confirm the cabinet dimensions, and make sure you have an accessible drain line before opening the box. Most frustration starts with spacing, not the membrane.

Whole-house RO is different. That's where I strongly lean toward professional design and installation. You need to think about pretreatment, pump sizing, drain routing, and whether your household water use pattern matches what the system can produce.

What you can expect from the water

RO earns its reputation. Salty water tastes flatter in the bad way. RO-treated water usually tastes clean, neutral, and crisp by comparison. Homeowners often notice the change first in coffee, tea, soups, baby formula preparation, and ice.

RO also works beyond salt. It reduces many dissolved contaminants along with sodium and chloride, which is part of why it remains the default desalination choice in both home and larger systems.

A few realistic trade-offs matter:

Consideration What it means at home
Wastewater RO creates a reject stream that carries concentrated salts away
Flow rate Production is slower than a standard faucet line
Maintenance Prefilters and membranes need periodic replacement
Space Under-sink systems take cabinet room

That doesn't make RO inconvenient. It just means the system needs to fit your daily habits.

When RO is the right call

RO is the strongest fit when:

  • Your drinking water tastes salty: You want a direct fix at the kitchen sink.
  • You have brackish or mildly saline source water: Especially common with certain wells and coastal conditions.
  • You want dependable, repeatable treatment: Not a one-off emergency setup.
  • You need a method people use at home: Not a lab concept or survival hack.

Later in the market, there are also newer desalination ideas beyond conventional RO. One notable example is Temperature Swing Solvent Extraction, developed by Columbia University researchers. It achieved up to 98.4% salt removal, uses low-grade heat of less than 70°C (158°F) instead of high-pressure pumping, and researchers estimate it could reduce energy consumption by approximately 30%, lowering desalinated water cost by roughly 6%, according to CNET's report on the TSSE method. That's promising, especially for hypersaline brines, but it isn't the thing you're ordering for your kitchen this week.

For home use today, RO still wins on availability and practicality.

A quick visual helps if you're comparing layouts and expectations:

Homeowner expectations that stay realistic

Don't expect an under-sink RO system to behave like a full-flow kitchen line with unlimited output. That's not what it's designed for. Think of it as a high-purity drinking water tap, not a whole-home pressure replacement.

Do expect it to handle the main problem effectively when the source water and pretreatment are matched properly. That's why it's the method I recommend first when someone asks how can you remove salt from water without turning the house into a small utility plant.

Emergency and Small-Scale Salt Removal

Sometimes you don't need a permanent install. You need a backup plan. Storm prep, cabin use, travel, and short-term off-grid situations all change the question from "What's the best system?" to "What can I do with basic tools and time?"

That usually means distillation or a simple solar still.

An infographic showing three methods to desalinate water: solar still, boiling with condensation, and hand pump filters.

A basic solar still

A solar still works because sunlight heats salty or brackish water, water vapor rises, and that vapor condenses on a cooler surface where you can collect it.

A stripped-down version looks like this:

  1. Use a shallow basin and place salty water in it.
  2. Put an empty cup in the center so it can catch condensed fresh water.
  3. Cover the basin with clear plastic and seal the edges as well as you can.
  4. Place a small weight over the center so the plastic slopes downward toward the cup.
  5. Set it in direct sun and wait.

The vapor that forms under the plastic condenses and drips into the cup. The salt stays behind in the basin.

This works. It also works slowly. That's the part people often underestimate.

Stovetop distillation

If you have fuel and a kitchen, boiling and condensing water is usually more predictable than a solar still. The idea is straightforward. Heat the saltwater, capture the steam, cool it, and collect the condensed water.

A home improvised setup often uses a pot, a lid arranged to encourage condensation, and a clean collection vessel. The challenge isn't understanding it. The challenge is doing it safely and producing enough water to matter.

Distillation is excellent for small batches. It's a poor choice if you're trying to supply normal household water demand every day.

Why portable filters aren't all the same

Portable emergency filters are often great for microbes, sediment, and debris. That's not the same as salt removal. Many people hear "survival water filter" and assume seawater is fair game. Usually it isn't.

If the packaging doesn't specifically say the device handles dissolved salts, don't assume it does. Hand-pump filters have real value in emergencies, but salinity is a different treatment category.

Newer solar desalination ideas

Research labs are pushing solar desalination in interesting directions. A new solar-thermal desalination method developed at the University of Rochester uses specially engineered black metal panels etched with femtosecond lasers to absorb nearly all solar radiation, distill water, and extract nearly 100% of salts in solid form instead of producing harmful brine waste, as described in the University of Rochester's desalination article.

There's also growing interest in ultra-compact solar devices. One widely discussed example is a $4 compact solar desalination device developed by MIT and Chinese researchers, with a 10.8 ft² (1 m²) model described as capable of providing continuous family drinking water using only sunlight, according to this Futurology discussion referencing the MIT-linked work. That's exciting, but for homeowners right now, it belongs more in the "watch this space" category than the "replace your kitchen system" category.

Best use cases for small-scale methods

  • Emergency preparedness: Keep the method simple and tested ahead of time.
  • Cabins and off-grid stops: Accept slow production and limited output.
  • Short disruptions: Distillation can bridge a temporary problem.

If you need regular, dependable drinking water at home, these methods are backups. They are not substitutes for a properly chosen RO system.

Choosing the Right Method for Your Needs

The right answer depends less on chemistry and more on your daily life. Are you trying to fill a glass at the kitchen sink every day, get through a storm outage, or fix a private well problem without tearing apart your plumbing twice?

Homeowners save money by being honest about the job.

Side-by-side reality check

Method Best for Main advantage Main drawback
Reverse osmosis Daily drinking and cooking water Reliable household use Needs installation and creates reject water
Distillation Small batches and backup use Very pure output Slow and energy-hungry
Solar still Off-grid and emergency use No grid power needed Very low output and weather dependent

RO wins when convenience matters. Distillation wins when purity matters more than speed. Solar stills win when you have sun, time, and no better equipment.

The well-water mistake that keeps repeating

The most common bad decision I see is a homeowner with natural sodium or chloride in well water treating it like a hardness issue. That usually leads straight to a softener-first strategy that doesn't solve the underlying problem.

Watch this closely: A standard water softener is not the fix for naturally salty well water. It targets hardness minerals, not the source of sodium and chloride.

A critical gap in existing coverage is the lack of clear guidance on removing salt from well water specifically containing natural sodium/chloride. While reverse osmosis removes 85–94% of sodium, it is often misapplied by homeowners who confuse the issue with hardness, leading to recurring contamination, as noted in this well-water sodium treatment discussion.

If you're on a private well, don't assume "salty" means "needs a softener." It may need testing, source evaluation, and point-of-use RO for drinking water. In some cases, homeowners also look at deionization or distillation for targeted needs, especially when the water chemistry is unusual.

Quick decision guide

Choose based on the job:

  • Kitchen drinking water every day: Under-sink RO is usually the most realistic fit.
  • Whole-house saline water issue: Get professional design input before buying equipment.
  • Backup for outages or remote use: Distillation or a solar still can work if you're patient.
  • Natural salt in well water: Test first, then treat the salinity directly instead of chasing hardness.

Homeowners near the ocean may also consider dedicated home desalination setups. For coastal properties, land-based systems using RO are marketed specifically to produce fresh water from seawater or brackish sources, with claims of 99%+ salt, mineral, and contaminant removal, as described by Echotec Watermakers' home desalination page. That's a specialized path, but it shows that home desalination is no longer an exotic concept.

The simpler your goal, the simpler your equipment should be. A dramatic solution is not always necessary. The right one is.

Finishing Touches Water Testing and Waste

Installing a treatment system isn't the finish line. You still need to confirm that it's working and deal with the salty reject water responsibly.

What to do with the brine

Reverse osmosis doesn't destroy salt. It separates it. The concentrated reject stream, often called brine or wastewater, has to go somewhere. In most home systems, that means a drain connection designed for the unit.

Don't improvise this part. A sloppy drain setup can create leaks, odors, or sanitation problems. If you're dealing with larger systems or unusual property conditions, ask a local pro how wastewater should be handled on your site rather than assuming every drain arrangement is acceptable.

Test the water after treatment

A simple TDS meter is a useful homeowner tool because it gives you a quick before-and-after snapshot of dissolved solids. It doesn't replace a full lab analysis, but it helps confirm that the system is changing the water.

A practical maintenance routine looks like this:

  • Test feed and product water: Compare incoming water with treated water from the RO faucet.
  • Track taste changes: If the salty taste starts creeping back, don't ignore it.
  • Replace filters on schedule: Membranes fail slowly. Prefilters often show trouble first.
  • Inspect fittings and drain lines: A small leak under a sink turns into a cabinet problem fast.

For readers who want a reference point on just how pure water can get in technical settings, Herbilabs' guide to WFI use is helpful context. Water for Injection is a pharmaceutical standard, not a home drinking-water target, but it shows how tightly controlled water quality becomes when purity requirements are extreme.

If you want more homeowner-focused help on testing, maintenance, and treatment choices, the practical guides in Water Filter Advisor's advice library are a solid next step.

The last thing I'll leave you with is this. Salty water is fixable, but only when you match the method to the problem. If the source water is naturally saline, don't let anyone sell you a hardness solution and call it done.


If you want clear, no-nonsense help comparing reverse osmosis systems, understanding water test results, or choosing filtration that fits your home, visit Water Filter Advisor. It's built for homeowners who want better water without guessing.

How Often to Replace Water Filter: A 2026 Home Guide

You're probably here because something finally tipped you off. The refrigerator light started blinking. Your pitcher got painfully slow. Your coffee tastes flat, metallic, or vaguely like pool water again. Many find themselves waiting for one of those moments, then realize they have no idea how often to replace a water filter without guessing.

Here's the blunt answer: guessing is how people end up drinking poorly filtered water for months. An expired filter doesn't just “work a little less well.” In some setups, it becomes a clogged, exhausted cartridge that still looks normal from the outside while doing a lousy job inside. That's why homeowners get confused. The filter is still physically there, water is still coming out, and the system hasn't exploded, so they assume they're fine.

They might not be.

Your Filter Is Expired Now What

A homeowner ignores the red light on the fridge for a few weeks. Then a few months. Water still comes out, so it gets pushed down the list behind groceries, school pickups, and fixing the gutter leak. Then one morning the ice tastes stale and the dispenser slows to a crawl. That's usually when people start paying attention.

That moment matters more than is commonly believed.

A close-up view of a refrigerator water dispenser control panel showing a glowing red filter replacement light.

Old filters don't fail in a dramatic way. They fail subtly. Water may still look clear while taste, odor, and contaminant reduction slip in the background. That's why filter replacement isn't a cosmetic chore. It's routine home maintenance, right up there with changing smoke detector batteries and servicing HVAC equipment.

The problem isn't just age

Different filters age in different ways. A pitcher cartridge reaches the end of its capacity fast. A refrigerator cartridge follows a fixed calendar. A whole-house setup usually has one schedule for sediment and another for carbon. Reverse osmosis systems add another layer because the membrane lasts much longer than pre-filters.

According to DuPure's water filter replacement overview, whole-house sediment and carbon filters typically require replacement every 6–12 months, while reverse osmosis membranes last 2–3 years, but pitcher filters may need replacement every 1–2 months due to shorter capacity.

That spread is exactly why so many homeowners get tripped up. They assume every filter follows the same logic. It doesn't.

Practical rule: If you can't remember the last time you changed a filter, treat it as overdue until proven otherwise.

What to do first

If your filter is already expired, don't overthink it. Start with the basics:

  • Replace the overdue cartridge first. Don't waste time trying to squeeze “just a little more life” out of a filter you already know is past schedule.
  • Check your filter type. Refrigerator, pitcher, whole-house, under-sink, and RO systems all play by different rules.
  • Write the install date down. Marker on the housing, note on your phone, calendar alert, whatever you'll use.
  • Pay attention after the change. Fresh filters usually improve taste, odor, and flow quickly. If they don't, the issue may be your water source or the wrong filter media.

A more complicated system isn't generally required. What's often needed is a better habit.

The Standard Water Filter Replacement Calendar

Start with a calendar, not a guess.

Manufacturer timelines are the baseline. They are not marketing fluff, but they are also not the whole answer. Use them as your default replacement schedule, then adjust later based on your water source, household use, and the warning signs your filter gives you.

Refrigerator filters have a hard deadline

Refrigerator filters get ignored because the water still looks clear and the dispenser still works. That mistake is common, and it leads to stale media sitting in a damp, enclosed system for too long.

Whirlpool states that refrigerator water filters must be replaced every 6 months regardless of usage indicators, and if an indicator light is absent, the 6-month rule remains mandatory. Follow that rule. If your fridge does not track filter life, put the replacement date on your calendar and move on.

Standard Water Filter Replacement Intervals

Filter Type Typical Lifespan (Time) Typical Lifespan (Gallons)
Pitcher filter 1–2 months 40 gallons
Refrigerator filter 6 months Not specified
Whole-house sediment filter 6–12 months Not specified
Whole-house carbon filter 6–12 months Not specified
Reverse osmosis membrane 2–3 years Not specified
Aquasana OptimH2O filter 12 months 100,000 gallons
Aquasana Rhino main filter 10 years 1,000,000 gallons

What these timelines actually mean

Pitcher filters are the shortest-life filters in the house. Treat them that way. A good rule is every 2 months or 40 gallons for standard pitcher cartridges. Small filters clog and exhaust fast, especially if they handle all your drinking water.

Whole-house sediment and carbon filters usually land in the 6 to 12 month range. Reverse osmosis membranes usually last 2 to 3 years. The mistake is assuming the membrane schedule covers the whole system. It does not. The pre-filters and post-filters around it usually need replacement much sooner.

Large-capacity systems can run much longer, but only when the product is built for it and the water conditions allow it.

Brand examples show why one schedule never fits every filter

Aquasana is a good example because one brand can have very different replacement intervals across its lineup. According to Aquasana's filter lifespan guide, the Rhino® and Rhino® Max Flow whole-house tanks are designed for a 10-year or 1,000,000-gallon main filter lifespan, while the OptimH2O® filter must be replaced every 12 months or at 100,000 gallons, whichever comes first.

That gap matters. A large whole-house tank and a point-of-use cartridge do completely different jobs with completely different media volumes. Copying one schedule onto another filter is lazy and expensive.

Follow the schedule for your exact filter type first. Then refine it based on real-world performance.

The calendar I recommend homeowners use

Use this as your default schedule:

  • Pitcher filter: every 2 months or at 40 gallons
  • Refrigerator filter: every 6 months
  • Whole-house sediment or carbon: inspect on a routine basis and expect replacement in 6 to 12 months
  • RO membrane: plan on 2 to 3 years
  • Large-capacity whole-house tanks: follow the product spec exactly

Faucet, under-sink, and shower filters need the same discipline

These filters vary too much for a single universal timeline. Some are calendar-based. Some are gallon-based. Some do both.

The right move is simple. Start with the manufacturer schedule. Then pay attention to what your water and your system are telling you. Flow rate alone is not a reliable judge of filter life, and a filter that still passes water can still be overdue.

Why Your Filter Might Die Sooner Or Later

Your neighbor swaps a filter every two months and swears that schedule works perfectly. You copy it, but your water starts tasting off weeks earlier. Same filter. Different house. Different result.

A new Maxtra Pro water filter in packaging next to a used, stained water filter on a counter.

Usage changes everything

Filter life starts with gallons used. A single adult who fills one glass at night puts far less strain on a pitcher cartridge than a family using it for water bottles, coffee, cooking, and pet bowls all day.

That is why manufacturer timelines are only a starting point. The common pitcher schedule of every 2 months or 40 gallons is a decent default, but it is not a law of nature. Light use may stretch performance. Heavy daily use can burn through capacity much faster.

Do not confuse lower usage with automatic safety. A lightly used filter can still age out, and a heavily used one can be spent long before the calendar says it should be.

Source water decides how hard the filter works

A filter in relatively clean municipal water has an easier job than one dealing with heavy chlorine, chloramine, sediment, or hard water. Well water adds even more variation. One home gets mild nuisance minerals. Another gets sediment, iron, sulfur, and constant filter stress.

Homeowners often get misled by generic packaging claims. A cartridge rated for a certain time or gallon count was tested under specific conditions. Your water may be harsher. If it is, the filter will not care what the box promised.

The biggest lifespan variables

  • Household size: More people means more gallons through the media.
  • Water quality: Sediment, disinfectants, metals, and hardness wear filters down in different ways.
  • Filter job: A basic taste-and-odor filter will age differently than one built to reduce tougher contaminants.
  • System design: A compact pitcher or fridge cartridge has far less media than a larger under-sink or whole-house system.

Filters fail from workload, not from a date printed on the calendar.

The myth that trips up homeowners

Plenty of homeowners judge filter life by flow alone. That is a mistake.

A clogged filter often slows down. A worn-out carbon filter may still pass water at a normal rate while removing far less chlorine, taste, odor, or other contaminants. Good flow only tells you water is getting through. It does not prove the media is still doing its job.

Use a better framework. Start with the official schedule for your exact filter. Then shorten it if you have high usage, hard water, heavy chlorine, visible sediment, or well water with known issues. If your usage is low and your water is relatively easy to treat, you may have some room, but do not stretch replacements blindly. Build your schedule around your water, your household, and the way the filter is performing.

Decoding the Signs of a Dying Water Filter

Most homeowners wait for one dramatic sign. That's a mistake. Filters usually wave several smaller red flags first.

An infographic titled Decoding Filter Signs listing four warning indicators that suggest a water filter needs replacement.

The obvious signs people notice first

You don't need lab equipment to catch the basics. Your senses are useful if you pay attention.

  • Taste changes: Filtered water starts tasting flat, chlorinated, metallic, or stale.
  • Odor returns: That clean neutral smell disappears and something chemical or musty creeps back in.
  • Flow gets slower: Dispensing takes longer, pitchers drip more slowly, and faucets lose pressure.
  • Water looks wrong: Cloudiness, floating particles, or a murky appearance means stop ignoring the system.

Those signs matter. They just don't tell the whole story.

Slow flow is not the full story

The biggest myth in home filtration is that slow flow equals failure, normal flow equals safety. That sounds tidy, but it's wrong. According to Frizzlife's discussion of filter change timing, carbon filters can lose 50% of their contaminant adsorption capacity for chloramine and lead while flow rate remains near normal.

That means a filter can still pour water at a decent rate while doing a much worse job removing certain contaminants.

Reality check: Flow rate tells you about clogging. It does not reliably tell you whether carbon media is still capturing chemical contaminants.

Here's a useful visual refresher if you want to compare the common warning signs at a glance.

What each warning sign usually points to

Sign What it often means
Slower flow Sediment or particulate clogging
Bad taste Carbon media is losing effectiveness
Odd odor Chemical reduction is weakening or stale water is present
Cloudy water Particle breakthrough, trapped debris, or another system issue

The dangerous part is assuming one sign explains everything. A clogged filter may still reduce some chemicals. A normal-flow filter may already be chemically spent. That's why relying on only one symptom is lazy maintenance.

Use signs as triggers, not the whole decision

If taste, odor, appearance, or pressure changes, don't wait around hoping it fixes itself. Replace the filter if it's near schedule. If it's not near schedule and the problem appears suddenly, investigate the water source, the cartridge fit, and the filter type. The symptom is your cue to act, not your excuse to keep delaying.

A Proactive Approach to Filter Maintenance

Reactive maintenance is what people do after the water tastes bad. Proactive maintenance is what people do when they'd rather not find out the hard way. The second group drinks better water and wastes less time.

An infographic showing four steps for proactive water filter maintenance, including consulting manuals and tracking usage.

Stop treating well water like a generic category

A lot of homeowners with wells get handed the same lazy advice: change filters every 3 months and call it good. That shortcut can fail in both directions. According to Enpress on home water filter replacement schedules, a 2024 meta-analysis found that 38% of filters replaced every 3 months were still 70% effective, while 15% replaced at 6 months had already failed on key contaminants like arsenic.

That's why a blanket well-water schedule is bad advice. One well may load a sediment filter quickly. Another may need media chosen around a very different contaminant profile.

What proactive homeowners actually do

A useful maintenance plan doesn't need to be fancy. It needs to be consistent.

  • Track the install date: Write it on the housing or the cartridge itself.
  • Track usage where possible: This matters a lot for pitchers and any filter sold with a gallon capacity.
  • Keep one replacement on hand: Waiting until a filter is dead before ordering the next one creates delays.
  • Use simple testing when it fits: Chlorine test strips can help confirm whether a carbon filter is still doing meaningful work.
  • Review your setup periodically: If your water source changes, your schedule may need to change with it.

For homeowners who know they'll forget, these free maintenance log templates are a practical way to keep replacement dates, cartridge types, and notes in one place without building your own spreadsheet.

Build a schedule that matches your house

If you want a framework that works, use this order:

  1. Start with the manufacturer interval.
  2. Shorten it if your water is difficult or your household uses a lot of water.
  3. Use testing and real-world performance to refine it.
  4. Update your notes every time you swap a cartridge.

If you want more general homeowner maintenance guidance, this water filtration advice resource is a good place to compare maintenance habits across common system types.

Test when you can. Track what you do. Replace before problems become obvious.

That's how you stop playing filter roulette.

Balancing Cost Safety and Eco-Impact

Homeowners usually lean too far in one direction. Some try to stretch every cartridge to save money. Others replace filters early out of anxiety. Neither approach is smart if your goal is clean water, predictable costs, and less waste.

Cheap filtration gets expensive when you push it too far

Trying to squeeze extra life out of a used filter feels frugal right up until the water tastes awful, the flow drops, or a downstream component gets worked harder than it should. A replacement cartridge costs money. So does neglect.

The better move is to buy intelligently and replace on schedule. If your system uses common cartridges, buying a multi-pack often makes planning easier. Auto-ship can help too, but only if the timing matches your actual household use. Otherwise you'll either overstock or replace too early out of guilt because the new filter is sitting there staring at you.

Safety has to outrank convenience

People love visible proof. If water looks clear, they assume the system is fine. That's comforting and wrong. Safety depends on whether the filter media is still capable of doing the job it was installed to do.

Use a simple hierarchy:

  • First priority: keep the filter within its proper service window.
  • Second: pay attention to taste, odor, and flow changes.
  • Third: use testing when the contaminant profile justifies it.
  • Last: worry about squeezing a few extra days from a cartridge.

That order saves more headaches than any hack.

Eco-impact improves when maintenance gets smarter

Disposable cartridges create waste. That's true. But reckless overextension isn't an environmental strategy. It's just poor maintenance with a green excuse attached. A better approach is to choose systems with sensible cartridge life, keep records so you don't replace too early, and check whether your brand offers a recycling option for used filters.

The greener homeowner isn't the one who ignores replacement dates. It's the one who buys the right system, uses it correctly, and doesn't burn through cartridges because of disorganization.

Think in terms of household protection

Water filtration is part of a bigger home-protection mindset. The homeowners who manage water systems well usually manage the rest of the house the same way. They don't wait for obvious failure. They use routines, logs, and preventive maintenance. That broader mindset shows up well in HomeProBadge's approach to home protection, especially if you're trying to build a more disciplined maintenance routine across the whole property.

The cheapest filter is the one you replace on time, not the one you run past its useful life.

The right long-term strategy is simple. Follow the baseline schedule. Adjust for your water and usage. Watch for warning signs. Test when needed. Keep records. That's how you balance cost, safety, and waste without fooling yourself on any of the three.


If you want straightforward help choosing replacement schedules, comparing filter types, or figuring out what your water needs, visit Water Filter Advisor. It's a solid starting point for homeowners who want cleaner water without the marketing fluff.

Best Chlorine Water Filter for Whole House: 2026 Guide

You turn on the kitchen tap, fill a glass, and catch that faint swimming-pool smell. Later, the shower leaves your skin tight, your hair rough, and the bathroom air harsher than it should be. That's the moment most homeowners start looking for a chlorine water filter for whole house use, not because they suddenly became water nerds, but because the water keeps reminding them something's off.

A good whole-house chlorine system fixes a very specific problem. It removes disinfectants and related byproducts from the water entering your home, so the water you drink, bathe in, cook with, and run through appliances feels less aggressive. But choosing the right setup isn't as simple as buying “a carbon filter.” The key decision comes down to media, sizing, certifications, and one overlooked issue that matters a lot: what happens in your plumbing after chlorine is removed.

What Is a Whole House Chlorine Filter

A whole-house chlorine filter is a point-of-entry system installed where the main water line enters the home. That placement matters more than people realize.

According to Culligan's whole-home filtration guidance, whole-house water filters are installed at the main water line entry point of a home, ensuring that 100% of the water used for drinking, bathing, cooking, and cleaning is filtered before it reaches any tap. This approach is essential for removing contaminants like chlorine, iron, and sediment from every drop of water entering the home.

A woman towel-drying her hair in a modern bathroom with a No More Chlorine text overlay.

Where it sits and why that changes everything

An under-sink filter only treats one faucet. A refrigerator filter only treats the water going to the dispenser. A shower filter only helps one bathroom. A whole-house system treats the supply before it branches off to showers, sinks, toilets, the water heater, washing machine, and dishwasher.

That means you're not only improving drinking water. You're also reducing chlorine exposure during showers and baths, and you're keeping chlorinated water from circulating through fixtures and appliances all day.

It's similar to installing one quality air filter at the main return of an HVAC system instead of taping tiny filters over random vents. The right location does the heavy lifting.

What a typical system includes

Most homes use a setup with these parts:

  • Sediment pre-filtration: This catches grit, rust, or debris before it reaches the carbon media.
  • Carbon-based filtration: This is the core stage for chlorine reduction.
  • Optional specialty stages: Some systems add catalytic carbon, KDF media, or UV depending on the water and the home.

Practical rule: If a system isn't installed on the incoming main line, it isn't a true whole-house solution.

What homeowners usually notice first

The first changes are usually simple and immediate:

  • Less odor: Tap water loses that pool-like smell.
  • Better shower comfort: Skin and hair often feel less stripped.
  • Cleaner everyday use: Cooking water, ice, laundry, and dishwashing all benefit because every fixture gets treated water.

That broad coverage is why a whole-house chlorine filter makes sense for families who want one central fix rather than a collection of small filters scattered around the house.

Why You Should Filter Chlorine from Your Water

Taste and smell are common starting points. That's a perfectly good reason. If your water smells like a public pool, you'll notice it in drinking water, tea, coffee, soup, pasta, and shower steam.

But the stronger case for filtration is that chlorine doesn't stay neatly in the “taste and odor” box. It affects comfort, it interacts with organic material in water, and it touches far more than what comes out of your kitchen tap.

Comfort matters more than people think

Chlorinated water can be hard on skin and hair. The effect is often most obvious after a hot shower, when the water and steam hit you for several minutes in a closed room.

The regulatory backdrop matters too. The U.S. EPA revised Trihalomethane regulations in 2007, which prompted many utilities to increase chlorine dosing. The same verified data notes that the CDC estimates millions rely on chlorinated water, where levels can exceed 4 ppm in some areas, potentially causing dry skin, hair damage, and respiratory irritation.

For many households, that means the issue isn't just drinking water. It's daily full-body exposure.

Chlorine isn't the only concern

When chlorine reacts with organic matter, it can form disinfection byproducts such as TTHMs. Municipal treatment is built around balancing pathogen control with byproduct limits, but homeowners often want another layer of reduction at the house level.

That's why a whole-house filter appeals to people who want more than “technically acceptable.” They want water that feels better to live with.

  • Taste and odor: Carbon media is widely used because it targets the compounds that make water smell and taste chlorinated.
  • Bathing and washing: Skin, scalp, and hair get exposed every day, not just when you drink a glass.
  • Appliance protection: Less chlorinated water moving through seals, valves, and connected equipment is generally easier on the home's plumbing ecosystem.

If hard water is also part of the problem, it helps to understand the separate role of softening. This guide on the benefits of a home water softener is useful because softeners address hardness minerals, while chlorine filtration handles an entirely different issue.

Better water at home usually comes from matching the treatment to the problem, not expecting one tank to solve everything.

The practical takeaway

If your home uses municipal water and you notice chlorine taste, odor, dry skin, hair issues, or harsh shower air, a whole-house chlorine filter is solving a real problem. It's not just a luxury upgrade. For many homes, it's the difference between water that's merely delivered and water that's comfortable to use.

Filtration Technologies That Remove Chlorine

At this stage, buyers either make a smart decision or buy the wrong media and spend months wondering why the water still smells off.

The simplest way to understand filtration media is this. Some media mostly grab chlorine. Some media break down tougher disinfectants. The best systems combine jobs.

Activated carbon and why it works

Standard activated carbon is the workhorse for chlorine reduction. It acts like a dense, porous sponge with a huge internal surface area. As water passes through, chlorine molecules are adsorbed onto that surface and chemically reduced.

Verified performance data shows that whole-house systems equipped with activated carbon filters can remove up to 97% to 100% of chlorine and chloramine from municipal water supplies, and the NSF/ANSI 42 standard is the main certification benchmark for chlorine taste and odor reduction, confirming that certified systems consistently reduce chlorine levels to below 0.5 ppm for noticeable improvement.

For straight chlorine problems, carbon is often enough. For chloramine, things change fast.

Chloramine is the trap most buyers miss

Many homeowners shop for a “chlorine filter” without realizing their utility uses chloramine instead. That's a different disinfectant, and it's much harder to remove.

Verified data shows that advanced systems combine Catalytic Carbon with KDF media to tackle both chlorine and chloramine. In those systems, catalytic carbon accelerates the breakdown of chloramine, while KDF media facilitates chlorine reduction through a galvanic reaction and inhibits bacterial growth, achieving up to 99.6% chloramine reduction where standard carbon filters might only manage 50% to 60% in the cited testing and analysis from this industry video reference.

That's the practical dividing line. If your city uses chloramine, standard carbon can leave you disappointed.

Why KDF matters in a whole-house setup

KDF doesn't replace carbon. It supports it.

KDF media helps with chlorine reduction and also discourages bacterial and algae growth inside the filter housing. In whole-house systems, where water volume is high and equipment can sit between flow cycles, that's a meaningful design advantage.

Standard carbon is often fine for chlorine. It's often the wrong answer for chloramine.

Comparison of Chlorine Filtration Media

Media Type Effective Against Chlorine Effective Against Chloramine Typical Lifespan Key Feature
Granular Activated Carbon Yes Limited to poor in many chloramine applications Varies by design and water quality Strong chlorine taste and odor reduction
Catalytic Carbon Yes Yes Varies by design and water quality Speeds chloramine breakdown
KDF Media Yes, as a support medium Limited on its own, stronger when paired with catalytic carbon Varies by system design Galvanic reaction and bacterial growth inhibition
Catalytic Carbon plus KDF Yes Yes, high-performance option Often used in long-life whole-house systems Best fit for mixed chlorine and chloramine concerns

What works and what doesn't

Use this as a shortcut:

  • If your water has chlorine only: A well-sized activated carbon system can work very well.
  • If your water has chloramine: Look for catalytic carbon, not generic carbon language.
  • If you want a stronger whole-house setup: A catalytic carbon plus KDF design is usually the more resilient choice.

Brand examples like SpringWell CF, Aquasana Rhino, and cartridge-based multi-stage designs show how different manufacturers approach the same problem. The label matters less than the media and the test data behind it.

How to Size Your System for Optimal Performance

A filter can have excellent media and still perform badly if it's undersized.

Sizing is about two things. First, can the system handle your home's peak water demand without strangling pressure? Second, does the media have enough contact time to reduce chlorine effectively?

An infographic titled How to Size Your Whole House Chlorine Filter System with six key installation steps.

Think of flow rate like highway lanes

Your plumbing system has rush hour. A shower is running, someone starts the dishwasher, a toilet refills, and the washing machine kicks on. If the filter is too small, water has to squeeze through like traffic forced from four lanes into one.

That causes pressure drop and weak performance.

A practical benchmark from verified data helps here. At an incoming chlorine concentration of 2.0 ppm, a standard high-capacity cartridge system can treat approximately 570,000 gallons, but that capacity is non-linear and drops significantly as chlorine levels rise, according to Morton's chlorine reduction specifications. In plain English, dirtier or more heavily chlorinated water burns through media faster.

A simple way to size your home

Start with the home you have, not the marketing label on the box.

  • Count simultaneous fixtures: Focus on what can run at the same time, especially showers, tubs, dishwashers, and laundry.
  • Match plumbing connection size: If your main line is larger than the filter's connection, you're creating a bottleneck.
  • Check chlorine level: Higher chlorine means shorter effective media life.
  • Plan for your household: Guests, teenagers, future bathroom use, and additions all matter.

If you're already comparing larger home equipment, the logic is similar to finding the right 100-gallon unit. Capacity on paper only helps if it matches actual household demand.

A short visual guide helps when you're mapping the decision:

Don't ignore contact time

Bigger isn't always about more gallons. Sometimes it's about slower, better treatment. Water needs enough contact with the media for chlorine reduction to happen properly.

That's why two systems with similar marketing claims can behave very differently in the field. One has enough media volume and flow capacity for the house. The other doesn't.

Understanding Certifications and Performance Claims

Water filtration marketing is full of soft language. “Reduces contaminants.” “Improves quality.” “Advanced media.” Those phrases aren't useless, but they're not proof.

The easiest way to separate marketing from performance is to look for specific certifications and specific contaminants.

What NSF standards actually tell you

For chlorine-focused systems, NSF/ANSI 42 is the benchmark tied to aesthetic concerns such as chlorine taste and odor. If a system is certified under that standard, it's being tested for that job, not just vaguely described as “premium.”

Some advanced systems also incorporate NSF/ANSI 53, which is the health-effects standard used for certain contaminants beyond taste and odor. That doesn't mean every whole-house chlorine filter covers the same contaminant list. It means you need to read exactly what the system is certified to reduce.

The benchmark I'd want to see

Verified testing data sets a clear bar. For a whole-house system to be effective, it must achieve at least 100% chlorine removal and near-complete reduction of byproducts like chloroform. Independent lab tests of high-performance 3-stage filters have demonstrated this level of performance, as cited in this Waterdrop-related video reference.

That doesn't mean every good system must be identical in design. It means you should expect a manufacturer to show concrete performance data, not broad promises.

If a brand says “removes contaminants” but won't tell you which ones, under what conditions, and by what standard, keep shopping.

Claims worth trusting and claims worth questioning

Use this quick filter when comparing products:

  • Good sign: Specific mention of chlorine or chloramine reduction.
  • Good sign: NSF/ANSI 42 listed for chlorine taste and odor.
  • Better sign: Lab data showing chlorine and byproduct reduction.
  • Red flag: One number for “all contaminants.”
  • Red flag: No distinction between chlorine and chloramine.

A serious manufacturer makes it easy to find the media type, gallon capacity, and testing basis. If that information is hidden, assume the performance is doing the same thing.

Maintenance and Long-Term Ownership Costs

The purchase price is only the opening bid. The full cost of a whole-house chlorine filter shows up over time through cartridge changes, media replacement, sediment loading, service calls, and whether the system was sized correctly in the first place.

A cheap system with frequent cartridge swaps can become more annoying and more expensive than a better-built unit with longer service intervals. On the other hand, a large tank system that's hard to service may frustrate DIY owners who wanted simplicity.

What maintenance usually looks like

Ownership depends on system style.

  • Cartridge-based systems: Easier for many homeowners to understand and replace. You swap filters at intervals based on water quality and usage.
  • Media tank systems: Often lower-touch day to day, but eventual media replacement is a bigger event.
  • Pre-filters: These do the dirty work up front and can load up quickly if your supply carries sediment.

The hidden cost is neglect. Once carbon media is exhausted, flushing it doesn't restore full performance. Saturated media eventually needs replacement.

The bacterial growth issue most guides skip

Here's the trade-off that deserves more attention. Chlorine is a disinfectant. When you remove it at the point of entry, you remove the residual protection that had been traveling through your plumbing.

The CDC warns that installing a whole-home filter that removes disinfectants like chlorine can allow germs to grow in plumbing post-filtration. Without a secondary disinfection stage like UV, this can create a paradoxical risk where water that tastes better may become a breeding ground for pathogens.

That doesn't mean whole-house chlorine filtration is a bad idea. It means you need to think one step beyond taste.

In homes where plumbing sits stagnant, biofilm risk deserves a real conversation, not a footnote.

When UV is a smart add-on

A UV stage makes the most sense when you want chlorine removed but also want a downstream disinfection barrier. It's especially worth considering in homes with periods of low water use, complex plumbing runs, or a history of water quality concerns.

For more homeowner-focused maintenance help and filtration decision support, the practical guides at Water Filter Advisor's advice hub are a useful reference point.

The best long-term setup isn't the cheapest system on day one. It's the one you can maintain correctly, with enough protection built in for the water conditions in your house.

Troubleshooting Common Filtration Issues

Most whole-house filter problems come down to four causes. Wrong media, wrong size, exhausted filters, or installation issues.

If your system isn't giving you the result you expected, start with diagnosis before replacement.

A troubleshooting guide table for whole house chlorine water filter problems, solutions, and causes for common issues.

The big one, chlorine versus chloramine

The most common complaint is simple: “I bought a chlorine filter and the smell is still there.”

In many cases, the home doesn't have a chlorine problem. It has a chloramine problem. Verified data notes that chloramine is 300 times more stable than chlorine and requires specific media like catalytic carbon. Systems with this media can remove up to 99.6% of chloramine, whereas standard filters show negligible removal.

That's why the first troubleshooting step is to confirm what disinfectant your utility uses. If it's chloramine, a standard carbon unit may never perform the way you expected.

Other common problems and the likely cause

  • Low water pressure: Check pre-filters first. A clogged sediment stage can choke the whole house. Undersized housings also create pressure problems.
  • Chlorine smell persists: Verify the bypass valve isn't partially open, confirm the media type, and make sure the system still has remaining capacity.
  • Cloudy or discolored water: That may be trapped air after installation, disturbed sediment, or a separate water issue not caused by chlorine filtration.
  • Frequent filter changes: High sediment load, high disinfectant levels, or a too-small system can shorten service life.

A practical troubleshooting order

Use this sequence before you assume the product failed:

  1. Call the utility and confirm chlorine or chloramine.
  2. Inspect the bypass and valves to make sure water is flowing through the system.
  3. Check service life on cartridges or media.
  4. Review sizing against the home's peak demand.
  5. Upgrade media if the disinfectant type requires it.

Most failures aren't mysterious. They're mismatch problems. The system and the water aren't aligned.


If you want help comparing systems, understanding media, or figuring out whether your home needs carbon, catalytic carbon, KDF, UV, or a combination, Water Filter Advisor is a solid place to keep researching before you buy.

Under Sink Water Filter Cartridge: A 2026 Buyer’s Guide

You open the cabinet under the kitchen sink, see a blinking filter light, and realize you have no idea what cartridge you need. Or maybe the water still looks clear, but it suddenly tastes flat, chlorinated, or a little “off.” That's usually the moment homeowners learn an under-sink filter system is only as good as the cartridge inside it.

The cartridge does the main work. It's the part that traps sediment, reduces taste and odor problems, and, in many systems, targets specific contaminants. If the cartridge is wrong for your water, worn out, or difficult to replace, the whole system becomes a hassle instead of a help.

A lot of shopping advice gets stuck on brand names. That matters less than commonly believed. The smarter way to choose an under sink water filter cartridge is to match it to your water, your cabinet space, and the kind of maintenance you'll consistently maintain.

What Is an Under Sink Water Filter Cartridge

You open the cabinet, find a slim plastic tube running into a filter housing, and realize the part you need is not the whole system. It is the cartridge. That replaceable piece is the working core of an under-sink filter, similar to how a computer's processor handles core computing while the outer case holds everything in place.

An under sink water filter cartridge sits inside the filter housing and treats water at a single tap, usually the kitchen sink. Homeowners use these systems for drinking, cooking, coffee, ice, and rinsing produce. The cartridge is the part that does the cleanup. If it is not designed for your water problems, clear water can still carry the taste, odor, or contaminants you were trying to reduce.

That is why cartridge shopping goes wrong so often. People compare housings, brand labels, or faucet style, but the smarter questions are more specific. What is in your water. How long will this cartridge last in your home. How easy will it be to swap out when you are kneeling in a cramped cabinet with supply lines in the way.

Why the cartridge matters more than the box

Two under-sink systems can look nearly identical and still do very different jobs. One cartridge may be built mainly to reduce chlorine taste and odor. Another may be designed to address sediment, lead, cysts, or a combination of problems. The outside does not tell you much. The cartridge specification does.

A good practical rule is simple. Match the cartridge to the contaminant, not just to the housing.

That point matters because an under-sink filter is a point-of-use tool. It is meant to improve the water you drink and cook with at one location, not every tap in the house. If you are still deciding between a kitchen-only setup and a whole-house approach, it helps to compare water filtration options before buying replacement parts.

What homeowners usually confuse

Three terms get mixed together all the time, and clearing them up makes shopping much easier:

  • The system is the full assembly under the sink, including the housing, fittings, tubing, and sometimes a dedicated faucet.
  • The cartridge is the replaceable insert that you change on schedule.
  • The media is the material inside the cartridge that does the filtering, such as activated carbon or sediment-filtering material.

A simple way to remember it is container, replaceable part, and filtering material. Once you separate those three, it becomes easier to check fit, performance, and replacement cost without guessing.

That last point is easy to overlook. A cartridge that removes the right contaminant but is hard to twist out in a tight cabinet, or needs frequent replacement, may cost more and cause more frustration over time than a slightly pricier option that fits your space and lasts longer.

Common Cartridge Types and Filtration Media

The easiest way to understand cartridges is to picture different fishing nets. One net catches leaves. Another catches smaller fish. Another doesn't work by “catching” at all. It pulls certain unwanted stuff out of the water through a different process.

That's what filtration media does. Different media targets different problems.

A diagram explaining the different components and types of under-sink water filter cartridges used for filtration.

Sediment cartridges

Sediment cartridges are the first line of defense in many systems. They catch visible or near-visible particles such as dirt, rust, and sand before those particles clog finer filter stages.

A useful way to think about them is as the doormat at the front door. They don't handle every problem, but they stop the big mess from moving deeper into the house.

Technical guidance for cartridge selection notes that under-sink systems often use 2 to 5 micron sediment stages to protect finer downstream stages, and geometry matters too: inner diameter, outer diameter, and length must match the housing so the cartridge seats correctly, as discussed in this cartridge sizing and micron overview.

Carbon cartridges

Carbon is the workhorse in many home systems. It's commonly used when homeowners want water that tastes and smells better, especially if they notice chlorine.

You'll usually see two broad styles:

  • Granular activated carbon
    Loose carbon granules give water contact with a bed of media and are often used for broad taste and odor improvement.

  • Carbon block
    Compressed carbon acts more like a denser, finer filtering layer. It often supports more precise reduction claims than looser media designs.

Specialty cartridges

Some cartridges are built for specific jobs. These may target contaminants such as lead, or work as part of a more complex system that includes reverse osmosis stages or polishing filters.

The key point is simple. Don't buy a specialty cartridge because the label sounds advanced. Buy it because it matches a real water concern in your home.

Media Type Best For Reducing Common Use Case
Sediment media Dirt, rust, sand, particulate matter Pre-filter stage to protect downstream cartridges
Granular activated carbon Chlorine, taste, odor, some organic compounds Municipal water with chlorine taste or smell
Carbon block Chlorine, taste, odor, and finer reduction goals depending on certification Homes that want stronger everyday drinking-water filtration
Specialty media Specific contaminants depending on design Lead-focused systems, multi-stage systems, or special water problems

Why micron rating confuses people

A micron rating describes how small a particle a filter is designed to catch. Smaller isn't automatically better.

A tighter filter can improve particulate capture, but it can also slow flow and increase pressure loss. That's why many systems pair stages together instead of using one ultra-tight cartridge for everything.

A good cartridge setup balances contaminant reduction, faucet flow, and the pressure your home already has.

Understanding Certifications and Lifespan

An infographic explaining water filter certifications, including NSF standards and tips for maximizing cartridge lifespan.

You are standing in the aisle, holding two cartridges that look almost identical. One promises better taste. The other lists a few certification numbers and costs more. Those numbers are often the difference between buying a filter that makes water more pleasant and buying one that is tested for a contaminant you need to reduce.

For under sink cartridges, NSF certifications are one of the clearest ways to sort marketing from tested claims. They help you match the cartridge to the job, which matters more than the brand name on the box.

What those certification numbers mean in real life

The easiest way to read these numbers is to ask one question: What problem am I trying to solve?

  • NSF 42 points to aesthetic improvements, such as chlorine taste and odor.
  • NSF 53 applies to cartridges tested for certain health-related contaminant reductions, such as lead or cysts.
  • NSF 58 is tied to reverse osmosis systems, which filter water through a membrane instead of relying only on a standard carbon cartridge.

A good shortcut is this. If your complaint is, “My city water tastes like a swimming pool,” NSF 42 may cover what you care about. If your concern is, “I want a cartridge tested for lead reduction,” look for the specific certification and reduction claim that matches that concern.

That is the hidden factor many shoppers miss. A cartridge can be high quality and still be the wrong choice if its certifications do not line up with your water.

Time rating versus gallon rating

Cartridge life is usually shown in two ways. One is time, such as a replacement every several months. The other is capacity, which is how many gallons the cartridge is designed to treat.

A simple way to read this is to treat the cartridge like a pair of work boots. Time matters because materials age. Usage matters because heavy use wears them down faster. Your replacement point is whichever limit comes first.

If a cartridge is rated for a certain number of months but your household uses filtered water for drinking, cooking, coffee, pet bowls, and filling reusable bottles all day, you may hit the gallon limit sooner than the calendar suggests. On the other hand, a lightly used guest kitchenette may age out on time before it reaches full capacity.

What shortens cartridge life

Real kitchens rarely match ideal test conditions. Several things can use up a cartridge faster:

  • Sediment-heavy water
    Dirt, rust, and fine particles can clog the cartridge early, much like dust loading up a furnace filter.

  • Higher daily water use
    Bigger families and frequent cooking simply push more water through the media.

  • Tougher contaminant loads
    If the cartridge is working hard to reduce a target contaminant, its useful life can shrink.

  • Poor match between cartridge and water
    A cartridge chosen for taste and odor may not hold up well if the actual issue is something more demanding.

Long-term cost gets clearer. A cheaper cartridge that needs frequent replacement can cost more over a year than a better-matched cartridge with a longer service life.

Watch for practical clues, too. Slower flow, returning chlorine taste, or a change in odor usually means the cartridge is reaching the end of its useful life. In a cramped sink base, that matters twice, because every extra replacement is another trip back into that cabinet.

Cartridge Installation and Replacement Basics

Most cartridge replacements start the same way. You kneel on the kitchen floor, move the spray cleaner, trash bags, and dish soap out of the cabinet, then realize the hard part isn't the filter. It's the space.

A person replaces an A. O. Smith brand under-sink water filter cartridge in a kitchen cabinet.

A common mistake is measuring only the cabinet footprint. Installation and servicing also require enough vertical clearance to pull the cartridge down without unmounting the whole unit, which can raise leak risk over time, as noted in this under-sink installation guide.

Before you loosen anything

Start with the basics:

  1. Shut off the feed water to the filter.
  2. Relieve pressure by opening the filtered-water faucet.
  3. Place a towel or shallow pan under the housing.
  4. Check your clearance before you twist the cartridge or housing loose.

That last part saves a lot of frustration. If the housing can't drop far enough, you may have to shift storage items, reroute tubing carefully, or in some setups reconsider the mounting position.

The small details that prevent leaks

Many replacement jobs go wrong on the little stuff, not the big stuff.

  • Watch the O-ring
    If the seal is dry, twisted, dirty, or out of place, you can end up chasing drips for the next hour.

  • Don't overtighten
    Hand-tight is usually the goal after the seal is seated properly. Forcing it can damage parts or make the next change miserable.

  • Match the cartridge exactly
    A cartridge that looks close may still be the wrong geometry or the wrong filtration class.

Here's a helpful walk-through if you want to see a replacement process in action:

Don't skip the flush

A new cartridge usually needs a flush before normal use. In multi-stage systems, the replacement can involve removing and reseating cartridges, reconnecting tubing, and flushing the system afterward. That's one reason maintenance burden matters when choosing a cartridge style in the first place.

Some cartridges are easy to swap in a minute or two. Others turn a simple maintenance job into a cramped, wet project. The better choice is often the one you'll actually replace on time.

Estimating Your Total Cost of Ownership

The cheapest cartridge on the shelf can be the most expensive one you own. That sounds backward until you look at replacement frequency, capacity, and the hassle cost of poor flow.

A simple way to think about total cost of ownership is this:

System cost + replacement cartridge cost over time + the inconvenience cost of maintenance

That last part isn't on the receipt, but it matters. If a cartridge is annoying to change, people delay it. Then performance drops.

Capacity is money in disguise

A cartridge's capacity tells you how long it can do its job under expected conditions. That directly affects how often you buy replacements.

A real market example helps. One replacement under-sink cartridge is rated for about 720 gallons with replacement every 6 months and a stated flow rate of 0.72 to 1.0 GPM, according to WaterChef's replacement cartridge details. That gallon rating isn't decoration. It's an operational limit tied to maintaining performance.

How to compare two cartridge options

When you're choosing between cartridges, ask these questions:

  • How often will I replace it
    A lower upfront price may come with more frequent purchases.

  • What's the usable flow like
    Slow faucet performance creates daily annoyance, especially when filling pots or bottles.

  • Am I paying for features I don't need
    A more complex cartridge can cost more without solving a problem you have.

  • How difficult is the swap
    A hard-to-replace cartridge has a hidden cost in time, mess, and procrastination.

Here's a practical comparison mindset. Cartridge A costs less today, but it needs more frequent changes and has slower flow. Cartridge B costs more upfront, but it lasts longer and is easier to service. Over time, Cartridge B may be the more sensible buy even before you count the frustration factor.

Don't confuse high capacity with universal value

High capacity is useful only if the cartridge also matches your water goals and your system. A long-life cartridge that doesn't fit the housing or target the right contaminants is still the wrong cartridge.

For homeowners, the smart move is to compare the real ownership rhythm. How often you order replacements. How annoying the change process is. How the faucet feels every day. That's the cost you live with.

Your Ultimate Cartridge Buying Checklist

By the time you're ready to buy, the goal isn't to memorize filter jargon. It's to narrow the decision to a cartridge that fits your system, fits your water problem, and fits your patience level for maintenance.
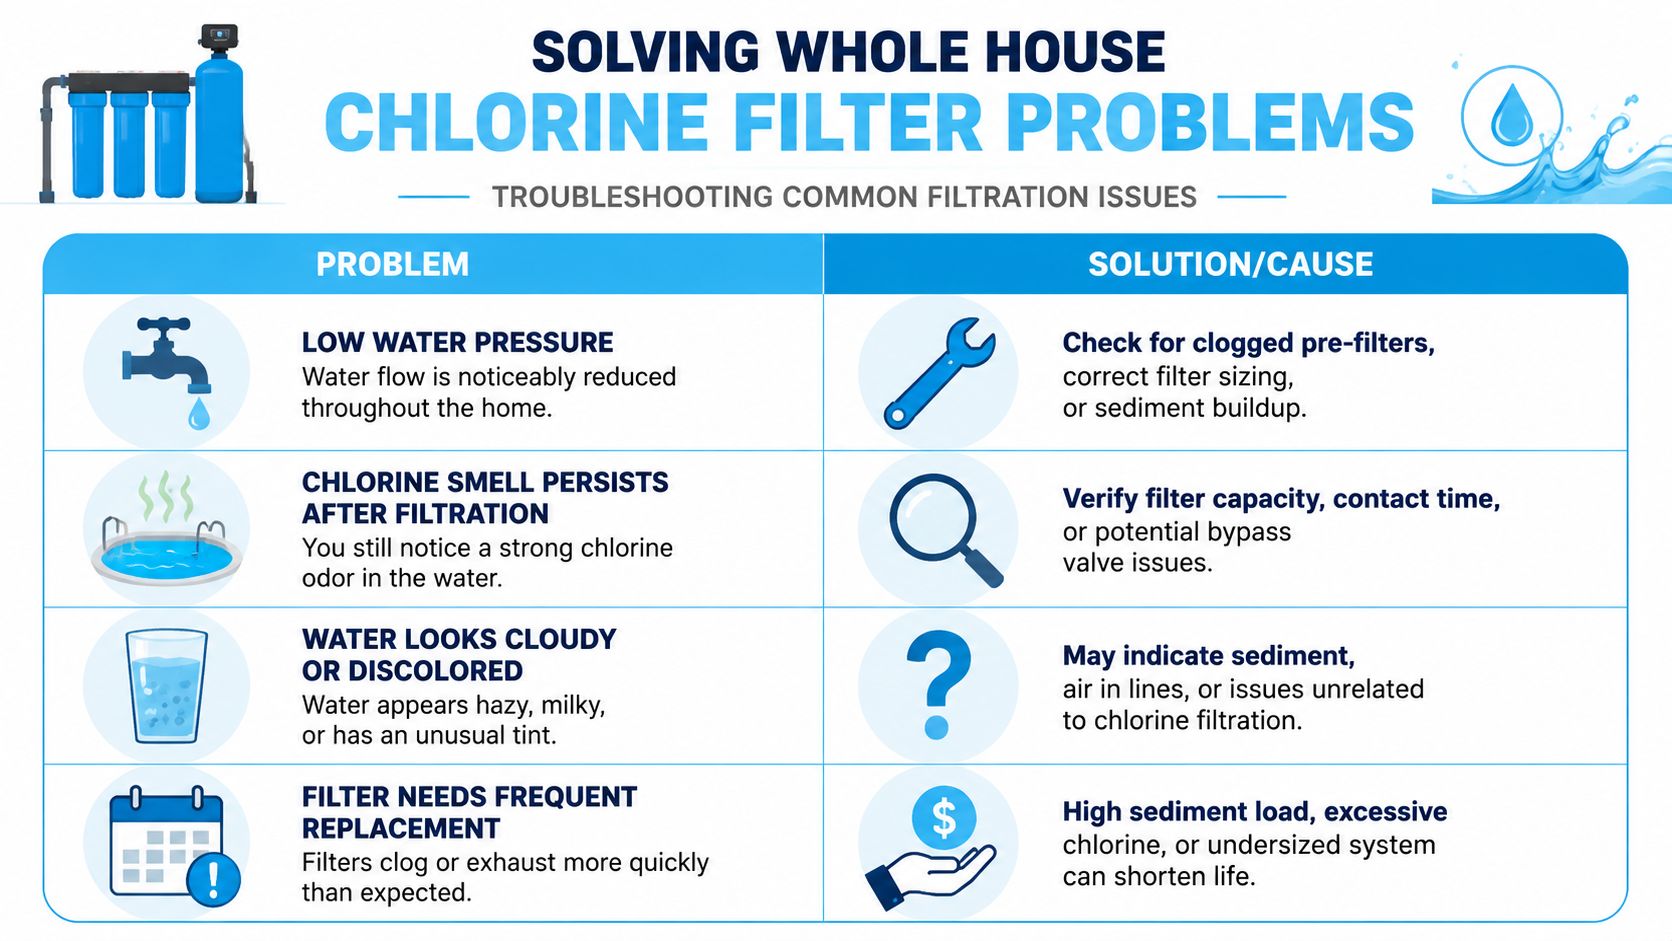
A helpful checklist for buying water filter cartridges featuring seven essential steps for making informed purchases.

Use this checklist before you order

  • Identify the problem first
    If your issue is chlorine taste, you're shopping differently than someone worried about lead or someone dealing with sediment.

  • Confirm physical compatibility
    Check the exact cartridge style, housing fit, and whether your system uses a proprietary shape or a more standard form.

  • Match the cartridge to the filtration job
    Sediment, carbon, and specialty media each play different roles. Buy for the problem, not the marketing.

  • Check the certification label
    Packaging should tell you what the cartridge is certified to reduce. That matters more than vague promises.

  • Look at lifespan and daily use
    A cartridge may be right on paper but annoying in a busy household if it needs frequent changes or slows the faucet too much.

  • Be honest about maintenance tolerance
    The best cartridge choice depends not just on water goals but also on how much maintenance burden you'll accept, since multi-stage systems can involve more complex replacements and flushing, as shown in this hands-on replacement discussion.
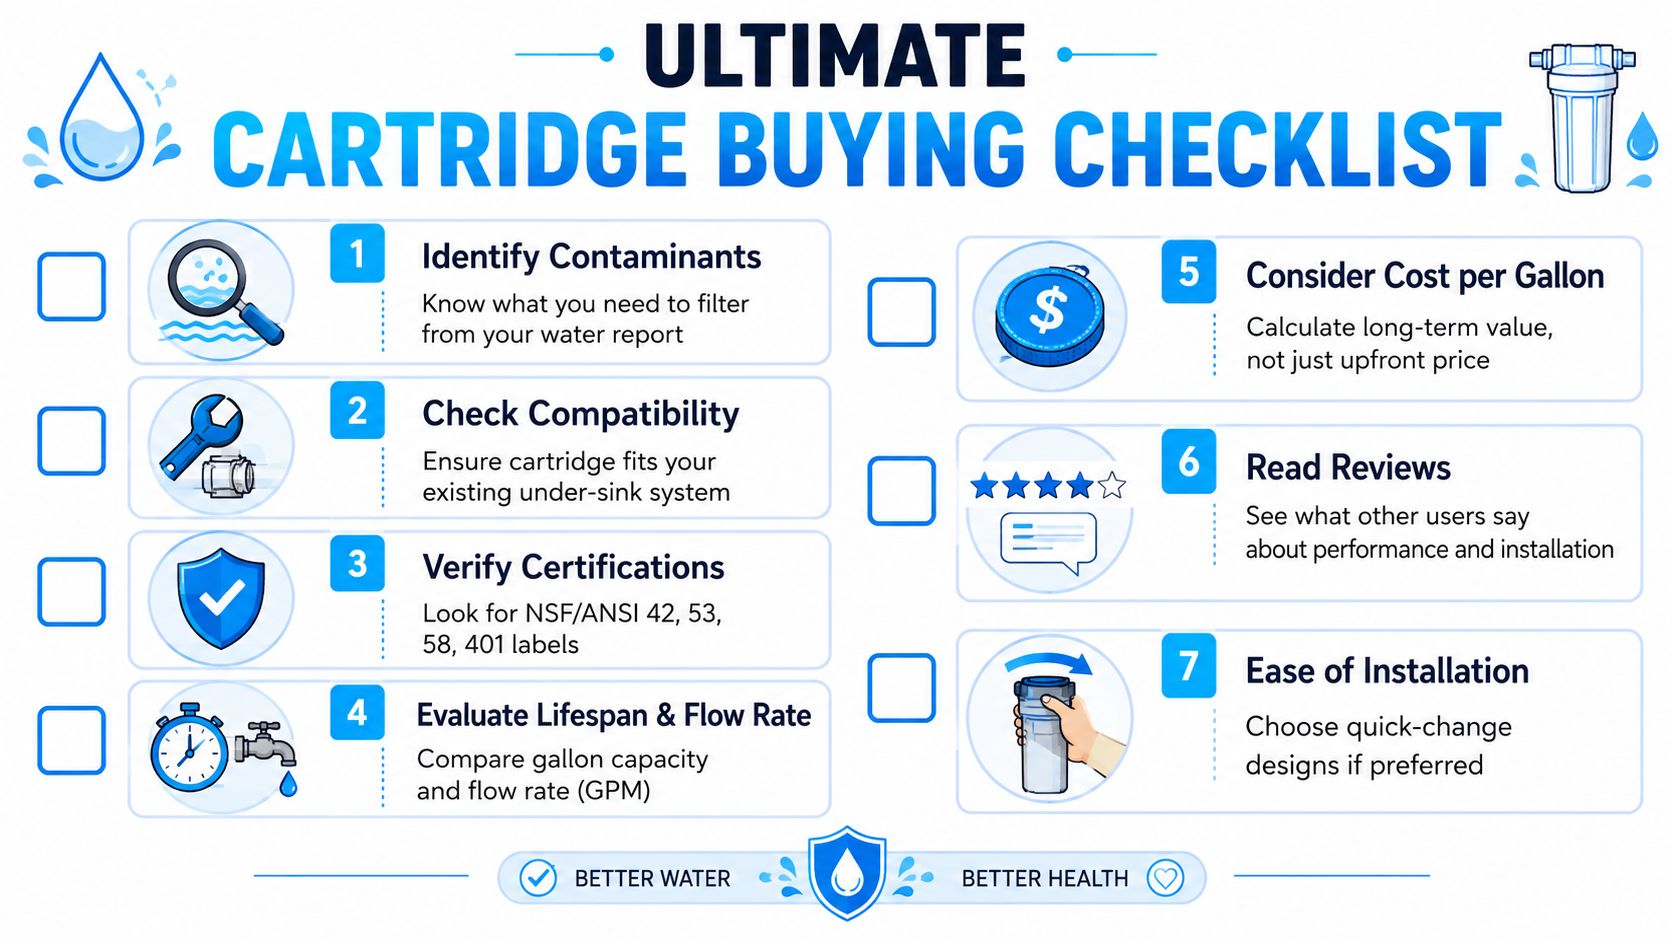
  • Think beyond the cartridge itself
    If your real goal is less bottled water at home, it's worth learning more about reducing single-use plastic while you plan your filtration setup.

One smart final check

Before buying, pull up the product page, your old cartridge, and a photo of your under-sink setup at the same time. That simple habit catches a lot of mistakes.

If you want a broader library of practical comparisons and maintenance guidance, Water Filter Advisor's advice center is one place homeowners can use to compare filter types, certifications, and replacement considerations across common home systems.

The right cartridge is the one you can identify clearly, install without drama, replace on schedule, and trust for the specific water you actually have.


If you want help sorting through cartridge types, certifications, and replacement decisions without the guesswork, visit Water Filter Advisor for practical guides built around real household water filtration needs.