Refrigerator Water Filter Bypass: Methods & Safety

Your refrigerator starts blinking for a filter change, the water stream slows down, and you realize you don't have the replacement cartridge sitting in the pantry. That's when the search for a refrigerator water filter bypass typically begins.

Used correctly, a bypass can keep the dispenser and ice maker working. Used carelessly, it can leave you with leaks, error messages, or a cracked filter housing. The difference usually comes down to one thing: whether you identified the right bypass method for your exact refrigerator model before you touched anything.

Why You Might Need to Bypass Your Refrigerator Filter

A bypass makes sense in more situations than people think. Sometimes it's a short-term move because your old filter clogged and your replacement hasn't arrived yet. Sometimes it's part of a bigger water-filtration plan, especially if the house already has an under-sink or inline filter feeding the refrigerator.

A stainless steel refrigerator water dispenser panel displaying a red status light for the water filter replacement.

The first thing to understand is that a bypass plug isn't some garage workaround. It's a factory-recognized part on many refrigerators. GE states that if you don't want to use the water filter, “a bypass plug must be used in place of the filter,” and GE also notes that a missing original plug can be ordered at no charge through GE Cares on its GE support page for refrigerator filter bypass plugs.

Temporary reasons people use a bypass

Most service calls fall into a few familiar categories:

  • Waiting on a replacement filter: The old cartridge is clogged, flow is weak, and you need water now.
  • Diagnosing a problem: Removing the filter and using the correct bypass can help you tell whether the filter caused the restriction.
  • Testing a new installation: If a dispenser isn't working after filter replacement, the bypass can help isolate whether the issue is the cartridge or something else in the water path.

Practical rule: Use a bypass to restore flow or diagnose the filter circuit. Don't confuse it with a filtration solution.

Permanent reasons can also be valid

Some homeowners choose a bypass because the refrigerator's internal filter isn't the main treatment stage anymore. That often makes sense when the fridge is already being fed with filtered water from another system.

Common examples include:

  1. An under-sink filter already treats the kitchen cold line
  2. An inline refrigerator filter was added on the supply tube
  3. The water and ice functions are rarely used, but still need to remain operational

If your reason is permanent rather than temporary, you still need to think about water quality, not just flow. A blinking light and a weak stream are appliance symptoms. Clean drinking water is a separate issue. If you're trying to decide whether replacing the cartridge is still the better move, this guide on why you should replace your refrigerator water filter is a useful comparison point.

Finding and Installing the Correct Bypass Plug

This is where most mistakes happen. People search “fridge filter bypass,” buy the first plastic cap that looks close enough, and force it into the housing. That's how housings get damaged.

Start by checking whether your refrigerator even needs a plug

Some refrigerators have an automatic bypass path. A simple field check helps: remove the filter and see whether the dispenser still works normally. If water still dispenses, the unit may already have an internal bypass path. If flow stops, the refrigerator likely expects either the filter or a model-specific bypass part in that port.

The basic process is straightforward once you know your setup.

An infographic showing a four-step guide on how to install a refrigerator water filter bypass plug.

Match the bypass to the exact model number

Refrigerator water filters are not universal, and bypass parts aren't universal either. LG lists bypass plug cap ABN73019101, Samsung lists bypass cap DA67-02270A for specific models, and Whirlpool, KitchenAid, and Maytag use W11395888. The fit has to match the exact housing geometry or the refrigerator may not dispense water properly, as shown on this LG refrigerator bypass plug product listing.

That means you should work in this order:

  • Find the model number first: Look inside the fresh-food compartment walls, near crispers, on the ceiling liner, or on the door frame label.
  • Use the manufacturer's parts lookup: Don't shop by appearance alone.
  • Compare the filter family: A similar-looking cartridge mount from another brand usually won't interchange correctly.

A replacement guide like this one on refrigerator water filter replacement can help you identify your filter family before you order the bypass part.

For readers who prefer a visual demonstration, this walkthrough can help illustrate the physical process:

General installation steps that work on most supported models

The exact motion differs by brand, but the service logic stays the same.

Step What to do Why it matters
Shut off or pause water use Stop dispensing and work carefully around the housing Reduces mess and makes leaks easier to spot
Remove the filter Twist, push-release, or pull depending on design Opens the port for the bypass part
Insert the bypass plug Seat it in the same cutouts or channel used by the filter The plug must engage the valve correctly
Lock it in place Turn or press until fully seated A half-seated plug often causes no flow or dripping
Test dispenser flow Run water and check the housing area Confirms the seal and valve position

If the bypass doesn't insert smoothly, stop. The right part should fit the housing correctly. Forcing it is how tabs snap and seals get distorted.

Brand-specific fit matters more than people expect

Some housings use a simple twist lock. Others use a push-in latch. Even within one brand, different product lines can use different holders and lock-in motions. A bypass plug has to do more than occupy space. It has to open the internal water path the way the cartridge would.

That's why a “universal bypass” is usually a bad bet on refrigerators. In the field, the correct bypass almost always looks boring. Small plastic part, exact fit, no drama. That's what you want.

The Unfiltered Truth Risks and Water Quality Concerns

The bypass can restore water flow fast. What it does not restore is filtration.

An infographic detailing the various health, safety, and appliance risks associated with using unfiltered refrigerator water.

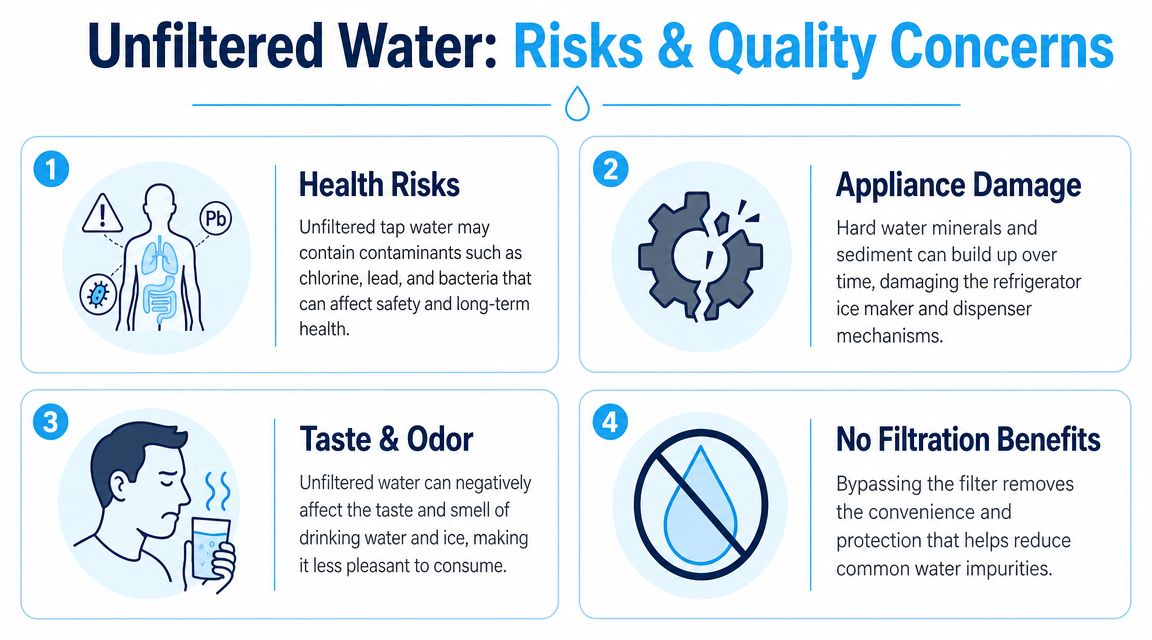
That distinction matters more than people expect. A refrigerator dispenser can make water colder and more convenient, but once the filter is bypassed, the quality in your glass goes back to whatever is coming from the house supply. If your tap water already tastes clean and has been tested, that may be an acceptable short-term compromise. If it carries chlorine, sediment, hardness, sulfur odor, or old-pipe taste, the fridge is no longer helping.

What changes in the glass

I see this catch people with ice first. They install the correct bypass, the dispenser works again, and they assume the water is "basically the same." Then the ice starts tasting like the tap. Coffee and tea show the change even faster because off-flavors become obvious once the water is heated.

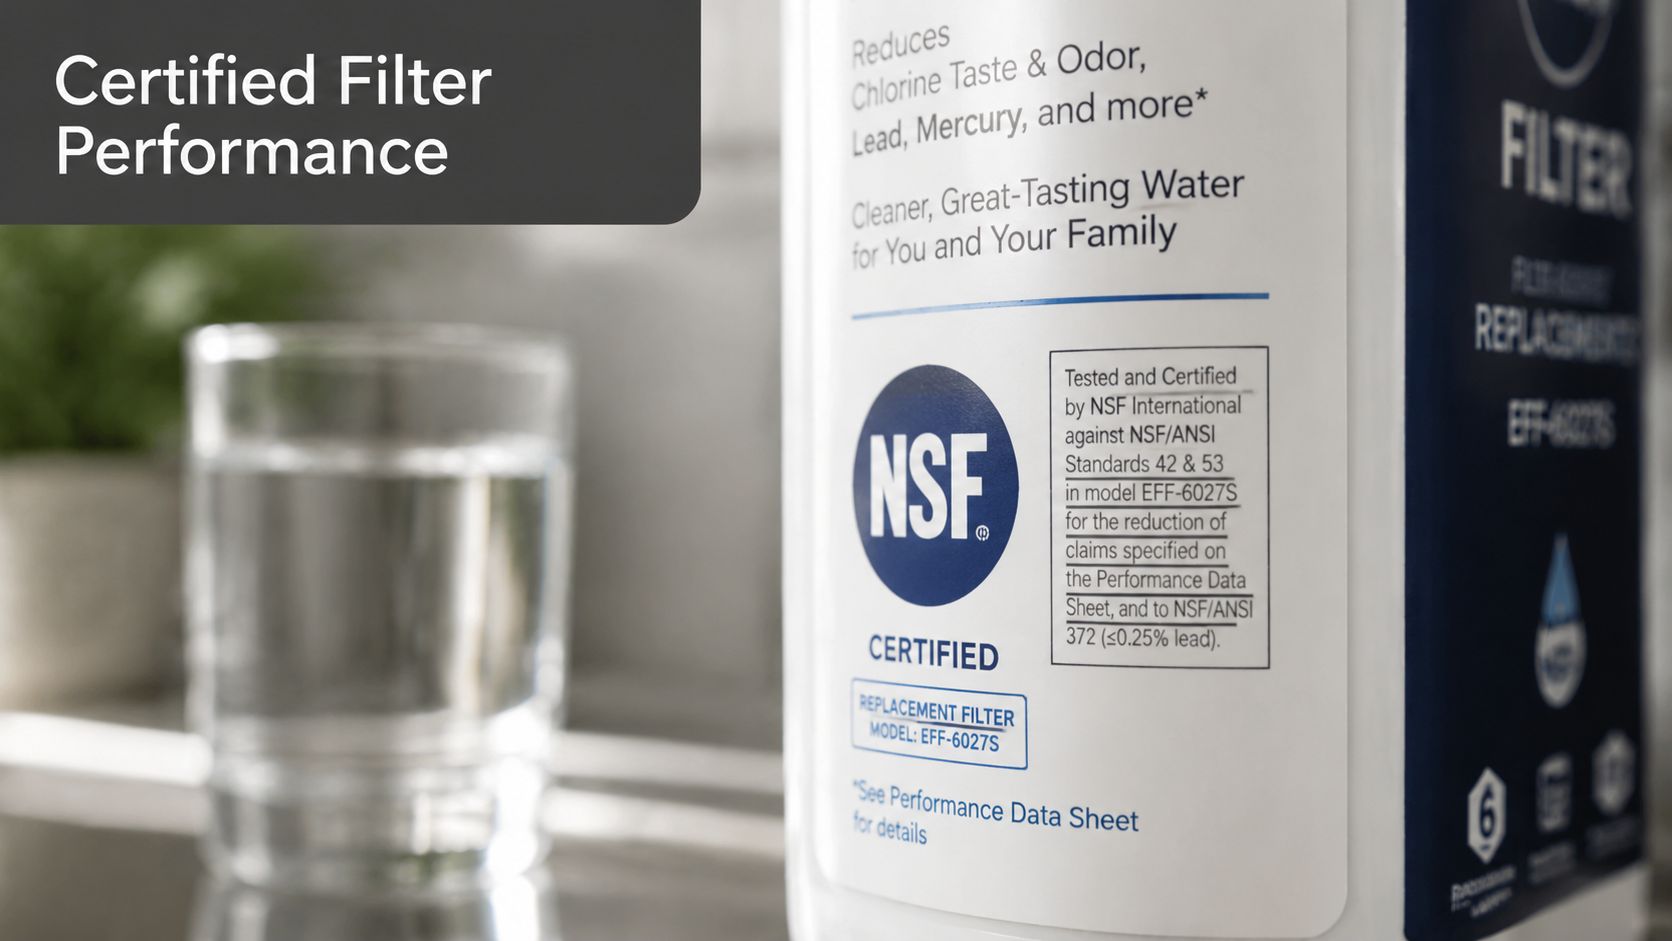
Water quality also affects more than taste. Refrigerator filters are commonly certified for specific contaminant reduction claims, and NSF explains that those claims depend on the filter and certification standard, not on the refrigerator itself. Remove the cartridge from the treatment path and you remove that reduction step. You can review the certification side of it through NSF's consumer guidance on drinking water treatment unit certification.

If flavor matters in daily use, Allied Drinks Systems' coffee water advice gives a practical explanation of why untreated water changes extraction and taste.

Cold water from the fridge is still unfiltered water if the bypass is doing the work instead of a cartridge.

Water quality is only half the risk

The other half is appliance compatibility. A bypass plug is not just a cap. On many refrigerators, it has to press the right internal valve points, seat the O-rings correctly, and match the holder geometry for that exact filter head. On some newer models, the refrigerator may also check for a specific cartridge type or recognition feature.

That is why model-specific identification matters so much here. The wrong bypass method can leave you with weak flow, no flow, leaks inside the housing, or a damaged latch that turns a simple filter issue into a parts repair.

A video-based GE support reference highlights that bypass compatibility can vary by model and by filter holder style, which is exactly why generic tutorials get people into trouble. See this video reference on refrigerator bypass compatibility and model-specific risk.

These warning signs mean you should stop and verify the exact refrigerator model and filter system before going any further:

  • Water flow returns, but the housing drips or sweats
  • The bypass part goes in partway, then binds
  • The refrigerator shows a filter, error, or no-water message after installation
  • The cartridge head or holder looks different from the parts diagram for your model
  • The fridge uses a newer filter platform with electronic or keyed recognition features

In the field, forcing the issue is what breaks things. If the bypass method is correct for the brand and model, it should seat cleanly, lock the way the manual describes, and restore flow without strain.

Smart Alternatives to a Permanent Bypass

A permanent bypass is usually the wrong long-term fix if your household still drinks from the refrigerator dispenser. The better approach is to keep the fridge happy with the correct bypass method for that model, then move the actual filtration outside the refrigerator where service is easier and filter choices are better.

A person holding a water filtration pitcher with a fresh filter next to a glass of water.

That setup avoids two common mistakes I see in the field. One is leaving the fridge on bypass for months and forgetting the water is no longer being treated at the appliance. The other is buying a random inline filter without checking whether the refrigerator's inlet pressure, tubing size, and bypass part are all compatible with that brand and model.

The practical alternatives are straightforward:

  • Inline refrigerator filter on the supply line: Good for homes that want filtered water only at the fridge and icemaker
  • Under-sink filter with a branch line to the refrigerator: Better if you also want a drinking faucet at the sink
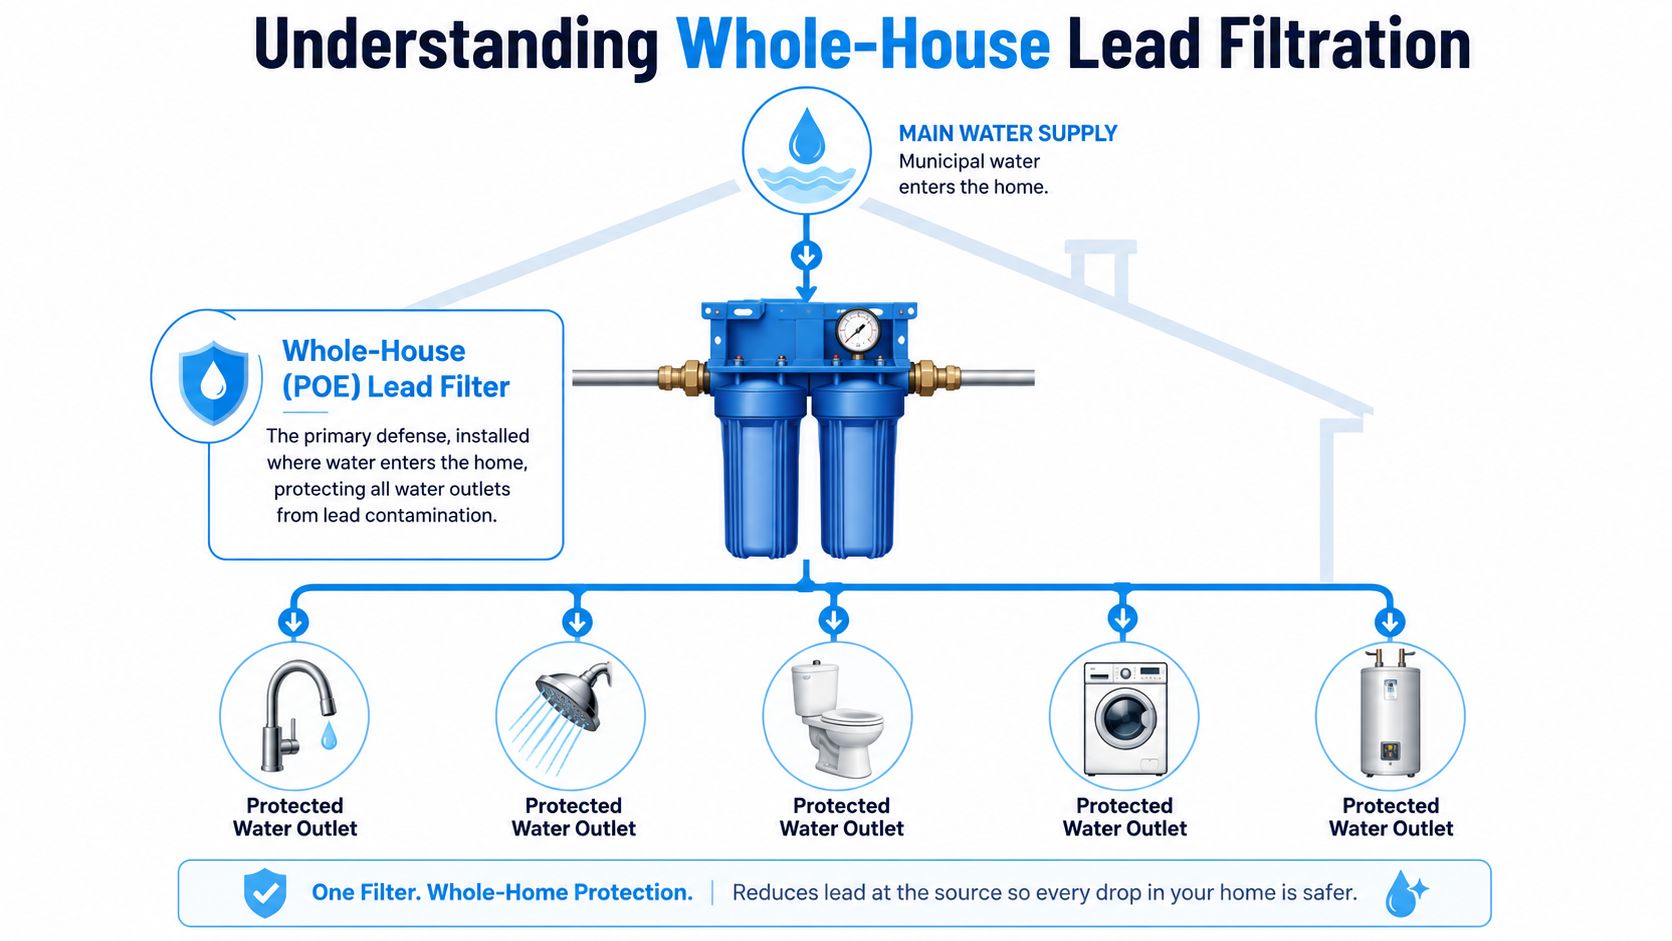
  • Whole-house treatment with point-of-use polishing: Best for broader water issues like sediment or chlorine throughout the house, while still improving drinking water at the kitchen

Each option has trade-offs. An inline fridge filter is simple, but replacement access can be awkward if the refrigerator sits tight to the wall. An under-sink system is easier to service and usually gives you more cartridge options, but it takes more planning to run a clean branch line. Whole-house systems help with general water conditions, yet they often do not replace a good drinking-water filter at the kitchen.

If you go this route, set it up in the right order:

  1. Confirm the refrigerator can run on a bypass for your exact model. Some units need a model-specific bypass plug, while others can run with the filter removed or with a built-in bypass path.
  2. Install and flush the upstream filter first. That clears trapped air and loose carbon fines before they reach the dispenser or icemaker.
  3. Reconnect the fridge and test flow at the dispenser. Good flow and no leaks tell you the external filter and bypass arrangement are working together.
  4. Label the new filter location and replacement schedule. Once filtration moves upstream, maintenance is easy to forget because the fridge filter light may no longer reflect the active cartridge in use.

A pitcher works for short gaps, such as waiting on the correct bypass plug or filter delivery. It does not replace the convenience of a working dispenser and icemaker, and it does nothing for the ice side of the refrigerator.

Local water conditions matter too. Chlorine taste, hardness, sediment, and source-water quality all affect which upstream system makes sense. If you want a location-specific example, Oxy Plus Water's Dubai water guide shows how regional supply conditions can change the right filtration choice.

If the goal is lower filter cost without giving up water quality, relocate the filtration instead of abandoning it. That keeps the refrigerator operating the way it was designed, without locking yourself into expensive proprietary cartridges.

Troubleshooting Common Refrigerator Bypass Issues

Bypass installed, but the refrigerator still isn't acting right? Most problems fall into a short list.

No water after installing the bypass

Likely cause: The plug isn't fully seated, the wrong part was ordered, or the housing valve wasn't opened by the bypass.

Fix: Remove the bypass and inspect alignment. Reinstall it slowly and lock it exactly as the model requires. If it still won't dispense, verify the part number against the refrigerator model tag rather than the original filter number.

Slow flow even with the bypass

If the bypass is correct, don't assume the plug is the problem. One technical answer notes that refrigerator inlet valves typically require at least 20 psi to function properly, so low house pressure can still cause weak or failed dispensing even after the filter restriction is removed, as described in this refrigerator bypass troubleshooting note.

Check the simple items first:

  • Supply valve: Make sure the shutoff is fully open
  • Feed line: Look for a kink behind the refrigerator
  • House pressure: If other cold-water fixtures are also weak, the issue may be upstream of the fridge

Leaks around the filter housing

Small drips usually point to one of three things. The bypass isn't locked in fully, the wrong plug is installed, or a seal inside the housing has been disturbed.

A good field habit is to dry the area completely, run the dispenser, then watch for fresh moisture at the housing seam. That tells you whether the leak starts at insertion, under pressure, or only during dispensing.

Filter light stays on

The indicator light often tracks service intervals or reset status, not water purity and not necessarily bypass status. On many models, you'll need to reset the filter indicator manually after installing a bypass or after switching back to a cartridge.

If the light stays on but water flow is normal and there are no leaks, that usually points to a reset issue rather than a plumbing failure.

Frequently Asked Questions on Filter Bypassing

Will a bypass plug void my refrigerator warranty

Using a manufacturer-supported bypass method is generally different from modifying the appliance. The safer path is to use the exact part intended for your model and follow the owner's manual. If the refrigerator is under warranty, confirm the approved procedure with the brand before installing anything.

What if my model doesn't have a bypass plug available

First, verify whether the refrigerator has an automatic bypass path. If it doesn't, don't improvise with a lookalike part. Either keep the correct filter installed or move to an upstream filtration setup that lets you continue using the proper cartridge arrangement.

How do I switch back to using a filter later

Remove the bypass, install the correct filter for the model, and flush the dispenser according to the filter instructions. Then reset the filter indicator if your refrigerator has one.

Can I leave the bypass in permanently

You can, but only if you're comfortable drinking unfiltered supply water or you've added filtration upstream. Permanent bypass without any other treatment is usually a convenience choice, not a water-quality choice.


If you want help choosing a better long-term solution than bypassing the fridge filter, Water Filter Advisor is a solid place to compare refrigerator, inline, under-sink, and whole-house options so you can keep the dispenser convenience without giving up clean, good-tasting water.

Best Shower Filter for Hair Loss: Stop Damage Today

You've changed shampoos. You've bought the scalp serum. You've cut back on heat styling. Yet your hair still feels rough after every shower, your scalp feels tight, and the drain keeps collecting more strands than you'd like.

That's usually when people start looking for the best shower filter for hair loss. The mistake is assuming there's one universal winner.

There isn't.

A shower filter only helps when it targets the problem in your water. Chlorine needs one kind of performance. Chloramine is a different challenge. Hard water minerals create a different set of hair and scalp complaints. If you buy a filter based on marketing instead of water chemistry, you can end up with a nice-looking fixture that changes very little.

Here's the practical way to think about it. Start with what your water is doing to your hair, then match the filter media and model to that issue. That's how you get a result you can feel in the shower and see in the mirror.

Water problem What it often feels like Filter priority Better fit
Chlorine in municipal water Dry hair, irritated scalp, faded color, chemical smell Strong disinfectant reduction Filters with proven chlorine reduction
Chloramine-treated city water Persistent dryness and irritation despite a basic filter Media that can handle chloramine, not just chlorine More advanced multi-media designs
Hard water minerals Dull texture, residue, poor lather, tangling Treatment aimed at mineral-related issues Shower filters designed for hard water support, or a whole-home softener if hardness is severe
Mixed contaminants Hair feels coated and scalp feels off at the same time Broad contaminant coverage Higher-performing shower filters with tested reduction claims

The Surprising Link Between Your Shower and Hair Thinning

The shower isn't typically blamed at first. Blame often falls on age, stress, hormones, bad luck, or the newest product that didn't live up to the label.

That makes sense. Hair shedding and breakage are messy problems because several things can be true at once. Someone can have normal daily shedding, some product buildup, and a water issue all at the same time. The shower water often gets missed because it feels ordinary. It's part of the background.

But water quality can change how your scalp feels, how your hair shaft behaves, and how well your products rinse away. Chlorine has been part of public water disinfection since the early 1900s, and many households in the 2020s still deal with chlorine or chloramine in shower water. That means daily exposure is still a real home comfort issue, especially for hair and scalp care.

A diagram illustrating the connection between shower water quality and common hair loss and thinning concerns.

What filtered shower water may actually change

A 2026 Afina article cited a study reporting a 23% reduction in hair shedding after 8 weeks of filtered shower use and a 47% improvement in scalp hydration among participants with dry scalp, which supports the idea that better shower water can improve the scalp environment even if it won't reverse genetic hair loss (Afina on filtered showerheads and balding).

That's the key distinction. A shower filter is not a regrowth treatment for hereditary baldness. It's a home water treatment tool that may reduce one source of ongoing stress on your hair and scalp.

Practical rule: If your hair feels worse right after washing than it does before washing, the water deserves scrutiny.

That matters because “hair loss” is often a catch-all phrase. Some people are seeing true thinning. Others are dealing with breakage that makes hair look thinner. Others have scalp irritation that makes the whole situation feel more dramatic. If you're also researching the medical side, this guide to understanding male hair loss treatments helps separate water-related support from treatments meant for pattern hair loss.

For many households, the first useful clue is simple. If your scalp feels calmer and your hair feels less coated after washing with filtered or lower-mineral water, your shower may be part of the problem. If hard water is on your radar, it also helps to review these hard water effects on skin and hair so you can tell buildup apart from true scalp sensitivity.

Decoding Your Water What's Really Hurting Your Hair

You move into a new place, keep the same shampoo, and within two weeks your hair feels rougher, your scalp gets tighter after every shower, and the drain suddenly looks more alarming. That pattern usually points to the water.

A shower filter only helps when it matches the problem in your supply. “Best” is not a brand name or a price tier. It is the filter media that fits what is coming out of your showerhead.

Chlorine and chloramine

City water often contains chlorine or chloramine. They are not interchangeable from a filtering standpoint.

Chlorine is the easier one to spot. Hair may feel stripped after rinsing, the scalp can feel dry or squeaky, and hot water may release a noticeable pool-like smell. Color-treated hair often loses its soft feel faster in chlorinated water because repeated washing leaves the cuticle less comfortable and more prone to dryness.

Chloramine is more stubborn. Utilities like it because it remains stable longer as water moves through the system. The problem for shoppers is simple. Plenty of shower filters reduce chlorine reasonably well, but fewer are designed to deal with chloramine effectively. If your area uses chloramine, a basic carbon cartridge may not give you the relief you expected.

That is why water reports matter. Before buying a filter, check your utility's annual report or ask directly which disinfectant they use.

Hard water minerals

Hard water creates a different set of complaints. Instead of a stripped feeling, it usually leaves buildup behind.

Calcium and magnesium can make hair feel coated, dull, stiff, or harder to rinse clean. They also make shampoo lather poorly, so people often use more product and still feel like their hair is not fully clean. On the scalp, that combination can leave residue, dryness, and itching that gets blamed on the wrong product.

If those signs sound familiar, this guide to choosing a shower filter for hard water can help you judge whether a shower filter is enough or whether your home is really a better candidate for a softener.

Heavy metals and sediment

Heavy metals and sediment are less obvious, but they still matter.

Sediment often shows up as visible grit, discoloration, or cartridges that clog faster than expected. Heavy metals are harder to confirm without a water test, and that is exactly why they get missed. Homeowners buy a filter for chlorine, assume they covered everything, and then wonder why their hair still feels off.

When people say a shower filter “did nothing,” the usual issue is mismatch. They chose a chlorine-focused filter for water that is mainly hard, chloramine-treated, or full of sediment.

One practical clue is timing. If your hair and scalp changed after a move, after municipal water work, or after switching from well water to city water, test the water before blaming your shampoo. Hair thinning can have several causes at once, so it also helps to rule out non-water factors. My Transformation for hair confidence offers a useful overview of other reasons hair may start falling out.

The main takeaway is straightforward. Chlorine, chloramine, and hard water do not affect hair in the same way, and they are not handled by the same filter design. Matching the filter to your water chemistry gives you a much better shot at calmer scalp skin, cleaner-feeling hair, and less breakage from day-to-day washing.

Shower Filter Technologies Compared for Scalp Health

Two shower filters can look nearly identical and perform very differently on your hair. The deciding factor is the media inside the cartridge, how that media reacts with your water, and whether the filter was built for chlorine, chloramine, or a lighter cleanup job.

That is the part shoppers miss. A polished housing does not tell you if the filter can handle your actual water problem.

Shower Filter Media Comparison

Filtration Media Best For Removing Less Effective Against Notes
KDF Chlorine support, some heavy metal reduction Hard water softening, broad-spectrum removal by itself Common in multi-stage shower filters. Usually more useful in a blend than as the only media.
Activated carbon Chlorine, odor, some organic compounds Hot-water performance in some shower setups, hard minerals Familiar and useful, but shower flow rates can limit contact time.
Catalytic carbon Chloramine and tougher disinfectant reduction than standard carbon Hardness minerals A stronger option when the utility uses chloramine instead of free chlorine.
Vitamin C Chlorine and often chloramine neutralization Sediment, mineral scale by itself Fast-acting for disinfectants. Usually not enough if minerals are the main issue.
Calcium sulfite Chlorine reduction in shower conditions Hardness minerals, broad contaminant reduction Popular in shower filters because it reacts quickly in warm water.

How these media perform in actual showers

KDF has a place, especially in mixed-media cartridges. It can help reduce chlorine and can support reduction of some metals. I do not treat it as a complete answer on its own. If a filter leans heavily on KDF and says little about chloramine performance, I assume it is better suited to standard chlorine-treated water than to a tougher municipal supply.

Activated carbon can work well, but shower conditions are not gentle. Hot water and higher flow shorten contact time, which is why some carbon-based shower filters disappoint even though carbon performs well in kitchen filters. Good design matters as much as the media itself.

Catalytic carbon is the better pick when chloramine is the main problem. Standard carbon can struggle there. If your city uses chloramine and your scalp still feels irritated after trying a basic chlorine filter, this is one of the first upgrades I would look at.

Vitamin C and calcium sulfite are both practical disinfectant-focused options. They act quickly, which suits shower use. They are helpful for hair that feels dry, rough, or over-stripped after washing. They do very little for true hard water.

What shower filters usually cannot do

A shower filter is rarely a substitute for a real water softener. Some cartridges can reduce a small amount of scale-related effect or make water feel better on the skin, but they do not remove hardness minerals the way ion exchange softening does.

That trade-off matters. If your main problem is chlorine smell, a well-matched shower filter can make a noticeable difference for scalp comfort and hair feel. If your main problem is heavy scale, soap that will not lather, and constant white buildup on fixtures, a shower filter alone is usually the wrong tool.

Field note: Dry, stripped hair points toward disinfectants. Sticky residue, tangling, dullness, and poor lather point toward minerals. The filter should match that pattern.

For readers comparing cartridges and media claims, Water Filter Advisor's shower filter resources can help you check whether a product is aimed at chlorine reduction, chloramine reduction, or a more limited cosmetic improvement.

Top Shower Filter Models for Hair and Scalp in 2026

Model recommendations make sense only when they're tied to a use case. A filter that performs beautifully in a high-chlorine city may be a weak fit for someone whose main issue is stubborn hard water residue.

A chrome AquaBliss shower head filter installed in a modern bathroom with water running through it.

In a 2026 data-driven review, the Weddell Duo completely removed chlorine, was one of only two filters in that comparison to eliminate disinfection byproducts, and the Canopy Shower Filter reduced chlorine by 97% from 2.7 ppm to 0.06 ppm, showing that the gap between top performers and average performers is real, not cosmetic (Water Filter Guru shower filter review data).

Best for high-chlorine municipal water

Weddell Duo stands out when chlorine is the obvious enemy. If you live in a city system, smell disinfectants during hot showers, or deal with hair that feels brittle after washing, this is the type of performance you want to prioritize.

The practical appeal isn't just “cleaner water.” It's the combination of full chlorine removal and stronger contaminant reduction in testing. For hair and scalp shoppers, that matters more than a long list of vague wellness claims.

Best all-around upgrade for many households

Canopy Shower Filter makes sense for people who want a strong, measurable improvement but may not need the absolute top performer for every contaminant class. A 97% chlorine reduction is a meaningful result because it shows real treatment, not just a nicer spray pattern.

If your hair is dry, your scalp tends to feel irritated, and you want a simple shower-focused upgrade rather than a broader plumbing project, this is the kind of profile worth considering.

Best when hard water is the bigger problem

Shoppers should give this careful consideration. A shower filter can help with some hard-water-related hair complaints, but it usually won't replace a softener in a hard water home.

For mineral-heavy water, I look for shower filters that explicitly address hard water support and pair that with realistic expectations. If your hair feels coated, your shampoo doesn't lather well, and the bathroom shows scale everywhere, the right answer may be a two-part plan:

  • Use a shower filter for disinfectants and general shower comfort.
  • Consider a whole-home softener if mineral buildup is severe.
  • Add a clarifying or chelating hair routine while you address the water source.

That hybrid approach is often more effective than asking one shower cartridge to solve every water problem in the house.

A quick product walkthrough can help you see the design differences that marketing blurbs tend to hide.

What to avoid when shopping

Some products sell “multi-stage” as if stage count equals performance. It doesn't. A filter can have many layers and still underperform if the media mix is weak or the contact time is poor.

Watch for these red flags:

  • No contaminant focus: If the product says it's good for everything, it probably isn't.
  • No clear media information: You should know what's inside the cartridge.
  • No testing language: Even qualitative test discussion is better than a page full of beauty copy.
  • Hard water promises that sound absolute: Most shower filters treat. They don't soften.

If you're trying to find the best shower filter for hair loss, the safer question is this. Which model has the strongest evidence for the contaminants most likely affecting my hair and scalp?

Installing and Maintaining Your New Shower Filter

Most shower filters are easier to install than people expect. If you can unscrew a showerhead, you can usually install one.

The standard setup is simple. Remove the existing showerhead, wrap plumber's tape if the manufacturer recommends it, thread the filter onto the shower arm, then reattach the showerhead if you're using an inline unit. Hand-tight is often enough, though an adjustable wrench can help if the old fitting is stubborn.

A step-by-step infographic illustrating the installation and maintenance process for an easy home shower filter system.

A clean install matters

After installation, run water through the unit before your first real shower. New cartridges often need a brief flush. That clears loose carbon fines or manufacturing dust and lets you check for drips around the threads.

Then pay attention to orientation. Some inline filters have a clear top and bottom. Install them backward and performance can suffer, even if water still flows.

Don't judge a new shower filter by the first minute of water. Flush it, check the seal, then evaluate it over several showers.

Maintenance decides whether the filter keeps helping

A neglected shower filter becomes a nice-looking reminder that cartridges don't last forever. As media gets spent, disinfectant reduction drops and performance becomes inconsistent.

The signs usually show up before people connect them to the cartridge:

  • Hair starts feeling rough again
  • The old chlorine smell returns
  • Water flow changes noticeably
  • Scalp irritation creeps back
  • The cartridge shows visible discoloration or sediment loading

Follow the replacement interval from the manufacturer, and shorten it if your water is especially challenging. Homes with more sediment, stronger disinfectant residuals, or heavy daily use will wear cartridges out faster.

Cost of ownership is part of the purchase

A cheap housing with expensive cartridges can be more frustrating than a higher-priced unit with straightforward maintenance. Before buying, check three things:

  1. Replacement cartridge availability so you're not hunting around later.
  2. How easy the cartridge is to swap because awkward systems often get neglected.
  3. Whether the filter fits your shower type so you don't end up forcing adapters into a rental bathroom.

The best shower filter for hair loss isn't just one that works on day one. It's one you'll maintain on time.

How to Tell if Your Shower Filter Is Working

The fastest test is your own shower routine. Hair and scalp usually tell you something before a lab report does.

Subjective signs that matter

Look for changes in feel, not miracles. Hair may feel less straw-like when wet. The scalp may feel less itchy after rinsing. Shampoo may lather and rinse more normally, especially if disinfectants were interfering with comfort and product performance.

You may also notice that conditioner leaves hair smoother instead of fighting through a coated surface. That's often one of the earliest practical wins.

Simple ways to verify performance

For chlorine-focused filters, chlorine test strips are a smart home check. Test the unfiltered tap or tub spout water if possible, then compare it with shower output after the filter. It won't give you a full contaminant profile, but it can confirm whether the filter is still doing the job it was bought to do.

A few habits make the results more useful:

  • Test at the same time of day because water conditions can shift.
  • Use hot and warm settings consistently if that's how you shower.
  • Retest after cartridge changes so you know your baseline.
  • Keep brief notes on scalp feel, hair texture, and any chlorine odor.

The best confirmation is a match between what you feel and what you can measure. If both improve, the filter is earning its place.

If the filter tests fine but your hair still feels bad, revisit the diagnosis. You may be dealing with hard water, product buildup, or a hair-loss issue that isn't mainly caused by shower water.

Frequently Asked Questions About Shower Filters

Will a shower filter reduce water pressure

Sometimes a little, but a good design shouldn't turn your shower into a trickle. If your pressure is already weak, the plumbing may be the bigger issue. For that side of the problem, this guide on how to resolve low shower pressure with Voyager is worth reading before you blame the filter.

Do shower filters work with hot water

They're built for shower conditions, but media still responds differently under heat and fast flow. That's one reason performance varies by design. A filter that sounds impressive on paper may do less in a real hot shower than shoppers expect.

Can renters install them

Usually yes. Most inline and showerhead-replacement filters screw onto standard fittings and can be removed when you move out. That makes them one of the more renter-friendly water upgrades.

Do shower filters soften water

Usually not in the true plumbing sense. They may improve how hard water feels and reduce some associated complaints, but severe hardness usually needs a dedicated softener.

Will a shower filter regrow hair

No. A shower filter can improve water quality, which may reduce dryness, irritation, and breakage-related thinning for some people. It won't reverse genetic hair loss. Think of it as removing one avoidable source of stress, not replacing medical treatment.

What's the smartest way to choose one

Start with your water source. City water often points to chlorine or chloramine. Visible scale and poor lather point to hard water minerals. From there, choose a filter with media and test evidence that fit that problem.


If you want help comparing shower filters by contaminant type, maintenance needs, and real-world use, Water Filter Advisor offers practical guides that make it easier to choose a system that fits your home instead of chasing generic “best” lists.

Whole House Filter for Lead: A 2026 Buyer’s Guide

A lot of people land on this topic the same way. A water report comes back with lead. A neighbor mentions old service lines. A child's pediatric visit turns a vague concern into a very specific one.

That's when the search for a whole house filter for lead starts, and that's also where the confusion starts.

A whole-house system sounds like the obvious answer. Treat everything. Protect every faucet. Stop worrying about which tap is safe. That instinct makes sense. But lead is one of those contaminants where the details matter more than the marketing. The biggest issue is not just whether a system says “lead” on the box. It's whether that claim is backed by the right kind of testing, installed in the right place, and matched to the way lead is showing up in your home.

If your concern includes possible exposure that's already happened, it also helps to understand the health side alongside the filtration side. A plain-language guide to assessing blood lead levels can be useful context while you work through the water treatment decision.

Is a Whole House Lead Filter Right for Your Home

A whole-house lead filter can be the right move, but it's not automatically the safest move, and it's not always the most effective first move.

Think of it as a house-wide shield. If it's designed well and installed properly, it treats water before it spreads through the plumbing. That matters if you want coverage at multiple outlets, not just the kitchen sink. Many homeowners like that idea because it feels complete. You're not relying on one person to remember which faucet has the filter.

The catch is that lead behaves differently from chlorine or sediment. It can show up as dissolved lead, particulate lead, or contamination tied to your own interior plumbing. One setup may handle one form better than another. That's why “whole-house lead filter” is not one product category with one clear answer.

When it makes sense

A point-of-entry system is worth serious consideration if your goal is broad household treatment and you've confirmed that the contamination problem isn't limited to a single drinking tap.

It's often a reasonable fit when:

  • You want protection at every outlet. That includes kitchen taps, bathroom sinks, tubs, and showers.
  • Your plumbing layout allows proper installation. The unit needs to go where water enters the house, before branch lines split off.
  • You're willing to maintain it on schedule. A lead system that isn't serviced becomes an expensive canister with fading performance.
  • You understand its role. In many homes, whole-house treatment works best as part of a layered setup, not as a one-box promise.

Practical rule: Buy a whole-house lead system only after you know where the lead is coming from and what form it's taking.

When it may not be the best first purchase

Sometimes a whole-house system is solving the wrong problem.

If lead risk is concentrated at drinking and cooking taps, a certified point-of-use filter can be easier to verify, easier to maintain, and easier to trust. If the lead is coming from disturbed plumbing or intermittent particulate release, a broad “lead reduction” claim may not tell you enough about how the system will perform in your house.

That's the core decision. Are you buying full-home treatment because you need it, or because the label sounds reassuring?

A seasoned buyer slows down there. The right answer starts with the plumbing map and the water test, not the product photo.

Understanding Point-of-Entry Filtration for Lead

A point-of-entry, or POE, system is installed where water enters the home. That's why people call it a whole-house filter. It sits on the main line and treats water before the plumbing branches off to the kitchen, bathrooms, laundry, and other fixtures.

A diagram illustrating how a whole-house lead filtration system protects all water outlets in a home.

The simplest way to picture it is this. A POE filter is the guard at the front gate. A point-of-use filter is the guard standing at one door inside the house. Both can be useful, but they're doing different jobs.

Why installation location matters

With lead, placement isn't a small detail. It's the whole game.

Whole-house lead control is a point-of-entry hydraulics problem, not just a media problem. To reduce lead at all fixtures, the system has to be installed on the main line before branch distribution so every outlet receives treated water. NSF also notes that performance is only validated up to 150 ppb, and if source water exceeds that level, the filter should not be relied on as the sole control measure, according to the NSF lead reduction listings guidance.

That sentence carries more weight than most product pages do. It means a system can have impressive materials and still fail your household goals if it's undersized, installed too late in the plumbing path, or expected to handle conditions beyond the tested range.

What POE systems do well

A whole-house unit can solve a real convenience problem. Once it's properly plumbed into the main line, every downstream fixture gets treated water. That can matter if your concern goes beyond drinking water and you want broad coverage without adding filters at multiple sinks.

A good POE design can also help with mixed contamination issues when lead appears alongside sediment or other nuisance contaminants. In practical terms, that often means using staged treatment, with one component catching particles and another doing the actual lead reduction work.

What POE systems do not do automatically

They don't guarantee lead safety just because they're big.

A larger tank doesn't override poor contact time. A heavy-duty housing doesn't prove lead performance. And a whole-house label doesn't tell you whether the system is best at dissolved contaminants, particulate contaminants, or something else entirely.

A whole-house system covers more plumbing. That doesn't mean it gives you stronger proof of lead reduction at the tap you drink from.

That's the distinction many buyers miss. Scope and certainty are not the same thing. A POE filter treats more water. A tap-mounted or under-sink filter can offer tighter contaminant-specific verification for the water you consume.

The Technology That Actually Removes Lead

Lead removal isn't magic. A filter has to capture, adsorb, or exchange something specific in the water stream. If you don't know which mechanism a system uses, you can't judge whether it fits your problem.

A cutaway view of a multi-stage water filter cartridge designed for effective lead filtration and removal.

That matters because lead doesn't always show up the same way. Some homes deal with fine particulate lead shed from pipes or fittings. Others have dissolved lead in the water itself. Some have both. The filter media needs to match that reality.

Particle capture and adsorptive media

One common design approach combines fine particle filtration with media that can hold onto lead. Think of this as a two-step trap. First, the system screens out small particles. Then the adsorptive media grabs contaminants that aren't just floating as visible debris.

A lead-focused whole-house system may combine sub-micron particle capture with adsorptive media to target soluble and particulate lead. One example product description specifies a 0.5-micron nominal filtration level and claims reduction of soluble lead, particulate lead, and more than 99.95% of cysts, as described on the US Water Systems Pioneer whole-house lead system page.

That kind of description is more useful than a vague “heavy metal reduction” badge. It tells you what the system is trying to do and gives clues about how it's built.

Ion exchange and why flow matters

Ion-exchange systems work differently. Instead of trapping particles in a maze-like structure, they use resin beads that swap ions in the water. In lead applications, those beads can exchange lead ions out of the flow.

That can work well for dissolved lead, but it depends heavily on contact time and flow rate. If water races through the system too quickly, the exchange process has less opportunity to happen. That's one reason whole-house claims deserve scrutiny. A system that looks impressive on paper can lose effectiveness if the home's demand outruns the media bed.

Here's a practical way to think about it. A lead filter is not a sponge with unlimited grab power. It's more like a loading dock. Water has to arrive at a pace the system can handle.

For a broader technical overview of treatment methods and household options, this guide on how to remove lead from water is a useful companion.

Why generic media lists aren't enough

Some homeowners shop by ingredient list. Carbon. Resin. KDF. Sediment stage. That's understandable, but it's incomplete.

What matters in the field is the combination of:

  • Media type
  • Micron rating
  • Flow rating
  • Housing size
  • Change-out schedule
  • Whether the claim matches your contaminant form

A product can contain good media and still be wrong for the job. If you have particulate lead from aging interior plumbing, a dissolved-lead solution alone may leave a gap. If your home has high simultaneous demand, a system that depends on slow contact may not perform as expected during busy morning use.

This walkthrough helps visualize how staged filtration components are arranged inside a system.

What I trust more than marketing language

I trust systems that describe the mechanism plainly. I trust rated flow and cartridge capacity more than vague promises. I trust product claims that tell you whether they're aimed at soluble lead, particulate lead, or both.

Buy the system that tells you how it works under load. Skip the one that just says “advanced filtration.”

That doesn't make the decision simple, but it does make it cleaner. You're not buying a word like “lead reduction.” You're buying a process.

Decoding Lead Filter Certifications and Claims

On this specific matter, many homeowners get misled.

A product page says “whole-house lead filter,” so people assume it has the same kind of proof behind it as a lead-certified faucet filter. Usually, it doesn't. That's the certification gap, and it's the most important thing to understand before spending real money.

What NSF certification actually tells you

NSF notes that certified lead filters are independently verified to reduce lead from 150 ppb to 10 ppb or less, or 5 ppb under updated requirements, but it also states that there are currently no whole-house systems certified to reduce lead, according to NSF's consumer guidance on lead in drinking water and filter certification.

That single point changes how you should read almost every whole-house lead claim on the market.

If a faucet filter or under-sink unit carries the relevant lead-reduction certification, you're looking at a claim that has a recognized certification pathway behind it. If a whole-house system says it reduces lead, you need to ask a harder question: what exactly is supporting that statement?

The language that should make you pause

Watch for phrases like:

  • “Designed for lead reduction”
    That may describe intent, not certification.

  • “Tested media”
    Media can be tested in isolation. That's not the same as a certified finished whole-house system.

  • “Removes heavy metals including lead”
    “Heavy metals” is a broad category. It doesn't tell you how the claim was validated.

  • “NSF components”
    Certified parts and certified finished systems are not the same thing.

A lot of product pages blur those distinctions because most buyers don't know to ask.

What to ask before you buy

You don't need to be a chemist. You need a short list of sharp questions.

Question Why it matters
Is the whole-house system itself certified for lead reduction? This gets straight to the core gap.
If not, what testing supports the lead claim? You want specifics, not broad reassurance.
Was the claim based on dissolved lead, particulate lead, or both? Different lead forms may need different treatment behavior.
What flow rate was the system evaluated at? Whole-house performance changes with demand.
What is the rated change-out capacity? A lead claim without a maintenance boundary isn't useful.

Buyer warning: If the seller can't explain the basis of the lead claim in plain language, treat that as part of the answer.

What this means for your decision

It doesn't mean every whole-house lead system is worthless. It means you should judge it differently.

For whole-house units, I look at them as engineered treatment systems with varying levels of evidence, not as certification-equivalent substitutes for lead-certified tap filters. That's a more realistic frame. It protects you from assuming that “whole-house” means “more proven.”

EPA guidance also aligns with the practical side of this issue. Consumers should use a filter tested and certified by an independent third party, and an expired filter can become less effective. For lead, that advice pushes buyers toward verification and maintenance discipline, not toward the biggest housing they can afford.

How to Size and Select the Right System

Most bad filtration purchases start with shopping before testing.

That's especially risky with lead because the right system depends on what form the contamination takes and where it's entering the water. A broad marketing pitch can make one product sound like it handles everything. In real homes, the right answer changes fast once you know whether the lead is dissolved, particulate, or tied to internal plumbing.

An infographic showing five steps to choose a whole-house water filter for removing lead from home systems.

Start with a testing-first framework

Homeowners need a testing-first framework to match treatment technology to the contamination form. EasyWater markets a whole-house unit for lead, arsenic, and fluoride, but the real decision question is whether the lead is dissolved, particulate, or coming from internal plumbing, as shown on the EasyWater LeadShield product page.

That's the right mindset even if you never buy that system.

A practical selection process looks like this:

  1. Test the incoming water and the tap water

    Test at the point where water enters the house if possible, and also at the tap you care about most. If the results differ, your interior plumbing may be part of the story.

  2. Identify the lead form

    A system aimed at dissolved lead may not be the right answer for particle shedding from old plumbing components.

  3. Check where you need protection

    If the concern is mostly drinking and cooking water, a dedicated tap solution may be the smarter buy. If you want broad household treatment, then whole-house sizing matters more.

Size for your house, not for the brochure

Once you know the target, size the system around actual household demand.

A whole-house filter has to keep up with showers, sinks, toilets, and appliances without starving the house for pressure. That doesn't mean buying the biggest tank available. It means matching the media bed and housing to your home's peak use pattern.

Look at these selection points:

  • Rated flow: The flow rating should fit how your household uses water during busy periods.
  • Port size: Undersized connections can create unnecessary pressure drop.
  • Prefiltration needs: Sediment ahead of lead media can protect the main treatment stage from premature fouling.
  • Service interval: If replacement is complicated or expensive, missed maintenance becomes more likely.
  • Installation footprint: Some systems need more clearance than homeowners expect.

For readers comparing broader POE options, Water Filter Advisor also maintains a practical guide to whole-house water filtration systems that helps narrow the field by application.

A short homeowner checklist

Before you approve a purchase, make sure you can answer yes to most of these:

  • I know where the lead is likely entering the water.
  • I know whether I'm targeting dissolved lead, particulate lead, or both.
  • I know the house's busiest water-use period and expected demand.
  • I know how often the media or cartridge must be replaced.
  • I know who will install and service it.

The best-sized system is the one that fits your plumbing, your demand, and your maintenance habits. Not the one with the most dramatic label.

A whole-house filter for lead should feel like a plumbing solution, not a gadget purchase. If you buy it that way, you'll make fewer expensive mistakes.

Budgeting for Installation and Lifetime Maintenance

The purchase price is only the first invoice.

With a whole-house lead system, the larger cost question is ownership. Installation, replacement media, plumbing adjustments, and ongoing service are what determine whether the system remains useful or slowly turns into neglected hardware in the basement or garage.

What drives installation complexity

Some homes make this easy. There's a clear main line, enough wall space, and room for shutoffs and housings. Other homes fight you from the start. Tight mechanical rooms, awkward pipe runs, or older plumbing materials can turn a simple install into a more involved job.

A realistic budget should account for:

  • Plumber labor if you're not doing it yourself
  • Bypass valves and shutoffs so the system can be serviced cleanly
  • Mounting and support hardware for heavy housings or tanks
  • Prefilter stages if your water carries sediment that could foul the lead media
  • Space for future service because cartridges and media beds need access

A homeowner who budgets only for the canister usually gets surprised later.

Maintenance is the real commitment

Lead media doesn't last because the calendar changed. It lasts until the system reaches the end of its usable capacity under your water conditions. That's why maintenance schedules on product pages should be treated as starting points, not promises.

In practice, the recurring questions are simpler than the chemistry:

Cost area What to ask
Replacement cartridges or media How hard are they to source and change on time?
Service calls Will you need a professional every time?
Prefilter changes Does the lead stage depend on upstream sediment protection?
Post-install testing How will you confirm the system is still doing its job?

That last point gets overlooked. If you never retest, you're trusting the label longer than the water may deserve.

Where homeowners overspend and underspend

They overspend on oversized housings with vague claims. They underspend on testing, valve layout, and maintenance planning.

That's backward.

The strongest budget approach is to buy enough system for your real demand, leave room for easy service, and plan for routine replacement from day one. If replacing media is messy, expensive, or easy to postpone, many households will postpone it. Lead treatment is not the place to build around procrastination.

A whole-house filter is affordable only if you can maintain it without excuses.

If that sounds blunt, it should. A cheaper system with disciplined upkeep often serves a family better than a premium-looking setup that nobody wants to service.

Whole House vs Point-of-Use Filters for Lead

This is the decision most homeowners are making. They may start by searching for a whole-house lead filter, but the choice is broader. Do you want house-wide treatment, tap-specific treatment, or a layered combination?

For lead, bigger isn't automatically better. Sometimes the smartest setup is a whole-house system for general treatment plus a certified point-of-use filter for the water you drink and cook with.

What real-world evidence says about POU filters

A field study in Flint, Michigan, found that certified faucet-mounted point-of-use filters reduced very high lead levels extremely well under difficult conditions. More than 97% of filtered samples contained lead below 0.5 μg/L, and the devices consistently achieved lead levels at or below 1 μg/L, which is far below the EPA action level of 15 μg/L and below the 10 ppb benchmark tied to lead-reduction certification, according to the Flint field study on certified faucet filters.

That study also matters for another reason. The paper notes that using whole-house or point-of-entry devices for lead removal instead of certified POU devices can create problematic water-quality changes, including chlorine removal that may increase bacteriological risk and potentially increase lead release from premise plumbing after the filter.

That's why I don't treat whole-house and point-of-use lead options as interchangeable versions of the same idea. They solve different problems and carry different trade-offs.

Whole-House vs. Point-of-Use for Lead: A Comparison

Feature Whole-House (POE) Filter Point-of-Use (POU) Filter
Coverage Treats water sent to the full home Treats water at one tap or appliance
Best use case Broad household treatment goals Drinking and cooking water protection
Lead proof standard Lead claims often rely on product-specific testing or marketing language Lead reduction is most rigorously established through recognized tap-level certification pathways
Installation Requires main-line plumbing work Usually simpler and more localized
Maintenance Larger components, house-wide service planning Smaller, more frequent but easier change-outs
Flow concerns Must balance treatment with whole-home demand Lower flow demand makes lead treatment easier to manage
Confidence at drinking tap Can be indirect, depending on design and plumbing conditions Directly targets the water people consume most
Typical smart strategy Use when broad treatment is needed and justified Use when verified drinking-water lead reduction is the top goal

Which option I'd choose in different homes

If a family's main concern is safe water for drinking, cooking, infant formula, and food prep, I usually lean first toward a certified POU filter.

If the family also wants treatment at bathroom sinks, tubs, and other fixtures, then a whole-house system may make sense. But I'd still think hard about adding a dedicated drinking-water filter at the kitchen sink rather than asking the whole-house unit to carry the entire safety burden.

That layered approach respects the certification gap instead of pretending it doesn't exist.

The most defensible lead strategy in many homes is not one filter. It's one broad treatment decision plus one highly targeted drinking-water decision.

A whole-house filter for lead can be useful. It can also be oversold. The safest buyers are the ones who separate convenience from proof, and whole-home coverage from drinking-water certainty.


If you're comparing systems and want a practical way to sort through certifications, filter media, installation trade-offs, and maintenance demands, Water Filter Advisor is a useful place to continue your research. The site focuses on household filtration guidance, including whole-house and point-of-use options, so you can match the system to the actual water problem instead of the marketing claim.

San Francisco Tap Water: A Filtration Guide for Your Home

You're probably here because you've heard the same line every San Franciscan hears: the city has amazing tap water, so why bother filtering it?

That line is only half useful. San Francisco tap water starts from a strong municipal system, but your glass of water doesn't come straight from a mountain stream. It travels through treatment, distribution, building plumbing, and finally your faucet. That's where taste, odor, and home-specific issues enter the picture.

My advice is simple. Don't treat this as a debate over whether SF water is “good” or “bad.” Treat it like a home filtration decision. If you want better taste, fewer disinfection leftovers, and a solid barrier against plumbing-related metals, filtration makes sense.

Why Filter Water in a City Famous for It

San Francisco has earned its reputation. The city's water system is centered on the protected Tuolumne Watershed and Hetch Hetchy Reservoir, and the utility monitors it aggressively. In 2024, the SFPUC released its 29th Annual Water Quality Report, confirming that the city's drinking water met or exceeded all federal and state standards after conducting nearly 100,000 water-quality tests across the system, according to the SFPUC water quality page.

A clear glass of fresh water sitting on a clean kitchen countertop with a blurred background.

That's the good news. The practical question is different: does legally compliant municipal water match what you want coming out of your own kitchen tap? Often, the answer is no.

Legal compliance isn't the same as ideal drinking water

Individuals don't buy a filter because they think the city is failing. They buy one because they notice something specific:

  • Taste issues: You fill a glass and catch a chemical note.
  • Odor complaints: The water smells “treated,” especially first thing in the morning.
  • Old-building anxiety: You live in a classic SF apartment and don't trust the pipes.
  • Peace of mind: You want a final barrier where water is consumed.

That's a rational approach. Municipal water reports describe the system broadly. Your faucet reflects your building, your plumbing, and how long the water has been sitting in those lines.

Practical rule: Great source water lowers your risk. It doesn't eliminate the need for a point-of-use filter if taste or plumbing is your concern.

The real reason so many SF homes still filter

In San Francisco, filtration usually isn't about fixing hard, mineral-heavy water. It's about polishing already decent water. That means reducing disinfectant taste, cutting down disinfection byproducts, and adding protection against metals that can show up after water enters the building.

That's why I tell homeowners and renters the same thing. San Francisco tap water can be both high quality and worth filtering. Those ideas don't conflict. They belong together.

Decoding San Francisco's Water Contaminants

The biggest mistake people make is thinking “contaminants” means the city water is dirty. That's not the right frame. With san francisco tap water, the smarter frame is this: what's in the water that affects taste, odor, and final-tap quality?

Start with what isn't showing up

PFAS gets a lot of attention, and for good reason. In 2024, SFPUC reported zero PFAS detected in the city's drinking water, while independent analysis still noted that legally compliant water can contain low-level disinfection byproducts, which is one reason many people still choose point-of-use filtration, as summarized in the SFPUC news update on water quality.

That matters because it clears up a common fear. If PFAS is your main concern, SF's current utility reporting is reassuring. But that doesn't mean your filter search is pointless.

What actually drives filter choices in SF homes

For most households, three issues matter more than dramatic headlines.

Chloramine and that treated taste

San Francisco water is disinfected, and that's a good thing for public health. But disinfectants can leave water tasting flat, chemical-like, or slightly medicinal. If your water tastes noticeably better after sitting in the fridge, that usually tells me you're reacting to treatment-related taste and odor, not a major source-water problem.

A basic carbon filter can help with that. A stronger carbon block filter usually does a better job.

Disinfection byproducts

When disinfectants interact with organic matter, byproducts can form. These are often present at low levels in legally compliant city water. This is one of the main reasons I recommend better filtration even when a utility report looks clean on paper.

If your goal is “I want cleaner-tasting water with fewer leftovers from treatment,” focus on certified carbon block systems and, if you want the strongest point-of-use barrier, reverse osmosis.

Lead and other plumbing-related metals

This is the issue that changes the conversation from citywide to personal. Water can leave the utility in good condition and still pick up metals from older plumbing, solder, fixtures, or building components before it reaches your glass.

That's why two neighbors in the same area can have very different experiences.

Water quality at the treatment plant and water quality at your faucet are not the same thing.

What this means for your buying decision

If your water tastes off, start with carbon. If you live in an older building, don't rely on taste alone. Metals don't announce themselves. In that case, look for filters explicitly certified for lead reduction and consider testing your tap.

Use this short priority list:

  • Taste and odor first: Choose a faucet, pitcher, or under-sink carbon filter.
  • Old pipes or older building: Choose a unit with lead-reduction certification.
  • Maximum reduction mindset: Use reverse osmosis at the kitchen sink.
  • Shower concerns: Different problem, different filter. Don't expect a drinking-water pitcher to help there.

Reading the SFPUC Water Report for Your Home

It's common to open a water report, see acronyms and tiny numbers, and give up. Don't. You don't need to become a chemist. You need to read it like a homeowner deciding whether to install a filter.

An infographic titled Understanding Your Annual Water Report, outlining four steps to read SFPUC water quality reports.

The car-speed analogy works

Think of the report like driving.

  • MCL is the legal speed limit.
  • PHG is the safer speed you might choose for your own comfort.

If a contaminant is below the legal limit, the utility is in compliance. Good. But many homeowners still prefer levels that are as low as reasonably possible, especially for things tied to long-term exposure or in-home plumbing.

What to focus on when you read it

Don't stare at every line equally. Focus on the entries that connect to filtration decisions in your home.

  • Disinfectants and byproducts: These affect taste, odor, and “I'd rather reduce that” decisions.
  • Units like ppm and ppb: Tiny numbers still matter. Small doesn't mean irrelevant.
  • Range versus average: Variation tells you more than one neat summary number.
  • Where the report stops: A city report doesn't tell you what happened in your building pipes.

For a plain-English walkthrough, use this guide on how to read water test results.

A quick visual helps if you'd rather watch than decode tables:

The report helps, but it doesn't finish the job

The SFPUC report is useful for setting a baseline. It tells you what the city is delivering. It does not tell you whether your prewar kitchen plumbing, old shutoff valves, or long periods of stagnant water are changing what comes out of your faucet.

That's why I treat the annual report as step one. Step two is matching a filter to your actual home.

Choosing the Right Filtration System for SF Water

Here's the good news. San Francisco tap water is very soft, typically around 1 to 3 grains per gallon, which means scale buildup is minimal and expensive softening systems usually aren't necessary, according to this overview of San Francisco water hardness and filtration.

That single fact saves a lot of people from buying the wrong equipment. In SF, don't spend your budget solving a hard-water problem you probably don't have. Put that money into better drinking-water filtration.

What to skip

If a salesperson starts pushing a big salt-based softener as the obvious first move, slow down. In this city, that's usually the wrong answer unless you have an unusual building-specific issue.

Your likely priorities are:

  • Chlorine or chloramine taste
  • Disinfection byproducts
  • Lead reduction at the tap
  • Better water for cooking, coffee, and drinking

What actually fits SF homes

Pitcher filters

These are the easiest entry point. They're cheap, renter-friendly, and useful if your main complaint is taste. They're also easy to ignore, underfill, or forget to replace.

I like pitchers for small households and temporary setups. I don't like them as the final answer for an older SF building where lead is part of the concern.

Faucet-mounted filters

These make more sense for renters who want a fast install without touching plumbing. A good faucet unit can noticeably improve taste and give you a more practical daily setup than a pitcher.

The downside is flow rate and aesthetics. Some models feel bulky, and not every faucet plays nicely with adapters.

Under-sink carbon block systems

This is the sweet spot for many SF homeowners. A solid under-sink carbon block setup gives you better contact time, stronger reduction for taste and odor issues, and a more serious option for lead reduction if the unit is certified for it.

If you own your place and you cook at home, I'd make it the first area for investigation.

Reverse osmosis systems

If you want the strongest point-of-use treatment, go RO. It's the most aggressive option in this lineup and a sensible pick for people who want broad reduction at the kitchen sink.

The tradeoff is complexity. RO systems take more space, need more maintenance, and can be overkill if your only complaint is a mild treated taste.

San Francisco Water Filter Cheat Sheet

Contaminant / Concern Primary Impact Recommended Filter Type
Chloramine or treatment taste Flat or chemical taste, odor Pitcher filter, faucet filter, under-sink carbon block
Disinfection byproducts Extra reduction beyond legal compliance Under-sink carbon block, reverse osmosis
Lead from older plumbing Tap-specific metal exposure concern Faucet filter or under-sink system certified for lead reduction
Maximum purity mindset Broad contaminant reduction Reverse osmosis
Hard water scaling Not usually a major SF issue Usually skip softeners in San Francisco

My blunt recommendation

If you rent, buy a good faucet filter or a serious pitcher with lead-reduction certification. If you own, install an under-sink carbon block system unless you know you want RO.

And if you run a home service business while upgrading your place, it's worth seeing how other local operators tighten up customer acquisition. This breakdown of strategies for power washing lead generation is a good example of practical, process-driven marketing thinking that applies well beyond that trade.

For side-by-side filter research, Water Filter Advisor also publishes city-specific and contaminant-specific buying guidance you can use as one comparison source alongside product certification sheets.

The Hidden Risk in Your Building's Pipes

The city can deliver solid water. Your building can still mess it up.

That's the part too many people miss. The primary weak point in san francisco tap water often isn't the protected source or municipal treatment. It's the last stretch between the building entry point and your faucet.

A diagram illustrating the five stages of water delivery in San Francisco from reservoir to tap.

Localized risk is the real story

A Bay Area community-led testing program found that over 99% of household tap water samples met primary regulatory standards, while about 5% exceeded stricter Public Health Goal standards, with issues often clustering in specific communities and older buildings, according to this report on community tap water testing in the Bay Area.

That finding matters more to homeowners than broad city averages. It tells you the problem is often localized, not uniform.

Why old buildings change the equation

San Francisco has a lot of aging housing stock. Older pipes, older joints, older fixtures, and longer periods of water sitting in plumbing all raise the odds that your tap water looks different from the citywide baseline.

Common trouble spots include:

  • Older service lines or interior pipes
  • Lead solder in older plumbing
  • Aging brass fixtures
  • Low-use faucets where water sits stagnant

If you rent in an older building, this isn't paranoia. It's a straightforward maintenance reality.

If you're worried about lead, test the water at the tap you actually drink from. Then add a certified point-of-use filter instead of assuming the city report answers the question.

What to do if your building is the issue

First, don't panic. Localized risk doesn't mean disaster. It means you should make decisions at the fixture level.

Second, learn what lead-focused filtration covers. This guide to lead in water and filtration options is useful if your home has older plumbing or you're not sure what certification language to look for.

Third, flush stagnant water before use, especially first thing in the morning. Filtration and flushing work well together. One reduces exposure at the point of use, the other reduces what's been sitting in contact with your plumbing.

Your Practical Filtration Plan for an SF Home

Here's the plan I'd give a client standing in the kitchen asking what to buy.

If you rent an older apartment

Get a faucet-mounted filter if your faucet can take one. If not, get a pitcher filter that specifically lists lead reduction. Don't overcomplicate it, and don't spend money on a whole-house system you can't take with you.

If the building is old and the water sits overnight, flush the cold line briefly before filling your bottle or kettle.

If you own a condo or newer home

Install an under-sink carbon block system at the kitchen tap. That setup usually gives the best balance of convenience, taste improvement, and meaningful contaminant reduction for SF households.

Use it for drinking, cooking, baby formula prep, coffee, and ice if your line layout allows.

If you want the most aggressive kitchen filtration

Go with reverse osmosis. This is the right move for people who don't want to debate individual contaminants and just want a stronger purification barrier at the sink.

I wouldn't make RO the default for everyone. I would absolutely recommend it for households that want the highest level of point-of-use treatment and don't mind the extra maintenance.

If you're wasting money on the wrong upgrade

Skip softeners unless you've confirmed a building-specific reason. San Francisco's water profile doesn't make scale control the main event. Your money is better spent on certified drinking-water filtration, replacement cartridges, and testing when needed.

My final call

For most SF homes, the smartest filtration plan looks like this:

  • Renter: Faucet filter or lead-certified pitcher
  • Owner: Under-sink carbon block
  • Maximum protection: Reverse osmosis
  • Almost never first choice in SF: Water softener

That's the practical answer. San Francisco tap water starts from a good place. Your home still decides the final quality.


If you want help comparing certified filters, understanding contaminant claims, or narrowing the right system for your kitchen, Water Filter Advisor is a useful place to start. It's built for households trying to cut through marketing language and choose a filter that matches their water.

How Do Water Filtration Systems Work?

You turn on the kitchen tap, fill a glass, and pause. Maybe the water smells a little like a swimming pool. Maybe it tastes flat, metallic, or just “off.” Maybe the bathtub ran cloudy this morning, or you've noticed spots building up on fixtures faster than you'd like.

That's usually the moment people start asking the core question. How do water filtration systems work, and which kind best solves my problem?

The short answer is simple. A water filter isn't one magic barrier. It's a set of tools, and each tool has a different job. Some catch visible grit. Some grab dissolved chemicals that affect taste and odor. Some systems go further and separate out many dissolved impurities with a membrane. The trick is matching the tool to the problem in your water.

Why Your Tap Water Isn't Just H2O

Open a faucet in two different homes, and you can get two very different stories from the same city supply. One glass smells like chlorine. Another looks cloudy after plumbing work. A third leaves orange or brown staining in the tub. Water is never just H2O. It is water plus everything picked up along the way from the source, treatment plant, water main, and your home's plumbing.

That is the first idea to keep in mind before you shop for any filter. A filter is not solving a vague problem called “bad water.” It is doing a specific job. Sometimes that job is catching grit. Sometimes it is reducing a chemical that affects taste or odor. Sometimes it is dealing with dissolved material you cannot see at all.

A simple comparison helps. Your tap water is a mixed bag of passengers arriving together in the same car. Some are big and obvious, like sand, rust, or sediment. Some are dissolved and invisible, like chlorine byproducts or minerals. Some are harmless but annoying. Some may deserve closer attention. The right filtration system works like a team, with each stage assigned to the kind of problem it can handle well.

That explains why a one-size-fits-all filter often disappoints. A basic sediment filter can catch visible particles, but it will not do much for chlorine taste. Activated carbon can improve taste and odor, but it is not designed to remove every dissolved impurity. A tighter membrane system can address many dissolved substances, but it is usually not the first tool you need for cloudy water full of grit.

The problem you notice isn't always the problem you have

The symptom at the tap is a clue, not a full diagnosis.

If you have ever dealt with discolored bathwater, this practical explanation of why brown water in your tub is useful because it shows how color can point to sediment, rust, or plumbing-related issues instead of one single universal “water quality” problem. However, the problem you notice isn't always the only problem you have. Water can look clear and still contain dissolved substances that affect taste, odor, scale buildup, or overall drinking quality.

A helpful way to sort the jobs looks like this:

  • Visible particles need screening or blocking. Sand, silt, rust, and debris are usually handled with sediment filtration.
  • Taste and odor problems often need a surface that grabs contaminants. Activated carbon works a bit like a magnet for certain chemicals, holding them on its surface as water passes by.
  • Many dissolved impurities need a tighter barrier. Problems involving salts or other dissolved substances may call for reverse osmosis or another specialized treatment step.

Practical rule: Do not shop for “the best filter.” Shop for the filter system that matches the jobs your water needs done.

Once you look at filtration this way, product labels start to make more sense. A pitcher, an under-sink unit, and a whole-house system are not doing the same work in different shapes. They are different tool sets for different water problems.

The Three Core Filtration Mechanisms

Most home systems rely on a few basic ways of separating unwanted material from water. Once you understand these, most filter designs stop looking mysterious.

A helpful visual makes this easier to picture:

A diagram explaining the three core water filtration mechanisms: mechanical filtration, adsorption, and ion exchange.

Mechanical filtration

Mechanical filtration is the easiest one to understand. Think of a pasta strainer or a coffee filter. Water passes through. Bigger particles don't.

In home filtration, this job often belongs to sediment or mesh media. As explained by NuWater's overview of how water filtration systems work, these stages capture suspended solids such as sand, silt, rust, and debris before they move farther into the system. That matters for water quality, but it also protects the next filter stages from clogging too quickly.

If your water looks cloudy after plumbing work, or if you see grit in the bottom of a glass, this is usually the first line of defense.

Adsorption

Adsorption sounds technical, but the idea is very friendly. It means contaminants stick to the surface of the filter material.

Activated carbon is the star here. It works a bit like a contaminant magnet, except not every contaminant sticks equally well. As water moves across the carbon surface, compounds associated with chlorine, taste, odor, and some organic chemicals adhere to that media instead of continuing to your tap.

That's why a carbon filter can make water taste dramatically better even when the water already looks perfectly clear. The issue isn't floating dirt. It's dissolved substances your eyes can't detect.

Filter media doesn't have to trap everything like a net. Sometimes it works by giving unwanted compounds a place to cling.

Membrane separation and why RO feels different

Reverse osmosis works differently from both straining and adsorption. It uses pressure to push water through a semipermeable membrane. Many dissolved ions and larger molecules are left behind rather than passing through with the water.

That's why RO systems are often chosen when the concern goes beyond taste. They're used for broader reduction of dissolved impurities, including salts and many substances that basic carbon filters don't handle well.

A short walk-through can help if you want to see the process in motion:

Why systems use stages instead of one super-filter

A good home system often combines these mechanisms because each one handles a different task.

  • Stage one clears the path: Sediment filtration removes larger particles.
  • Stage two improves the water experience: Carbon handles taste, odor, and some dissolved chemicals.
  • Stage three goes tighter when needed: RO addresses many dissolved impurities that the earlier stages don't catch.

That staged approach is why multi-stage units are so common. One filter is doing the gritty cleanup. Another is polishing taste. Another may be doing the heavy lifting on dissolved contaminants.

Exploring Your Filtration Media Toolkit

Once you know the mechanisms, the parts inside a filtration system start to feel less like mystery cartridges and more like a toolbox. Each media type has strengths, blind spots, and a best use.

Here's what that toolkit can look like inside the practical world of home filtration:

A water filter cartridge sits next to bowls of ion exchange resin and activated carbon media.

Sediment media

Sediment filters are the work boots of the system. They do the dirty, necessary work first.

They're built to catch physical material such as grit, rust, and debris before that material reaches more specialized media. If you skip this stage in a home with particle-heavy water, downstream cartridges can clog faster and water flow can drop.

This kind of staged thinking shows up outside homes too. If you're curious how similar ideas apply in another setting, this guide to marine water filtration is a useful example of how filtration choices change when water conditions and system demands change.

Activated carbon

Activated carbon is the neighbor everyone likes. It improves the experience of using water.

This media is especially valuable when the complaint sounds like, “The water smells like chlorine,” or “It tastes weird, but it looks fine.” Carbon's strength is adsorption. Its weakness is that it's not a universal answer for everything dissolved in water.

A carbon cartridge is excellent at making many municipal water supplies more pleasant to drink. It is not the same thing as a broad dissolved-solids solution.

KDF media

KDF, often described as a copper-zinc medium, is usually part of a team rather than a stand-alone hero in home systems. In whole-house setups, it's commonly paired with sediment filtration and carbon.

Its role is often tied to addressing chlorine and some heavy metals in the treatment train. Think of it as a specialist that works best when the rough debris has already been removed and when a carbon stage is nearby to handle related taste and odor concerns.

A smart filter setup doesn't ask one material to do five jobs badly. It assigns each media one job it does well.

Reverse osmosis membrane

The RO membrane is the precision instrument in the kit. Unlike a basic cartridge full of loose media, the membrane is built for selective separation under pressure.

This is the component people often choose when they want stronger reduction of many dissolved impurities, not just better flavor. That's also why RO systems are commonly installed where people draw drinking and cooking water, such as under the sink.

Why media works best as a team

If you opened several different systems, you'd see a pattern. Good design is less about one “premium” material and more about job order.

  • Sediment media protects everything downstream
  • Carbon improves taste and targets certain dissolved chemicals
  • KDF adds another treatment role in some whole-house systems
  • RO membranes handle many dissolved impurities that basic media misses

That's the key lesson. Filtration media isn't a list of buzzwords. It's a work crew.

Common Types of Home Water Filter Systems

A home water filter system is really a delivery method for a set of jobs. One setup is built to improve the glass of water you drink at the kitchen sink. Another is built to treat every drop entering the house so showers, laundry, and appliances get cleaner water too.

That is the easiest way to sort the options. Point-of-use systems treat water at one spot, usually where you drink or cook. Point-of-entry systems, often called whole-house systems, treat water as it comes into the home.

Point-of-use options for targeted treatment

Pitchers and faucet-mounted filters handle small, focused jobs. A pitcher is a lot like keeping a simple coffee filter on the counter. It helps with common taste and odor complaints, and it asks very little from the homeowner beyond refilling and changing cartridges. Faucet filters do a similar job right at the sink, which makes them handy for apartments, rentals, or anyone who wants a quick kitchen upgrade.

Countertop and under-sink systems take on bigger jobs because they have more room for stages working together. That extra space matters. It can allow sediment reduction, carbon treatment, and in some designs reverse osmosis, all in one path before the water reaches your glass. If your main goal is better drinking and cooking water, this category usually makes more sense than filtering water for toilets or outdoor spigots.

If you want a side-by-side look at formats before deciding, this guide to types of home water filters compares common setups by use case.

Whole-house systems for point-of-entry treatment

Whole-house systems solve a different problem. They are chosen when the complaint is spread across the home, such as chlorine smell in the shower, sediment affecting fixtures, or water quality issues that can bother appliances as well as people.

These systems usually work in stages, just like a team on a job site. A sediment prefilter catches the larger grit first so the downstream media does not get clogged too quickly. Carbon media often follows to improve taste and odor and reduce chlorine. Some systems add specialty media such as KDF for a narrower treatment role. The order matters because each stage protects or supports the next one.

Size matters too. A whole-house unit has to keep up with real household demand, not just one drinking glass at a time. If the system is undersized, you may feel it as weaker flow at busy times, like when someone is showering while the dishwasher runs.

Home Water Filter System Comparison

System Type Installation Typical Cost Best For
Pitcher filter Very easy, no plumbing Lower upfront cost Renters, small households, better-tasting drinking water
Faucet-mounted filter Easy Lower to moderate Quick kitchen upgrade without major changes
Countertop system Easy to moderate Moderate People who want more capacity without under-sink work
Under-sink filter Moderate Moderate to higher Dedicated drinking and cooking water, including multi-stage or RO setups
Whole-house system Professional or advanced DIY Higher Treating water for the entire home, including bathing and appliances

“Typical cost” varies widely by brand, filter life, and installation complexity, so it is smarter to compare categories than chase one number.

Matching lifestyle to system type

The best system depends on where the water problem shows up.

  • Apartment living: A pitcher or faucet filter keeps installation simple and portable.
  • Busy family kitchen: An under-sink system often gives better capacity and less day-to-day hassle.
  • Whole-home comfort concerns: A point-of-entry system fits better if the issue shows up in showers, sinks, and appliances across the house.
  • Mobile setups: If your water source changes from stop to stop, these RV water filtration systems show how filter design shifts for travel.

The main idea is simple. Choose the system by the job you need done, then make sure the stages inside that system match the contaminants or nuisances you are trying to address.

How to Know a Filter Really Works Certifications

A filter box can promise almost anything. The question is whether anyone independent tested those claims.

That's where certification matters. It moves you from marketing language to verified performance standards. Instead of “improves water quality,” you can ask a much better question: certified for what, exactly?

A close-up view of a certified water filter replacement package labeled with NSF standards and performance details.

Why the seal matters

According to NSF International's consumer research on certified water filters, 91% of Americans used a water filter in 2023, and 73% of filtration buyers are influenced by an independent certification seal. That says two things at once. Water filtration is mainstream, and people increasingly want proof that a filter does what the label says.

That instinct is a good one.

The NSF numbers most homeowners should recognize

Not every certification number means the same thing. A lot of confusion starts here because shoppers see a seal but don't know what category it covers.

Use these as plain-English shortcuts:

  • NSF 42: Often tied to taste and odor concerns
  • NSF 53: Used for certain health-related contaminants, including lead
  • NSF 58: Applies to reverse osmosis systems

Those categories matter because a product can be strong in one lane and irrelevant in another. A filter certified for taste and odor isn't automatically the right answer for a more serious contaminant concern.

Buying advice: If a product page talks big but avoids specific NSF standards, slow down and read the fine print.

What to check before you buy

You don't need to become a lab technician. You just need a short checklist.

  1. Match the claim to the problem. If your issue is chlorine taste, look for the right certification category for that job.
  2. Read beyond the seal. See which contaminants the model is certified to address.
  3. Check the exact system or cartridge. Certification should apply to the specific product you're buying, not just the brand name.

Certification won't choose your filter for you, but it's the best first screen for separating tested performance from wishful packaging.

Matching a Filtration System to Your Home

The best filter for your neighbor might be a waste of money in your house. The right choice starts with the problem, not the product.

Some people want coffee that tastes better. Some want to reduce chlorine at the shower. Some are on a private well and need to think carefully about what filtration can and cannot do. Those are different jobs, and they lead to different system designs.

Start with the water problem, not the catalog

Begin with what you already know.

If the water smells chemical, that points you in one direction. If you see grit or rust-colored particles, that points you in another. If you're on a well, the smartest move is to test the water so you're not guessing about invisible issues.

A simple decision path looks like this:

  • Taste or odor problem at one tap: A point-of-use carbon system may be enough.
  • Visible sediment or debris: Start with a sediment stage.
  • Concern about dissolved impurities in drinking water: Consider a system that includes RO.
  • Whole-home comfort issues: Look at point-of-entry treatment for the house, not just the kitchen sink.

Know what filtration doesn't do by itself

Many people get tripped up on this point. They hear “filtered” and assume “fully safe.”

According to government guidance on how filtration works, filtration does not equal disinfection. Even after sand or carbon filtration, water may still need purification or disinfection before it's safe to drink because most standard filters are not designed to remove pathogens. That's especially important for well owners, who may need a dedicated disinfecting stage such as UV treatment if microbes are a concern.

That's not a small technicality. It changes the entire buying decision.

Filtered water can be cleaner, clearer, and better tasting without being microbiologically disinfected.

A practical matching framework

If you want a simple way to choose, think in three layers.

Layer one is the symptom. What do you notice first: smell, particles, staining, or concern about what you can't see?

Layer two is the objective. Do you want nicer shower water, better drinking water, or treatment across the whole house?

Layer three is the treatment type. Pick the system that fits both the contaminant and the point of use.

For example, a family bothered by chlorine taste in the kitchen may do great with an under-sink carbon system. A homeowner dealing with sediment throughout the plumbing may need a whole-house prefilter. A well owner worried about pathogen safety shouldn't stop at standard filtration if the water source requires disinfection.

That's the heart of how do water filtration systems work in real life. They solve specific jobs. They don't solve every water problem by default.

Keeping Your Water Clean with Proper Maintenance

A water filter only works well when the media inside it still has capacity left. Once a cartridge fills with captured particles or a carbon stage is spent, performance can drop and water flow can change.

You don't need a complicated maintenance routine, but you do need a consistent one. For whole-home systems, this practical guide to whole-house water filter maintenance is a helpful reference for keeping replacement schedules and service steps organized.

A simple maintenance checklist

  • Follow the replacement schedule: Every system has cartridges or media that need periodic replacement.
  • Watch for slower flow: Reduced pressure can be a clue that a sediment stage is loading up.
  • Pay attention to returning taste or odor: If the chlorine smell comes back, the carbon stage may be spent.
  • Inspect housings and connections: Look for leaks, cracks, or worn seals during routine changes.
  • Keep records: A note on your phone or calendar beats trying to remember when you last changed a filter.

Signs your filter needs attention

Some failures are obvious. Others creep in slowly.

If water starts tasting like it used to before filtration, that's a clue. If the shower or sink flow feels weaker than normal, that can also point to a loaded filter stage. The goal is to replace media before performance becomes a problem, not after.

A good filter system is a lot like a furnace filter or the oil in your car. It performs its function effectively, but only if you keep up with it.


If you're comparing systems, trying to decode certifications, or figuring out which setup fits your home, Water Filter Advisor offers practical guides that make the process easier without burying you in jargon.

Changing Brita Filter: Easy Steps for Cleaner Water

You fill the pitcher, take a sip, and something feels off. The water isn't terrible, but it's not as clean-tasting as it was a few weeks ago. Maybe there's a faint chlorine note. Maybe the flow through the reservoir has slowed down enough that you notice it every morning. Or maybe that little light on the lid has been blinking at you long enough that it's become part of the kitchen scenery.

That's usually when changing Brita filter instructions are needed. They don't just want the basic steps. They want to know if the light is right, if the black specks are normal, if the filter has to be soaked, and whether they're about to snap a plastic lid trying to remove a stuck cartridge.

A Brita filter swap is simple once you understand what the filter is doing. These cartridges rely on activated carbon and related media to improve taste and reduce certain contaminants over time. When the media gets used up, performance drops. So the primary task isn't just replacing a part. It's keeping the pitcher working the way it was designed to work.

That Moment You Know the Filter Is Done

It usually starts with a small clue.

A homeowner changes nothing about the water they buy, the sink they use, or the pitcher's location on the counter, but the taste shifts anyway. One day the water still seems crisp. A few days later it tastes flatter, or the chlorine smell is back when the glass gets close to your face. The filter often doesn't fail dramatically. It fades.

Another common trigger is the indicator light. A lot of people ignore it because the water still looks clear, and clear water can fool you. A pitcher filter isn't there just to make water look nice. It's there to reduce chlorine taste and odor, and with some filter types, reduce additional contaminants when used on schedule. If you wait too long, you're still pouring water through the cartridge, but you're not getting the same job from it.

The usual signs people notice first

  • Taste changes first: Water that once tasted neutral starts tasting like tap water again.
  • Odor creeps back in: A light chlorine smell is often the clue that gets people moving.
  • Filtration slows down: The upper reservoir drains more slowly than normal.
  • The lid starts nagging you: A blinking or color-changing indicator is easy to ignore until it isn't.

Practical rule: If your water tastes worse and the indicator agrees, don't overthink it. Change the filter.

I've found that most trouble comes from putting the swap off because the pitcher still “kind of works.” That's the maintenance trap with simple water filtration. Since the unit doesn't shut down, people assume it's fine. It isn't always fine. A tired filter still passes water. It just may not be doing the same level of taste and contaminant reduction it did when it was fresh.

The good news is that Brita replacements are quick. The better news is that once you understand the timing, the filter types, and the reset process, the whole job stops feeling vague.

Decoding When to Change Your Brita Filter

The cleanest way to decide when to replace a Brita filter is to use three signals together. Follow the built-in indicator if your model has one, keep the expected lifespan of your filter type in mind, and pay attention to what your water is telling you.

Brita's schedule isn't one-size-fits-all. According to Medical News Today's summary of Brita filter timing and lifespan, standard pitcher filters are typically changed every 2 months, while Brita says its filters generally last 2 to 6 months depending on the pitcher or dispenser type. In practical use, that works out to about 40 to 120 gallons before replacement, and Brita says the Longlast+ now called Elite lasts 6 months, while the standard filter lasts about 2 months.

An infographic showing four signs to change your Brita water filter including time, taste, flow, and indicators.

Time matters because the filter media wears out

That replacement window isn't random. Activated carbon and ion-exchange media become less effective as they saturate. So if you want the pitcher to keep reducing chlorine taste and odor properly, schedule matters.

A lot of people treat the filter like a battery that works perfectly until the exact minute it dies. In practice, it's better to consider it as any maintenance item that gradually loses effectiveness. That's why the idea behind what is condition based maintenance fits so well here. You use a mix of timing and condition signals, not blind guesswork.

What the indicator is really telling you

On newer pitchers, the electronic indicator is your easiest prompt. It's there to keep your replacement timing consistent with the filter the lid is tracking. If it changes color or starts blinking, take it seriously, but don't treat it like magic. It only helps if it was reset correctly after the last filter change.

Older pitchers may use a simpler sticker or manual date dial. That system is less fancy, but it works if you set it when you install the cartridge. Most missed filter changes happen because someone says they'll remember, then life happens.

If the indicator wasn't reset after the last swap, the light may be warning you about the wrong filter age.

Your senses still matter

Even with an electronic lid, taste and smell are worth trusting. If chlorine odor comes back or the water tastes off before the indicator says it's time, I pay attention. Indicators are useful. Your mouth and nose are useful too.

A slow filter is another clue. Not every slow pitcher means the cartridge is spent, but a noticeable drop in flow often means something has changed inside the media or around the fit of the filter. If your usual refill routine suddenly drags, that's worth checking.

Here's the simplest way to read the signals:

Signal What it usually means Best response
Indicator changes or blinks Replacement timing has likely been reached Check filter type and replace if due
Water tastes or smells off Reduction performance may be fading Replace sooner rather than later
Flow gets much slower Filter may be clogging or seated poorly Reseat or replace
You lost track entirely Maintenance drift Replace the filter and reset properly

When people ask me which signal is most reliable, I say this: time gives you the schedule, the indicator gives you the reminder, and taste gives you the reality check.

The Filter Swap Process for Any Brita Model

A clean filter change takes only a few minutes, but the order matters. The job goes smoother when you think in four moves: remove, prep, install, reset.

A person placing a white replacement water filter into a clear Brita water pitcher on a counter.

Brita's own support guidance for replacement filters says the key workflow is to remove the old cartridge, pre-condition the new one, flush it, and reset the indicator. Brita says to rinse new filters under running water for 15 seconds, insert them firmly until seated or clicked, and for some models hold the STATUS button for 6 seconds until the green Elite light blinks three times. That same guidance is the reason I tell people not to skip prep. Most of the annoying first-use problems come from rushing.

Pitchers and dispensers

Start by emptying the reservoir and taking the lid off. Pull the old filter straight out. If it's stuck, grip it low and wiggle gently instead of yanking the top edge. A filter can bind a little when it has been sitting in place for a while, especially if mineral residue or moisture has made the fit tight.

Before the new cartridge goes in, give the pitcher a quick wash with mild soap and rinse it well. This is one of the easiest ways to keep the whole system tasting clean. If you only ever change the cartridge and never wash the body, the filter gets blamed for problems the pitcher caused.

Why the rinse step matters

Brita says to rinse the new filter under running water for 15 seconds. That step isn't busywork. It helps pre-condition the media and wash away loose carbon fines that can show up as tiny black specks in the first water you pour.

Those specks worry people, but in most cases they're just residual carbon fines from a new filter. The rinse and initial flush handle that.

Use this rhythm:

  1. Remove the old cartridge and discard it according to your local recycling or disposal option.
  2. Rinse the new cartridge under cool running water for the full recommended time.
  3. Insert it firmly until it feels properly seated. On many models, you'll feel or hear a click.
  4. Fill and flush the first batch of water through the filter.
  5. Reset the indicator before you walk away.

A loose filter is one of the sneakiest problems. If the cartridge isn't fully seated, water can bypass the fit you're counting on.

What works and what doesn't

Some habits help. Some just create extra mess.

  • Works well: Cleaning the reservoir while it's empty.
  • Works well: Pressing the filter down firmly so it seals properly.
  • Works well: Flushing the first pitcher if you see carbon dust.
  • Doesn't work: Dropping the filter in casually and assuming gravity will seat it.
  • Doesn't work: Forgetting the reset and trusting yourself to remember the date later.
  • Doesn't work: Blaming the new filter for bad taste when the pitcher itself needs washing.

If you like seeing the process before doing it, this walkthrough is useful:

If your filter seems stuck or crooked

A stuck old cartridge usually comes out with patient side-to-side movement. Don't pry hard against the plastic housing with a knife or screwdriver. That's how lids get gouged and reservoirs crack.

If the new filter sits unevenly, remove it and try again. The right fit should feel deliberate, not questionable. Water filtration parts are simple, but seal quality matters. If something looks crooked, fix it before you fill the tank.

A note on faucet mount systems

Brita faucet systems aren't swapped exactly like pitcher cartridges. The idea is similar, but the housing and cartridge design are different, and the model-specific instructions matter more. With faucet units, I always recommend following the cartridge alignment marks on the system itself and checking for a proper seat before running filtered water.

The general principle still holds. Don't force the cartridge, don't skip the flush, and don't assume a blinking indicator means the new filter automatically registered itself. Faucet systems can be less forgiving if the cartridge is installed slightly off.

Resetting Your Indicator and Final Checks

Physical installation is only half the job. If the indicator isn't synced to the new cartridge, you've set yourself up for confusion later.

A close-up view of a finger pressing the reset button on a Brita water pitcher indicator.

How to reset without guessing

On some Brita pitchers, the reset is straightforward. Press and hold the STATUS button until the indicator responds. For some models, the confirmation is the green Elite light blinking three times after holding the button for 6 seconds, as noted in Brita's support instructions mentioned earlier.

That blinking matters because it tells you the lid accepted the reset. If you press too briefly, nothing may change. If the light sequence doesn't appear, do it again before you refill and forget about it.

For readers who want a model-by-model walkthrough, this guide on how to reset a Brita filter indicator is a handy reference.

Sticker indicators and manual tracking

Some older pitchers use a sticker or dial instead of electronics. Those systems work fine if you update them the moment the filter goes in. Don't set the date later. Later usually turns into never.

A manual system is simple, and that's its strength. It can't glitch, but it also can't remind you unless you've marked it clearly.

Final checks before you call it done

Run through these quick checks:

  • Look at the fit: The cartridge should sit straight and secure.
  • Check the water: If you see a few black flecks at first, flush another batch.
  • Watch the indicator: Confirm the reset registered.
  • Taste the water: It should return to that cleaner, neutral profile you expect.

If the light is still acting like the old filter is installed, the issue is usually the reset step, not the cartridge.

When people say a new filter “didn't work,” I often find one of two problems. The filter wasn't fully seated, or the indicator never got reset, so they assumed something was wrong when the lid kept warning them.

Smart Tips for Brita Filter Maintenance

Good Brita maintenance is mostly about consistency. You don't need a complicated system. You need a routine that keeps the pitcher clean, the replacement schedule visible, and the right filter on hand before the old one is overdue.

Brita says that all of its filters reduce chlorine taste and odor, and that the Elite filter removes 99% of lead, reduces more contaminants than earlier pour-through systems, and lasts 3 times longer than the original standard filter according to Brita's product overview for better water. That matters when you're deciding what to keep in the pantry. A standard filter may suit households that don't mind more frequent changes. An Elite filter makes sense for people who want fewer swap days and a longer service interval.

An infographic showing five helpful tips for maintaining a Brita water filter pitcher for optimal performance.

Buy smarter, not just cheaper

Filter packs are one of those boring purchases that reward planning. If you know you'll keep using the same pitcher, buying multi-packs usually makes life easier because you're less likely to put off a replacement while waiting to reorder.

The better value isn't always the cheapest box on the shelf. It depends on the filter type you use, how often you change it, and whether you prefer lower up-front cost or fewer maintenance events.

Set reminders outside the pitcher

Electronic indicators are helpful, but I still like a backup. A calendar reminder on your phone keeps you from relying on memory alone. If you want a simple system for automating recurring tasks, that approach works well for filter changes too, especially in busy households where no one remembers who last touched the pitcher.

Troubleshooting the three most common annoyances

These are the issues I hear about most often:

  • Black specks in the first fill: Usually carbon fines from a new cartridge. Flush another pitcher or two.
  • Slow draining water: Check that the filter is fully seated and that the reservoir isn't clogged with debris or buildup.
  • Odd taste after replacement: Wash the pitcher body and lid, then flush again. Sometimes the cartridge is new but the problem is the container.

For households using the longer-life cartridge, this guide on using a Brita Longlast filter to reduce the risk of lead in drinking water is worth reading.

Clean water habits are small habits. Rinse the filter correctly. Wash the pitcher regularly. Reset the indicator every time. That's what keeps the simple system working.

A final practical point on storage. Keep spare filters sealed and stored in a cool, dry place. Don't toss them loose under the sink where they can pick up odors or get damaged by other supplies. And if a filter package looks torn or crushed, I'd skip it.


If you want more practical help choosing, replacing, and comparing home water filtration options, visit Water Filter Advisor. It's a solid resource for households that want clearer guidance on pitchers, faucet filters, under-sink systems, and long-term maintenance.

How to Check a Well Pump: Step-by-Step Guide

You usually don't start checking a well pump because you're curious. You start because the shower went weak, the faucet spit air, or a sediment cartridge that should still look decent already looks like it came out of a mud line.

That's the part many homeowners miss. A pump problem isn't only a water supply problem. It's often a water filtration problem first. If the pump can't deliver steady pressure and clean flow, every filter downstream has to absorb the abuse. Sediment filters load up early. Carbon media doesn't get the contact time it needs. Reverse osmosis systems struggle when feed pressure swings around.

Knowing how to check a well pump helps you avoid more than a no-water emergency. It helps you protect the equipment you already paid for, and it helps you catch the kind of slow performance decline that ruins cartridges long before the pump quits completely.

Why Your Water Filters Hate a Failing Well Pump

A sputtering faucet usually sends people in the wrong direction. They blame the filter housing, the cartridge, or the softener. Sometimes that's true. Often it isn't.

The common assumption is that a pump is either working or dead. That view is too simple. Some troubleshooting sources note that most guides are binary: working vs. broken, even though a pump can still run while drawing abnormal current, producing lower flow, or overheating as it slips toward failure, especially in private well systems dealing with seasonal changes or sediment buildup (video-based troubleshooting notes).

A close-up view of a dirty, sediment-clogged water filter cartridge sitting on a counter next to a glass.

Filters see pump trouble before you do

A weak pump doesn't always announce itself with silence. It often shows up as nuisance filter behavior.

  • Sediment cartridges clog too fast because pressure swings and disturbed well conditions can send bursts of grit into the line.
  • Carbon filters perform poorly when flow becomes erratic. Water can move too fast one moment and too weakly the next.
  • RO systems get fussy because they prefer stable feed conditions, not a pressure gauge that hunts up and down.
  • Backwashing equipment struggles when the pump can't maintain the flow the media bed needs.

If you've been comparing options for well water filtration systems for the home, this is the hidden rule nobody should ignore. The filter train is only as healthy as the pump feeding it.

Practical rule: If a filter problem appears suddenly across the whole house, check the well system before you keep buying cartridges.

Performance loss is expensive in quiet ways

A failing pump can short-cycle, overheat, or run with reduced output while still giving you some water. That in-between stage is rough on filtration equipment. Pressure spikes hammer housings and switches. Low flow can leave treatment systems underfed. Sediment slugs turn maintenance into guesswork.

Homeowners often replace the visible part first because it's easy. They change a cartridge, clean an aerator, maybe even blame the softener. Then the same symptoms come back. The pump was the actual issue all along.

Your First Look Before Touching Any Tools

Before you open anything, loosen anything, or test anything electrical, get a baseline. Good troubleshooting starts with observation, not disassembly.

A surprising number of well calls come down to a tripped breaker, a closed valve, or a symptom that only affects one fixture. Those are easy wins, and they matter because they keep you from chasing the wrong problem into the well house.

Start with what the system is telling you

Walk the house first. Don't go straight to the pressure switch.

Ask three simple questions:

  1. Is the problem everywhere, or only at one faucet or shower?
  2. Did the issue start as low pressure, sputtering, or no water at all?
  3. Did it happen suddenly, or has it been getting worse?

If one faucet is weak and the rest of the house is fine, that's usually a fixture issue, clogged aerator, or local valve issue. If every tap is weak, the well system moves to the top of the list.

Then look at the breaker panel. A well pump circuit that has tripped once may trip again, so resetting it without paying attention isn't a diagnosis. It's only a clue.

Quick diagnosis symptoms and first checks

Symptom Most Likely Cause First Thing to Check
No water anywhere Power loss, control issue, pump issue Breaker position and whether the pressure gauge is reading pressure
Weak pressure everywhere Pump performance issue, tank problem, clogged prefilter Pressure gauge behavior while water is running
Sputtering faucets Air in the line, low well level, check valve issue Whether the issue affects multiple fixtures
Pump noise or repeated clicking Short-cycling, switch issue, tank problem Pressure gauge movement and pump on-off pattern
One fixture has low flow Local plumbing restriction Aerator, shutoff valve, or fixture cartridge

Listen before you touch

Stand near the pressure tank and switch area while someone opens a faucet. Listen for the pump system response. You're not trying to become a motor expert by ear. You're only trying to answer basic questions.

  • Silent system when pressure has dropped can point toward electrical or control trouble.
  • Frequent starts and stops suggest cycling trouble.
  • Continuous running with weak delivery points toward performance loss rather than a simple on-off failure.

If the gauge and the sound of the system don't match what the faucets are doing, don't assume the filter is the culprit.

One more filtration-specific check matters here. Look at your prefilter housing if you have one. If the sump suddenly holds more visible grit than usual, that often means the well system has been disturbed, not that the filter did something wrong.

Checking the Brains of Your Well System

The pressure switch and pressure tank decide how your pump behaves. If the pump is the heart, these parts are the brain and lungs. When they're out of sync, the whole house feels it, and filters usually take the beating first.

The switch tells the pump when to start and stop. The tank smooths out delivery so the pump doesn't fire every time someone rinses a spoon. When either one is off, the result is often short-cycling, uneven pressure, and hard service life on cartridges, housings, and treatment valves.

An infographic showing four steps to check well pump system controls safely and effectively.

Watch a full pressure cycle

Pick a faucet that runs cleanly and let water flow long enough for the system to react. Keep your eyes on the gauge.

What you want is a calm pattern. Pressure drops as water is used. The pump turns on at the switch's cut-in point. Pressure climbs steadily. The pump shuts off at cut-out. The gauge then holds reasonably steady while no water is being used.

A bad pattern looks different:

  • Rapid on and off cycling usually means the tank isn't buffering correctly, the air charge is wrong, or the system is losing pressure somewhere.
  • Pressure that won't build normally can point toward a weak pump, worn controls, or a plumbing restriction upstream of your filtration equipment.
  • A gauge that drifts downward with no water running deserves attention fast.

Isolate the tank and see if pressure holds

One of the most useful checks is also one of the simplest. A reliable first diagnostic is to isolate the pressure tank from the house plumbing and observe whether pressure holds. If pressure drops, a leaking check valve is a prime suspect because it lets water drain back and can force short-cycling. Technicians also verify voltage at the pressure switch. On a 240V setup, each leg should read about 115V to ground, and a missing leg often points to wiring or breaker trouble rather than the pump itself, as described in this submersible pump diagnostic guide.

That pressure-hold test matters for filtration because a leaking check valve creates unstable delivery. Your filters don't see a smooth stream. They see repeated starts, pressure swings, and occasional bursts that stir up fines.

A lot of homeowners replace a pressure switch because the system is cycling fast. If pressure falls after the plumbing is isolated, the switch may be innocent.

Check the tank before blaming the pump

A bad tank or bad air charge can mimic pump trouble so well that people pull a pump they didn't need to pull.

Here's the practical sequence:

  • Turn off power first. Never open a switch or inspect contacts live.
  • Drain the tank fully before checking its air side.
  • Inspect the switch visually for corrosion, debris, or burned contacts.
  • Check for waterlogging symptoms such as very short run times and abrupt pressure changes.

An unhealthy tank creates fake evidence. It can make a decent pump look weak because the system never gets a stable cushion of compressed air. That instability also makes whole-house filtration behave badly, especially if you have a softener or backwashing media filter that expects predictable flow and pressure.

Is Your Pump Working Hard or Hardly Working

Some pumps fail dramatically. More often, they fade. The house still has water, but the pressure feels thin, the sediment filter darkens too quickly, and treatment equipment starts acting temperamental.

That's where actual measurement helps. At this point, guessing stops being useful.

A close up view of a water pressure gauge attached to a hose on blue background.

Run the bucket test

The bucket test is simple, but it tells you whether your pump can still feed the house and the treatment equipment attached to it.

In many residential markets, most modern submersible well pumps in single-family homes deliver between 5 and 15 GPM under normal conditions, with 5 GPM generally treated as the minimum acceptable household flow and 10 to 15 GPM seen as a strong setup. Target system pressure is commonly 40 to 60 psi. A standard field method is to run water until the pump engages, then fill a 5-gallon bucket repeatedly until the pump cycles off, record the gallons and seconds, and calculate flow with (Gallons ÷ Seconds) × 60. Those residential testing details are summarized in this well pump efficiency testing guide.

Why this matters for filtration is straightforward. Filters and treatment systems are built around flow windows. Too little flow and the house feels weak. Too much flow can reduce contact time or push equipment past what it was meant to handle. If you're trying to improve low water pressure in a house, this test helps separate a true pump issue from a plumbing-side complaint.

What the numbers mean in real life

If your bucket test shows the system is struggling to sustain household flow, don't only think about showers and sinks. Think about:

  • Sediment filtration getting loaded unevenly because the system surges
  • Carbon tanks not seeing the consistent service flow they were sized around
  • Water softeners regenerating and backwashing less predictably
  • RO units receiving feed pressure that drifts instead of staying stable

A pump can still technically run while failing your filtration setup.

Field note: A system can be “good enough” for a bathroom sink and still be a poor match for a whole-house treatment train.

Check current draw if you know how to work safely

Flow tells you what the pump delivers. Amperage tells you how hard it's working to deliver it.

For homeowners or technicians comfortable with electrical testing, a clamp meter on the pump lead gives useful information during startup and run. The practical benchmark from residential pump guidance is that a 1 HP pump commonly draws about 8 to 10 amps under load. If actual draw doesn't line up with expected pump size, the system may be dealing with internal wear, overload, or another developing problem.

Before making too much of that reading, remember the setup matters. Tank condition, switch condition, and water level all affect what you see. A pump that overheats under low-water conditions can look like a generic pressure complaint from inside the house.

A short demonstration helps if you want to see the measurement process in action:

The filter clue most people ignore

If current draw looks off and your sediment load has also increased, pay attention. That pairing often means the system isn't just aging. It may be working under stress from low water, debris, or mechanical wear.

That's exactly when it makes sense to stop replacing cartridges as a first response and start treating the pump as the root problem.

Know When to Call a Pro

Some parts of how to check a well pump are solid DIY territory. Other parts can hurt you, damage the system, or turn a manageable repair into a full replacement job.

The line is simple. Observation is one thing. Live electrical diagnosis, pulling a submersible pump, or opening a control box when you're unsure is another.

The red-line situations

Call a professional if any of these apply:

  • You need to work around live power. The pressure switch area is not a place for trial and error.
  • The diagnosis points below ground. Pulling a pump, drop pipe, or check valve assembly isn't a casual weekend job.
  • The system keeps short-cycling after basic checks. Repeated starts are hard on motors and hard on filtration equipment.
  • You see pressure loss that doesn't make sense. Hidden leaks, failing valves, or low-well conditions can mimic one another.
  • Your filters are failing unusually fast and the cause isn't obvious. That often means the water supply side needs a trained set of eyes.

A professional tool bag with plumbing equipment placed next to a well pump on a sunny day.

Why calling early often saves money

Once a pump starts running poorly, every extra day can punish the rest of the system. Filters clog. Pressure switches arc and wear. Tanks suffer from repeated cycling. Treatment valves get fed unstable pressure and flow.

That's why calling a pro isn't giving up. It's protecting the expensive parts downstream.

If your test results don't tell one clear story, stop there. Ambiguous well problems are where DIY damage usually starts.

A good technician won't just ask whether the pump runs. They'll want to know how the pressure behaves, how the filters have been acting, whether sediment has increased, and whether the trouble is constant or demand-related. That full picture is what leads to the right repair.

Your Well Pump Questions Answered

How often should I check my well pump if my main goal is protecting filters

Check the system any time the water changes behavior. Weak pressure, sputtering taps, sudden sediment loading, or unusual cycling all justify a pump check. If you're on a private well with treatment equipment, regular observation of pressure behavior and cartridge condition is smarter than waiting for a total failure.

Can a bad well pump make water quality seem worse even if the water source hasn't changed

Yes. A struggling pump or unstable control setup can stir sediment, introduce air, and create pressure swings that make filters less effective. The water source may be the same while the delivered water feels worse because the system is handling it poorly.

Should I replace filters first when pressure drops

Only if the restriction clearly starts at the filter. If the whole house changes at once, start upstream at the well system. Replacing cartridges without checking pump behavior often wastes time and money.

What's the most overlooked check

The pressure tank and its air side. People jump straight to the pump because it feels like the important part. In practice, a bad tank setup can imitate pump trouble and make filter performance erratic.

Are manufacturer resources worth reading if I'm trying to understand pump basics

Yes, especially if you want to get familiar with pump types and general operating principles before talking to a technician. A good example is this Ingersoll Rand pump guide from MA Hydraulics Ltd, which is useful for broader pump context even if your home well system uses a different brand.

What should I tell a technician so they can diagnose faster

Give them symptoms in sequence, not guesses. Say when the pressure changed, whether faucets sputter, whether filters started clogging faster, whether the gauge drops while no water is running, and whether the issue is house-wide. That kind of detail is far more useful than saying, “I think the pump is bad.”


If you're trying to protect your cartridges, improve pressure, or choose a treatment setup that actually fits your well system, Water Filter Advisor has practical guides that help you match filtration to real-world water conditions.

Best Whole House Nitrate Filter Options for 2026

You open the lab report at the kitchen counter, scan past the pH and hardness numbers, and then see the word nitrate flagged high. That's usually the moment the questions start. Is the water safe to drink? Do you need a whole house nitrate filter right now? Or are you about to spend money on a system that treats far more water than you need to treat?

A lot of homeowners hit that exact fork in the road, especially on private wells. The good news is that nitrate contamination is a familiar water-quality problem with established treatment options. The bad news is that plenty of buying guides jump straight to product pitches before helping you decide whether a whole-house setup is even the right tool.

The Day Your Water Test Comes Back High in Nitrates

High nitrates on a water test feel personal fast. You think about baby formula, coffee, pasta water, pets, and every glass poured from the tap. If you rely on a well, you may also feel isolated, like this is your property's problem alone.

It usually isn't.

According to a foundational EPA survey, nitrate detection was projected in 57 percent of rural domestic wells, and more recent data shows that 1 in 5 households on private wells continue to have nitrate levels higher than the EPA's safe drinking water limit of 10 mg/L according to this nitrate overview. That tells you two things at once. First, your concern is justified. Second, this is a known problem with known responses.

A person holding a test strip indicating high nitrate levels in front of a kitchen faucet.

What matters first

The first practical move is simple. Don't guess from taste, smell, or water clarity. Nitrates don't announce themselves that way.

Start with these questions:

  • Who drinks the water most often. If infants, pregnant women, or medically vulnerable people are in the home, the decision gets more urgent.
  • Where the water is consumed. Kitchen tap, fridge dispenser, coffee maker, ice maker, and any bathroom tap used for brushing teeth all matter more than the shower.
  • Whether the result came from a reliable test. If the test was a basic strip, confirm it with a lab-quality result before sizing expensive equipment.

Practical rule: A high nitrate result is a treatment decision, not a panic decision.

Homeowners often assume the answer has to be a whole house nitrate filter because the phrase sounds thorough and safe. Sometimes that's correct. Sometimes it's expensive overreach. The right answer depends on your water chemistry, your plumbing demand, and one very important question that gets skipped too often: do you need to treat every gallon in the house, or only the water you ingest?

Understanding Nitrates in Your Water Supply

Nitrate is a form of nitrogen that moves easily with water. In home water problems, it often shows up after nitrogen from fertilizer, manure, septic influence, or decaying organic matter travels down through soil into groundwater. The simplest analogy is over-fertilizing a garden. What the plants don't use doesn't just disappear. Water carries some of it downward.

That's why wells are so often part of the nitrate conversation. Groundwater can pick up what's happening at the surface and hold onto it.

The one number to remember

For homeowners, the key benchmark is the EPA drinking water limit of 10 mg/L as nitrogen, often written as 10 ppm. If your result is above that number, you need a treatment plan or a safe alternate source for drinking and cooking water.

That number should guide every decision that follows. Not the sales page. Not the size of your house. Not the fact that your neighbor installed a big tank system.

If you want a plain-language refresher on the contaminant itself, this guide on nitrate in drinking water is a useful place to start.

Why ingestion is the real concern

Nitrate risk is primarily about what goes into the body through drinking and cooking. That's why water used for baby formula deserves special attention. It's also why homeowners can make smarter, more targeted choices instead of defaulting to treating every faucet and shower line.

A few practical examples make this easier to see:

  • Drinking water matters.
  • Water used to make soup, tea, coffee, and pasta matters.
  • Ice made from tap water matters.
  • Shower water and laundry water generally aren't the main nitrate exposure pathway.

High nitrates are a drinking-water problem first. That distinction saves some households a lot of unnecessary equipment.

Testing before buying

Before you compare filters, tighten up the testing side.

Use a result that tells you the actual nitrate level, and make sure the sample reflects the raw water entering the home. If you're on a well, test the untreated source water before any existing equipment. If you already have softeners, sediment filters, or carbon units, those matter for system design, but the raw-water number is what decides whether nitrate treatment is necessary at all.

A good nitrate plan starts with the test report, not the catalog.

Comparing Whole House Nitrate Removal Technologies

If you do need house-wide treatment, the technology matters as much as the nitrate number. A whole house nitrate filter is not one universal machine. It's a category, and the systems inside that category work very differently.

The two technologies homeowners see most often are nitrate-selective ion exchange and reverse osmosis. Distillation gets mentioned sometimes, but it's rarely the practical whole-house choice in normal residential settings.

A diagram comparing three technologies for removing nitrates from whole house water systems: ion exchange, reverse osmosis, and distillation.

How the main technologies behave in real homes

Ion exchange works like a bouncer swapping wristbands at the door. The resin bed captures nitrate ions and trades them for chloride. It's one of the most common whole-house approaches because it can keep up with household flow better than many alternatives.

According to product guidance summarized by Aqua Home Supply, nitrate-selective ion-exchange systems can reduce nitrate levels by up to 90% and are commonly sized with 1.0 to 2.0 cu ft of media to support service-flow targets of 9 to 13 GPM for residential nitrate treatment. In practice, that means sizing errors show up fast. Too little resin or too much demand, and nitrate breakthrough arrives earlier than expected.

Reverse osmosis works more like an ultra-fine screen. Water is pushed through a semi-permeable membrane while many dissolved contaminants, including nitrates, are rejected. RO is excellent for high-quality drinking water and can also remove a broader range of contaminants than ion exchange. The trade-off is complexity. Whole-house RO systems require careful pretreatment, storage, and pressure management.

Distillation separates water by boiling and condensing it. It can remove nitrates, but it's usually a niche fit for residential use because it's energy-intensive and not a normal answer for supplying a whole house.

Nitrate filtration technology comparison

Technology How It Works Pros Cons Best For
Ion exchange Swaps nitrate ions for chloride using resin Good fit for continuous household flow, common for whole-house use Needs salt regeneration, produces brine, sensitive to competing water chemistry Homes that need house-wide nitrate treatment and can support maintenance
Reverse osmosis Forces water through a membrane that rejects nitrates and other dissolved contaminants Broad contaminant reduction, strong drinking-water performance More complex as a whole-house setup, needs pretreatment and ongoing service Households with broader contamination concerns or targeted under-sink use
Distillation Boils water and condenses steam Effective in principle Slow, energy-heavy, impractical for full-home demand Small-volume specialty use

For readers comparing treatment paths for well water, this guide on how to remove nitrates from well water helps connect the technology to real installation choices.

What gets overlooked

Most homeowners compare removal claims and stop there. That's not enough. You also need to think about waste streams. Ion exchange produces brine. RO produces reject water. If your house runs on a septic or onsite treatment setup, the interaction between filtration equipment and wastewater handling matters. That's one reason some homeowners also review sustainable wastewater solutions from USA Tank when planning larger water-treatment upgrades.

A nitrate system that looks strong on paper can still be the wrong choice if your home can't comfortably support its maintenance and wastewater demands.

Sizing Your System for Flow Rate and Water Chemistry

Regarding nitrate projects, success or failure often depends on the approach. Homeowners often size by square footage or family count because that's easy to visualize. Nitrate systems don't care about your floor plan. They care about flow rate and source-water chemistry.

A whole house nitrate filter has to do two jobs at once. It has to keep up when multiple fixtures run, and it has to perform correctly against the specific minerals and contaminants in your water.

A diagram illustrating residential water system flow rates and pipe sizing for home plumbing infrastructure.

Flow rate decides whether the system keeps up

Think about your busiest water moment. A shower is running, someone starts the dishwasher, and a toilet refills. That combined demand is what the treatment system has to handle without starving the house for pressure or reducing contact time too much.

With nitrate ion exchange, undersizing creates a familiar failure pattern. The system may seem fine at first, but treated-water quality drifts as demand pushes the bed harder than it was designed for. Homeowners often describe this as a filter that “worked for a while and then didn't.” In many cases, the issue was sizing, not magic resin failure.

Water chemistry decides whether the system keeps working

Clean Water Store's guidance gets to the heart of it. The best-performing installations are built around lab-tested source water, not just household size, and product specs often cap hardness at less than 3 gpg and iron at less than 0.3 ppm because higher levels can foul the resin and push treated nitrate above the EPA's 10 ppm limit in real operating conditions.

That's why a detailed water test is not optional.

Here's what to watch for before choosing equipment:

  • Hardness and iron can foul media or create service problems that shorten effective run length.
  • Sulfates compete with nitrate in ion-exchange systems and can reduce removal efficiency.
  • Sediment can physically burden valves, beds, and membranes if you skip pretreatment.
  • Manganese and other nuisance minerals can turn a good design into a maintenance-heavy one.

Field note: Match the equipment to the water first, then match it to the family's usage pattern.

If a dealer recommends a one-size-fits-all tank without asking for a lab report, that's a red flag. The better installations are built from raw-water data outward.

The Hidden Costs Regeneration Maintenance and Upkeep

The purchase price gets attention because it's visible. The long-term burden usually doesn't, and that's where a lot of disappointment starts.

Ion-exchange nitrate systems often look straightforward from the outside. Tank, control valve, brine tank, done. But the system keeps doing work after installation. It regenerates, uses salt, backwashes, and sends waste brine out of the home. Those are not side details. They are part of the ownership cost.

What the brochure tends to underplay

According to RainDance's nitrate filter guidance, many ion-exchange systems advertised for 90%+ nitrate reduction require salt regeneration and produce waste brine, with hidden costs that include annual salt purchases, more water use for backwashing, and growing service complexity over time for the homeowner.

That translates into a few practical realities:

  • You'll buy salt regularly. If you dislike carrying bags and managing a brine tank, don't ignore that.
  • The system uses water to maintain itself. That matters on wells, septic systems, and properties where water efficiency matters.
  • Valves and controls need attention. Even good hardware can become unreliable if settings drift, injectors clog, or maintenance is skipped.

Reverse osmosis has its own upkeep profile

Whole-house RO avoids salt regeneration, but it doesn't eliminate maintenance. Pretreatment filters need replacing. Membranes eventually need service. Pumps, storage, and repressurization add moving parts and troubleshooting time.

I always tell homeowners to budget attention, not just money. The right nitrate treatment system should fit the amount of maintenance you will do, not the amount you hope you'll do.

For readers who like understanding what failure looks like before it happens, this piece on analyzing water treatment equipment failures is worth reviewing. It's useful because water systems rarely fail all at once. They usually drift, foul, clog, or lose performance in ways that are predictable if you know what to watch.

The honest cost question

The best nitrate system isn't the one with the boldest removal claim. It's the one you can keep operating correctly.

If maintenance gets neglected, the label on the tank won't save water quality. A simpler point-of-use setup that does get serviced can beat a neglected whole-house system every time.

The Big Decision Whole House vs Point of Use Filters

This is the question most buyers should ask before comparing brands. Do you need a whole house nitrate filter, or do you need safe water only at the taps used for drinking and cooking?

For many homes, those are not the same thing.

A person sitting between two blue Aquatemp water filters while appearing to contemplate a difficult decision.

Culligan's product guidance makes the central point clearly. Nitrate risk is tied primarily to ingestion, not skin contact, which means point-of-use treatment can be more cost-efficient for many homes, even though vendor pages often present whole-house nitrate removal as the default without much comparison.

When whole house treatment makes sense

A whole-house system is usually easier to justify when the household wants one treatment strategy across the property and understands the maintenance involved.

That choice tends to make sense when:

  • Multiple taps are used for drinking and cooking, including secondary kitchens, utility sinks, or bathroom taps.
  • The household wants every cold-water line treated because managing one protected tap isn't practical.
  • There are additional treatment goals that make a centralized setup more logical.
  • You're prepared for the service burden of a larger system.

When point-of-use is the smarter move

If nitrates are your main concern and the risk is about what people drink, an under-sink reverse osmosis unit or dedicated drinking-water tap is often the cleaner answer.

Point-of-use treatment is often the better fit when:

  • The concern is limited to ingestion.
  • Only one kitchen tap and maybe the ice line need treatment.
  • You want lower upfront cost and less whole-home plumbing disruption.
  • You're not interested in managing brine regeneration for every gallon used in showers and laundry.

Treating shower water for nitrate alone is often like putting a whole-house air filter in place because one room smells musty. Sometimes it's warranted. Often it's not.

A short explainer can help if you want to see the decision framed visually:

A practical decision path

Use this simple logic:

  1. Confirm the nitrate result with a reliable test.
  2. Ask where exposure happens in your home.
  3. If the main need is drinking and cooking water, start by evaluating point-of-use RO.
  4. If multiple points of consumption make POU impractical, price and size a whole-house system based on lab results.
  5. Choose the option you can maintain consistently.

The most expensive answer isn't automatically the safest one. The safest one is the treatment plan that reliably protects the water people ingest.

Installation Costs and Finding a Certified System

Once you know whether whole-house treatment is justified, the buying process gets easier. Cost still matters, but certification matters just as much.

According to Mid Atlantic Water, the upfront cost for a whole-house nitrate filter typically ranges from $2,895 to $3,295, with annual operating costs of about $100 to $200, and certified systems are proven to reduce nitrates by 78% to over 92% depending on the system and certification basis. Those numbers are useful because they set expectations before you talk to an installer.

What to check before you buy

Use this checklist:

  • Verify the treatment approach. Don't buy a whole-house nitrate filter before deciding that whole-house treatment is necessary for your household.
  • Ask for certification details. For RO, NSF/ANSI 58 matters for contaminant reduction claims. For other filters that reduce nitrates, look for the relevant certification support behind the claim.
  • Review the full water test. A nitrate system chosen without raw-water chemistry is guesswork.
  • Discuss maintenance in plain terms. Ask who changes filters, who sets regeneration, and how post-install testing will confirm performance.
  • Be realistic about DIY. Some homeowners can handle plumbing work, but nitrate treatment equipment is less forgiving than simple cartridge filters. A bad install can undermine a good system.

A certified system doesn't replace proper sizing, and a properly sized system doesn't replace maintenance. You need both. When those pieces line up, nitrate treatment becomes a manageable home-water project instead of a recurring source of worry.


If you're weighing a whole house nitrate filter against a simpler under-sink option, Water Filter Advisor can help you compare technologies, understand certifications, and choose a filtration setup that fits your actual water use instead of a sales script.

SUBSCRIBE
Weekly newsletter