You usually don't start checking a well pump because you're curious. You start because the shower went weak, the faucet spit air, or a sediment cartridge that should still look decent already looks like it came out of a mud line.
That's the part many homeowners miss. A pump problem isn't only a water supply problem. It's often a water filtration problem first. If the pump can't deliver steady pressure and clean flow, every filter downstream has to absorb the abuse. Sediment filters load up early. Carbon media doesn't get the contact time it needs. Reverse osmosis systems struggle when feed pressure swings around.
Knowing how to check a well pump helps you avoid more than a no-water emergency. It helps you protect the equipment you already paid for, and it helps you catch the kind of slow performance decline that ruins cartridges long before the pump quits completely.
Why Your Water Filters Hate a Failing Well Pump
A sputtering faucet usually sends people in the wrong direction. They blame the filter housing, the cartridge, or the softener. Sometimes that's true. Often it isn't.
The common assumption is that a pump is either working or dead. That view is too simple. Some troubleshooting sources note that most guides are binary: working vs. broken, even though a pump can still run while drawing abnormal current, producing lower flow, or overheating as it slips toward failure, especially in private well systems dealing with seasonal changes or sediment buildup (video-based troubleshooting notes).
Filters see pump trouble before you do
A weak pump doesn't always announce itself with silence. It often shows up as nuisance filter behavior.
- Sediment cartridges clog too fast because pressure swings and disturbed well conditions can send bursts of grit into the line.
- Carbon filters perform poorly when flow becomes erratic. Water can move too fast one moment and too weakly the next.
- RO systems get fussy because they prefer stable feed conditions, not a pressure gauge that hunts up and down.
- Backwashing equipment struggles when the pump can't maintain the flow the media bed needs.
If you've been comparing options for well water filtration systems for the home, this is the hidden rule nobody should ignore. The filter train is only as healthy as the pump feeding it.
Practical rule: If a filter problem appears suddenly across the whole house, check the well system before you keep buying cartridges.
Performance loss is expensive in quiet ways
A failing pump can short-cycle, overheat, or run with reduced output while still giving you some water. That in-between stage is rough on filtration equipment. Pressure spikes hammer housings and switches. Low flow can leave treatment systems underfed. Sediment slugs turn maintenance into guesswork.
Homeowners often replace the visible part first because it's easy. They change a cartridge, clean an aerator, maybe even blame the softener. Then the same symptoms come back. The pump was the actual issue all along.
Your First Look Before Touching Any Tools
Before you open anything, loosen anything, or test anything electrical, get a baseline. Good troubleshooting starts with observation, not disassembly.
A surprising number of well calls come down to a tripped breaker, a closed valve, or a symptom that only affects one fixture. Those are easy wins, and they matter because they keep you from chasing the wrong problem into the well house.
Start with what the system is telling you
Walk the house first. Don't go straight to the pressure switch.
Ask three simple questions:
- Is the problem everywhere, or only at one faucet or shower?
- Did the issue start as low pressure, sputtering, or no water at all?
- Did it happen suddenly, or has it been getting worse?
If one faucet is weak and the rest of the house is fine, that's usually a fixture issue, clogged aerator, or local valve issue. If every tap is weak, the well system moves to the top of the list.
Then look at the breaker panel. A well pump circuit that has tripped once may trip again, so resetting it without paying attention isn't a diagnosis. It's only a clue.
Quick diagnosis symptoms and first checks
| Symptom | Most Likely Cause | First Thing to Check |
|---|---|---|
| No water anywhere | Power loss, control issue, pump issue | Breaker position and whether the pressure gauge is reading pressure |
| Weak pressure everywhere | Pump performance issue, tank problem, clogged prefilter | Pressure gauge behavior while water is running |
| Sputtering faucets | Air in the line, low well level, check valve issue | Whether the issue affects multiple fixtures |
| Pump noise or repeated clicking | Short-cycling, switch issue, tank problem | Pressure gauge movement and pump on-off pattern |
| One fixture has low flow | Local plumbing restriction | Aerator, shutoff valve, or fixture cartridge |
Listen before you touch
Stand near the pressure tank and switch area while someone opens a faucet. Listen for the pump system response. You're not trying to become a motor expert by ear. You're only trying to answer basic questions.
- Silent system when pressure has dropped can point toward electrical or control trouble.
- Frequent starts and stops suggest cycling trouble.
- Continuous running with weak delivery points toward performance loss rather than a simple on-off failure.
If the gauge and the sound of the system don't match what the faucets are doing, don't assume the filter is the culprit.
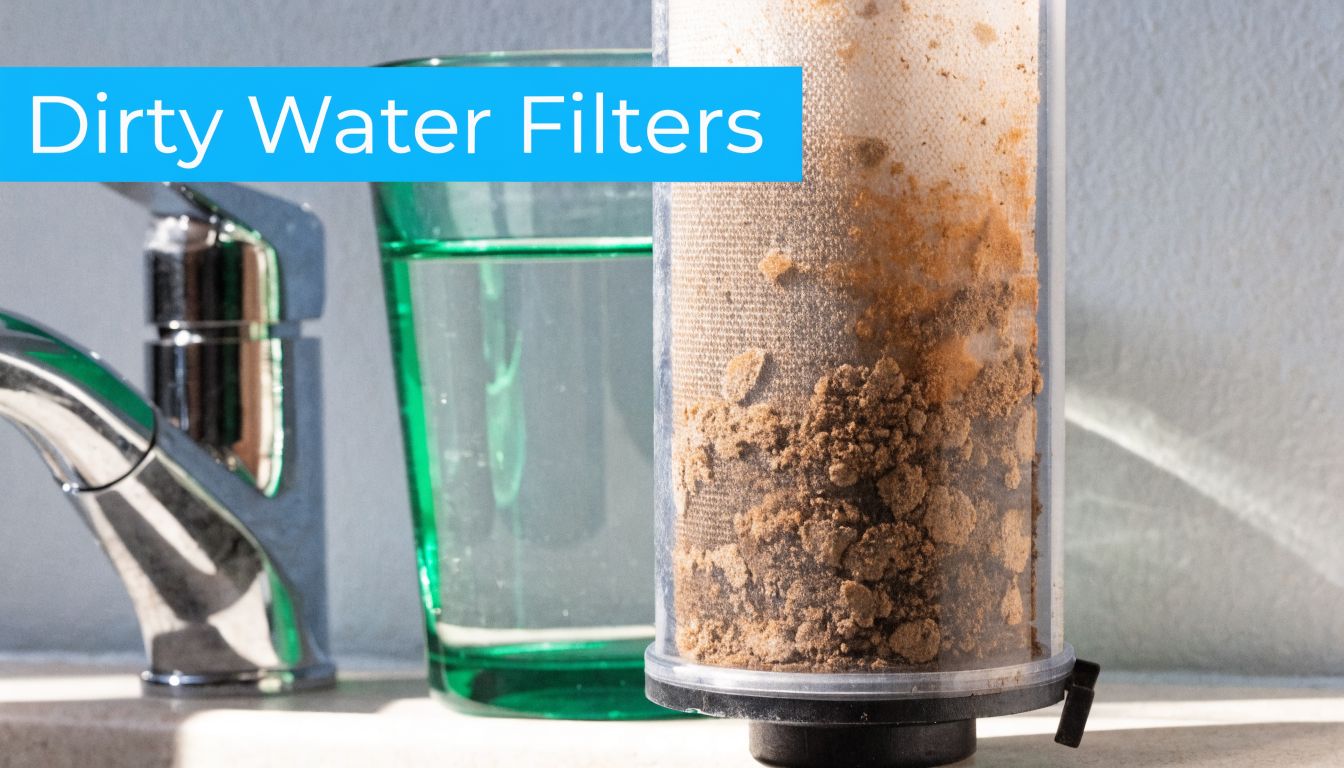
One more filtration-specific check matters here. Look at your prefilter housing if you have one. If the sump suddenly holds more visible grit than usual, that often means the well system has been disturbed, not that the filter did something wrong.
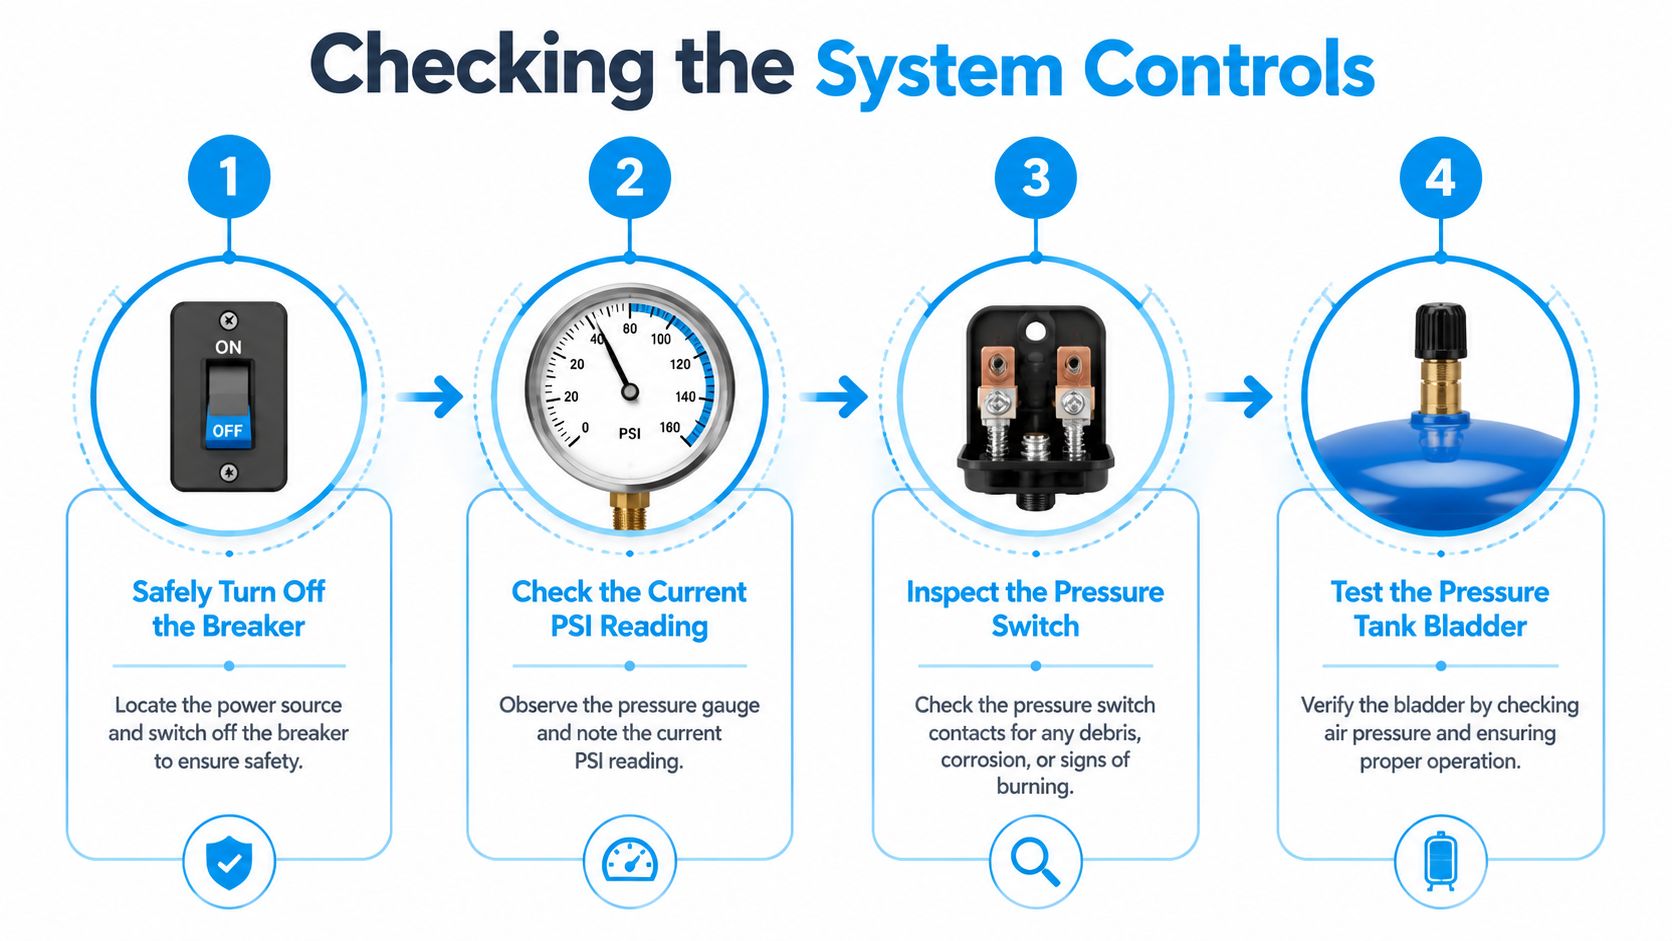
Checking the Brains of Your Well System
The pressure switch and pressure tank decide how your pump behaves. If the pump is the heart, these parts are the brain and lungs. When they're out of sync, the whole house feels it, and filters usually take the beating first.
The switch tells the pump when to start and stop. The tank smooths out delivery so the pump doesn't fire every time someone rinses a spoon. When either one is off, the result is often short-cycling, uneven pressure, and hard service life on cartridges, housings, and treatment valves.
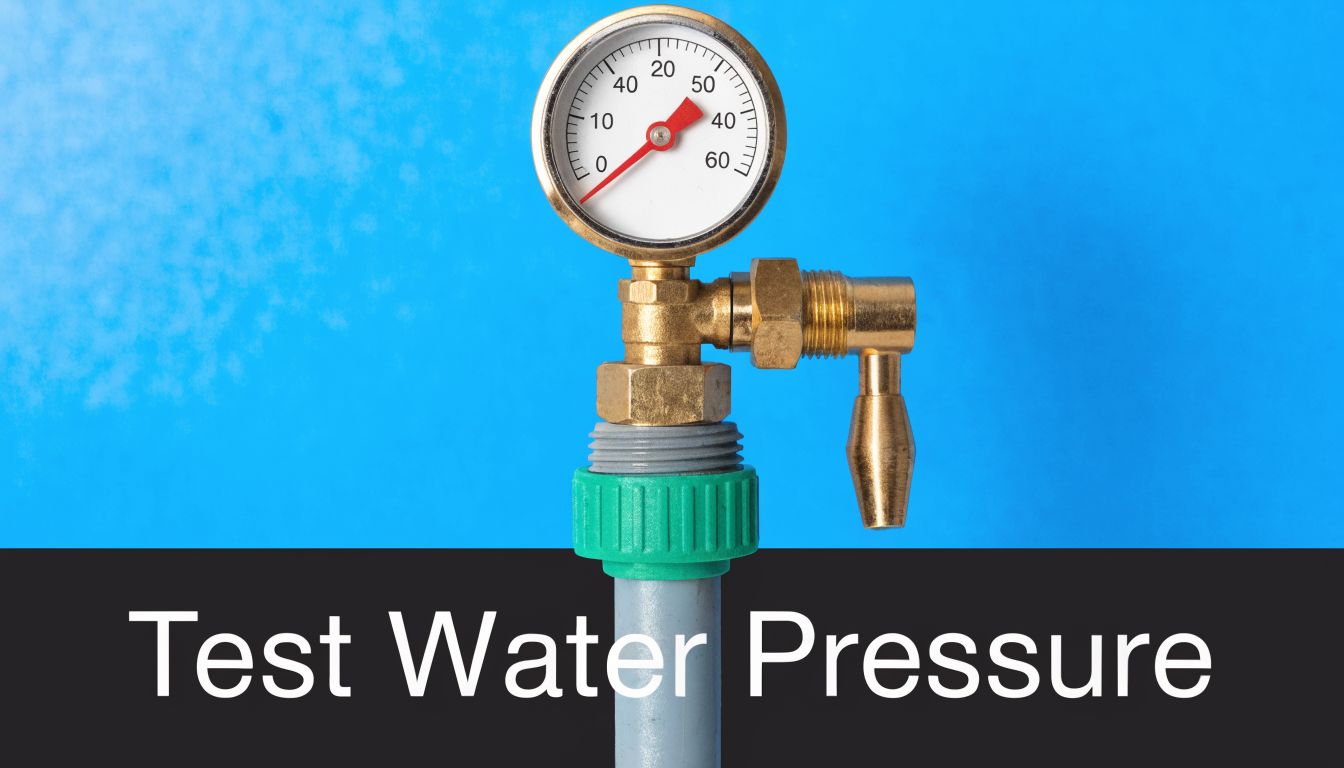
Watch a full pressure cycle
Pick a faucet that runs cleanly and let water flow long enough for the system to react. Keep your eyes on the gauge.
What you want is a calm pattern. Pressure drops as water is used. The pump turns on at the switch's cut-in point. Pressure climbs steadily. The pump shuts off at cut-out. The gauge then holds reasonably steady while no water is being used.
A bad pattern looks different:
- Rapid on and off cycling usually means the tank isn't buffering correctly, the air charge is wrong, or the system is losing pressure somewhere.
- Pressure that won't build normally can point toward a weak pump, worn controls, or a plumbing restriction upstream of your filtration equipment.
- A gauge that drifts downward with no water running deserves attention fast.
Isolate the tank and see if pressure holds
One of the most useful checks is also one of the simplest. A reliable first diagnostic is to isolate the pressure tank from the house plumbing and observe whether pressure holds. If pressure drops, a leaking check valve is a prime suspect because it lets water drain back and can force short-cycling. Technicians also verify voltage at the pressure switch. On a 240V setup, each leg should read about 115V to ground, and a missing leg often points to wiring or breaker trouble rather than the pump itself, as described in this submersible pump diagnostic guide.
That pressure-hold test matters for filtration because a leaking check valve creates unstable delivery. Your filters don't see a smooth stream. They see repeated starts, pressure swings, and occasional bursts that stir up fines.
A lot of homeowners replace a pressure switch because the system is cycling fast. If pressure falls after the plumbing is isolated, the switch may be innocent.
Check the tank before blaming the pump
A bad tank or bad air charge can mimic pump trouble so well that people pull a pump they didn't need to pull.
Here's the practical sequence:
- Turn off power first. Never open a switch or inspect contacts live.
- Drain the tank fully before checking its air side.
- Inspect the switch visually for corrosion, debris, or burned contacts.
- Check for waterlogging symptoms such as very short run times and abrupt pressure changes.
An unhealthy tank creates fake evidence. It can make a decent pump look weak because the system never gets a stable cushion of compressed air. That instability also makes whole-house filtration behave badly, especially if you have a softener or backwashing media filter that expects predictable flow and pressure.
Is Your Pump Working Hard or Hardly Working
Some pumps fail dramatically. More often, they fade. The house still has water, but the pressure feels thin, the sediment filter darkens too quickly, and treatment equipment starts acting temperamental.
That's where actual measurement helps. At this point, guessing stops being useful.
Run the bucket test
The bucket test is simple, but it tells you whether your pump can still feed the house and the treatment equipment attached to it.
In many residential markets, most modern submersible well pumps in single-family homes deliver between 5 and 15 GPM under normal conditions, with 5 GPM generally treated as the minimum acceptable household flow and 10 to 15 GPM seen as a strong setup. Target system pressure is commonly 40 to 60 psi. A standard field method is to run water until the pump engages, then fill a 5-gallon bucket repeatedly until the pump cycles off, record the gallons and seconds, and calculate flow with (Gallons ÷ Seconds) × 60. Those residential testing details are summarized in this well pump efficiency testing guide.
Why this matters for filtration is straightforward. Filters and treatment systems are built around flow windows. Too little flow and the house feels weak. Too much flow can reduce contact time or push equipment past what it was meant to handle. If you're trying to improve low water pressure in a house, this test helps separate a true pump issue from a plumbing-side complaint.
What the numbers mean in real life
If your bucket test shows the system is struggling to sustain household flow, don't only think about showers and sinks. Think about:
- Sediment filtration getting loaded unevenly because the system surges
- Carbon tanks not seeing the consistent service flow they were sized around
- Water softeners regenerating and backwashing less predictably
- RO units receiving feed pressure that drifts instead of staying stable
A pump can still technically run while failing your filtration setup.
Field note: A system can be “good enough” for a bathroom sink and still be a poor match for a whole-house treatment train.
Check current draw if you know how to work safely
Flow tells you what the pump delivers. Amperage tells you how hard it's working to deliver it.
For homeowners or technicians comfortable with electrical testing, a clamp meter on the pump lead gives useful information during startup and run. The practical benchmark from residential pump guidance is that a 1 HP pump commonly draws about 8 to 10 amps under load. If actual draw doesn't line up with expected pump size, the system may be dealing with internal wear, overload, or another developing problem.
Before making too much of that reading, remember the setup matters. Tank condition, switch condition, and water level all affect what you see. A pump that overheats under low-water conditions can look like a generic pressure complaint from inside the house.
A short demonstration helps if you want to see the measurement process in action:
The filter clue most people ignore
If current draw looks off and your sediment load has also increased, pay attention. That pairing often means the system isn't just aging. It may be working under stress from low water, debris, or mechanical wear.
That's exactly when it makes sense to stop replacing cartridges as a first response and start treating the pump as the root problem.
Know When to Call a Pro
Some parts of how to check a well pump are solid DIY territory. Other parts can hurt you, damage the system, or turn a manageable repair into a full replacement job.
The line is simple. Observation is one thing. Live electrical diagnosis, pulling a submersible pump, or opening a control box when you're unsure is another.
The red-line situations
Call a professional if any of these apply:
- You need to work around live power. The pressure switch area is not a place for trial and error.
- The diagnosis points below ground. Pulling a pump, drop pipe, or check valve assembly isn't a casual weekend job.
- The system keeps short-cycling after basic checks. Repeated starts are hard on motors and hard on filtration equipment.
- You see pressure loss that doesn't make sense. Hidden leaks, failing valves, or low-well conditions can mimic one another.
- Your filters are failing unusually fast and the cause isn't obvious. That often means the water supply side needs a trained set of eyes.
Why calling early often saves money
Once a pump starts running poorly, every extra day can punish the rest of the system. Filters clog. Pressure switches arc and wear. Tanks suffer from repeated cycling. Treatment valves get fed unstable pressure and flow.
That's why calling a pro isn't giving up. It's protecting the expensive parts downstream.
If your test results don't tell one clear story, stop there. Ambiguous well problems are where DIY damage usually starts.
A good technician won't just ask whether the pump runs. They'll want to know how the pressure behaves, how the filters have been acting, whether sediment has increased, and whether the trouble is constant or demand-related. That full picture is what leads to the right repair.
Your Well Pump Questions Answered
How often should I check my well pump if my main goal is protecting filters
Check the system any time the water changes behavior. Weak pressure, sputtering taps, sudden sediment loading, or unusual cycling all justify a pump check. If you're on a private well with treatment equipment, regular observation of pressure behavior and cartridge condition is smarter than waiting for a total failure.
Can a bad well pump make water quality seem worse even if the water source hasn't changed
Yes. A struggling pump or unstable control setup can stir sediment, introduce air, and create pressure swings that make filters less effective. The water source may be the same while the delivered water feels worse because the system is handling it poorly.
Should I replace filters first when pressure drops
Only if the restriction clearly starts at the filter. If the whole house changes at once, start upstream at the well system. Replacing cartridges without checking pump behavior often wastes time and money.
What's the most overlooked check
The pressure tank and its air side. People jump straight to the pump because it feels like the important part. In practice, a bad tank setup can imitate pump trouble and make filter performance erratic.
Are manufacturer resources worth reading if I'm trying to understand pump basics
Yes, especially if you want to get familiar with pump types and general operating principles before talking to a technician. A good example is this Ingersoll Rand pump guide from MA Hydraulics Ltd, which is useful for broader pump context even if your home well system uses a different brand.
What should I tell a technician so they can diagnose faster
Give them symptoms in sequence, not guesses. Say when the pressure changed, whether faucets sputter, whether filters started clogging faster, whether the gauge drops while no water is running, and whether the issue is house-wide. That kind of detail is far more useful than saying, “I think the pump is bad.”
If you're trying to protect your cartridges, improve pressure, or choose a treatment setup that actually fits your well system, Water Filter Advisor has practical guides that help you match filtration to real-world water conditions.
- May 16, 2026
- Uncategorized