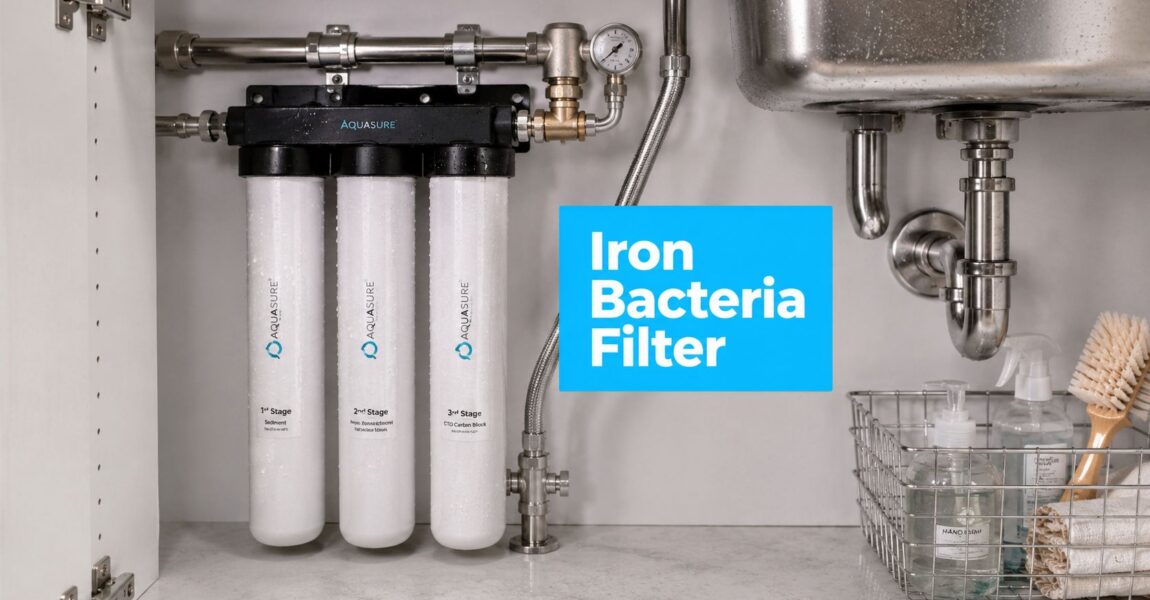
Find the Best Water Filter for Iron Bacteria

You lift the toilet tank lid and there it is. A reddish-brown slime clinging to the sides, maybe a swampy smell near the sink, maybe stains that seem to come back no matter how hard you scrub. A lot of homeowners see that mess and immediately search for a water filter for iron bacteria, hoping there's one box they can install and forget.

That instinct makes sense. It's also where many people waste money.

Iron bacteria problems usually aren't solved by filtration alone. They're solved by figuring out what's in the water first, then matching the right treatment system to the problem. Sometimes the issue is iron bacteria. Sometimes it's plain dissolved iron, manganese, sulfur, or a mix. Those problems can look similar from across the bathroom.

If you're dealing with slimy buildup, rusty staining, odors, or recurring fouling in a private well system, the goal isn't to buy a magic filter. The goal is to stop the living growth, remove what feeds it, and keep the plumbing from turning into a petri dish again. Think of this as a homeowner's roadmap from “What is this gross stuff?” to “What equipment will fix it?”

That Red Slime in Your Toilet? Let's Talk About It

A homeowner once described it to me this way: “The toilet looks clean on Monday, and by Friday it looks like something is growing in it.” That's a classic reaction, because iron bacteria often show up as a repeating nuisance, not a single dramatic failure. You wipe it away, flush a few times, and it comes back.

The clues tend to arrive in clusters. You may notice slimy buildup in the toilet tank, rusty residue in faucet aerators, laundry that picks up strange discoloration, or water that smells earthy or swampy. Some people assume they just have “hard well water.” Others buy a sediment filter, then wonder why the slime keeps winning.

Why homeowners get tripped up

The confusing part is that iron bacteria can mimic other water problems. Plain iron can stain. Manganese can darken fixtures. Sulfur can create odor complaints. If you treat the wrong problem, the equipment may work on paper and still fail in your house.

That's why the smart path starts with diagnosis.

Practical rule: If the problem is slimy, recurring, and tied to well water, don't shop by stain color alone.

A proper fix usually involves more than one piece of equipment. It may include cleaning, disinfection, contact time, and a filter that can handle oxidized material without plugging up right away. The filter matters. But the filter is part of a system, not the entire answer.

What a good solution should do

A lasting home treatment plan should help you answer three questions:

  • What am I dealing with. Iron bacteria, dissolved iron, manganese, sulfur, or a combination.
  • What needs to be killed or cleaned first. Living slime behaves differently from mineral staining.
  • What should be filtered continuously afterward. Ongoing filtration keeps the problem from rebuilding.

If you keep that order straight, choosing a water filter for iron bacteria becomes much easier.

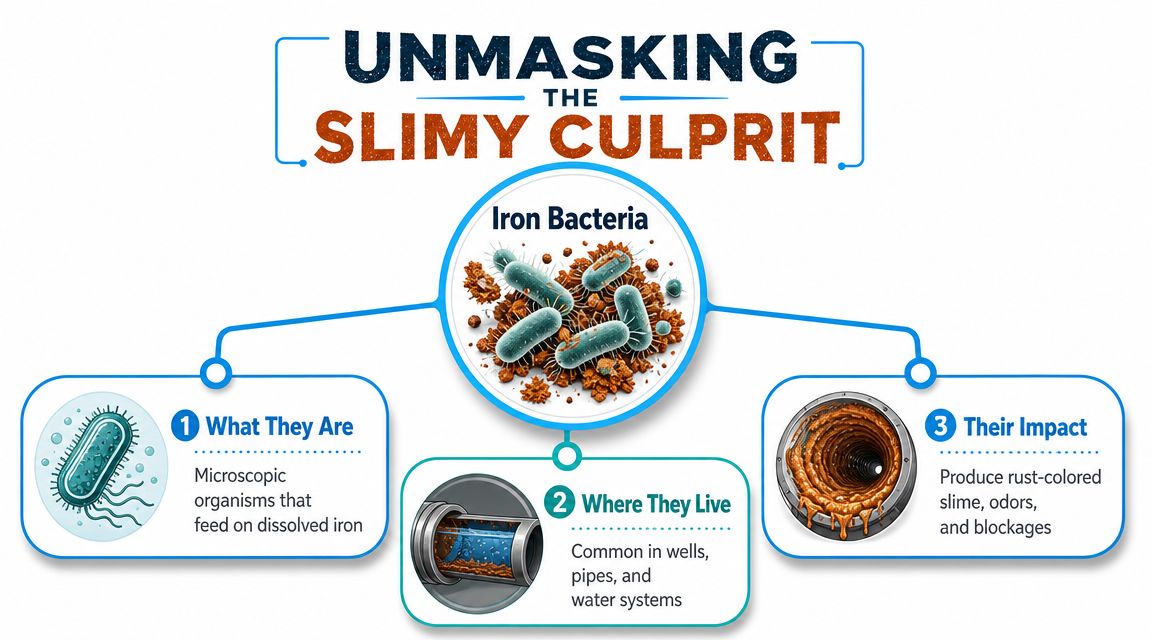
Unmasking the Slimy Culprit in Your Pipes

Iron bacteria are living microorganisms found most often in well-water systems. They feed on dissolved iron and oxygen, then leave behind a slimy biofilm that can coat wells, pipes, pressure equipment, and fixtures. The Minnesota Department of Health explains iron bacteria in wells and notes that they are not known to cause disease in people, but the biofilm can clog pipes, reduce well yield, and create conditions where other microorganisms may grow.

That last part matters. Homeowners often hear “not known to cause disease” and assume the issue is harmless. It isn't harmless to your plumbing system. It's more like plaque on teeth. The plaque itself may not be the whole problem, but once it builds up, it creates a place for other trouble to stick around.

An infographic explaining what iron bacteria are, where they live, and the impact they have on water systems.

What makes iron bacteria different from plain iron

Dissolved iron is a water chemistry issue. Iron bacteria are a biological growth issue. That distinction changes everything about treatment.

If you only have dissolved iron, your system's job is to convert that iron into filterable particles and remove it. If you have iron bacteria, you also need to deal with a living colony attached to surfaces. A filter can catch particles passing through it. It can't reach deep into slime coating your well casing or the inside of your plumbing and magically erase a colony.

Here's a simple way to separate the ideas:

Problem What it is What you notice
Dissolved iron Iron in the water Stains, discoloration
Iron bacteria Living microorganisms using iron Slime, odors, clogging, repeat buildup

Where the mess comes from

Iron bacteria act like tiny squatters in the system. They settle where water moves slowly or where iron and oxygen are available. Then they build up a film that traps more material. That's why homeowners often see trouble in toilet tanks, filter housings, pressure tanks, and low-flow plumbing parts.

The slime is the clue. Rust staining alone points one way. Stringy or gel-like buildup points another.

This is also why the search for a “water filter for iron bacteria” can be misleading. The right equipment usually has to do two jobs. It must help control the living growth and then remove the oxidized iron and debris left behind.

Is It Really Iron Bacteria? A Homeowner's Diagnostic Guide

The most expensive filter mistake is buying before testing. Public-health guidance stresses that iron bacteria should be confirmed by laboratory testing because the symptoms can look a lot like other iron, manganese, or sulfur issues. A useful homeowner-friendly explanation appears in this guide on iron bacteria in well water and why testing comes first.

A person holding a glass of murky water with sediment, concerned about water quality in their kitchen.

Start with what you can see

Before you call anyone, do a slow visual inspection around the house.

  • Check the toilet tank. Slimy walls or gel-like residue are stronger clues than ordinary rust staining.
  • Look at faucet aerators. If they clog with stringy material, that points more toward biological fouling than simple sediment.
  • Notice the odor. Earthy or swampy smells often send homeowners toward bacteria, though sulfur can confuse the picture.
  • Watch how the problem returns. If you clean a surface and the slime comes back quickly, that suggests active growth somewhere upstream.

If your concern is smell around a single sink, it's also worth separating water quality issues from drain issues. A drain trap or biofilm in the drain line can create odors even when the incoming water is fine. This guide on how to eliminate drain odors can help you rule that out before blaming the well.

Try a simple jar check

A basic home check can help you think more clearly before lab testing.

  1. Fill a clear jar with cold water from a tap that shows the problem.
  2. Look at it right away. Is it clear, cloudy, rusty, or does it have visible debris?
  3. Let it sit undisturbed for a while.
  4. Check the bottom and sides. Sediment alone suggests one kind of issue. Slimy or stringy material suggests another.

This won't replace a lab. It helps you avoid guessing blind.

What to ask a lab or water treatment pro

When you call for testing, don't just say, “My water is orange.” Describe the slime, odor, fixture buildup, and whether you're on a private well. Ask whether they can help distinguish among iron, manganese, sulfur-related issues, and iron bacteria.

A useful inspection includes more than the water sample. A good pro also looks at the well system, plumbing condition, and any treatment equipment already in place. If the well has been fouled for a long time, the system may need cleaning and disinfection before any filter has a fair chance.

For a visual walkthrough of common signs, this short video can help you compare what you're seeing at home.

What testing gives you: permission to stop guessing. Once you know whether the problem is biological, mineral, or mixed, the treatment path gets much simpler.

The Two-Punch Strategy for Total Elimination

Homeowners often ask whether they need a filter or a disinfectant. For iron bacteria, the answer is usually both. Think of the right approach as a two-punch strategy.

The first punch is disinfection. The second is filtration.

Punch one means killing the colony

If iron bacteria have colonized a well or plumbing system, you need to knock back the living growth. In well systems, shock chlorination is the standard first-line disinfection approach. Minnesota guidance specifies a chlorine concentration close to, but not greater than, 200 ppm, and notes that going significantly above that can reduce effectiveness. It's a useful reminder that stronger isn't always better.

That point surprises a lot of people. Many assume that if a little chlorine works, a lot must work better. Water treatment rarely rewards that kind of improvisation.

If you're trying to understand the chemistry side before attempting any cleanup, this article on the proper use of bleach in plumbing is a helpful companion for separating safe, targeted use from random pouring and hoping.

Punch two means removing the food and debris

Once the system has been disinfected, filtration takes over the ongoing job. Iron bacteria depend on iron as a growth substrate. If you remove the iron effectively, you make regrowth harder and reduce the staining and fouling that homeowners notice every day.

Here's the key mistake to avoid:

A filter can remove iron. It does not automatically erase an established colony living in the well and plumbing.

That's why a single “iron filter” often disappoints in homes with confirmed bacterial iron. The filter may reduce discoloration while the slime continues to rebuild upstream.

Why the two steps belong together

This paired approach works because each step covers what the other can't.

  • Disinfection handles the living contamination on surfaces.
  • Filtration handles the iron and oxidized material moving through the water.
  • Together they reduce recurrence better than either step alone.

In stubborn cases, homeowners may need repeated cleaning or follow-up treatment because biofilm protects bacteria much the way baked-on grease protects what's underneath. You don't wipe once and call the pan clean. You break up the layer, flush it out, and then keep new buildup from forming.

Building Your Iron Bacteria Defense System

A reliable home setup for iron bacteria usually looks like a treatment train, not a single canister. The Water Systems Council describes a multi-stage iron bacteria setup that uses disinfectant injection, a retention tank for contact time, and a backwashing media filter, often with 10-micron filtration to capture oxidized particles.

That sequence matters because each component does a different job.

A five-step diagram illustrating an iron bacteria water treatment process starting from raw water source to optional disinfection.

The basic treatment train

A typical whole-house system for this problem may include:

  1. Chemical injection
    An injection pump feeds a disinfectant into the incoming water. In many homes that means chlorine. The point isn't just odor control. It's to attack bacteria and oxidize dissolved iron so later equipment can catch it.

  2. Retention tank
    Water needs time with the disinfectant. If it rushes straight from the injection point into a filter, the chemistry may be incomplete and the bacteria may not be controlled well. The retention tank gives the water dwell time.

  3. Backwashing media filter
    This is the workhorse filter in many systems. It captures oxidized iron and suspended material, then cleans itself during a backwash cycle so the media bed doesn't stay packed with debris.

Why cartridge filters usually disappoint

A homeowner will sometimes ask whether a big blue housing with a replaceable cartridge can do the job. For temporary polishing, maybe. For an active iron bacteria issue, usually not well enough.

Cartridge filters tend to load up quickly when slime and oxidized iron are both present. They can become maintenance magnets. A backwashing filter is better suited to ongoing whole-house service because it sheds accumulated material instead of asking you to swap cartridges every time the water gets ugly.

How to think about media choices

You'll hear a lot of media names in this category, including Manganese Greensand, Birm, and Catalytic Carbon. Each has a place in water treatment conversations, but the right choice depends on your water chemistry, whether disinfection is part of the system, and how much maintenance you're willing to handle.

A simple homeowner view looks like this:

Component What it does What to watch
Injection pump Adds disinfectant Needs refill and adjustment
Retention tank Provides contact time Must be sized to household flow
Backwashing filter Removes oxidized material Needs proper drain and backwash setup
Polishing stage if used Improves finished water Adds maintenance and cost

Sizing matters more than homeowners expect

The Water Systems Council notes that system sizing must match household flow demand. That means the tank and filter need to be large enough for peak use, not just average use. If the system is undersized, a shower, washing machine, and kitchen faucet running together can push water through too fast for treatment to finish properly.

That's why two neighbors with “the same iron problem” may need different equipment layouts. One household may have low demand and modest plumbing runs. Another may have multiple bathrooms, irrigation tie-ins, or fixtures that draw heavily at the same time.

If you're comparing configurations and trying to learn the language vendors use, Water Filter Advisor's filtration advice library is a useful place to sort through filter types, maintenance expectations, and matching systems to home water problems.

A dependable system is boring in the best way. It gives disinfectant time to work, filters the water without choking, and keeps doing that every day without constant babysitting.

Choosing the Right Filtration Method for Your Home

Once testing confirms what's in the water, the next choice is matching the treatment method to the iron load and the nature of the problem. Homeowners should then stop looking for a universal answer. The “best” water filter for iron bacteria depends on concentration, whether bacteria are present, and how much upkeep you're willing to take on.

The strongest hard thresholds available come from Ohio State University Extension. It states that a water softener may be used for less than 5 mg/L iron, an iron greensand filter is recommended for less than 10 mg/L, and for more than 10 mg/L the preferred approach is chlorine followed by filtration. The same guidance says the water should stay in contact with chlorine for 20 to 30 minutes before filtration so iron particles can form. It also notes that chlorine may need to be applied more than once in stubborn situations, which lines up with what homeowners see when biofilm is involved. These treatment thresholds are outlined in Ohio State University Extension's iron removal guidance.

A comparison chart highlighting the differences between chemical, aeration, and greensand/birm methods for filtering household water contaminants.

A homeowner comparison

Method Best fit Strength Trade-off
Water softener Lower iron levels Can help when iron is modest Not a cure for iron bacteria
Greensand-style iron filter Moderate iron levels Purpose-built iron removal Still not a standalone answer for biofilm
Chlorine plus filtration Higher iron or bacterial iron concerns Handles oxidation and supports disinfection More equipment and more maintenance

How to decide without overbuying

If your testing shows iron on the lower end and no confirmed bacterial issue, a simpler iron treatment approach may be enough. If the report confirms iron bacteria, your decision changes. The system needs a disinfection philosophy built into it, not just a media tank with a persuasive label.

Use these questions to narrow the field:

  • Do you have confirmed iron bacteria or just iron staining
    If bacteria are confirmed, filtration alone is usually the wrong first move.

  • How much maintenance will you tolerate
    Chemical feed systems ask you to monitor solution levels and keep the equipment adjusted. Some homeowners don't mind that. Others want the simplest setup that still works.

  • Is your household flow modest or heavy
    Bigger families and homes with multiple simultaneous demands need properly sized retention and filtration stages.

  • Do you want a temporary improvement or a durable fix
    Small filters can reduce symptoms for a while. Whole-house treatment trains are better suited for lasting control.

Cost and hassle trade-offs

A more complete system usually costs more upfront and asks more from the installer. But that's often cheaper than buying the wrong filter first, then replacing fouled cartridges, cleaning clogged fixtures, and still living with slime.

Here's the practical truth. The lowest equipment price is not always the lowest ownership cost. A filter that constantly plugs, stains, or needs manual attention can become the expensive option fast, even without dramatic numbers attached to it.

Buy for the water you actually have, not the product description you wish were true.

If your home has recurring slime, odors, and well-water staining together, lean toward systems that combine disinfection, contact time, and backwashing filtration. Those systems are built for the problem you're trying to solve, not just for pretty water in a brochure.

Keeping Your Water Clear for the Long Haul

Getting rid of iron bacteria once is one job. Keeping it from creeping back is another. The homeowners who do best over time treat their system like a piece of household equipment that needs observation, not like a black box in the basement.

A simple maintenance rhythm

Keep an eye on the basics:

  • Watch for returning slime. Toilet tanks and aerators often show the first warning signs.
  • Check treatment supplies. If your system uses chemical injection, don't let the solution tank run dry.
  • Confirm backwashing is happening. A backwashing filter can't protect your home if it isn't cycling correctly.
  • Pay attention to flow changes. Reduced pressure can mean fouling, clogged components, or a filter that's no longer clearing itself well.
  • Retest when symptoms change. New odors, discoloration, or recurring buildup can mean the water chemistry has shifted or the colony has re-established itself.

When to stop troubleshooting and call a pro

Some signs mean it's time for expert help.

If the slime returns after disinfection and the equipment appears to be operating properly, the well or plumbing may need a deeper cleaning plan. If fixtures clog repeatedly, if multiple water issues seem to overlap, or if your treatment setup was pieced together without a full diagnosis, a water treatment specialist can save you months of frustration.

The right long-term mindset is simple. Diagnosis first, treatment second, maintenance always. That's how you choose a water filter for iron bacteria that works as part of a complete home solution, not as another expensive experiment.


If you're comparing system types, trying to understand filter media, or sorting through whole-house options for well water, Water Filter Advisor is a practical resource for researching filtration choices before you buy.

Mastering Water Softener Hardness Settings

A lot of homeowners run into the same aggravating moment. The softener is installed, the salt tank is full, the display is lit up, and yet the shower door still spots up, the dishes still dry cloudy, and the faucets still grow that chalky crust.

In most cases, the machine is not broken. The water softener hardness settings are wrong.

That setting controls how the softener interprets your water, how much resin capacity it expects to use, and when it decides to regenerate. Get the number wrong and the whole system behaves wrong. Set it too low and hardness slips through. Set it too high and the unit burns through salt and water for no good reason.

The fix is usually straightforward once you stop treating the softener like a sealed black box. Test the water. Adjust for iron if needed. Program the actual number. Then fine-tune for how your home uses water and how your family wants it to feel.

Why Your New Water Softener Might Not Be Working

A new softener can fail in a very ordinary way. It is doing exactly what you told it to do, but you told it the wrong thing.

The hardness setting is the system’s decision-maker. It tells the control valve how hard the incoming water is, how quickly the resin will be used up, and when regeneration needs to happen. If that number does not match reality, the softener either underperforms or overworks.

Most of the symptoms point back to that one problem:

  • Spots on dishes: Hardness is still leaking through.
  • Scale on fixtures: The setting is often too low, or iron was never included.
  • Heavy salt use: The setting may be too high.
  • Soft water only some of the time: Regeneration timing or capacity assumptions are off.

A lot of homeowners assume the installer, factory setting, or quick-start guide already handled this. Sometimes that is true. Often it is not. City water can vary by neighborhood. Well water can change with season, rainfall, and iron content. A “standard” hardness number is just a placeholder until the water is tested.

What works is a simple, practical approach. Start with the actual hardness reading. Build in compensation for iron where needed. Program the valve carefully. Then watch how the house responds for a week or two.

Practical rule: If a brand-new softener still leaves hard water symptoms, check the settings before you blame the resin, the salt, or the plumbing.

If you want broader home treatment guidance beyond softeners, the advice library at https://www.waterfilteradvisor.com/advice/ is a useful place to compare common water quality issues and treatment approaches.

Decoding Your Water Hardness Number

Your hardness number is one piece of information you cannot guess.

Without it, programming a softener turns into trial and error. With it, the rest of the setup becomes much more predictable.

Infographic

Where to get the number

For most homes, there are three practical ways to find hardness.

  1. Utility report

    If you are on municipal water, your local water utility may publish hardness in its water quality report. This is the easiest starting point. It gives you a broad picture of the supply, though it may not reflect variation at your exact address.

  2. DIY test kit

    A home hardness kit is the fast route. It is useful when you want a same-day answer before programming a new unit or checking whether your current setting is off.

  3. Certified lab

    This is the best option for well water, mixed water problems, or any home where iron and manganese may be part of the story. A lab report gives you the cleanest data for setup.

The method matters less than one thing. You need a hardness result you trust.

GPG and PPM are not the same

Most water softeners use grains per gallon, usually written as GPG. Some water reports use parts per million, or PPM.

The standard conversion is simple. One grain per gallon equals 17.14 parts per million, according to HomeWater101’s hard water numbers guide.

If your report gives hardness in PPM, convert it before programming the softener. If your softener menu asks for GPG and you enter a PPM number by mistake, the setting will be wildly off.

Hardness scale in plain English

This is the framework most homeowners need:

Classification Grains per Gallon (GPG) Parts per Million (PPM)
Soft 0–3 0–51.42
Moderately hard 3–7 51.42–119.98
Hard to very hard Over 7 Over 119.98

That same source classifies 0–3 GPG as soft, 3–7 GPG as moderately hard, and water over 7 GPG as hard to very hard, which is where treatment often becomes necessary to limit buildup and appliance wear.

Those categories line up with what homeowners notice. At the lower end, you may just see a little spotting. Higher up, you start seeing crusty faucets, shower film, dishwasher residue, and scale in the water heater.

If those symptoms sound familiar, a good side resource on cleaning visible deposits is this guide to hard water stains. It is useful after the softener is corrected, because old buildup does not disappear on its own.

Why precision matters

A rough estimate is better than nothing, but an accurate number protects you from two expensive mistakes.

  • Underestimating hardness: The softener treats less than it should and minerals keep passing through.
  • Overestimating hardness: The unit regenerates more aggressively than needed and wastes salt.

Key takeaway: The display setting should reflect the water entering the softener, not your best guess based on a neighbor’s house or an old installer sticker.

Calculating Your True Hardness Setting with Iron

The hardness result from your test is only the starting number.

For many homes on city water, that tested hardness may be close to the final programming value. For many homes on well water, it is not. Iron changes the math, and ignoring it is one of the most common reasons a softener seems to “sort of” work but never really fixes the problem.

A hand holds a water hardness test strip next to a calculator with the number 532 displayed.

Why iron changes the setting

A softener resin bed does not experience iron the same way it experiences calcium and magnesium. Iron fouls resin beds 4 to 5 times faster than calcium, and ignoring iron is linked to up to 70% of service calls for residual spotting, according to Water Filter Guru’s water softener hardness setting guide.

That matters in homes because a softener can be “correct” on paper for hardness alone and still run short on usable capacity. The resin gets burdened by iron, the bed loses efficiency sooner than expected, and hardness begins leaking through before the next regeneration.

Seasoned installers talk about compensated hardness instead of raw hardness.

The essential formula

Use this formula when iron is present:

Compensated hardness = base hardness in GPG + 4 GPG for every 1 PPM of iron

That is the number you program into the softener.

If manganese is part of your lab report, some manufacturers also compensate for that, but the critical homeowner error is usually missing iron. If you know iron is present, do not skip this step.

Worked examples

These examples show how the math changes depending on your water source.

City water with no iron

If your municipal water tests at 12 GPG and iron is not present, your compensated hardness is still 12 GPG.

No extra adjustment is needed. This is the easy case.

Well water with moderate iron

If your water tests at 15 GPG and 2 PPM iron, the compensated hardness becomes:

  • Base hardness = 15 GPG
  • Iron compensation = 2 × 4 GPG
  • Total = 23 GPG

That exact example is the standard one used in the source. A softener programmed to 15 in this case will behave undersized even if the equipment itself is adequate.

Water with mixed minerals

If your hardness looks only moderately high but the home still gets rust staining, metallic smell, or orange-brown rings, treat that as a warning sign. The raw hardness number may not explain the whole load on the resin. In the field, homeowners often keep turning the softener up and down without solving the core issue because iron was never measured.

What homeowners usually get wrong

Some mistakes show up over and over:

  • Using the city report without testing the house: The report may be close, but not exact for your line.
  • Programming raw hardness on well water: This is the classic iron miss.
  • Assuming staining is separate from hardness: In softener setup, it often is not.
  • Chasing comfort before performance: Get the compensated hardness right first. Then fine-tune for feel later.

Tip: If your dishes spot, your toilets ring, and your softener seems to use salt normally, check iron before replacing parts. The setting may be wrong even when the machine is functioning.

A simple decision guide

Water situation What to use for programming
City water, no iron present Tested hardness number in GPG
Well water, iron present Hardness number plus 4 GPG per 1 PPM iron
Unclear water quality Get a test that includes hardness and iron before changing settings repeatedly

The practical takeaway

A softener does not care what label is on the water source. It cares what mineral load enters the resin.

That is why two houses with the same softener can perform very differently. One owner programs the tested hardness. The other owner programs compensated hardness with iron included. The second system usually behaves like it was sized and installed by someone who understands the water, not just the equipment.

Programming Your Water Softener Control Valve

Once you have the right number, the job becomes mechanical. You need to put that number into the valve correctly.

Most modern residential softeners follow the same basic logic even if the brand names differ. Fleck, Clack, and many private-label systems all rely on a digital control head that lets you move through settings with a few buttons.

A close-up of a person's finger adjusting the digital settings on a home water softener control panel.

What to look for on the display

The hardness field may be labeled in several ways:

  • H
  • Hardness
  • DH

The exact label changes, but the purpose does not. Here, the unit learns the incoming water load you calculated earlier.

Most systems use a mix of Up, Down, and Set or Regen buttons. Some require holding two buttons to enter programming mode. Others place user settings and master settings in separate menus.

Your owner’s manual still matters here. Do not guess your way through advanced menus if the softener also asks for capacity, reserve, or cycle timing.

The settings that matter most

A lot of displays show many values, but homeowners usually need to focus on three.

Hardness

Enter the compensated hardness number you calculated. This is the core setup value.

If the display was factory-set to a generic number, overwrite it. Factory defaults are for shipping convenience, not for your specific water.

Regeneration time

Set regeneration for a time when the home is not using water. Overnight is the usual choice.

That keeps hard water from slipping through during the cleaning cycle and avoids interruptions when showers, laundry, or dishwashing are happening.

Regeneration type

A key difference between old and new softeners lies in their regeneration types.

  • Timed regeneration: The system regenerates on a schedule, whether the capacity was used or not.
  • Metered or demand-initiated regeneration: The system regenerates based on actual water use.

For most homes, metered control is the better setup. It matches regeneration to real household consumption rather than a fixed calendar.

A practical programming sequence

This is the order I recommend for homeowners doing a first setup:

  1. Confirm service position

    Make sure the bypass is not engaged. Many “bad settings” complaints turn out to be a bypass valve left in the wrong position.

  2. Enter the hardness value

    Use the compensated number, not the raw test result if iron is part of the water.

  3. Check the clock

    If the internal clock is wrong, regeneration may happen at the wrong time of day.

  4. Set regeneration timing

    Choose a low-use period.

  5. Verify regeneration mode

    If your unit supports metered operation, use it unless the manufacturer specifies otherwise for your system.

A short visual walkthrough can help if your valve interface is unfamiliar:

What not to touch casually

Some homeowners go deep into installer menus and change values they do not understand. That can create more trouble than the original problem.

Be careful with settings tied to:

  • Capacity
  • Reserve
  • Cycle durations
  • Backwash or brine draw timing

Those are not impossible for a homeowner to understand, but they should be changed with the manual in hand and a clear reason. If you only need to correct water softener hardness settings, stick to the hardness field and basic regeneration options first.

Good practice: Make a quick note of every original setting before you change anything. If performance gets worse, you will know exactly what changed.

After programming

Do not expect instant proof at every faucet the second you hit save. The softener may need to regenerate before the corrected settings fully affect the house, especially if the resin was already near exhaustion.

Then monitor the obvious signs. Dishes should improve. Soap should rinse differently. Fixtures should stop collecting fresh scale. If the setting is still off, the clues will show up quickly.

Fine-Tuning for Salt Efficiency and Seasonal Changes

A softener that is set correctly once is not always set correctly forever.

Many homes drift out of tune at this point. The original setup may have been close, but the water changes. Municipal blending changes. Well water shifts. Iron spikes. Household usage changes. The softener keeps following the old instructions until someone notices the dishes are spotting again or the salt bin empties faster than expected.

A person's hand adjusting a blue dial on top of a black and white water treatment device.

Seasonal shifts are real

Some municipal reports show a 20% to 50% variance between summer and winter, and well water can vary even more because iron may spike along with hardness, according to SoftPro’s discussion of ideal hardness setting.

That matters because a number that worked in winter may undershoot summer water. The reverse can also happen. If you program for peak hardness all year, you may be protecting the house but wasting salt. The same source notes that homeowners in high-variability regions should re-test and recalibrate at least twice a year to avoid up to 30% more salt waste or residual scaling.

How to handle changes without chasing the display

You do not need to stand in front of the control valve every week.

A practical homeowner routine looks like this:

  • Spring test: Check hardness and iron as warmer weather begins.
  • Fall test: Check again when source conditions shift.
  • After obvious changes: Re-test if you suddenly see new spotting, rusty staining, or unusual salt use.

For stable municipal water, that may be enough. For a private well with known iron issues, pay closer attention after seasonal transitions or heavy changes in groundwater conditions.

Salt efficiency is not just about using less salt

Softener performance depends on balancing hardness removal with how aggressively the system regenerates.

According to the NSF/ANSI 44 benchmarks cited by Culligan, a salt dosage of 6 to 15 lbs per regeneration is associated with 90% efficiency in a properly calibrated system. That is a useful technical range, but it is not a command to push every machine to the lowest setting possible.

Lower salt use can be smart. Too little regeneration support can also leave the resin under-cleaned. The right choice depends on your water load and how the unit was designed.

A better way to think about optimization

Use these questions instead of aiming blindly for “maximum efficiency”:

If you notice this The likely issue
Salt use jumps but water quality is fine Setting may be higher than necessary
Scale returns between regenerations Setting may be too low, or seasonal hardness has increased
Rust stains return on a well system Iron level may have changed, not just hardness
Water quality changes after family size changes Metered demand assumptions may no longer fit usage

City water and well water need different habits

Municipal supply

City water usually changes more gradually. You can often tune once, verify a couple of times a year, and leave it alone unless symptoms return.

Well water

Well water asks more of the owner. If iron and manganese move around, the softener does not get a vote. It just reacts to what enters the tank. That means well owners should think in terms of monitoring, not one-time setup.

Field advice: If you have well water and your setting was perfect six months ago, that does not mean it is perfect today.

The homeowners who get the best long-term results are not constantly tinkering. They are willing to test on a schedule and make deliberate changes when the water tells them to.

Troubleshooting Common Hardness Setting Problems

When a softener underperforms, the symptoms usually look mysterious for about a day. After that, they become pretty readable.

The important thing is not to jump straight to replacing resin, buying additives, or blaming the whole system. Most complaints track back to setup.

White spots still show up

If dishes, shower glass, or faucets keep collecting mineral film, the first suspect is a hardness setting that is too low.

That can happen in three common ways:

  • The incoming hardness was guessed.
  • The original test is outdated.
  • Iron was present but never included in the programmed number.

If the house is on a private well, that third mistake is especially common. If the house is on municipal water, check whether the supply has shifted since the original setup.

The softener burns through salt

A machine that uses a lot of salt is not always “working harder.” Sometimes it is programmed too aggressively.

When the hardness number is pushed too high, the valve assumes the resin is carrying a heavier mineral load than it really is. That can drive unnecessary regeneration. If your water quality is good but your salt use feels excessive, review the programmed number against current test results.

The water feels slimy

The complaint often catches new softener owners off guard.

Soft water changes how soap behaves on your skin. Many people describe properly softened water as slippery or slick at first. That sensation does not necessarily mean anything is wrong.

Still, preference matters. According to ProAqua’s discussion of ideal water softener level, many people aim for 0 GPG, but some prefer a post-softening target of 2 to 3 GPG, or roughly 35 to 50 PPM, to avoid the slippery feel and keep a bit of mineral character in the water.

That trade-off can make sense for homeowners who dislike ultra-soft feel but still want scale protection.

A practical comfort adjustment

If the system is performing well but the water feels too soft for your taste, you can fine-tune for comfort rather than chasing absolute zero.

Try this approach:

  1. Confirm the softener is solving the hard water problem.
  2. Make only a small adjustment.
  3. Live with it for several days.
  4. Watch for the return of spotting or scale.

You are not trying to make the water hard again. You are trying to land at a point where appliances stay protected and the family likes the feel.

Balanced target: Many households are happiest when the water is soft enough to prevent visible buildup but not pushed so far that every shower feels unfamiliar.

When the problem is not the setting

If the number is right and symptoms continue, check the basics before assuming the valve is failing:

  • Salt supply: The tank needs usable salt, not just a crusted bridge.
  • Bypass position: The unit must be in service.
  • Recent regeneration: The corrected settings may need a regeneration cycle before results show fully.

A lot of “bad softener” calls turn out to be a decent machine with one wrong number or one simple oversight.

Frequently Asked Questions on Water Softener Settings

How often should I re-test my water?

For homes where hardness is known to vary, twice-yearly testing is the most practical habit. That is especially important on well water and in regions where municipal hardness changes with the season.

If your water is stable and your softener performance stays consistent, you can be less reactive. Still, any sudden return of spots, scale, or staining is a good reason to test again.

Should I set my softener to zero hardness?

Not necessarily.

Many systems are calibrated to deliver very low residual hardness, and NSF/ANSI 44 performance targets call for less than 1 GPG of hardness leakage in a properly calibrated system, according to Culligan’s technical guide on the right amount of soft.

But homeowner comfort is part of the practical answer. Some people prefer a little residual hardness for feel and taste, as discussed earlier. The right target depends on your priorities. Appliance protection, personal comfort, and water character do not always point to the exact same setting.

How does salt dose relate to the hardness number?

They work together, but they are not the same control.

The hardness number tells the softener how much mineral load to expect. Salt dose affects how the resin is regenerated. In the same technical benchmark, 6 to 15 lbs per regeneration is the cited range for 90% efficiency.

If the hardness setting is wrong, changing salt dose will not fix the root problem. Get the hardness number right first. Then adjust salt strategy only if your system manual supports it and you understand the trade-off.

What are the main technical benchmarks for a good setup?

A well-calibrated residential system should generally show a few signs of health:

  • Low hardness leakage: Proper calibration should achieve less than 1 GPG leakage under the NSF/ANSI 44 benchmark in the cited source.
  • Reasonable salt use: Salt dose should fall within the design range for the valve and resin setup.
  • Stable performance: The home should not swing between soft water and hard water symptoms.

If your setup misses those marks, the machine may still be salvageable with better programming.

What mistakes cause repeated regenerations?

Iron errors are a major one. The same source states that incorrect iron adjustments account for 40% of premature regenerations.

That is why well owners often think the softener is undersized when the core issue is bad compensation math. The resin is being asked to carry a load the controller never accounted for.

Can I just turn the hardness setting way up to be safe?

That usually backfires.

The same benchmark notes that setting hardness above 50 GPG can lead to resin exhaustion and system failure in 25% of cases. More is not safer. It is just a different kind of wrong.

The right setting is the tested number, adjusted correctly for iron where needed. Not the highest number the keypad allows.

What should I check first if my system seems off?

Use this order:

  1. Test current water hardness
  2. Check iron if you are on well water or seeing rust-related signs
  3. Confirm the programmed hardness value
  4. Verify bypass position and salt condition
  5. Look at regeneration timing and mode

That sequence solves a surprising number of service headaches without replacing a single part.


If you want help comparing softeners, test kits, iron filters, and whole-house treatment options, visit Water Filter Advisor. It is a practical resource for homeowners who want clear guidance on choosing and maintaining better water treatment at home.