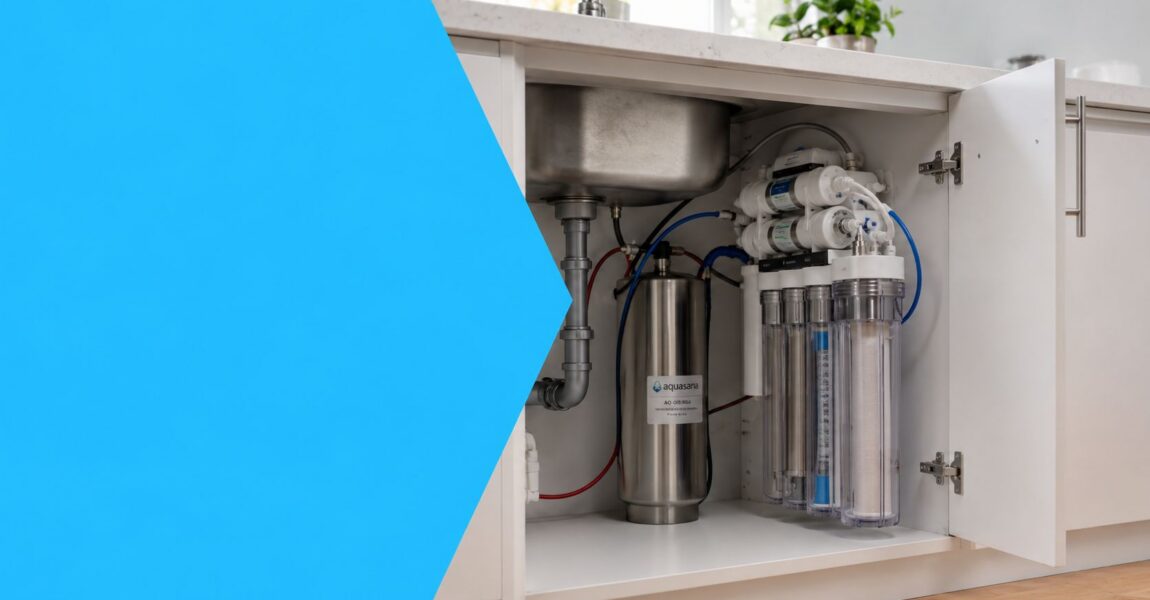
For the most common under-sink reverse osmosis system, a homeowner can expect a total installed cost between $450 and $1,600. That range can swing quite a bit depending on the unit you choose and how difficult the installation is under your sink.
If you're reading quotes and wondering why one installer talks in the low hundreds while another makes it sound like a small renovation, you're not alone. Reverse osmosis installation cost gets confusing fast because the system price is only part of the story. The bill depends on cabinet space, faucet drilling, drain access, whether the plumbing is easy to reach, and whether your home needs extra work to make the setup function properly.
Most homeowners start with the same question. "What does an RO system cost?" The better question is, "What will this cost me to own and maintain over time?" That's where a lot of buying guides come up short. They stop at the sticker price and leave out the parts that shape the budget over the life of the system.
How Much Does Crystal Clear Water Really Cost
You notice it in the little moments first. A glass of water has a dull taste. Ice picks up an odor from the tap. Coffee tastes inconsistent even when you buy the same beans. Then you price reverse osmosis systems and find a spread wide enough to make any homeowner wonder what they are paying for.

In practice, homeowners usually aren't just buying a filter. They are paying for better drinking water, cleaner ice, less bottled water, and a system that can run for years without turning the sink cabinet into a service headache. That is why reverse osmosis installation cost feels harder to pin down than the price tag on the box.
Two systems can look nearly identical online, yet the actual ownership cost can differ quite a bit after installation, filter changes, and maintenance start adding up.
Why quotes vary so much
The area under the sink drives the first round of cost differences. A cabinet with open space, a healthy shutoff valve, easy drain access, and room for a tank is usually straightforward. Tight cabinets, older valves, disposal-heavy drain layouts, or stone countertop drilling add labor, parts, and time.
Good water filtration pricing starts with the cabinet, not the catalog.
That difference is significant because the installed price includes more than the system itself. Labor can rise fast when a plumber has to replace a seized shutoff, reroute tubing around a garbage disposal, or drill for a dedicated faucet. Homes with older plumbing often cost more to set up correctly, even when the RO unit is modestly priced.
I see the same pattern with other utility upgrades too. The fixture price gets attention first, but installation conditions often decide the final bill. The same thing shows up in Brisbane hot water costs by DLG Electrical, where access, existing infrastructure, and job complexity shift the total more than many homeowners expect.
What a smart budget includes
A realistic RO budget has three parts:
- System cost: The unit, storage tank if included, faucet, tubing, fittings, and mounting hardware.
- Installation conditions: Cabinet space, drain configuration, shutoff quality, water line access, and countertop drilling.
- Lifetime ownership costs: Prefilter replacements, membrane changes, sanitizer service, and the labor involved if maintenance is awkward.
That last category gets missed all the time.
A lower-priced unit can still be the expensive option over five to ten years if replacement filters cost more, the membrane has a shorter life, or every service call takes extra labor because the system is packed into a corner with poor access. A better-designed setup often costs more up front but less to live with. For homeowners comparing options, that is the number that matters most.
Breaking Down Your RO Installation Bill
An RO installation bill has two main parts. The equipment you buy, and the labor required to make it work properly in your kitchen.

Homeowners often focus on the box price first. The install work is what changes a budget quote into a real final invoice, especially in older homes or tight sink cabinets.
The hardware side of the bill
The equipment charge covers the RO unit and the parts that come with it. For a standard under-sink setup, that usually includes the prefilters, membrane, storage tank, dedicated faucet, tubing, fittings, and mounting hardware.
Price differences at this stage usually come down to build quality, filter design, and service access. A better manifold layout or easier filter changes can cost more up front, but those details often lower maintenance labor later. That affects total ownership cost, not just day-one price.
Some premium systems also include extras like remineralization stages, faster-flow components, or a tankless design. Those features can improve convenience, but they can also change future replacement costs. Before paying more for upgrades, check what replacement filters cost and how often the manufacturer expects you to change them.
The labor side of the bill
Labor covers the hands-on plumbing work. That means connecting to the cold-water line, mounting the faucet, installing the drain connection, setting the tank or main unit, testing for leaks, and flushing the system so it is ready to use.
Labor costs rise when the installer has to work around real-world obstacles. Stone or porcelain drilling, cramped cabinet layouts, corroded shutoff valves, awkward drain runs, and limited room for the tank all add time. Time is where installation budgets expand.
I tell homeowners to pay close attention here. A low labor quote can leave out the exact tasks that make the system reliable, quiet, and serviceable later.
Practical rule: Cheap installation can get expensive fast if it leaves you with leaks, poor flow, noisy drain discharge, or a system that is miserable to service six months from now.
Three factors shape the bill more than anything else:
- System cost: What comes in the box
- Labor cost: What it takes to connect and test it correctly
- Corrective work: Problems already hiding under the sink, such as bad valves, limited space, or outdated fittings
The same pricing pattern shows up in other home utility work. Product cost is only part of the story. Access, existing plumbing, and installation difficulty often decide the final number, which is why guides like Brisbane hot water costs by DLG Electrical feel familiar to any homeowner comparing RO quotes.
What you should ask for on any quote
A solid quote should spell out what is included and what triggers extra charges. If that detail is missing, ask before the installer shows up.
Look for these line items:
- Faucet drilling: Important if there is no open hole in the sink or countertop
- Drain connection work: Some layouts are simple. Others require careful placement to avoid noise and drainage issues
- Valve or supply line replacement: Older shutoffs and brittle tubing often need attention before an RO unit goes in
- Startup testing: The job should include flushing, leak checks, and confirmation that the system is filling and dispensing correctly
- Future service access: Ask whether the unit location leaves enough room for routine filter and membrane changes
That last point gets overlooked all the time. An RO system tucked into a hard-to-reach corner may install fine today, then cost more every time filters need to be replaced.
If a quote bundles everything into one price, ask for separate numbers for equipment, installation labor, and possible add-on work. That is the clearest way to compare bids and spot the option that costs less over the life of the system.
Comparing Costs for Under-Sink Whole-House and Countertop RO
A homeowner starts with a simple goal. Better-tasting drinking water. Then the options show up. A compact under-sink unit, a countertop model that plugs in fast, or a whole-house system with a price tag that can rival a small appliance package. The right choice depends less on the opening price and more on what you will spend to live with that system for years.

Under-sink RO
Under-sink RO is usually the best fit for homeowners who want high-quality water at the tap they use for drinking and cooking. It keeps the project focused. You are filtering a small share of the home's water, not every gallon that feeds showers, toilets, laundry, and hose bibs.
That focus matters for long-term cost. Under-sink systems usually cost less to buy than whole-house RO, and they are much cheaper to maintain because they use fewer filters, smaller membranes, and less supporting equipment. Service is also more predictable. The catch is access. A low-priced system installed in a cramped sink base can become annoying and more expensive every time filters need to be changed.
What under-sink RO does well:
- Delivers purified water where it matters most
- Keeps initial equipment and labor costs in a moderate range
- Avoids the pressure and storage demands of whole-house RO
Where it falls short:
- Consumes cabinet space
- Does not treat bathroom, laundry, or whole-home water
- Can be frustrating to service if the unit is packed into a tight corner
A short visual can help if you're still sorting out the formats:
Whole-house RO
Whole-house reverse osmosis is for a different problem. It is built for homes with broad water-quality issues, not homeowners who just want cleaner water at the kitchen sink.
Installed cost climbs fast because the system has to handle the home's incoming supply, protect the membrane with pretreatment, and often support pressure with added equipment. Rayne Water's whole-house RO installation cost overview notes installed pricing can run from $1,500 to $4,800+, which tracks with the added tanks, pumps, and plumbing work these systems often require.
The lifetime cost is where many buyers get surprised. Whole-house RO usually means more sediment and carbon prefilters, larger membranes, more service labor, and more water sent to drain. If the incoming water is hard or high in sediment, pretreatment is not optional in practical terms. Without it, maintenance gets expensive fast and membrane life drops.
Whole-house RO makes sense when untreated water is causing house-wide problems. Scale, staining, poor taste at every fixture, or water chemistry that affects appliances can justify the spend. For a one-faucet need, it is usually too much system.
Countertop RO
Countertop RO appeals to renters, short-term owners, and anyone who does not want holes drilled or tubing routed through a cabinet. Setup is usually easier, and installation labor is often minimal or avoided entirely.
That lower entry cost does not automatically make it the cheapest option over time. Countertop units can have smaller reservoirs, slower production, and replacement filters that cost more relative to the amount of water they produce. They also take up visible space every day. Some homeowners tolerate that for a month and then decide they hate it.
Here is the practical comparison:
| System type | Best fit | Cost behavior | Main compromise |
|---|---|---|---|
| Under-sink | Most homeowners | Moderate purchase price, moderate install cost, manageable long-term upkeep | Uses cabinet space |
| Whole-house | Entire-home treatment needs | Highest equipment, labor, and maintenance costs | Expensive and space-hungry |
| Countertop | Renters and low-commitment buyers | Lower installation cost, but convenience and filter value vary by model | Takes counter space |
For many households, under-sink RO gives the best total cost of ownership. Whole-house RO has the widest reach and the highest long-term expense. Countertop RO can save money upfront, but only if the trade-offs in capacity, appearance, and replacement filter cost fit how the home uses water.
The DIY vs Professional Installation Cost Showdown
The biggest temptation in RO buying is to look at labor and think, "I can save that." Sometimes you can. Sometimes that decision turns a clean water upgrade into a cabinet repair.

When DIY makes sense
DIY installation can work if your sink base is roomy, the system is well designed, your shutoff valve works properly, and you're comfortable with basic plumbing tasks. A handy homeowner can often handle supply connection, tubing runs, tank placement, and startup flush if the layout is simple.
DIY is strongest when the job doesn't require specialty drilling or correction of existing plumbing issues.
- Simple cabinet layout: Plenty of room to mount components and route lines without kinks.
- Existing faucet hole available: No need to drill stainless steel, porcelain, or stone.
- Modern shutoff and drain access: Less chance you'll disturb aging plumbing and create another repair.
Where DIY goes wrong
Most installation mistakes aren't dramatic at first. They're slow leaks, badly seated tubing, awkward drain routing, or poorly supported filters that become a problem later. The system may even seem fine the day it's installed.
The trouble shows up after repeated pressure cycles, tank refills, or a bumped line under the sink. Water filtration equipment is forgiving in some ways, but pressurized fittings punish sloppy work.
If you're not confident identifying a bad valve, a fragile supply line, or a poor drain route, the labor savings can disappear fast.
Common failure points include:
- Countertop drilling mistakes that chip finished surfaces.
- Drain saddle placement that leads to noise or poor discharge.
- Tubing bends that restrict flow and hurt performance.
- Loose push-fit connections that drip only after the cabinet door has been closed for hours.
What professional labor is really buying
Professional installation isn't only about speed. You're paying for judgment. A good installer knows where to place the tank so future filter changes aren't miserable, how to route tubing cleanly, how to avoid weak points, and how to test the system before leaving.
That matters because the installed result affects maintenance for years. A neatly mounted system with accessible cartridges is easier to service. A messy install becomes your problem every time replacement day arrives.
For many homeowners, the choice comes down to this short checklist:
- Choose DIY if you have the tools, patience, and straightforward plumbing conditions.
- Choose a professional if drilling is involved, the cabinet is tight, or the existing plumbing is old enough to make surprises likely.
- Choose the lower-risk path if cabinet water damage would be a major headache in your home.
The cheapest install is the one you don't have to redo.
Budgeting for Add-Ons and Regional Price Differences
A basic RO quote is only basic until the installer sees the kitchen. That's when add-ons and local labor conditions enter the conversation.
Add-ons that change the job
Some extras improve performance. Others solve a condition your home already has. The mistake is treating all add-ons like upsells. In water filtration, a few of them are there because the system won't perform well without them.
Examples include:
- Booster pumps: These are used when incoming pressure isn't ideal for steady RO operation.
- Remineralization stages: Some homeowners want taste adjustment after filtration.
- Extra pretreatment: This matters more when feed water carries conditions that can be hard on an RO membrane.
- Leak detectors or shutoff accessories: These don't make the water cleaner, but they can make ownership less stressful.
The right way to judge an add-on is simple. Ask whether it solves a verified water or plumbing condition, or whether it's just dressing up the sale.
House conditions that raise cost
The biggest budget jumps often come from the home, not the machine. Drilling a standard sink deck is one task. Drilling a tough finished surface is another. Working in an open cabinet is easy. Working around a disposal, pullout trash hardware, and a crowded drain assembly takes more time and better routing.
Watch for these conditions:
- Stone or specialty surfaces that make faucet installation harder
- Tight cabinetry that complicates mounting and future servicing
- Aging shutoff valves that should be replaced before connecting new equipment
- Awkward drain layouts that limit where the reject line can be tied in
Why your ZIP code matters
Labor rates aren't the same everywhere. A homeowner in a high-cost metro area should expect a different service price than someone in a smaller market with lower overhead and travel costs. The same RO system can produce very different final quotes because local tradespeople charge differently.
Ask for a site-specific quote, not a generic installed price. RO installs are small plumbing jobs, and small plumbing jobs are notorious for changing once the installer sees the actual sink base.
If you're budgeting carefully, leave room for two categories. The expected install and the likely adjustment after inspection. That simple habit keeps a straightforward water filtration project from turning into a budgeting surprise.
The True Cost of an RO System Over Its Lifetime
A homeowner buys an RO system for a few hundred dollars, then learns a year later that the replacement filters are proprietary, the membrane costs more than expected, and servicing the unit means working one-handed behind a garbage disposal. That is how a cheap system turns into an expensive one.
Reverse osmosis installation cost only tells part of the story. The full number includes replacement filters, membrane changes, occasional service labor, and the practical reality of how easy the unit is to maintain in your actual cabinet.
Why sticker price can mislead you
Two systems can sit in the same price range and cost very different amounts to own over ten years. The difference usually comes down to parts availability, cartridge design, and service access.
I always tell homeowners to look past the first invoice. A unit with common replacement filters, clear service intervals, and enough room to change cartridges without disconnecting half the sink plumbing usually costs less to live with. A bargain model can go the other way fast if every maintenance visit turns into a small plumbing job.
Installation quality also affects long-term cost. Poor tubing runs, awkward mounting, and hard-to-reach housings make routine filter changes slower and increase the odds that someone puts off maintenance or pays for help.
Build your own lifetime budget
Your budget should account for three layers of cost:
- Upfront purchase and installation
- Routine filter and membrane replacement
- Occasional service calls if maintenance access is poor
That framework is simple, but it catches what buyers often miss. A system that saves money on day one can lose that advantage if annual maintenance is higher or replacement parts are harder to find.
Use the manufacturer's maintenance schedule, then price the actual cartridges and membrane before you buy. If you want more help comparing service demands and filter schedules, the Water Filter Advisor advice center is a practical place to continue your research.
| Scenario | Upfront Cost (System + Install) | Annual Filter Cost | Total 10-Year Cost |
|---|---|---|---|
| DIY under-sink RO | Your actual purchase cost | Enter manufacturer filter estimate | Upfront cost plus 10 years of filter cost |
| Professionally installed under-sink RO | Your actual purchase cost plus installer charge | Enter manufacturer filter estimate | Upfront cost plus 10 years of filter cost |
| Whole-house RO | Your actual system and installation quote | Enter manufacturer service estimate | Upfront cost plus 10 years of service and filter cost |
What usually works best financially
For a lot of homes, the best long-term value is an under-sink RO system with standard replacement filters, good parts support, and enough cabinet clearance to service it without frustration. That setup keeps the project focused on drinking and cooking water while avoiding the higher maintenance load that comes with treating the entire house.
The systems that create regret usually have the same problems:
- Tight installs that turn simple maintenance into a chore
- Proprietary replacement parts that cost more and are harder to source
- Oversized system choices for a basic drinking water need
Buy for the next ten years, not just for install day.
Making the Right RO Investment for Your Home
The best RO choice usually isn't the cheapest system on the shelf or the biggest one in the catalog. It's the one that fits your water goals, your sink layout, and your willingness to handle maintenance over time.
If you want a practical decision filter, ask yourself these questions:
Questions that narrow the right choice
- What am I trying to fix? If it's drinking and cooking water, an under-sink RO system often makes more sense than a whole-house build.
- How much cabinet and service space do I have? Tight layouts can turn both installation and maintenance into ongoing annoyances.
- Am I comfortable with plumbing work? If the answer is "somewhat," that's usually a sign to avoid difficult DIY installs.
- What will replacement day look like? Easy filter access matters more than is commonly realized.
A simple buying mindset
Choose based on ownership, not excitement. A system that fits your home cleanly, has sensible maintenance needs, and doesn't force workarounds under the sink is usually the better investment.
If you want more practical water filtration guidance before you commit, browse the homeowner resources at Water Filter Advisor's advice center. It's a useful next stop when you're comparing system types, maintenance demands, and filtration priorities for your home.
A solid RO purchase should leave you with cleaner water and fewer headaches, not a complicated plumbing project you regret six months later.
If you're weighing options and want reliable, plain-English help, visit Water Filter Advisor. You'll find practical guides on water filtration types, maintenance, and how to choose a system that fits your home and budget.
- June 17, 2026
- Uncategorized
