Water Filter Replacement Cartridge: A Homeowner’s Guide

You know the moment. The water from the kitchen tap suddenly tastes a little flat. The refrigerator dispenser slows to a tired trickle. Or that filter light starts glowing like a smoke alarm for your plumbing. The immediate thought is simple: “I guess I need a new filter.”

That's usually right, but the next problem shows up fast. Which one? How often? Does the cheaper compatible cartridge work, or are you asking for leaks, weak flow, or a return trip to the store?

I've changed enough filters to know the job itself usually isn't the hard part. The hard part is figuring out the right water filter replacement cartridge and understanding why replacement timing matters. If you can solve those two puzzles, the rest feels a lot less mysterious.

The Unsung Hero in Your Home's Water System

A water filter cartridge does a quiet job. It sits inside a housing under the sink, inside a refrigerator, or in a whole-house canister in the garage or basement, and nobody thinks much about it until the water starts acting different.

That's what makes it an unsung hero. It handles the daily grind so your water tastes better, smells cleaner, and flows the way it should. When it gets overloaded, the symptoms can be subtle at first. A faint chlorine smell. A slower pour into the coffee pot. A glass of water that just doesn't seem as crisp.

Homeowners often treat filters like they treat batteries in a smoke detector. Replace it when something nags you. But filtration systems are part of the bigger maintenance picture in a home, right alongside valves, hoses, shutoffs, and drain lines. If you like practical upkeep checklists, this roundup of valuable plumbing advice for homeowners is a useful companion.

Practical rule: If your water tastes worse, smells worse, or flows slower than it used to, the cartridge deserves suspicion before the faucet does.

The cartridge is the working part, not just an accessory. It catches sediment, reduces unwanted taste and odor issues, and in some systems supports more specialized treatment. Similar to a coffee maker's filter basket, if it's clean and matched correctly, the whole process works better. If it's clogged, worn out, or the wrong fit, the whole system struggles.

That's why buying “something that looks close” can go sideways. A cartridge can appear similar and still be a bad match for your housing, your water conditions, or your filtration goals.

What Is Inside a Water Filter Cartridge

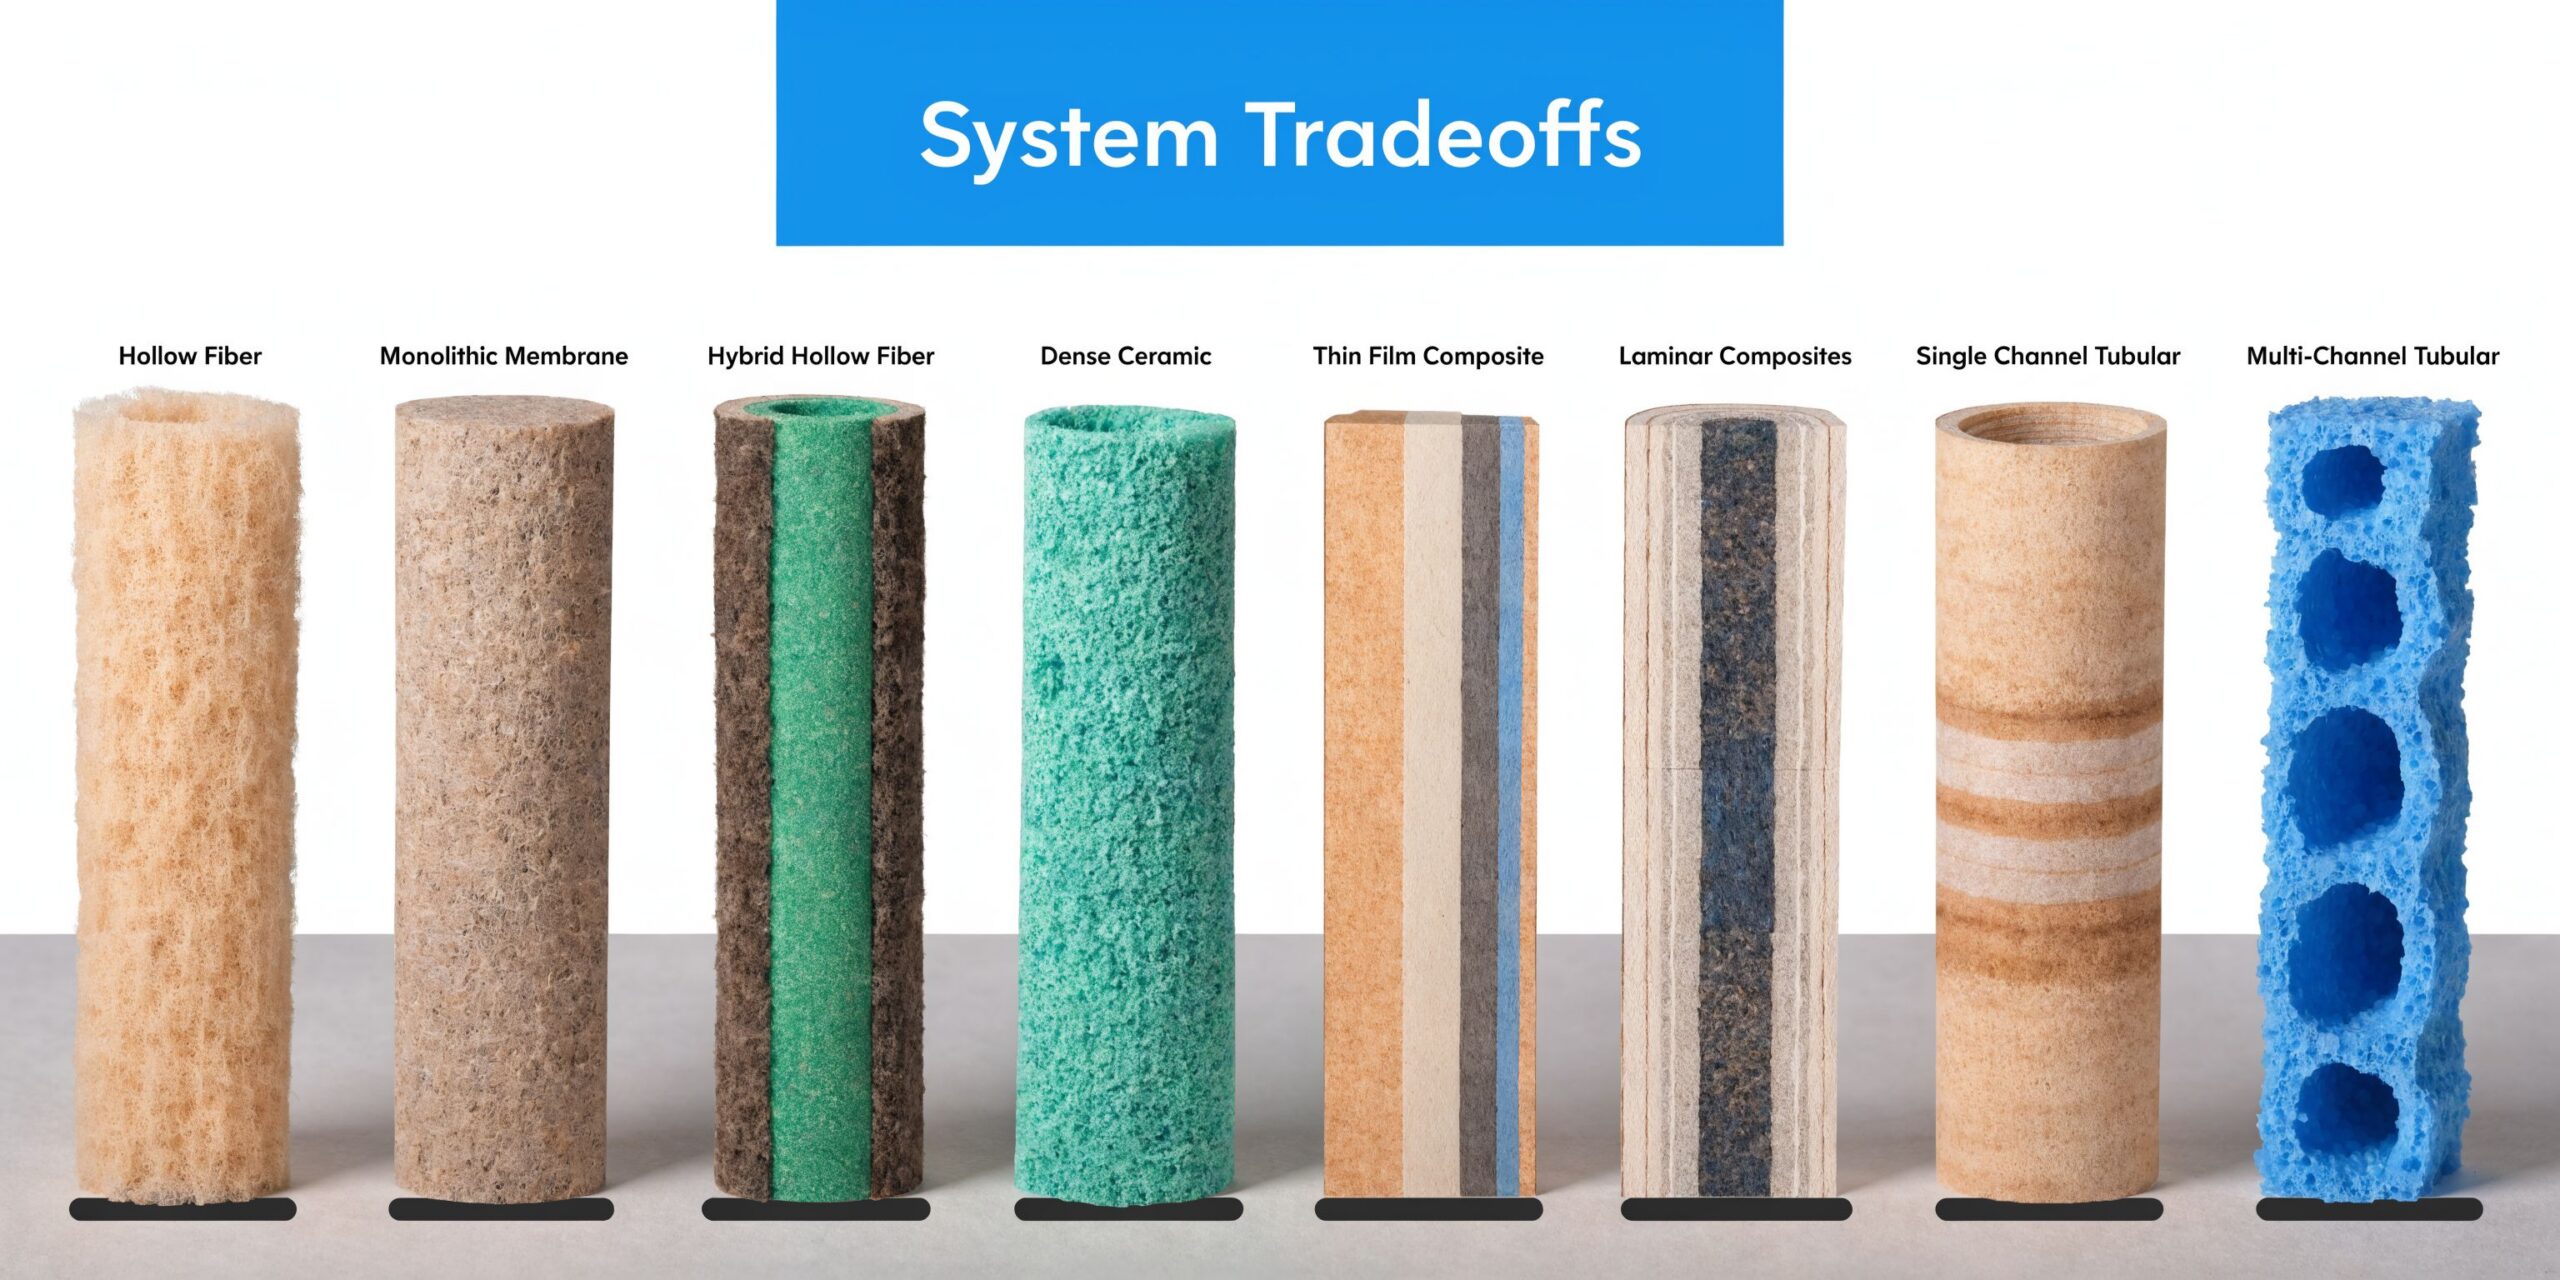
Some cartridges look like plain white tubes. Others look like sealed plastic cylinders. Inside, though, they're doing very different jobs.

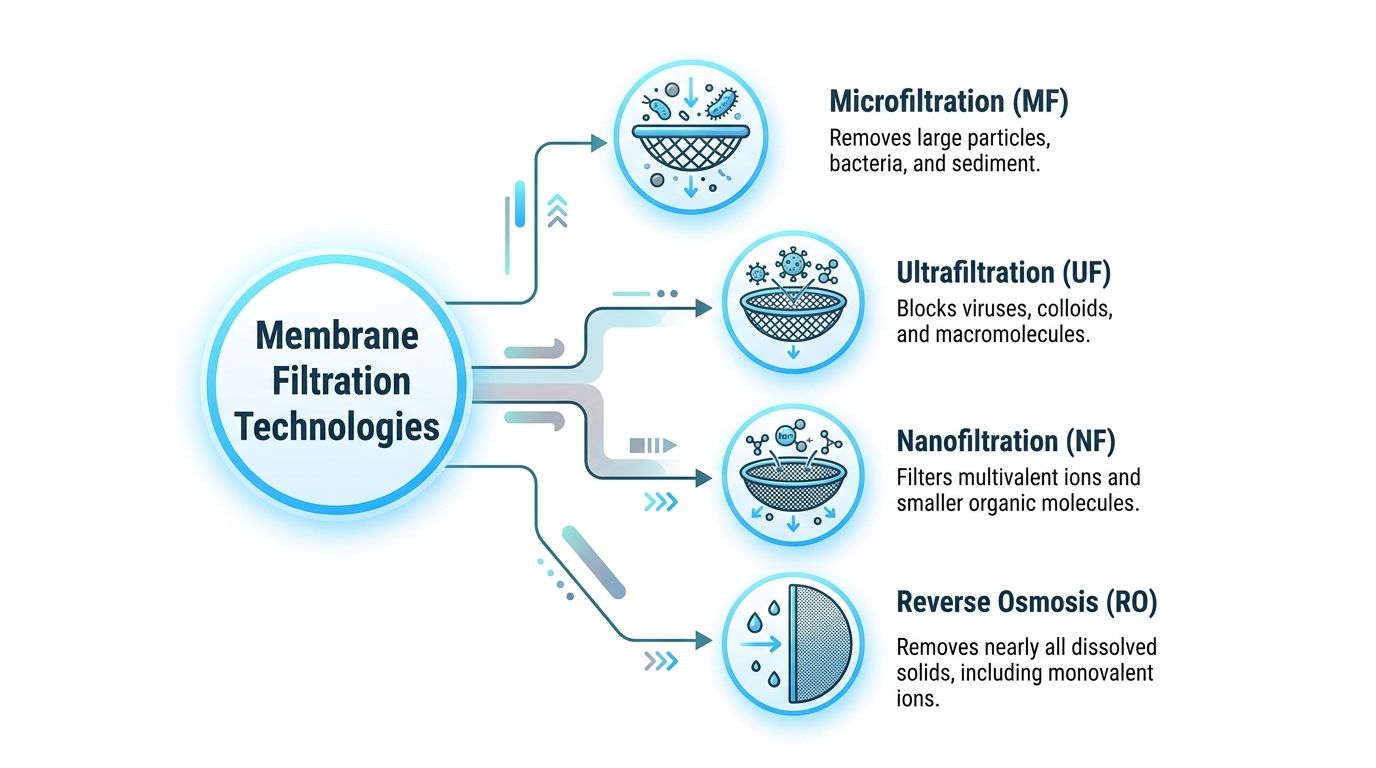
The easiest way to think about filter media is this: each type is built to catch a different kind of trouble. One grabs visible grit. Another helps with smell and taste. Another handles much finer contaminants.

What Is Inside a Water Filter Cartridge

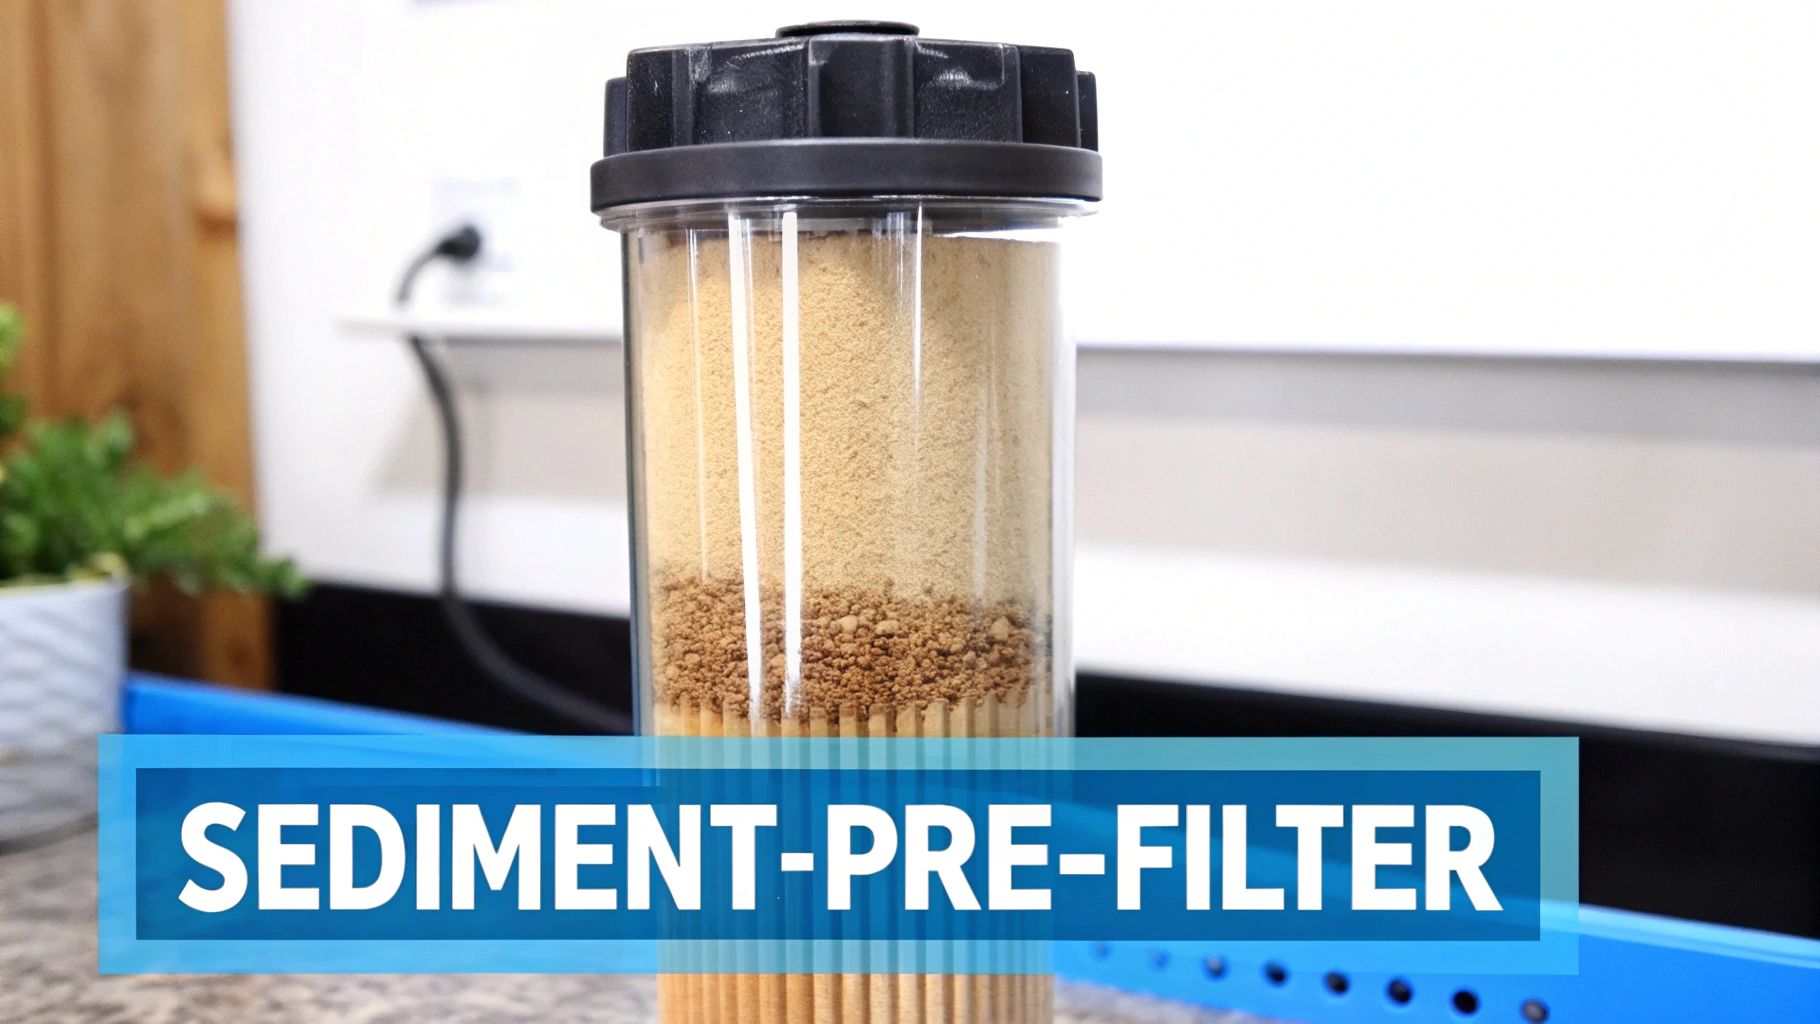
Sediment media acts like a bouncer

A sediment filter is the bouncer at the club door. Big particles don't get in. Sand, rust, and other visible debris get stopped before they travel farther into your plumbing or into later filter stages.

Larger particles can clog more specialized media behind them, leading to reduced performance. If a sediment stage does its job well, it protects the stages that follow.

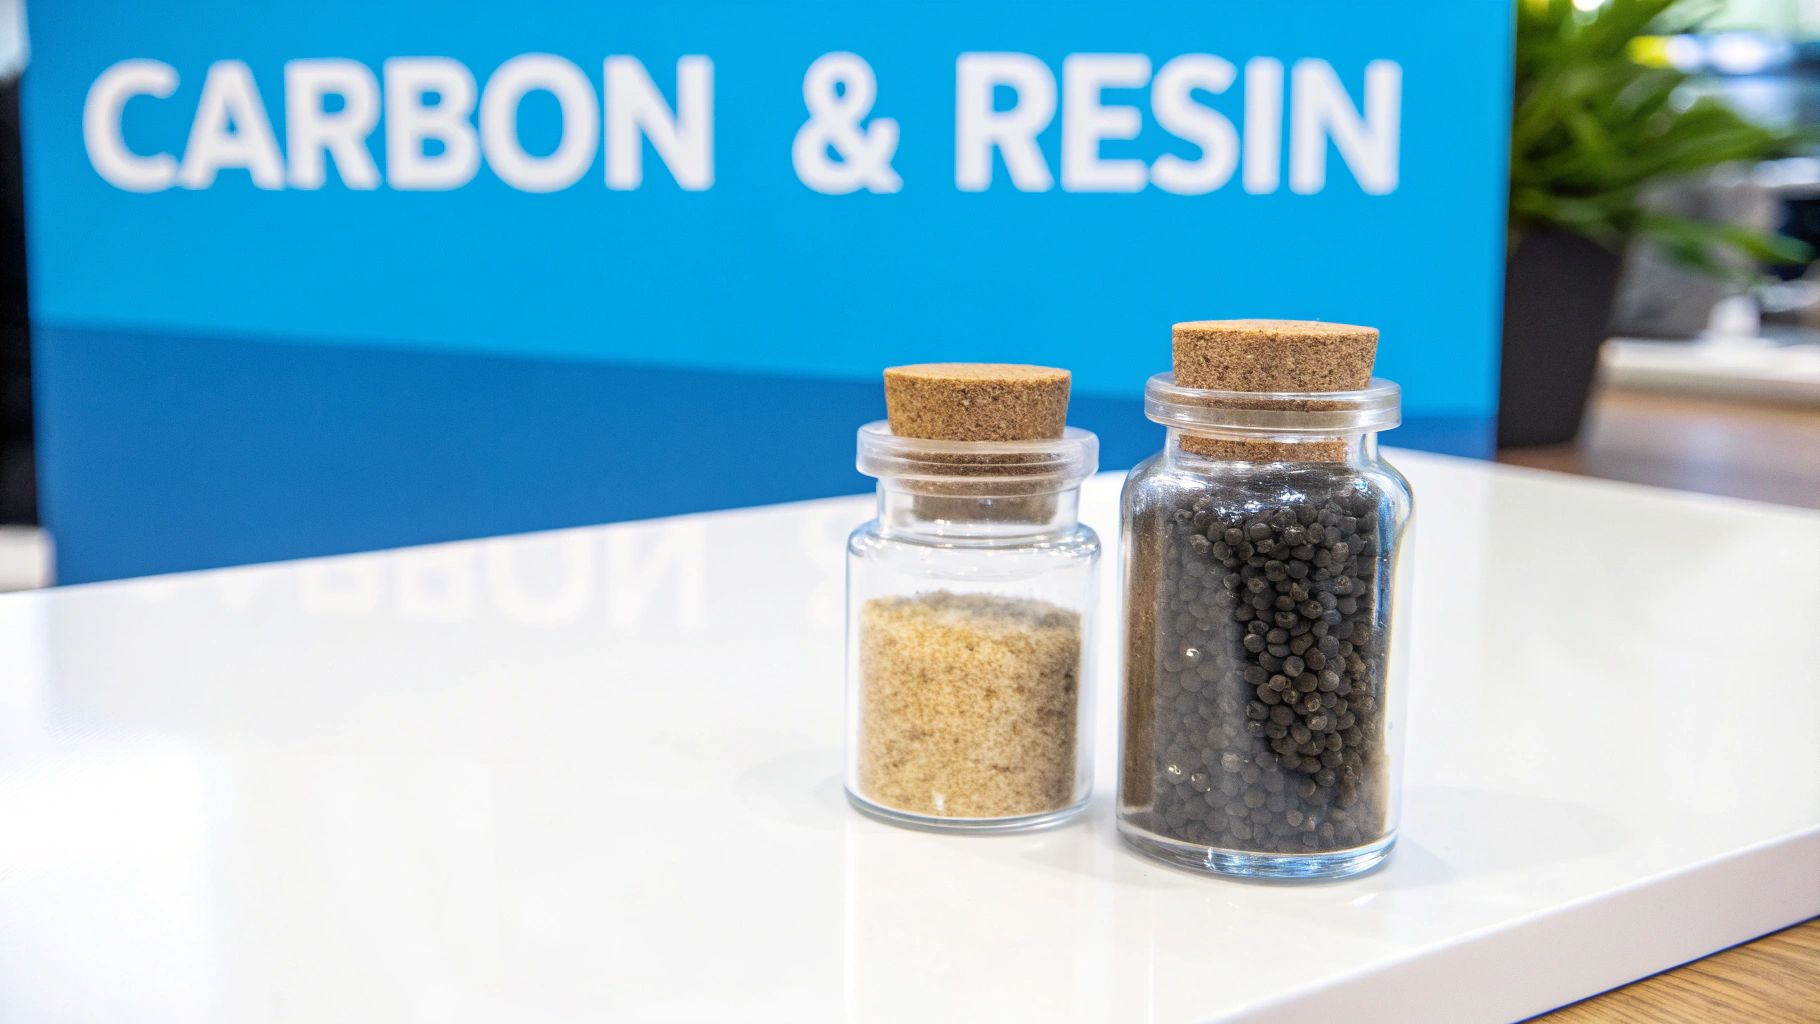
Carbon works more like a sponge

Activated carbon is less like a screen and more like a sticky sponge. Instead of just blocking chunks, it helps absorb things that affect taste and odor, including chlorine in many common household systems.

That's why water can look clear but still taste off. Clear doesn't mean untouched. Carbon is often the stage that makes people say, “The water tastes normal again.”

Some cartridges combine jobs

Not every cartridge contains one media type. Some are built in layers or stages. A performance sheet for a refrigerator-style system notes that replacement intervals can range from 25 to 30 gallons up to 150 gallons for pitcher filters, while some systems are designed for about one year of service, and some advanced cartridges use up to five filtration stages in the manufacturer performance information.

That tells you something important. The cartridge isn't always one simple filter. It can be a stack of jobs packed into one part.

Reverse osmosis is the ultra-fine screen

A reverse osmosis membrane is the fine net in the family. If sediment is a bouncer and carbon is a sponge, reverse osmosis is a super-fussy gatekeeper that allows very little through.

It's used in systems designed for much tighter filtration. Because it works differently from basic sediment or carbon cartridges, its maintenance rhythm and system role are different too.

Filter media cheat sheet

Media Type Primary Target Best For
Sediment Sand, rust, visible particles Pre-filtration and protecting downstream stages
Activated Carbon Chlorine, taste, odor issues Better drinking water from city supplies
KDF Media Heavy metals and helping control bacteria growth Specialized cartridges with multiple treatment goals
Reverse Osmosis Membrane Dissolved solids and microscopic contaminants Dedicated systems that need finer filtration

Water that looks clean can still need treatment. The eye is a poor filter tester.

A lot of confusion starts when people assume every cartridge does the same thing. It doesn't. If you know what media your system uses, you're already much closer to choosing the right replacement.

Finding Your Filter's Perfect Match

People often find themselves stuck. They pull out the old cartridge, hold it in one hand, scroll through product pages with the other, and realize a dozen filters all look almost the same.

They aren't.

Finding Your Filter's Perfect Match

Start with the easiest clue

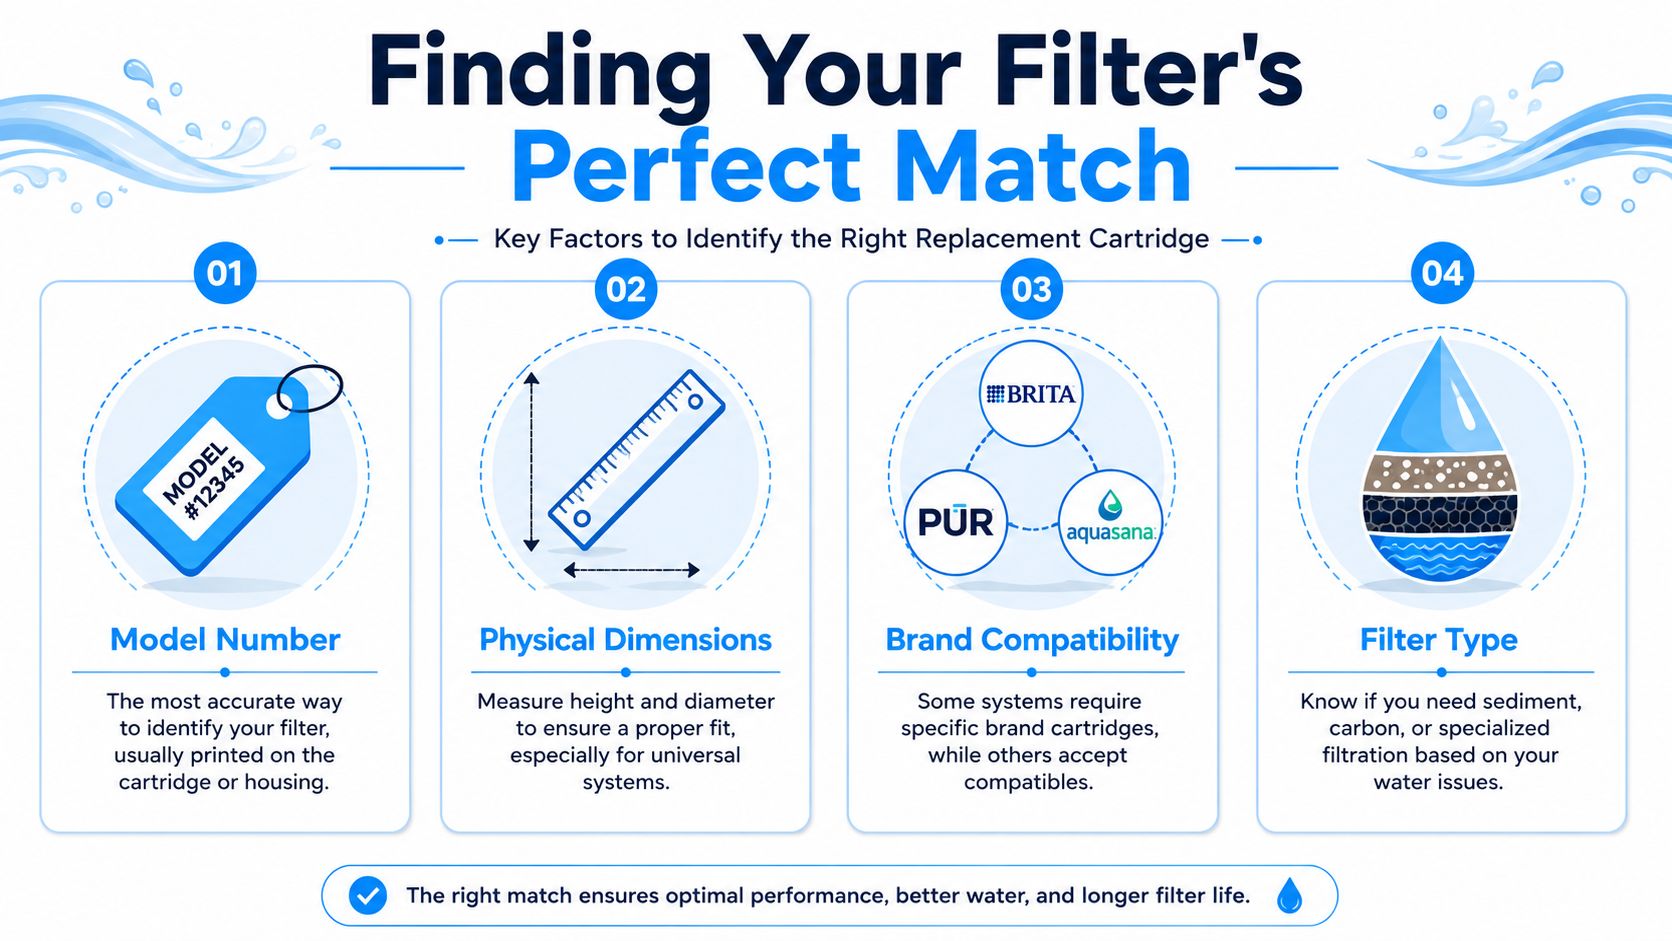
Your best clue is usually the model number printed on the old cartridge, the filter housing, or the system manual. If you still have that, you're ahead.

If you don't, you become a filter detective. That means measuring and checking the details that many shoppers skip.

A practical reference library like this water filtration advice hub can help when you're trying to sort housing types, cartridge styles, and maintenance questions in one place.

The three measurements that matter

A replacement cartridge must match the housing by overall length, outside diameter, and inside diameter, and even a cartridge that seems to fit can still be wrong if the end style doesn't match, such as a single open-end versus double open-end design, as outlined in this cartridge identification guide from Boshart's filter support documentation.

That last part trips people up all the time.

A cartridge can slide into the housing and still fail as a proper replacement if the end-cap style doesn't seal the way the housing expects. It's like buying shoes that are your size but for the wrong foot. Close isn't good enough.

A smart identification checklist

Use this order when the label is missing:

  1. Check the old cartridge first
    Look for printed codes, arrows, brand names, or flow markings.

  2. Inspect the housing cap or sump
    Many housings carry useful identifiers even when the cartridge doesn't.

  3. Measure carefully
    Use a tape measure or ruler and write the dimensions down before shopping.

  4. Study the ends
    Open both ends? One open and one closed? Gasketed? Plain? This detail matters.

  5. Match filter type to water issue
    Sediment, carbon, specialty media, or membrane. A physical fit alone isn't enough.

OEM versus compatible

This is the other big fork in the road. OEM cartridges are the original brand's own replacements. Compatible or generic cartridges are made to fit the same system.

Sometimes compatibles work well. Sometimes they create headaches. The decision comes down to a few practical questions:

  • Fit confidence: If your system is old, unusual, or picky about seals, OEM usually reduces guesswork.
  • Performance confidence: If the original cartridge had a specific job, staying with the original design can feel safer.
  • Budget pressure: Compatible cartridges can be appealing when replacement is a recurring cost.

If you're dealing with a specialty kitchen setup, this guide on solutions for your instant boiling tap shows how replacement questions often get more specific once hot-and-cold dispensing systems enter the mix.

My rule of thumb is simple. When your housing is straightforward and the measurements and end style match exactly, a compatible cartridge may be worth considering. When the system is older, oddly shaped, or fussy, I'd rather pay for confidence than fight leaks and returns.

Decoding Your Cartridge Replacement Schedule

The most common bad habit in filter maintenance is treating replacement like a birthday reminder. Same date every time, no questions asked.

That's convenient, but it's incomplete.

A common service life for many cartridge-based systems is about 3 to 6 months, and one manufacturer-led guide recommends replacement after 6 months because bacterial buildup and sediment loading can happen before the cartridge looks dirty, with reduced flow called out as a practical warning sign in this instructional reference.

Time matters, but performance matters too

A cartridge doesn't age only by the calendar. It also ages by workload. If your home has heavier use, more sediment, or more demanding source water, the cartridge can lose effectiveness sooner than a reminder sticker suggests.

That's why “replace every six months” isn't a law of nature. It's a starting point.

What the warning signs are telling you

Watch for these clues:

  • Slower flow: The cartridge may be loading up with captured material, which raises resistance and reduces pressure at the tap.
  • Taste or odor coming back: Media that used to improve taste may be nearing the end of its useful run.
  • Water quality changes: If the water looks different or your dispenser behaves differently, the filter may be past its comfort zone.

A clean-looking cartridge can still be a tired cartridge.

People get tripped up because they expect obvious dirt. But filters often fail subtly. The media can become loaded long before the outside looks dramatic.

There's a useful parallel with HVAC upkeep. Homeowners often wait too long on furnace or AC filters because the problem builds gradually. This article on when to change air filters makes that same maintenance lesson easy to see in another part of the house.

Build a schedule that fits your water

A better routine blends both approaches:

  • Use the manufacturer interval as your baseline
  • Adjust sooner if flow drops
  • Pay attention to source water
  • Replace based on symptoms, not just the calendar

If your household uses a lot of filtered water every day, or if your water carries more sediment than average, your cartridge is working harder. A smart owner notices that and adapts.

Your Step-by-Step Guide to a Flawless Filter Swap

The actual replacement job is usually very manageable. Most problems come from rushing, forgetting to relieve pressure, or pinching the O-ring.

Do it slowly and the job is usually uneventful, which is exactly what you want.

Your Step-by-Step Guide to a Flawless Filter Swap

Before you touch the housing

Set yourself up first:

  • Grab the new cartridge: Confirm it's the correct replacement before opening the housing.
  • Keep a towel and bucket nearby: Even a well-behaved system usually drips a little.
  • Have food-grade silicone ready if your system uses an O-ring: This small detail helps more than people realize.

System manuals and technical guidance instruct users to fully depressurize the system and lubricate O-rings with food-grade silicone before resealing, because that helps prevent leaks, bypass, and seal failure, as noted in this technical cartridge specification document.
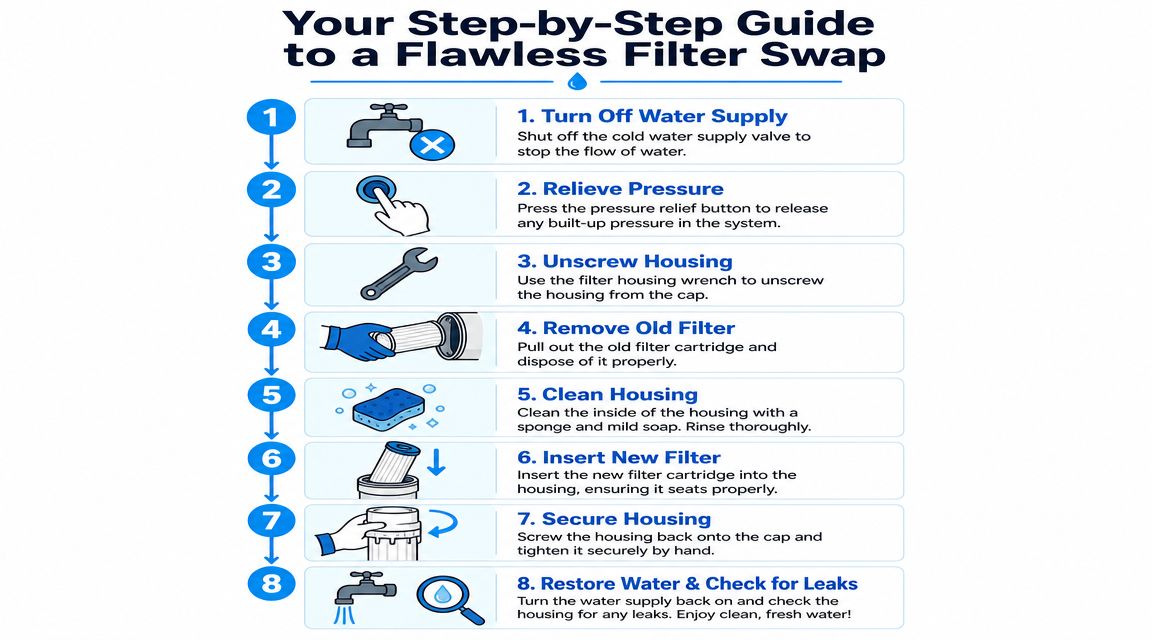
The swap itself

  1. Turn off the water supply
    Shut off the valve feeding the filter system.

  2. Relieve pressure
    Open the nearby faucet or use the system's pressure-relief button if it has one. This step keeps the housing from fighting you.

  3. Unscrew the housing
    Use the housing wrench if needed. Keep the bucket under it.

  4. Remove the old cartridge
    Pull it out and note how it sat in the housing.

  5. Clean the inside of the housing
    Wipe out sediment or slime. A dirty housing can shorten the life of the new cartridge.

  6. Inspect the O-ring
    Make sure it's seated properly and not twisted, cracked, or dirty.

A visual walkthrough can help if you like to see the rhythm of the job before doing it:

Putting it back together

Insert the new cartridge in the correct orientation. Re-seat the housing carefully so the threads catch cleanly. Tighten firmly, but don't muscle it like you're closing a pickle jar for the apocalypse.

Then turn the water back on slowly. Slow fill gives you a chance to spot drips before they become sprays.

If a housing leaks right after replacement, the first suspects are usually pressure left in the system, a dry or twisted O-ring, or cross-threading.

Final checks

Run water through the system and watch the housing for a few minutes. Put your hand around the seam and fittings. If it stays dry, you're in good shape.

This is the part where patience saves cleanup. Most post-replacement leaks don't come from the cartridge itself. They come from sealing details.

The Afterlife of a Filter: Cost and Disposal

A water filter replacement cartridge isn't a one-and-done purchase. It's a recurring household supply, more like detergent or HVAC filters than a major appliance part. Once you see it that way, budgeting gets easier.

The key is to stop thinking only about the price of one cartridge. Think in terms of ownership habit. A cartridge that needs frequent replacement may cost less each time but still demand more attention. A cartridge with a longer service window may simplify your routine. Neither is automatically better. It depends on your system and water.

Budget for the routine, not the emergency

The cheapest way to own a filter is usually to replace it on time and avoid panic buying. Keep the correct model written down somewhere obvious. I like a note inside the sink cabinet door or on the side of the housing with the cartridge name and install date.

That little note solves two common problems. It keeps you from guessing at the store, and it keeps you from stretching a cartridge just because you forgot what fits.

What to do with the old cartridge

Disposal is less tidy than often expected. Many cartridges combine plastic, filter media, trapped sediment, and sometimes multiple internal layers. That mixed construction means they often aren't simple curbside recycling items.

A practical approach is:

  • Check the packaging first: Some brands provide disposal guidance or special return instructions.
  • Separate only if the manufacturer says to: Don't assume every cartridge is meant to be taken apart.
  • Let it drain before disposal: A waterlogged cartridge is messier and heavier.

The environmental reality

People want a neat answer here, but the situation is system-dependent. Some housings or outer components may be recyclable in certain programs, while the used filter media often isn't. The best homeowner move is to buy deliberately, replace on schedule, and avoid unnecessary early changes.

That last point matters. Throwing out a cartridge too soon wastes money and materials. Leaving it in too long can hurt performance. Good maintenance sits right in the middle.

Solving Common Filter Frustrations and FAQs

Most filter problems after replacement aren't disasters. They're usually small installation or identification mistakes. The trick is knowing which kind of mistake you're looking at.

Solving Common Filter Frustrations and FAQs

Why is my housing leaking after I changed the cartridge

Start with the boring answers first, because they're often the right ones.

  • The O-ring is dirty or twisted: Remove it, clean the groove, and reseat it.
  • The housing is cross-threaded: Back it off and start again carefully.
  • The cartridge isn't seated correctly: Some filters need to sit squarely against a post or end seal.

If the leak is tiny, don't ignore it. Tiny drips become cabinet stains.

Why is the water sputtering or cloudy

Sputtering often means trapped air. That usually clears after running water for a bit. Cloudiness right after a filter change can also happen as the system flushes out fine particles or air bubbles.

If it clears quickly, that's usually normal. If it doesn't, check whether the cartridge was installed in the proper direction and whether the housing sealed properly.

What if my water still tastes bad after I replaced the filter

Don't assume the new cartridge is defective. Ask three questions:

  1. Did you buy the right filter type for the job
  2. Did you flush the system after installation
  3. Is the issue coming from another part of the plumbing or appliance

A cartridge can't solve a problem it wasn't designed to address.

I have an old unlabeled system. How do I identify the cartridge

This is one of the biggest pain points in real homes. Guidance for replacement can range from six months for carbon filters to 3 to 5 years for RO membranes, and a major source of confusion is matching cartridges to older or unlabeled housings, where mainstream retailers often don't provide a clear universal answer, as explained by Pure Water Products in its undersink parts guidance.

When you don't have a label, go back to fundamentals:

  • Identify the filter type: Sediment, carbon, RO, or specialty media.
  • Measure the housing and old cartridge: Length, diameter, and opening style matter.
  • Look for clues on the housing itself: Caps, brackets, and nearby labels may tell you more than the spent cartridge.

Older systems can still be easy to maintain. They just require more detective work before you order.

Is a generic cartridge always a bad idea

No. But “fits” and “works properly” aren't always the same thing. If the dimensions, end style, and filter function match exactly, a compatible cartridge may be fine. If anything is fuzzy, buying the original style is often the calmer choice.

How can I make replacements easier next time

Write down the cartridge model, install date, and where you bought it. Better yet, keep one spare on hand if your system uses a common cartridge and your household depends on filtered water every day.

That turns filter replacement from a scavenger hunt into a five-minute maintenance job.


If you want clear help comparing cartridge types, understanding compatibility, and keeping your home filtration system running smoothly, Water Filter Advisor is a practical place to continue your research. It's built for homeowners who want better water without the guesswork.

Ultimate Guide to Membrane Water Filtration Systems

You fill a glass from the kitchen tap, take a sip, and pause. Maybe it tastes flat. Maybe it smells faintly like a swimming pool. Maybe your shower leaves reddish stains, or your kettle grows scale faster than you can scrub it. Most homeowners don’t stand at the sink thinking about pore size, pressure, and membrane fouling. They just want water that feels safe to drink and pleasant to use.

That’s where membrane water filtration systems come in. They’re the class of filters that do the fine-detail work. While a simple sediment filter catches grit and a carbon filter improves taste and odor, a membrane acts more like a precision barrier. It separates water from particles, microbes, and in some cases dissolved material that other home filters can’t reliably handle.

The catch is that membrane systems can also surprise people. A unit may promise cleaner water, but its performance depends on the water entering it. If your home has iron, heavy sediment, or stubborn organic matter, the membrane may need protection long before you think about replacing it. That hidden side of ownership matters just as much as the contaminant list on the box.

Why Membrane Water Filtration Systems Matter

You notice the problem in everyday routines first. The coffee has a flat, mineral taste. Ice picks up an odd smell from the freezer. A rusty ring shows up in the tub again, and the kettle starts building scale long before it should.

Those clues all point to the same question. What, exactly, is in the water, and what kind of filter can separate it out?

Why membranes stand apart

Membrane systems matter because they do more than make water taste better. They act like very fine screening layers that sort water from unwanted material based on particle size and, with some membranes, dissolved content. That gives them a different job from a basic sediment cartridge or a carbon block.

For homeowners, that difference can be practical, not academic. A sediment filter is good at catching grit. Carbon is good at reducing many taste and odor problems. A membrane is often the stage that handles the smaller, harder-to-catch material that slips through those earlier steps.

Reverse osmosis, or RO, is the example many people know best. It is used when the concern goes beyond cloudiness and into dissolved salts, metals, or other contaminants that simpler filters may not reduce well. If your only problem is visible sediment, an aggressive membrane may be more system than you need. If your concern includes what is dissolved in the water, membranes start to make much more sense.

Why homeowners are paying attention

Analysts at Fortune Business Insights report that the global membrane filtration market, valued at roughly USD 19 to 20 billion in 2025, is projected to grow sharply by the mid-2030s, with water and wastewater treatment as the largest application area. Those figures are relevant to homeowners because they show membrane filtration is no longer a specialty tool used only in industrial settings. It has become a common answer to real water quality problems.

That popularity can create a false sense of simplicity.

A membrane system may look like a tidy box under a sink or beside a pressure tank, but ownership often involves more than replacing one filter on a schedule. Feed water quality affects membrane life. Some homes need pretreatment to control sediment, iron, hardness, or chlorine before water even reaches the membrane. Some systems need periodic flushing or backwashing. Those upkeep steps add cost, waste water in some designs, and determine whether the system keeps performing or starts clogging early.

A good membrane setup can solve the right problem with impressive precision. A poorly matched one can turn into an expensive lesson in fouling, short cartridge life, and surprise maintenance. That is why membranes matter. They are powerful tools, but they work best when homeowners understand both the filtration benefits and the hidden demands that come with them.

Understanding the Key Concepts of Membrane Filtration

Think of membrane filtration like a set of kitchen strainers arranged from coarse to very fine. One catches pebbles. Another catches sand. Another catches flour dust. The last one is so selective that it starts separating dissolved material from water itself.

That’s the big idea behind the four membrane categories homeowners hear about most often: microfiltration, ultrafiltration, nanofiltration, and reverse osmosis.

A diagram comparing four membrane water filtration technologies: Microfiltration, Ultrafiltration, Nanofiltration, and Reverse Osmosis.

The four membrane types in plain language

Microfiltration

Microfiltration is the coarse screen of the membrane family. It’s useful when water contains visible particles, sediment, or larger suspended matter. In home systems, MF often acts as a bodyguard for finer stages downstream.

If your water looks cloudy after plumbing work or carries fine grit from a well, MF may be part of the answer. It’s usually not the final answer for dissolved contaminants.

Ultrafiltration

Ultrafiltration sits in the middle ground. It’s much finer than MF, but it usually runs at lower pressure than RO. That makes it attractive for whole-house use where homeowners want broad particle and microbe reduction without the heavier demands of reverse osmosis.

According to WCP Online’s discussion of membrane filtration standards, UF systems filter particles down to 25 to 100 nanometers, typically with a molecular weight cut-off of 10,000 to 100,000 daltons, and operate at 200 to 700 kPa, or 30 to 100 psi. The same source explains that UF is commonly built as hollow-fiber modules.

That hollow-fiber design sounds exotic, but the concept is manageable. Picture a bundle of very thin drinking straws. Water either moves from the inside of each straw outward, or from the outside inward. The membrane wall is the filtering surface.

Nanofiltration

Nanofiltration is the less famous sibling. Homeowners usually hear about it when hardness, some organic compounds, or selective ion reduction enters the conversation. It doesn’t go as far as RO, but it can be a smart middle option when full demineralization would be excessive.

NF often appears in conversations about water softening alternatives or systems that need more selectivity than UF but less intensity than RO.

Reverse osmosis

RO is the precision specialist. It uses pressure to push water through an extremely selective membrane. That’s why it’s so often chosen for drinking water systems when dissolved contaminants are the main concern.

It also asks more from the homeowner. More pressure. More pretreatment. More attention to maintenance.

Pressure and pore size confuse people most

A straightforward explanation is as follows:

Membrane type Best mental model What it mainly handles at home
Microfiltration Fine screen Sediment and larger particles
Ultrafiltration Very fine screen Smaller particles, some microbes, humic material
Nanofiltration Selective barrier Hardness-related and smaller dissolved material
Reverse osmosis Near-total barrier Dissolved solids and broad contaminant reduction

A smaller pore or more selective barrier usually means the system needs more driving force. In real life, that often means more pressure, more complexity, and more maintenance sensitivity.

Why UF gets used before RO

One of the most practical ideas in home filtration is using a less extreme membrane to protect a more extreme one. WCP Online notes that UF pretreatment before RO can improve RO recovery from 75% to 85% by reducing SDI from greater than 5 to less than 3, cutting replacement costs by 30% over 5 years in whole-house systems, based on the source’s practical benchmark and standards discussion.

That matters because membranes don’t fail only from age. They fail because water keeps delivering debris and foulants to the surface.

A membrane isn’t a magic wall. It’s a working surface. If you keep throwing dirt at it, it clogs.

The same source notes that without pretreatment, fouling can reduce flux by 20% to 50% within weeks. That’s a useful reality check for homeowners who think the membrane alone does all the heavy lifting.

How Membranes Remove Water Contaminants

A membrane doesn’t “clean” water in the way soap cleans a plate. It separates. The most important habit for homeowners is to ask, what is this membrane separating out, and how?

Three ideas make most of the process easier to understand: size exclusion, selective passage, and surface interaction.

Size exclusion is the easiest one to picture

Start with a colander in the sink. Pasta stays behind, water passes through. Membrane filtration works on the same principle, just at a much smaller scale.

If your water contains sand-like sediment, rust flakes, or suspended particles, a coarser membrane can block them because they’re physically too large to fit through the openings. That’s the basic logic behind microfiltration and much of ultrafiltration.

For homeowners, this explains why a system can make cloudy water look clear. The particles are still in the incoming water. The membrane just refuses to let them continue downstream.

Selective passage matters more as contaminants get smaller

Once contaminants become tiny, the explanation gets less like a kitchen sieve and more like a checkpoint. Reverse osmosis is the classic example. It doesn’t just stop obvious particles. It separates water from dissolved material that is mixed into the water at a much finer level.

That’s why RO is so often chosen when people worry about total dissolved solids, salty taste, or dissolved metals. The membrane is selective enough that many dissolved substances don’t cross with the water.

A useful everyday comparison is brewed coffee. A paper coffee filter catches grounds, but the dissolved coffee compounds still pass through into your cup. If you wanted to separate the dissolved compounds too, you’d need something far more selective than a coffee filter. RO plays that role in water treatment.

Surface interaction and chemistry complicate the story

Some membranes do more than act like a size gate. Their material and operating conditions influence what passes and what doesn’t. Charge, pressure, and the chemistry of the water all matter.

This is one reason homeowners get frustrated when they read contaminant charts too strictly. A membrane might perform very well under one set of conditions and struggle under another. Water from a treated municipal line behaves differently from well water carrying iron, organic matter, or fine silt.

Homeowner takeaway: Don’t ask only, “What does this membrane remove?” Ask, “What kind of water was it tested against, and what protects it upstream?”

Matching contaminants to membrane types

The easiest way to think about removal is to group contaminants by form.

Larger suspended material

This includes visible sediment, grit, and rust particles. These are usually the simplest targets. Coarser membranes or prefilters handle them well.

Microbiological material

Ultrafiltration becomes relevant when the concern shifts to bacteria-sized or virus-adjacent material. According to the WCP Online standards discussion cited earlier, UF can remove all microbiological species captured by MF and can provide partial removal of bacteria, some viruses, and humic materials. The same source notes that standards evidence shows greater than 99.99% removal of particles larger than 0.02 μm in water reclamation contexts.

That doesn’t mean every home UF unit performs identically in every kitchen or basement. It does show why UF earns attention in whole-house treatment where homeowners want finer biological protection than a sediment filter offers.

Dissolved solids and salts

RO earns its reputation in this area. Dissolved material is what makes two glasses of water look equally clear while tasting completely different. If one glass has high dissolved solids, a carbon filter may improve odor but won’t necessarily solve the underlying issue. RO is built for that finer separation.

Small organic chemicals

Homeowners often overestimate membranes here. Some membrane systems struggle with very small organic chemicals unless they’re paired with other treatment stages. If pesticides or similar compounds are part of the concern, a hybrid approach may be more realistic than relying on a membrane alone.

Why one membrane rarely solves everything

A complete home setup often looks more like a team than a single superstar.

  • A sediment stage protects the finer membrane.
  • Carbon media can help with taste, odor, and chemicals that membranes may not target well.
  • UF or RO does the fine separation work.
  • Post-treatment may polish the water or adapt it for use at a specific tap.

That layered design is why shopping by one headline claim can backfire. “Removes X” sounds simple. Actual water treatment rarely is.

Comparing Tradeoffs Across Membrane Types

Homeowners often ask which membrane type is best. The honest answer is that each one asks you to trade something for something else.

You might trade broad contaminant reduction for easier maintenance. You might trade lower pressure needs for less chemical removal. You might trade a lower sticker price for a system that needs more cleaning and protection later.

A lineup of various industrial membrane water filtration system types displayed as cross-section column samples.

A practical side-by-side view

Membrane type Main strength Main limitation Best fit at home
MF Handles sediment with modest demands Limited against dissolved contaminants Prefiltration and particle control
UF Stronger microbiological and fine-particle barrier Still not a full dissolved-solids solution Whole-house treatment and RO pretreatment
NF Selective reduction without full RO intensity More specialized and less familiar to buyers Homes needing a middle option
RO Broad dissolved contaminant reduction Higher pressure, more upkeep sensitivity Drinking water and high-purity applications

Why cheap membranes can cost more later

A membrane system can look affordable on day one and become irritating by month six. The usual culprit is fouling, which is the gradual buildup of unwanted material on the membrane surface.

The newer antifouling membrane discussion is interesting. According to Northwestern University’s coverage of membrane investment research, high-performing antifouling membranes can reduce cost, energy consumption, and greenhouse gas emissions over their lifetimes, and the same piece notes that 65% of desalination plants already use membrane technology.

For homeowners, the headline isn’t “buy the fanciest membrane.” It’s simpler than that. Sometimes the bargain option is only cheaper if you ignore cleaning, earlier performance decline, and shorter useful life.

Tradeoffs that matter in real homes

Maintenance tolerance

If you want the least demanding system, MF or a modest UF setup may feel more manageable than RO. RO often brings tighter operating requirements and more sensitivity to what enters the membrane.

Water source

City water and well water don’t punish membranes in the same way. Well water with iron or heavy sediment can be rough on a membrane if pretreatment is weak. Municipal water may bring disinfectant byproducts, taste issues, or a contaminant profile that pushes homeowners toward RO for drinking water.

Energy and pressure

RO is powerful because it is demanding. The finer the separation, the harder the system has to work. That’s not automatically a reason to avoid it. It just means the strongest membrane isn’t always the smartest whole-house choice.

Better filtration on paper isn’t always better filtration in a basement utility room. The right system is the one your water and maintenance habits can support.

A smarter way to compare systems

When you’re judging membrane water filtration systems, use these questions instead of chasing marketing language:

  • What problem am I solving first? Taste, sediment, microbes, dissolved solids, or a combination?
  • What will protect the membrane? Prefilters, carbon stages, softening, or another pretreatment step.
  • How much upkeep can I realistically do? A neglected premium system often performs worse than a simpler system that gets maintained properly.
  • Is lifecycle value better than purchase price? Antifouling designs may make more sense if your source water tends to foul standard membranes.

Typical Household Applications for Membrane Systems

Membrane water filtration systems show up in homes for very different reasons. One family wants better-tasting drinking water. Another wants cleaner shower water and less staining in the bathroom. A third is trying to protect appliances from dirty well water while still getting polished water at the kitchen tap.

Those are not the same job, so they usually don’t call for the same setup.

A clear glass of ice water sits on a wooden counter next to a home water filtration system.

Under-sink drinking water systems

The most familiar home application is the under-sink RO unit. This setup treats water where people care most about taste and direct consumption, usually at a dedicated faucet near the kitchen sink.

A homeowner on municipal water might notice a chlorine smell in tea or coffee and dislike the taste of plain tap water. In that case, an RO system with suitable pretreatment can make sense because it focuses treatment where the family drinks and cooks.

This approach is often more practical than trying to run highly purified water to every toilet, shower, and hose bib.

Whole-house treatment for comfort and protection

Whole-house membrane setups often lean toward UF rather than RO. The reason is practical. Many homeowners want broader treatment for bathing, laundry, and fixture protection without the heavier complexity of whole-house reverse osmosis.

A family on a private well might use a layered system like this:

  • Sediment prefiltration to catch grit
  • An iron-focused treatment stage if needed
  • UF as a fine barrier for suspended material and microbiological concerns
  • Point-of-use RO at the kitchen sink for drinking water

That arrangement respects the strengths of each technology. The whole house gets cleaner utility water, and the kitchen gets the most aggressive polishing where it matters most.

When a middle-ground membrane makes sense

Nanofiltration often works best in the homes people don’t hear about on social media. These are the households with water that isn’t awful, but isn’t pleasant either.

If hardness or selective dissolved material is the issue, NF can sit in the useful middle. It can provide more finesse than UF without going all the way to RO. It’s not the default recommendation for every home, but it can be a smart match when full RO would be more than the situation requires.

A quick visual walkthrough can help if you’re comparing system styles and installation layouts:

Common household scenarios

City water with taste and odor complaints

A carbon stage may help, but some homeowners still want stronger reduction of dissolved material or byproducts. Under-sink RO is often the focused solution.

Well water with staining or particles

This water usually needs pretreatment first. Throwing a membrane straight at untreated well water is like sending a vacuum robot into a muddy garage and expecting it to stay happy. Sediment and iron control become part of the plan before the membrane does its job.

Homes that want cleaner showers and laundry water

A whole-house UF system can make sense when the goals are reduced cloudiness, lower suspended matter, and better water feel throughout the house. People often choose it when they’re trying to improve daily use, not just drinking water.

Some of the best home systems are hybrids. They don’t force one membrane to do every job. They assign each stage the job it does best.

Installation and Maintenance for Home Filtration

The hidden truth about membrane systems is that buying one is the easy part. Keeping it working well requires considerable skill.

A membrane has to be installed in the right place, protected from the right threats, and maintained on the right schedule. If any one of those pieces is missing, performance can slide fast.

A professional technician wearing a plaid shirt installs a water filtration system unit with a metal wrench.

Where installation goes wrong

Most installation mistakes happen before the first drop of water ever reaches the membrane.

Common trouble spots include:

  • Poor placement that leaves no room to service housings or access shutoff valves
  • Missing pretreatment even though the incoming water carries sediment, iron, or organics
  • Pressure mismatch between the membrane design and the home’s actual plumbing conditions
  • Drain and backwash planning that gets treated like an afterthought

If you’re dealing with a whole-house setup, tight utility-room plumbing, or older pipework, it’s sensible to bring in a qualified installer. If you need help evaluating the plumbing side, professional plumbing services can be useful as a reference point for what a proper installation scope should include.

Pretreatment is not optional

This is the part homeowners most often underestimate.

According to the review on membrane fouling and treatment challenges in PMC, pretreatment is an absolutely essential step for protecting membranes from rapid fouling, flux reduction, and rising operating costs. The same review notes that UF and MF systems may require backwashing as often as 2 to 4 times per hour, depending on feed water quality and flux.

That sounds extreme until you picture what the membrane is doing. It is constantly collecting rejected material on its surface. Without regular clearing and proper upstream conditioning, the membrane gradually turns into its own blockage.

Maintenance reality: A membrane doesn’t just filter water. It also collects what it rejects. Your system needs a plan for getting that rejected material off the membrane again.

A homeowner checklist for ongoing care

Before installation

Check your water quality first. The right membrane depends on what is in the water, not what you suspect.

Leave service space around housings, valves, and any storage components. Filters that are impossible to reach usually become filters that don’t get changed on time.

During setup

Install pretreatment in the right order. Sediment and adsorption-based stages often protect the membrane from the foulants most likely to shorten its life.

Confirm that the system has a realistic path for backwash, flushing, or reject flow. A membrane system that can’t clear itself properly is already in trouble.

After startup

Watch for pressure changes, slower flow, unusual taste shifts, or more frequent service needs. Those are often the first clues that fouling has started building.

For additional homeowner guidance on troubleshooting and general filter care, this practical library of advice at https://www.waterfilteradvisor.com/advice/ is a useful reference.

The upkeep people don’t see on the sales page

Consumer guides often focus on “what it removes” and skip “what it demands.” But membrane ownership includes routine attention to cleaning cycles, pretreatment media, and signs of fouling.

Some homeowners are comfortable with that. Others would rather have a simpler, less demanding system. Neither choice is wrong. The mistake is buying a membrane setup without understanding that upkeep is part of the technology, not a side issue.

Evaluating Cost and Certifications for Membrane Systems

The total cost of a membrane system isn’t the number on the product page. It’s the total of the unit, the support stages around it, the replacement parts, and the effort required to keep it working as designed.

That’s why two systems that look similar on a retailer’s shelf can feel completely different to own.

Think in lifecycle costs, not sticker price

A homeowner comparing membrane water filtration systems should ask four cost questions.

Cost area What to check
Initial hardware Is the membrane the whole system, or do you still need pretreatment and fittings?
Consumables Are replacement filters standard or proprietary?
Maintenance burden Will the system need frequent backwashing, flushing, or cleaning attention?
Operating demands Does it rely on higher pressure or a more complex setup to perform well?

This is also where antifouling membrane options deserve serious thought. A cheaper standard membrane may look attractive at checkout, but if your water tends to foul membranes quickly, the low purchase price can hide a more expensive ownership experience.

Certifications tell you what claims to trust

Certification language can feel dry, but it protects buyers from guesswork. A membrane system should never be judged only by broad marketing promises such as “pure,” “advanced,” or “laboratory-grade.”

The labels homeowners often look for include:

  • NSF/ANSI 42 for chlorine reduction and aesthetic effects
  • NSF/ANSI 53 for certain health-related contaminant claims
  • NSF/ANSI 58 for reverse osmosis systems
  • NSF/ANSI 61 for materials safety

These labels matter because they help connect a product claim to a recognized testing framework. If a system promises lead reduction, dissolved contaminant performance, or RO-specific treatment, the certification details help you see whether the claim is grounded in formal standards.

Buying signals that matter more than flashy claims

Match the system to the job

If you only need drinking water improvement, a point-of-use membrane system may be the sensible move. If your showers, laundry, and fixtures are suffering, a broader treatment strategy may make more sense.

Read the replacement path

A membrane system is easier to live with when replacement parts are easy to identify, easy to access, and easy to order. If the maintenance path feels murky before purchase, it usually gets worse after purchase.

Look for clear contaminant language

Good manufacturers say what the system is designed to address and under what standard or certification framework. Vague promises usually mean the burden of interpretation falls back on you.

Buy the system you can maintain, not the system with the most dramatic ad copy.

A simple rule for budgeting wisely

If a membrane seems affordable only because it excludes pretreatment, service parts, or realistic upkeep, it is not affordable. It’s incomplete.

The strongest buyers treat the membrane as one part of a treatment train. That mindset helps you compare systems accurately and avoid the common mistake of underestimating what it takes to own one successfully.

Making the Right Choice for Your Home

The best membrane water filtration systems are the ones that match your water, your goals, and your patience for upkeep. That’s the whole game.

If your main issue is cloudy water or sediment, a lighter-touch membrane strategy may be enough. If you’re worried about dissolved solids or broad drinking water purification, RO often becomes the more logical choice. If your water is tough on equipment, pretreatment matters just as much as the membrane itself.

Homeowners usually get into trouble when they skip one of three steps:

  • Testing the water
  • Planning pretreatment
  • Being honest about maintenance

A membrane can be a brilliant tool. It can also become an expensive, frustrating box under the sink if it’s asked to treat the wrong water with the wrong support.

Start with the problem you have. Taste and odor. Sediment. Iron. Dissolved material. Whole-house comfort. Safer drinking water at one tap. Once that’s clear, the filter choice gets much easier.

If you’re still deciding, compare systems by three standards. What they remove, what they require, and what they cost to keep running. That approach is less exciting than marketing slogans, but it leads to better water and fewer surprises.


If you want help comparing options, understanding certifications, and choosing a system that fits your home’s actual water problems, visit Water Filter Advisor. It’s a practical place to research filters, replacement needs, and maintenance before you buy.

Your Ultimate Guide to the Parts of a Water Filter

Ever cracked open a water filter and wondered what magical wizardry happens inside? It’s not some single, mystical component doing all the heavy lifting. It's more like a super-efficient factory assembly line, where each part has a very specific, crucial job to do to get your water from funky to fantastic.

Think of it as a multi-stage security checkpoint for your H2O. The first guard is a big, burly bouncer who tosses out the obvious riff-raff—sand, dirt, and rust. Further down the line, you’ve got chemical specialists who sniff out and neutralize invisible villains like chlorine that make your water taste and smell like a swimming pool.

The different parts of a water filter all work in harmony, with each component designed to target specific contaminants. The big players include sediment pre-filters to catch the chunky stuff, activated carbon blocks to grab chemicals, and high-tech gear like reverse osmosis membranes for the ultimate purification showdown. Getting a handle on these parts is the secret to understanding your filter and keeping your home’s water sparkling clean.

Your Water Filter’s Inner Workings Uncovered

To really get what's happening inside that mysterious plastic canister, it helps to understand the big picture. We've got a great general overview of how a water filter works that explains how these individual parts fit into the overall process. Knowing this stuff is what empowers you to make smart choices about your home's water.

The Key Players in Filtration

At its heart, any decent home water filter uses a few core stages to clean your water. Each stage hands the water off to the next, making it progressively purer along its journey to your glass.

  • The Initial Cleanup: First, you have to get rid of the physical gunk. This is the "get the mud off your boots" stage, and it's non-negotiable.
  • The Taste and Odor Fix: Next up, the system targets the chemicals and compounds that cause bad tastes and smells. This is where the real flavor transformation happens.
  • The Final Polish: Lastly, the water gets a final once-over to make sure it's as crisp and clean as possible before it hits your glass.

This quick infographic shows you exactly how those main stages work in most home filters.

Diagram illustrating the main components of a water filter system: Sediment, Carbon, and Final Polishing.

As you can see, it's not a single step but a deliberate sequence. This layered approach is brilliant because it uses the tough, inexpensive sediment filter to protect the finer, more complex (and often more expensive) filters downstream. It's this teamwork that makes modern home water filters so effective.

Key Water Filter Components and Their Functions

To make it even clearer, here’s a quick-reference table breaking down the most common parts you'll find in a home water filter and what they do.

Component Primary Function Common Contaminants Removed
Sediment Pre-Filter Captures large physical particles. Dirt, sand, silt, rust, scale.
Activated Carbon Adsorbs chemicals and impurities. Chlorine, chloramines, VOCs, pesticides.
Reverse Osmosis (RO) Membrane Forces water through a semi-permeable membrane. Dissolved solids, heavy metals, fluoride.
Ion-Exchange Media Swaps mineral ions to soften water. Calcium, magnesium (limescale).
UV Lamp Sterilizes water with ultraviolet light. Bacteria, viruses, protozoa.

This table covers the heavy hitters, but remember that many systems combine these technologies in different orders and configurations to tackle specific water quality issues in your home.

The First Line of Defense: Sediment Pre-Filters

Before your water gets the deep clean for invisible contaminants, it needs a good old-fashioned scrubbing. That's the all-important job of the sediment pre-filter, the unsung hero that acts as the rugged first line of defense in pretty much any serious home water filtration system.

Think of it as the bouncer at a club. Its one and only job is to stop the obvious troublemakers—the grit, sand, rust flakes from old pipes, and other chunky stuff—right at the door.

This hardworking filter physically blocks and traps these larger particles. Its primary mission? To keep all that gunk from crashing the party further down the line, where it would absolutely wreck the more delicate and expensive parts, like your carbon filters or that pricey reverse osmosis membrane.

Why This First Step Is So Important

By taking on all the heavy lifting of this coarse filtration, the sediment pre-filter lets the rest of your system actually do its job. Without it, those finer filters would get gummed up and clogged almost instantly. You'd see a massive drop in water pressure, and you'd be replacing expensive filters way more often than you should.

This first stage is what keeps the water flowing and your maintenance costs from getting out of hand.

Sediment filters have been around since the 1980s, typically made from pleated polyester or polypropylene. They are designed to trap particulates larger than 5-50 microns—stuff you can often see. Adding one can extend the life of your entire system by 30-50%. They're especially critical if your home is on well water, which is notorious for having higher levels of sediment. You can get more background on how these systems have evolved over at Cognitive Market Research.

This crucial protective role is why you’ll find a sediment filter as stage one in just about every under-sink, whole-house, or reverse osmosis setup.

The Support Crew: Housings and O-Rings

Of course, the filter cartridge doesn't just float in your pipes. It lives inside a filter housing, which is the tough canister that holds the filter and connects everything to your water lines. These are usually made from heavy-duty, food-grade plastic built to handle constant water pressure.

A tiny but critical part you can't ignore is the O-ring. It’s just a simple rubber gasket that sits at the top of the housing to create a perfect, watertight seal. If that seal fails, you've got a leak on your hands. That's why checking the O-ring for any cracks or wear every single time you change a filter is a non-negotiable maintenance step for any homeowner.

Wondering if your sediment pre-filter is crying for help? Here are the common signs:

  • A big drop in water pressure: This is the number one sign of a clogged filter.
  • Visible floaties in your water: If you can see particles, the filter is either full or has failed completely.
  • Discolored water: A sudden burst of rusty or cloudy water means the filter is overwhelmed and can't keep up.

Replacing this filter is usually the most frequent chore you'll have with any system. But the good news is, it's also one of the easiest and cheapest ways to protect your entire investment.

The Real Workhorses: Activated Carbon and Ion-Exchange Media

If the sediment pre-filter is the bouncer at the door, think of activated carbon as the charismatic host inside. It's the part of the system that deals with all the unseen troublemakers, completely transforming the taste and smell of your water. This is where cloudy, foul-smelling tap water becomes crisp, clean, and refreshing.

A clear sediment pre-filter cartridge filled with granular media, featuring a blue text overlay.

So, how does it work? Imagine activated carbon as a highly porous, magnetic sponge. Its surface is covered in millions of tiny nooks and crannies, creating a massive area for contaminants to get trapped. As water passes over it, a process called adsorption kicks in, grabbing onto things like chlorine, pesticides, and volatile organic compounds (VOCs). That's the magic that gets rid of that "public pool" smell from your tap.

Activated Carbon: The Flavor Saver

Using activated carbon to clean up water isn't some newfangled idea; people have been using it since the late 18th century. It's still the best tool we have for getting rid of the chlorine, chloramine, and weird odors that plague municipal water supplies. Its effectiveness is a big reason why the global water filter market hit USD 14.26 billion in 2023 and is expected to keep climbing. If you're curious, you can check out more data on the water filter market growth on SkyQuest.

You'll run into this stuff in a couple of different forms:

  • Granular Activated Carbon (GAC): These are loose carbon granules. They do a good job, but sometimes water can find a path around them, a problem known as "channeling."
  • Carbon Block: This is a solid, compressed block of carbon. It forces every drop of water to pass through it, ensuring maximum contact time and preventing any channeling.

No matter the form, carbon is the backbone of filtration. You'll find it in everything from a simple pitcher filter to a high-end under-sink system. It's a key player in just about every setup out there.

Ion-Exchange Media: The Hard Water Specialist

While carbon is busy tackling chemicals, ion-exchange media is the specialist you call in for hard water. Ever seen that chalky white scale building up on your faucets, showerheads, or inside your coffee maker? That's hard water, caused by high levels of calcium and magnesium.

Think of ion-exchange media as a microscopic trading post. It's made of tiny resin beads loaded up with harmless sodium ions. When hard water flows through, these beads snatch the troublesome calcium and magnesium ions and trade them for the sodium ions, effectively "softening" the water on the spot.

This process is a lifesaver for your plumbing and appliances. Hard water scale can clog pipes, make your water heater less efficient, and leave ugly spots all over your dishes. By swapping out those minerals, this media stops scale before it even starts, saving you a world of headaches and expensive repairs down the road. You’ll find this technology inside dedicated water softeners and some of the more advanced filtration systems.

The Ultimate Guardian: The Reverse Osmosis Membrane

When you absolutely, positively need the purest water possible, you call in the specialist. And in the world of home water filters, the undisputed specialist is the Reverse Osmosis (RO) membrane. This isn't just another filter layer; it’s a highly advanced gatekeeper that works at the molecular level.

Two glass bottles containing light brown resin and black carbon granules for water filtration.

The RO membrane uses your home’s existing water pressure to literally force water molecules through a tightly wrapped, semi-permeable sheet. You can think of it like a bouncer at an exclusive club with an incredibly strict guest list. Only pure water molecules get in, while up to 99% of dissolved solids are turned away and flushed down the drain. This process is exactly how an RO system can eliminate tiny contaminants that other filters simply can't touch.

What the RO Membrane Targets

While a good carbon filter is your go-to for chlorine and funky tastes, the RO membrane is in a different league, tackling a whole other class of impurities. Its pores are so ridiculously small that they can block a massive range of contaminants that are otherwise very difficult to get out of your water.

Here’s a look at what an RO membrane is designed to remove:

  • Heavy Metals like lead, arsenic, mercury, and cadmium.
  • Dissolved Salts, which is why RO technology is famous for desalination (turning salt water into fresh water).
  • Fluoride, a common additive in municipal water that many people prefer to remove.
  • Nitrates and Nitrites, contaminants often found in areas with agricultural runoff.

Reverse osmosis is the heart and soul of any advanced home water filtration system. It was originally patented way back in the 1950s for military use, turning seawater into drinkable water for sailors. By the 1970s, the technology made its way into homes, and today it powers about 40% of premium residential systems. You can dig deeper into the growth of home water filtration market share on Arizton.

Essential Supporting Parts of an RO System

An RO membrane is a powerhouse, but it can’t do the job all by itself. The process is slow and meticulous, so it relies on a couple of other critical parts to make it practical for your kitchen sink.

The most obvious companion piece is the storage tank. Since the RO membrane purifies water almost drop by drop, the tank is there to collect and hold a reserve of that super-clean water. This ensures you have a ready supply at the faucet whenever you need it. Without it, you’d be waiting several minutes just to fill a glass of water.

Another crucial—but often overlooked—component is the flow restrictor. This tiny but mighty part is vital for creating the back-pressure needed for reverse osmosis to even happen. It carefully controls how much wastewater goes to the drain, making sure the membrane operates at the perfect pressure to maximize pure water production and minimize waste.

Final Polishing and Sterilization: Post-Filters and UV Lamps

Your water has made it through the heavy-hitters—the sediment filter, the carbon block, and maybe even a reverse osmosis membrane. It’s almost ready. But before it hits your glass, a couple of specialists get the final say, acting as the ultimate quality control to make sure every drop is perfect. These last parts of a water filter are all about adding that final polish and ensuring total microbial safety.

Close-up of a wet reverse osmosis water filter with a blue label on a white background, showing water droplets.

First up is the post-filter, which is almost always another carbon filter. Think of it as the final taste polisher. This is especially important in a reverse osmosis system, where purified water often sits in a storage tank before you turn on the faucet. The post-filter’s one job is to catch any faint tastes or smells the water might have picked up while waiting in the tank, giving you that crisp, clean finish every time.

The Final Polish with a Post-Filter

This last-stage carbon filter is like the final inspector on a factory line. It’s there to catch any tiny imperfections that might have snuck past the other stages, guaranteeing the final product—your drinking water—is absolutely flawless. It’s what turns good water into great-tasting water.

Just like the other filters in the system, this component needs to be swapped out regularly, usually every 6 to 12 months. The tell-tale sign it’s time for a change is when that slight "off" taste or odor you got rid of starts to creep back in.

Ultimate Microbial Safety with UV Lamps

For absolute peace of mind, particularly if you're on well water or live in an area prone to boil water advisories, the final stop is often an Ultraviolet (UV) lamp. This component doesn't filter anything in the traditional sense; it sterilizes. It’s a completely different kind of guardian angel for your water.

A UV lamp blasts the water with powerful UV-C light, which is a potent germicidal agent. As water flows past the glowing lamp, this intense light instantly scrambles the DNA of any microorganisms present. It doesn't kill them outright, but it makes it impossible for them to reproduce and make you sick.

It's an incredibly effective, chemical-free way to neutralize a whole host of invisible threats:

  • Bacteria like E. coli and Salmonella
  • Viruses like Hepatitis A and Rotavirus
  • Cysts such as Giardia and Cryptosporidium

The UV lamp bulb itself needs to be replaced once a year—that’s about 10,000 hours of use. Even if the light still turns on, its germ-killing power weakens over time. The lamp is protected by a quartz sleeve, a clear glass tube that also needs to be kept clean so the UV rays can fully penetrate the water. Together, this powerful duo provides a final, non-chemical line of defense, ensuring your water isn't just clean, but biologically safe.

Connecting It All: Valves, Fittings, and Faucets

The filter cartridges and high-tech membranes tend to get all the attention, but they’d be completely useless without the plumbing hardware that ties the whole system together. These connecting parts of a water filter are the unsung heroes. They’re the ones managing water flow, stopping leaks before they start, and delivering that purified water right to your glass.

Think of your home filtration system as a complete plumbing circuit. These components are its critical infrastructure.

Take the feed water valve, for example. This is ground zero. It’s a small valve that taps directly into your cold water line, essentially acting as the main on/off switch for the entire operation. From there, a network of flexible tubing and sturdy fittings takes over, guiding the water from one filter stage to the next and ensuring a secure, leak-free path.

The Essential Connectors

These parts might look small, but their role in your system's performance and safety is massive. A single bad fitting can lead to a catastrophic leak, which is exactly why using high-quality components is non-negotiable. In fact, unfiltered water is responsible for over 50% of espresso machine leak problems, usually because scale buildup has damaged the internal connections.

Here are a few of the key players:

  • Dedicated Faucet: Most under-sink systems will come with their own stylish faucet. This is a great feature because it keeps your newly purified water separate from your regular hot and cold tap water.
  • Check Valves: Think of these as one-way gates. They prevent wastewater from flowing backward into the clean water line—an absolutely crucial safety feature, especially in RO systems.
  • Pressure Regulators: If your home has high or unpredictable water pressure, this part is a must-have. It acts as a shield, protecting the more delicate filter housings and membranes from sudden pressure spikes that could cause cracks or total failure.

Getting a handle on how these components work together is the real key to a successful, leak-free installation. They make sure purified water gets exactly where it needs to go, safely and reliably, turning a simple collection of filters into a high-performance system you can depend on.

Common Questions About Water Filter Parts

Figuring out replacement parts and system maintenance can sometimes feel like you’re a detective trying to solve a tricky case. Let's tackle some of the most common questions we hear from homeowners, so you can keep your system running perfectly without any of the guesswork.

How Do I Find the Right Replacement Part for My Filter?

Your first clue is always in the system's user manual. It’s the definitive guide, listing the exact model numbers for everything from the main filter cartridges and membranes to those tiny but critical O-rings.

If your manual has gone missing (it happens to the best of us!), check the filter housing itself for a label or sticker. The manufacturer's website is also a great resource. Just remember, using the correct model number is the key to getting a perfect fit and keeping your filter working at its best.

Can I Add New Parts to Upgrade My System?

Absolutely. Many home systems are designed to be modular, which makes upgrading surprisingly straightforward.

A really popular upgrade for reverse osmosis systems is adding a remineralization filter. This little add-on puts back the healthy minerals that the RO process strips out. Another great option is installing a UV lamp for an extra layer of protection against microbes, especially if your original setup didn't include one.

Before you start any upgrade, double-check that the new component is compatible with your system's pressure and flow rate. A mismatch can lead to lousy performance or even damage your filter. Following the installation instructions to the letter is your ticket to a successful upgrade. For more tips, check out our expert advice section.

Why Does My Water Look Cloudy After Changing a Filter?

Don't worry, this is totally normal and nearly always just tiny air bubbles trapped in the new filter. The cloudiness is harmless and should disappear on its own within a day or two as the air gets pushed out of the system.

Sometimes, a new carbon filter will also release some harmless carbon "fines" (which is basically just dust). This might give the water a slightly off taste at first. That's why the instructions always tell you to flush a new filter for a few minutes before you start drinking from it. This simple step clears out both the air and any loose carbon, making sure your first glass of water is crisp and clean.


At Water Filter Advisor, we're here to help you understand every single piece of your filtration system so you can enjoy safe, clean water every single day. Find the best solution for your home at https://www.waterfilteradvisor.com.