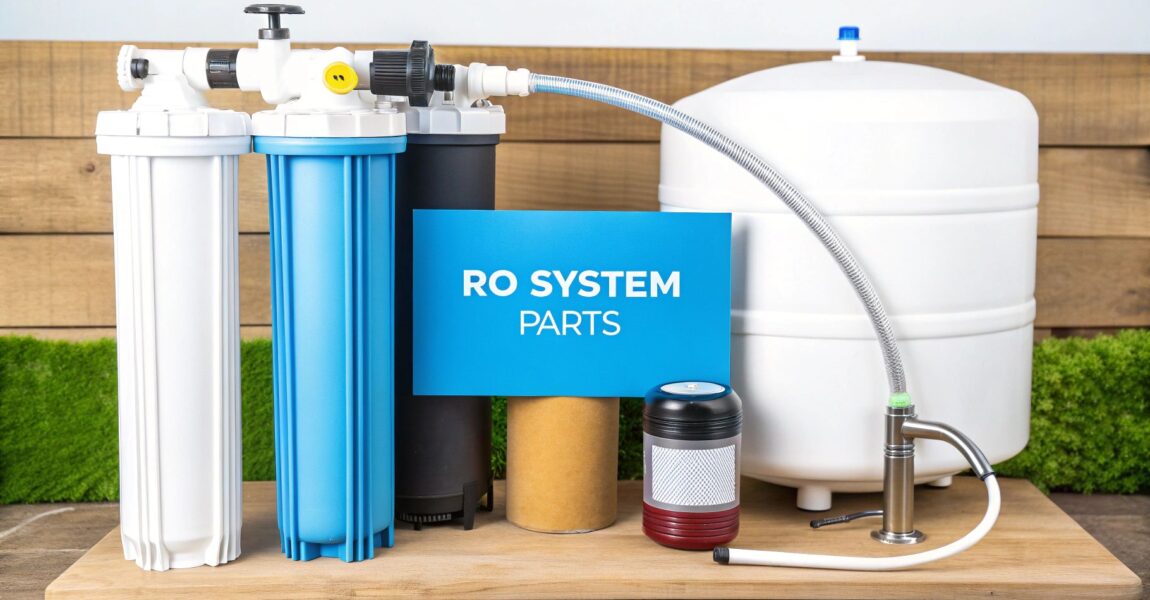
A reverse osmosis system isn't just one filter—it's a whole team of components working in concert to give you incredibly pure water right from your kitchen sink. The main players are the protective pre-filters, the powerhouse RO membrane, a storage tank for on-demand water, and a final polishing post-filter.
Think of it as a specialized security detail for your tap water, making sure only the purest H₂O molecules make it to your glass.
Decoding the Team Under Your Sink
Ever peeked under your kitchen sink and wondered what's actually going on in that tangle of tubes and canisters? It's a fascinating, multi-stage water purification party.
Imagine your tap water is a rowdy crowd trying to crash an exclusive event. The pre-filters are the bouncers at the door. Their job is to stop the obvious troublemakers first—things like silt, sand, rust, and the funky taste of chlorine. They handle the big, clumsy contaminants so the real star of the show can do its job.
This initial screening is absolutely critical. It clears the way for the main event: the reverse osmosis membrane. This is the VIP entrance, an incredibly fine filter that rejects up to 99% of the really nasty stuff like lead, arsenic, fluoride, and dissolved salts. Only pure water molecules are on the guest list.
This diagram gives you a great visual of the journey your water takes.
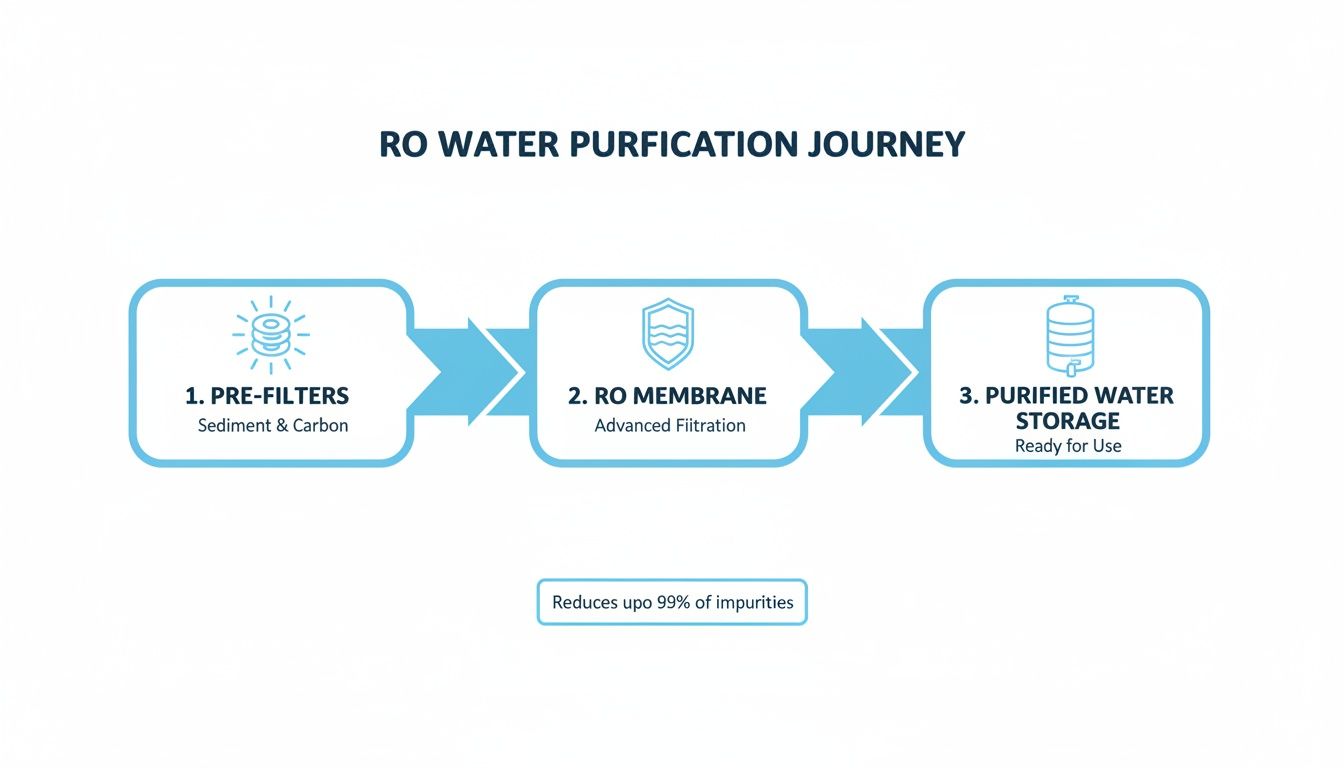
As you can see, the water moves logically from basic sediment removal to advanced molecular filtration before it's finally stored and ready to drink.
For a quick overview of how these parts work together, here's a simple breakdown.
The Core Components of Your RO System at a Glance
| Component | Primary Function | Stage in Filtration |
|---|---|---|
| Pre-filters (Sediment & Carbon) | Remove large particles and chlorine. | Stages 1-3 (Protect the RO Membrane) |
| Reverse Osmosis Membrane | Filters out dissolved contaminants. | Stage 4 (The primary purification step) |
| Storage Tank | Holds purified water for on-demand use. | Post-Filtration (Holds water after it passes the membrane) |
| Post-filter (Carbon) | Polishes water, removing final tastes/odors. | Final Stage (Just before the faucet) |
This table shows the clear, step-by-step process that ensures every drop from your faucet is pristine.
From the Tank to Your Faucet
Because this purification process is so ridiculously thorough, it's also pretty slow. You can't just force water through a filter that fine at high speed. That’s where the storage tank comes in. It acts as a reservoir, collecting the purified water so you have a ready supply the moment you turn on your dedicated RO faucet. No waiting around.
But before the water reaches your glass, it goes through one last checkpoint: the post-filter. Usually made of carbon, this final stage gives the water a last-minute polish, removing any faint tastes or odors it might have picked up while sitting in the tank. It’s what makes that final sip so perfectly crisp and clean.
Once you understand what each part does, maintaining your system and trusting your water quality becomes second nature. It's this powerful combination of stages that makes RO filtration one of the most effective methods out there for home use.
We're going to break down every single one of these components in detail throughout this guide. If you're looking for more general info, you can find a ton of water filtration advice for your home to get you started.
The Unsung Heroes: Pre-Filters That Protect Your System
Before your water ever gets near the reverse osmosis membrane, it has to run a gauntlet. This first line of defense is your pre-filters. Think of them as the opening act at a rock concert, warming up the crowd and making sure the stage is perfect for the headliner.
Without these filters doing the dirty work, the RO membrane—the real heart of the system—would get clogged up and wrecked in no time.
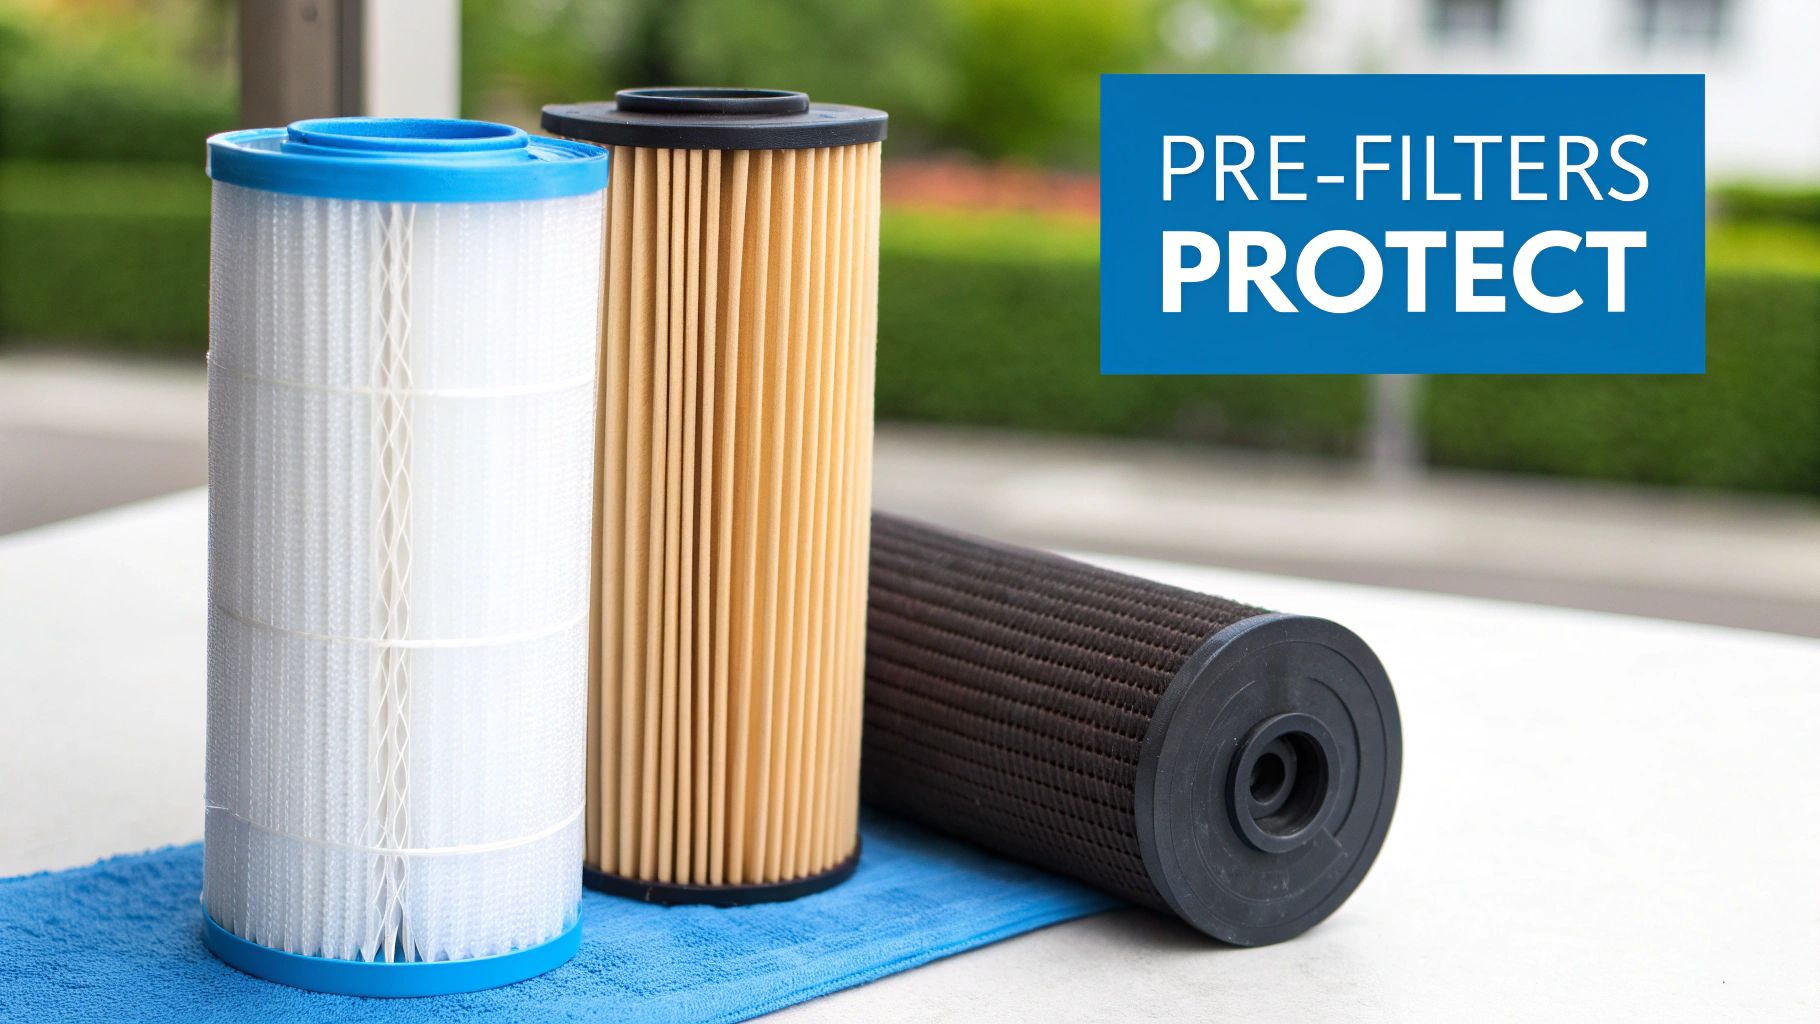
These pre-filters are the system's workhorses. Most home RO units use a one-two punch for pre-filtration, usually pairing two different filter types to tackle specific problems. Let's break down how these crucial parts work.
The Sediment Filter: The First Line of Defense
The very first stop for your tap water is the sediment filter. Its job is simple but absolutely critical: catch all the big stuff. It’s basically a super-fine net that traps all the suspended particles that would otherwise gum up the works.
We’re talking about common gunk found in city and well water alike:
- Rust flakes from old pipes
- Sand and silt
- Dirt and other debris
- Clay particles
By snagging these larger contaminants right at the start, the sediment filter keeps the more sensitive filters downstream from clogging up. It’s a simple, mechanical process, but it’s the foundation for everything that follows.
The Carbon Block Filter: The Chemical Sponge
After the sediment filter, water flows to the second bodyguard: the activated carbon block filter. If the sediment filter is a net, the carbon filter is more like a powerful sponge with a magnetic attraction for chemicals. Its surface is incredibly porous, giving it a massive area to grab onto and absorb chemical contaminants in a process called adsorption.
The number one enemy for the carbon filter is chlorine. Municipal water suppliers use it to kill bacteria, but it absolutely destroys the delicate material of an RO membrane, causing it to break down and fail.
The carbon block filter neutralizes chlorine, protecting the most expensive part of your system. It also does wonders for the taste and smell of your water by removing chlorine, chloramines, and other volatile organic compounds (VOCs).
Why Micron Ratings and Maintenance Matter
You'll see pre-filters rated in microns, which just tells you how small of a particle they can trap. For reference, a human hair is about 50 microns thick. Most sediment filters in home RO systems are rated for 5 microns, meaning they'll stop anything bigger than that. If you want to get into the weeds on filter specs, check out this a comprehensive guide to micron filters.
Because these filters are catching all that junk 24/7, they obviously don't last forever. In fact, clogged pre-filters are the #1 cause of most RO system problems.
Typical Replacement Schedule:
- Sediment Filter: Every 6 to 12 months
- Carbon Filter(s): Every 6 to 12 months
You’ll know it’s time for a change when your RO faucet’s water pressure drops off a cliff or the system takes forever to make water. Staying on top of this schedule is the single best thing you can do to protect your investment and keep your system running like new.
The Heart of the System: The Reverse Osmosis Membrane
If the pre-filters are the system's bodyguards, the reverse osmosis membrane is the VIP they’re protecting. This is where the real magic happens. It’s not just another screen; it’s a high-tech, semi-permeable wonder that draws the line between ordinary tap water and genuinely pure H₂O.
Think of the membrane as a microscopic gatekeeper with an incredibly strict guest list. Its pores are a mind-boggling 0.0001 microns wide. For a little perspective, a single human hair is around 50 microns thick, making this membrane over 500,000 times finer. Only pure water molecules get the nod to pass through.
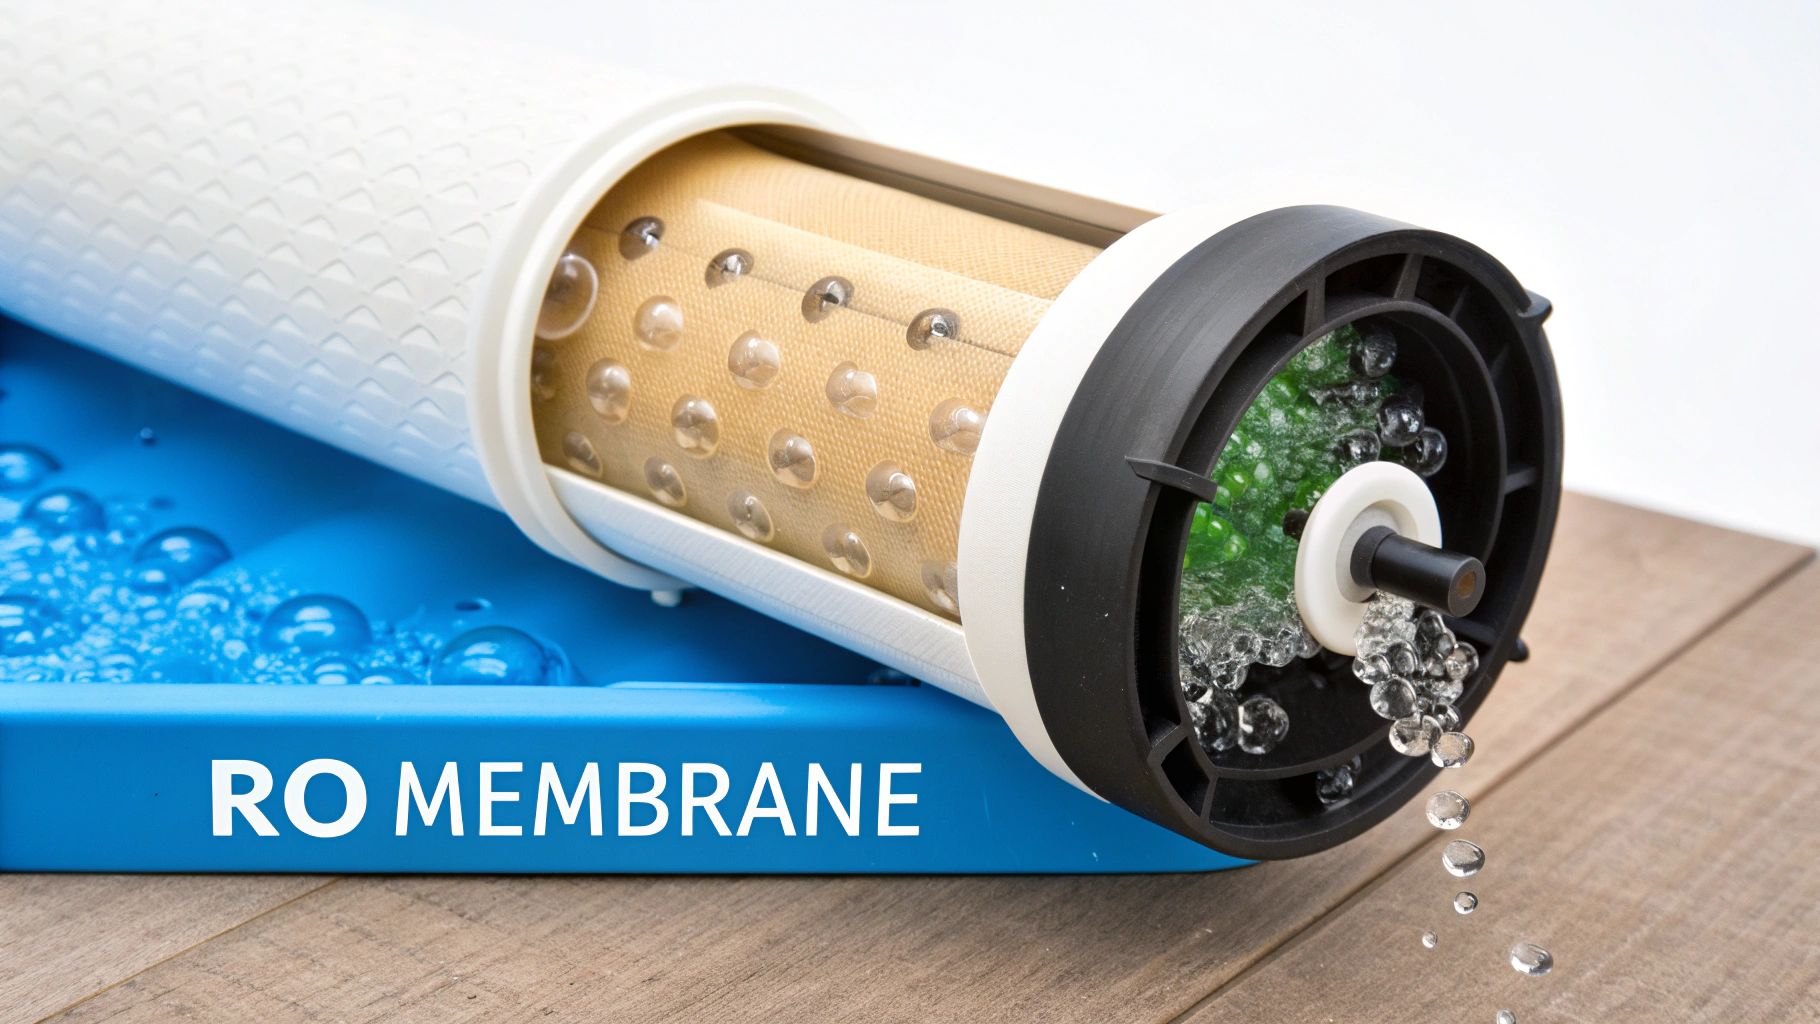
This unbelievably precise design is what allows it to pull off a feat of molecular separation. Your home’s water pressure is all the muscle it needs, forcing water molecules through while leaving almost everything else behind.
The Science Behind the Purity
At its core, the process is a marvel of physics. The membrane lets clean water slip through but rejects a staggering list of dissolved contaminants. We're not just talking about catching silt here; this is about yanking out substances that are completely dissolved in the water, the stuff you can't even see.
It all comes down to molecular size and ionic charge. When pressurized water hits the membrane, only the tiny H₂O molecules can actually squeeze through those microscopic pores.
The larger contaminant molecules get blocked and are simply flushed away down the drain line as wastewater (often called "brine"). This single function is what makes it one of the most effective parts of a reverse osmosis system.
What Does the RO Membrane Actually Remove?
This is the system's heavy lifter. While the pre-filters deal with the bulky stuff like sediment and chlorine, the RO membrane goes after the most difficult and concerning contaminants that homeowners worry about.
Its primary targets include:
- Heavy Metals: Lead, arsenic, mercury, and chromium.
- Dissolved Salts: Fluoride, nitrates, and sodium.
- Minerals: Calcium and magnesium, the main culprits behind water hardness.
- Total Dissolved Solids (TDS): This is the catch-all term for every dissolved substance in your water. A good RO system can slash TDS by up to 99%.
This is precisely why RO systems are the go-to for anyone concerned about specific issues like lead from older pipes or high fluoride levels in their municipal supply.
The semi-permeable membrane stands as the heart of any reverse osmosis (RO) system, acting like a molecular gatekeeper that allows pure water molecules to pass while blocking up to 99% of dissolved salts, minerals, heavy metals, and contaminants. Modern membranes are packed into compact spiral-wound modules, an innovation that folds massive surface areas into a small housing, a design that dominates 85% of RO applications today. In residential systems, these membranes can achieve rejection rates exceeding 99.5% for TDS. To discover more insights about this amazing technology, check out the history of reverse osmosis technology.
Understanding GPD Ratings
When you’re looking at a new system or just a replacement membrane, you'll see a rating called Gallons Per Day (GPD). This number tells you the maximum amount of purified water the membrane can produce in a 24-hour period, assuming ideal conditions (like specific water temperature and pressure).
For most homes, the common ratings are:
- 50 GPD: A solid choice for smaller families or couples.
- 75 GPD: The sweet spot for most average-sized families of 3-5 people.
- 100 GPD: Best for larger households or anyone who uses a lot of purified water.
A higher GPD rating means your system makes water faster, so the storage tank fills up more quickly. That can be a real game-changer if your family is constantly filling up water bottles for sports, cooking with purified water, or just drinks a lot of it.
When to Replace Your RO Membrane
Unlike the pre-filters that need changing every 6-12 months, the RO membrane is built to last—it has those pre-filters running interference for it, after all. But it doesn't last forever.
On average, you can expect to replace a residential RO membrane every 2 to 3 years. Of course, this timeline can shift depending on how hard your local water is and how much you use the system.
Here are the tell-tale signs that your membrane is on its way out:
- Water Production Slows to a Crawl: If you notice the storage tank is taking way longer to fill than it used to, the membrane is probably getting clogged.
- TDS Levels Start Creeping Up: You can check this with a simple handheld TDS meter. If the reading for your filtered water starts getting higher, the membrane isn’t rejecting contaminants like it should.
- The Taste is Off: If your pure water starts tasting more like regular tap water, that’s a dead giveaway the membrane is failing.
Swapping out the membrane is a simple job that brings your system right back to peak performance, ensuring the water you're drinking is as pure as the day you installed it.
The Finishing Touches: The Storage Tank and Post-Filter
After the reverse osmosis membrane does its molecular magic, the purified water still has a couple more stops to make before it's ready for your glass. The RO process is incredibly thorough, but that also means it’s slow. This is where the final components—some of the most important parts of a reverse osmosis system for day-to-day use—come into play.
These finishing touches are what make your system practical for a busy kitchen. They’re the reason you have pure water the instant you want it, and why every sip tastes so crisp and clean. It’s all about turning meticulously filtered water into a perfect, on-demand drinking experience.
Why You Need a Storage Tank
Reverse osmosis is a game of patience. Water gets pushed through a membrane with pores so tiny they can block contaminants at a molecular level. Because it’s so precise, a typical home RO system might only produce a few ounces of pure water every minute. That’s barely enough to fill a glass quickly, let alone a big pot for pasta.
This is exactly why a storage tank is a non-negotiable part of the setup. It acts as a reservoir, slowly collecting all that purified water until you’re ready to use it. When you turn on your RO faucet, the tank delivers that stored water instantly.
So how does it work? Picture a small, flexible balloon inside a metal tank. As the RO system sends pure water into the tank, it fills this balloon (which is actually a rubber bladder) and squishes a pocket of trapped air around it. This creates pressure. When you open the faucet, that built-up air pressure is what forces the clean water out of the bladder and up to your glass.
It's a simple but brilliant design that ensures you always have a few gallons of pure water ready to go.
The Post-Filter: The Final Polish
Once the water leaves the storage tank, it makes one final stop before hitting your faucet: the post-filter. You can think of this as the system's final quality control checkpoint. Its only job is to give the water a last-minute polish, ensuring it tastes absolutely perfect.
While the water in the tank is perfectly pure, it can sometimes pick up a faint "tank taste" from sitting against the rubber bladder. The post-filter, which is almost always an inline carbon filter (sometimes called a polishing filter), is there to remove those last traces of taste or odor.
Think of the post-filter as the final buff and shine on a freshly detailed car. It removes any lingering off-tastes that might have developed during storage, guaranteeing the water you drink is exceptionally crisp, clean, and refreshing.
This last step truly elevates the experience, making the difference between just pure water and genuinely delicious water.
Keeping the Final Stages in Top Shape
Looking after these last two components is pretty straightforward, but it's crucial if you want to keep enjoying top-quality water. The post-filter, just like your pre-filters, needs to be replaced regularly to stay effective.
- Post-Filter Replacement: Plan on swapping this filter out once every 12 months. Over time, the carbon inside gets used up and can no longer grab onto those pesky tastes and odors.
- Storage Tank Lifespan: The tank itself is built to last, usually around 5 to 10 years. You'll know it's time for a new one if it stops holding pressure, you see rust, or the water flow gets weak even right after you've changed the filters.
A well-maintained tank and post-filter work together to complete the system. They give you instant water flow for a busy kitchen and use that final carbon stage to strip away anything that might affect the taste. These little post-filters are surprisingly powerful, removing 95-99% of VOCs and other compounds that might sneak past the membrane. It’s a big reason why people overwhelmingly prefer RO water in blind taste tests. Find out more about how these components complete the RO process.
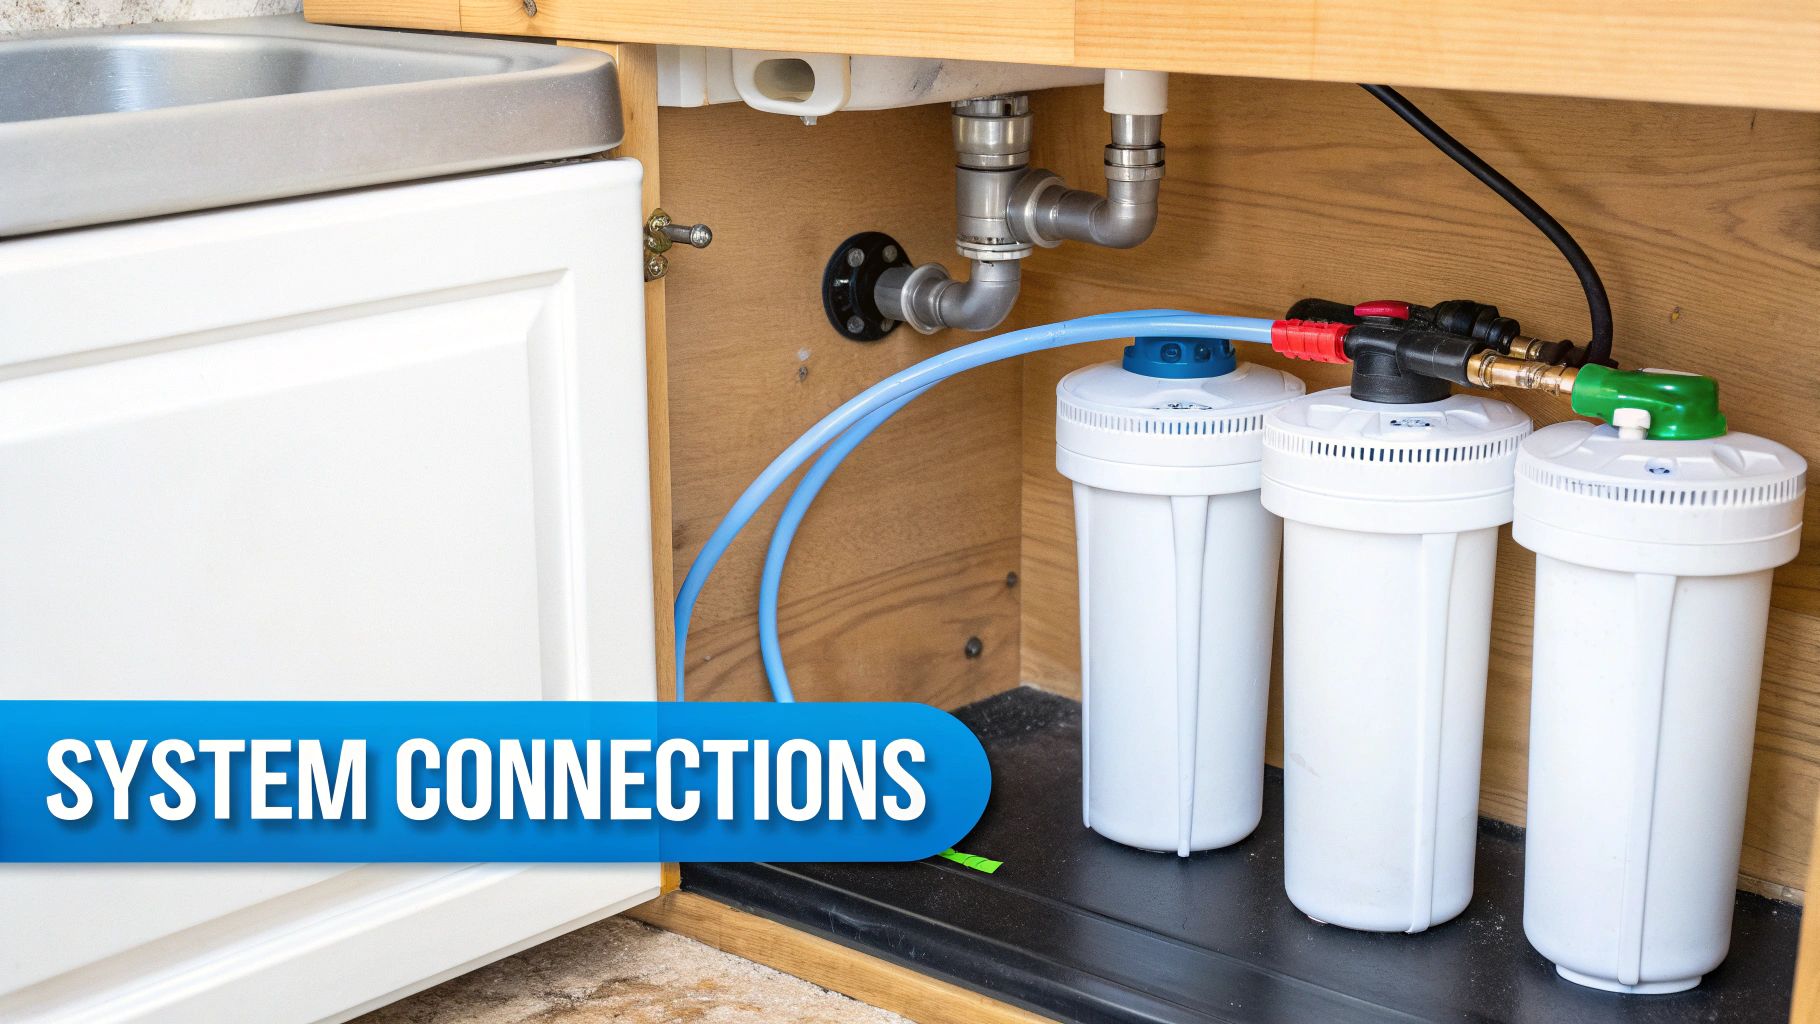
How All the Plumbing Components Connect Your System
While the filters and membranes get all the attention, a reverse osmosis system is just a collection of parts without the network of plumbing that ties it all together. These are the unsung heroes—the faucets, valves, and tubing—that manage the flow of water, making the whole purification process work seamlessly right under your sink.
Think of these parts as the central nervous system of your RO unit. They might not be the main attraction, but they're in charge of directing every single drop, making sure water gets exactly where it needs to go, right when it needs to be there.
Getting a handle on how these components work together really demystifies the setup, making future maintenance feel way less intimidating. Before you can properly hook up your RO system, you need a basic feel for how water moves through your house in the first place. You can get a great head start by understanding your home's plumbing system to build a solid foundation.
The Dedicated RO Faucet
One of the first things you'll notice about an RO system is its own separate, dedicated faucet. This isn't just for show—it's absolutely critical. Since the system connects to your cold water line, this separate tap guarantees that you’re only getting that ultra-pure water. It never mixes with your regular hot or cold tap water.
You'll usually run into two main kinds:
- Non-Air-Gap Faucets: These are the most common you'll see. They have a simple, sleek design with just one tube running up to the faucet, which makes for a pretty straightforward installation.
- Air-Gap Faucets: These are designed with a small gap inside the faucet base to prevent drain water from ever siphoning back into your clean RO system. They're a bit bulkier and have three lines connecting to the base, but they offer that extra layer of protection.
The Valves That Direct Water Flow
Valves are basically the traffic cops of your RO system. They open and close to guide water exactly where it needs to go, preventing waste and making sure the system runs on autopilot without you having to do a thing.
The most clever of them all is the Automatic Shut-Off (ASO) valve. When your storage tank is full, the back-pressure created signals the ASO valve to completely stop any more water from coming in. This shuts down the entire production process. It's a simple, brilliant mechanical device that stops the system from running 24/7 and mindlessly sending water down the drain.
Without the ASO valve, an RO system would just keep making pure water and flushing wastewater down the drain, even with a full tank. This one little component is responsible for saving thousands of gallons of water over the life of the system.
Other important valves include the feed water valve, which is the first connection point that taps into your cold water supply, and the tank valve. That's just a simple on/off switch sitting on top of the storage tank that lets you shut it off when it's time to change filters.
The Tubing That Ties It All Together
Finally, you've got the tubing. The whole system is connected by a web of flexible, color-coded plastic tubes. It might look like a mess of spaghetti under your sink at first, but the colors create a surprisingly simple roadmap.
- Blue Tubing almost always carries the purified RO water from the membrane over to the storage tank and then up to your faucet.
- Red Tubing is usually the line for the incoming tap water supply.
- Black Tubing is the wastewater line that takes all the rejected contaminants and sends them down the drain.
These color codes make life so much easier for a DIYer trying to troubleshoot a leak or perform a filter change. Knowing what each tube does instantly tells you the path the water is taking, from the moment it enters the system to the final, clean drop that fills your glass.
Optional Upgrades to Enhance Your RO System
Your standard reverse osmosis setup already does an incredible job of purifying your water, but you don't have to stop there. You can customize your system even further to solve specific problems or just improve your day-to-day drinking experience.
Think of these as specialized add-ons. They aren't necessary for every home, but for the right situation, they can be total game-changers. These components plug right into the main parts of a reverse osmosis system to boost its performance, whether that means making your water taste better, saving water, or adding a final layer of safety.
Let's dive into three of the most popular and effective upgrades homeowners are adding to their systems.
Remineralization Filters for Better Taste
If there's one small knock against the RO process, it's that it works a little too well. It strips out beneficial minerals like calcium and magnesium right along with all the nasty contaminants. This can leave the water with a slightly acidic pH and a "flat" taste that some people just don't find refreshing.
That's where a remineralization filter comes in. It's the perfect fix. This filter is installed after the storage tank, acting as one last stage before the faucet. As the pure water flows through, it picks up a healthy blend of minerals.
This simple upgrade does two things: it bumps the water’s pH to a more alkaline level and dramatically improves the taste. You get a crisper, more natural flavor that many people find much more satisfying.
Permeate Pumps for Efficiency
A common gripe about RO systems is the amount of wastewater they produce. The permeate pump is a brilliant, non-electric device designed to tackle that exact problem. It cleverly uses the energy from the wastewater heading to the drain to help shove the purified water into the storage tank with more force.
This ingenious pressure boost gives you two huge wins:
- Reduces Water Waste: By making the whole process more efficient, a permeate pump can slash the amount of wastewater by up to 80%.
- Fills the Tank Faster: That extra pressure helps the system produce pure water much more quickly, refilling your tank in a fraction of the time it would normally take.
This upgrade is a lifesaver for homes with low water pressure, as it helps the RO membrane operate at its peak performance.
UV Sterilizers for Ultimate Safety
While an RO membrane is exceptionally good at blocking bacteria and viruses, a UV sterilizer gives you an extra, fail-safe layer of protection. This is especially crucial for homes on well water, which can be more vulnerable to microbiological contamination.
A UV sterilizer zaps the water with ultraviolet light, which scrambles the DNA of any microorganisms and makes them completely harmless. It acts like a final security checkpoint, ensuring that 99.99% of living organisms are neutralized just before the water hits your glass. If you're at all concerned about biological contaminants, a UV light delivers absolute peace of mind.
RO System Parts: Your Questions Answered
Once you get a handle on the different parts, you'll inevitably have some practical questions that come up from using the system every day. Let's tackle some of the most common things homeowners ask about their reverse osmosis setup.
What’s the Real Difference Between a Pre-Filter and a Post-Filter?
Think of them as the bouncer and the host at a club—they stand at opposite ends of the process and have totally different jobs.
The pre-filters are the heavy-lifters right at the start. Their entire job is to protect that all-important RO membrane. They catch the big stuff like sediment and rust and knock out harsh chemicals like chlorine before they can cause any damage.
The post-filter, on the other hand, comes in at the very end. This is your "polishing" filter. After the water has been sitting in the storage tank, this filter gives it one last pass to remove any weird tastes or odors, making sure what comes out of your faucet is perfectly crisp and clean.
Can I Upgrade My Existing RO System Parts?
Absolutely. This is one of the best features of modern RO systems. Most brands use standard-sized parts, like the common 10-inch filter housings, which makes upgrading a breeze.
You can easily customize your system by adding things like:
- A remineralization filter to add back healthy minerals and balance the pH for better-tasting water.
- A permeate pump if you want to make your system more efficient and cut down on wastewater.
- A UV sterilizer for an extra layer of defense against bacteria, viruses, and other microorganisms.
Upgrading individual components is a fantastic, budget-friendly way to tailor your RO system to your home's specific water challenges. You get a custom setup without having to buy a whole new unit.
How Often Do I Really Need to Replace Everything?
This is the single most important piece of maintenance you can do. Honestly, the number one reason we see systems fail or underperform is because someone forgot to change the filters on time.
As a general rule of thumb for most households, here's a good schedule to follow:
- Pre-filters (Sediment & Carbon): Every 6-12 months.
- RO Membrane: Every 2-3 years.
- Post-filter (Polishing Filter): Every 12 months.
Keep in mind, if your local water is particularly nasty, you might need to change them more often. Always check what the manufacturer suggests and pay attention to clues like your water flow slowing down.
My RO Faucet is Dripping or Making Weird Noises. What Gives?
A dripping RO faucet almost never has to do with the faucet itself. It's usually a water pressure issue. The culprit is typically the air pressure in the storage tank being too high or too low, or a faulty automatic shut-off valve that keeps letting water trickle through when it shouldn't.
As for strange noises, a little gurgling is perfectly normal—that’s just the sound of the system working its magic and sending wastewater down the drain. But if you hear a constant "hiss," that could be a sign of a tiny leak or another problem with that shut-off valve.
At Water Filter Advisor, we believe everyone deserves access to clean, safe, and great-tasting water. Our in-depth guides and unbiased reviews are designed to help you make confident decisions about your home’s water quality. Explore our resources today at https://www.waterfilteradvisor.com to find the perfect filtration solution for your family.
- January 2, 2026
- 0
- Uncategorized