Do Shower Filters Reduce Water Pressure? the Honest Answer
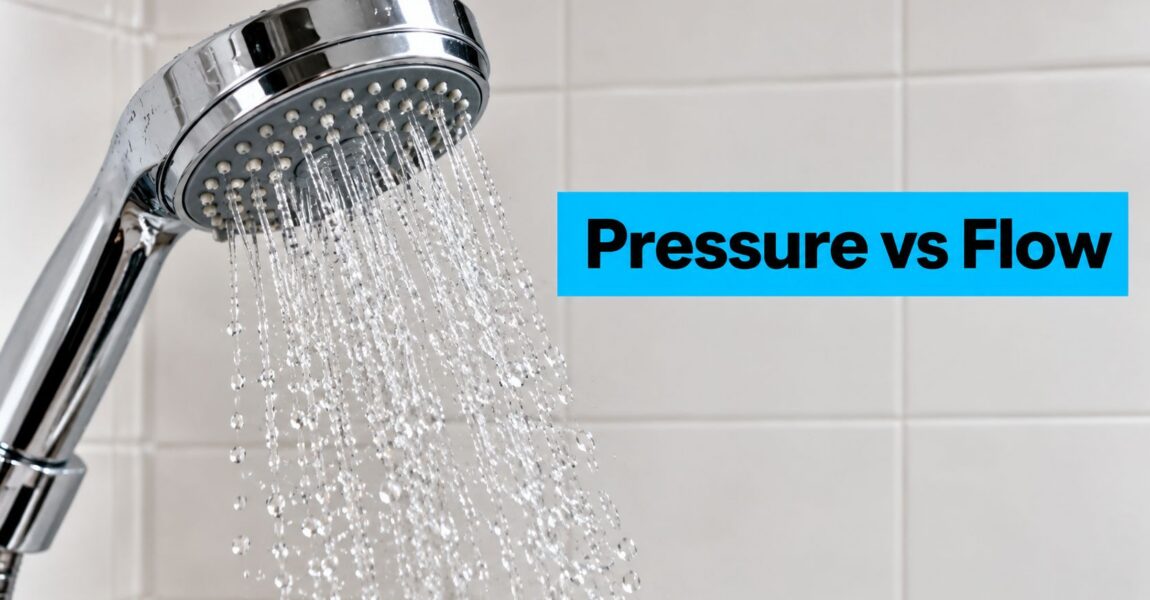
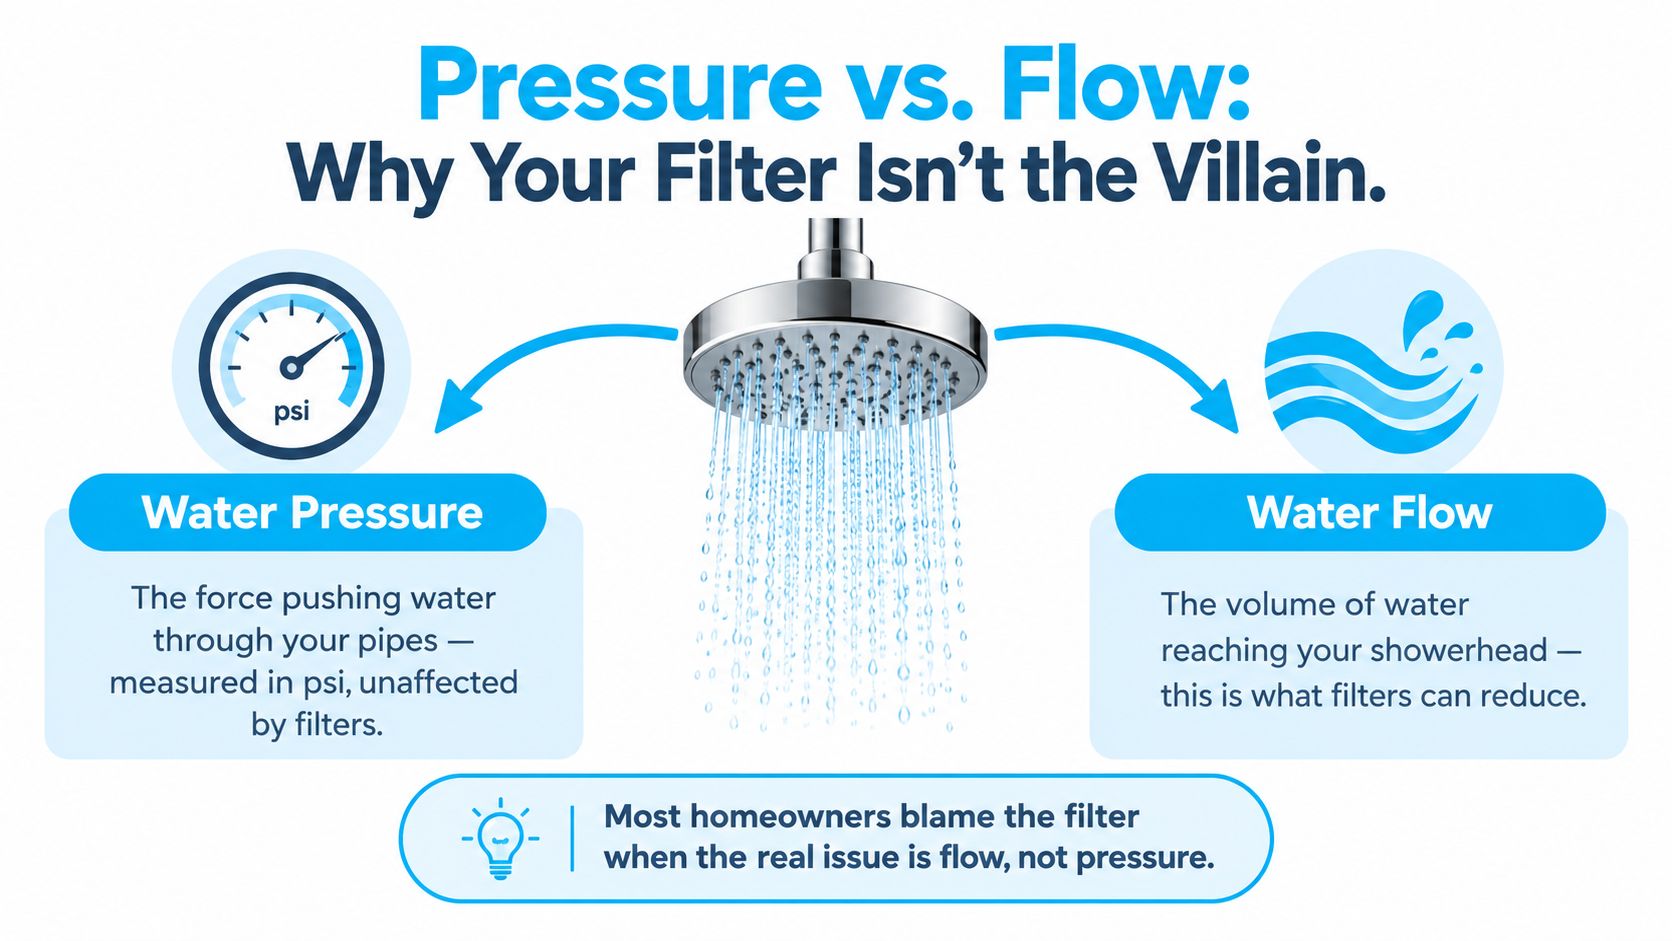
The popular advice is backwards: shower filters usually don't “reduce pressure.” They reduce flow, which is the amount of water reaching the showerhead. That difference explains why a pressure gauge can look normal while your shower suddenly feels weak.
A filter places a cartridge, screen, and fittings in the water path. Those parts create resistance. A clean, correctly sized filter may have little noticeable effect, but a dirty cartridge, restrictive housing, or low-pressure supply can turn a small restriction into a poor spray.
The fastest way to find the culprit isn't guessing. It's a timed bucket test, a cartridge inspection, and a comparison between your showerhead's rated gallons per minute and the amount of water it delivers.
Why Most People Blame the Filter for the Wrong Reason
A weaker shower doesn't prove that the filter lowered your home's water pressure. Pressure is the force available inside the plumbing. Flow is the volume that reaches the fixture. A shower filter can reduce delivered flow without normally changing the household's underlying static pressure, because its media and screens add resistance in the path. The EPA's showerhead specification supports this pressure-versus-flow distinction.
Think of the filter as a narrowed section inside a hose. The water supply may still push with the same force, but less water gets through the restriction each minute. If the cartridge is dirty, undersized, or paired with restrictive fittings, the drop becomes easier to feel.
A weak spray is a symptom, not a diagnosis
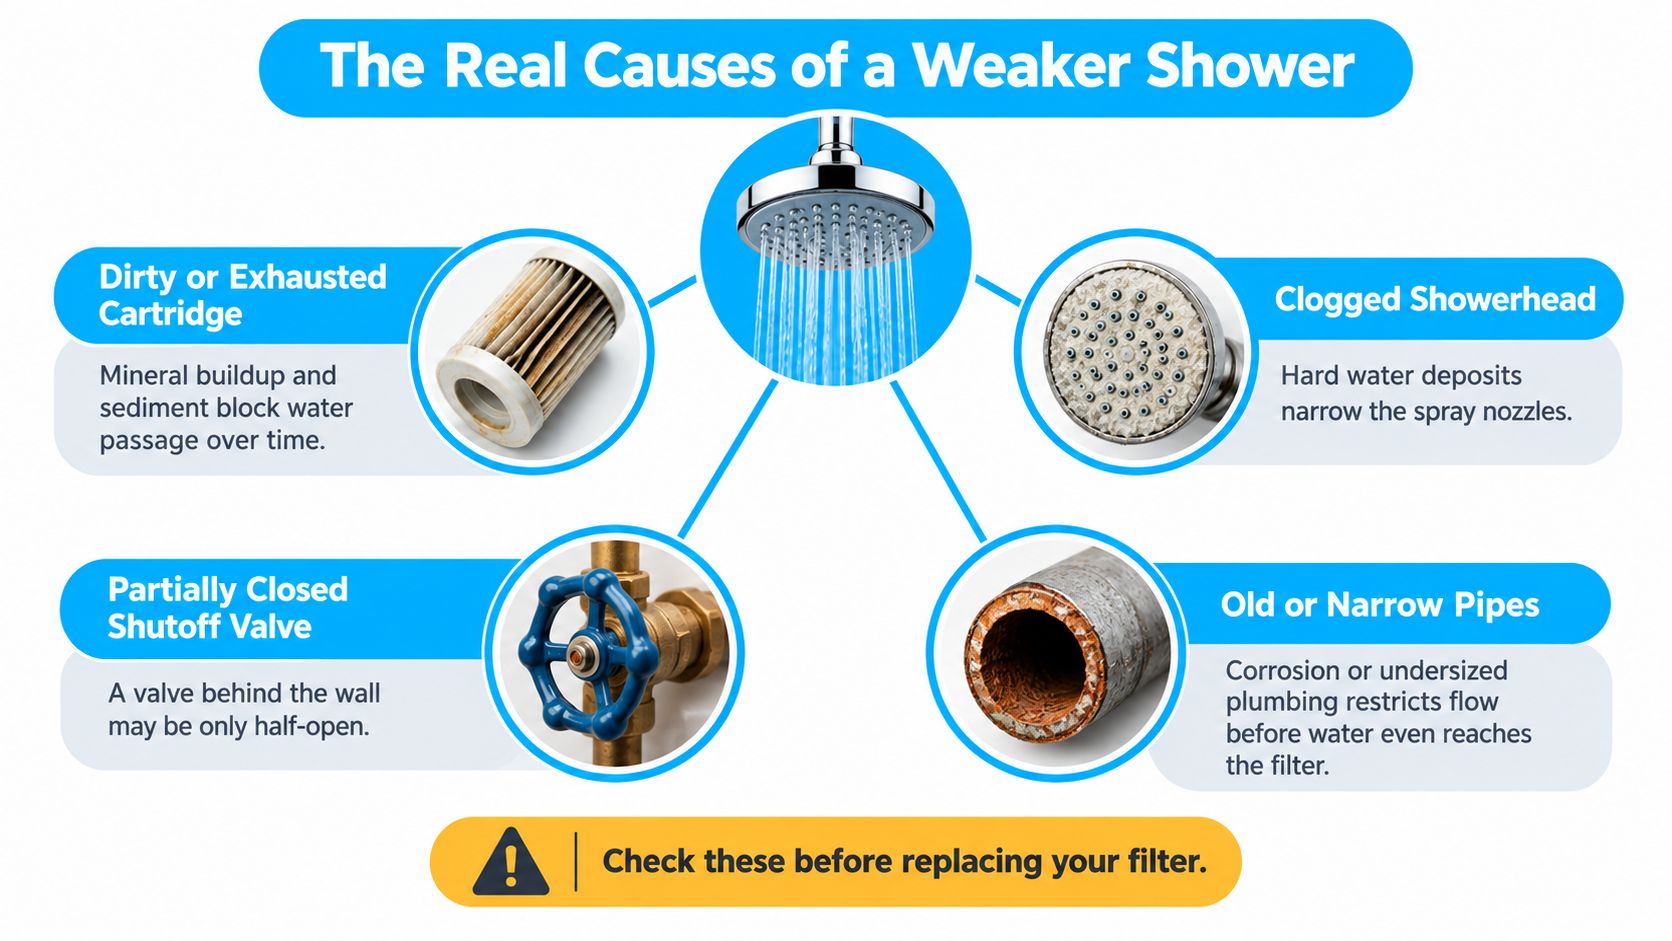
Several problems can produce the same complaint:
- Dirty cartridge: Sediment, rust, scale, and exhausted media narrow the available passage.
- Clogged showerhead: Deposits block spray nozzles after water leaves the filter.
- Low incoming pressure: The filter has less pressure available to overcome its resistance.
- Restrictive fittings: A small inlet screen, valve, or connector can become the bottleneck.
- Shared demand: Another fixture running at the same time can reduce the flow available to the shower.
The practical question isn't, "Do shower filters reduce water pressure?" It's, "Where does the flow drop occur?"
Start with the showerhead rating
Look for the showerhead's gallons-per-minute rating on its packaging, body, or documentation. A filter rated for a higher flow than the showerhead won't force the showerhead to exceed its own restrictor. The downstream showerhead remains a controlling limitation.
Your first job is to establish a baseline. Test the shower with the filter installed, then compare that result with the showerhead removed or the filter bypassed. A five-minute measurement will tell you more than a marketing phrase such as “high pressure.”
Pressure and Flow Explained Without the Jargon
Use a garden hose as the mental model. Pressure is the push behind the water. Flow is how much water comes out over time. A hose connected to a strong supply can still produce a weak stream if you pinch the hose or attach a restrictive nozzle.
A pressure gauge measures the force available at a point in the plumbing, usually in pounds per square inch, or psi. A bucket test measures the actual volume delivered, usually in gallons per minute, or gpm. Those measurements answer different questions.
A gauge can show normal pressure while the shower trickles because a filter screen, cartridge, valve, or showerhead is limiting the passage after the gauge. The water has enough push, but the system can't pass enough volume through the narrowest point.
The two readings that matter
| Attribute | Pressure | Flow |
|---|---|---|
| What it measures | Force available in the plumbing | Volume delivered to the showerhead |
| Common unit | psi | gallons per minute, or gpm |
| How to test it | Pressure gauge | Timed bucket test |
| What a filter can affect | Dynamic pressure across the cartridge | Delivered water volume |
| Why the shower feels weak | Less force may reach the fixture | Less water reaches the spray nozzles |
Static pressure is the reading with fixtures closed. Flowing, or dynamic, pressure is the reading while the shower runs. The second reading is more useful for diagnosing a restriction because it shows how the plumbing behaves under demand.
A filter doesn't need to cause a dramatic static-pressure change to make the spray feel different. If the system already operates near the lower end of the showerhead's usable range, a modest restriction can alter the spray pattern and volume.
Why gpm beats spray feel
Your hand is a poor measuring instrument. A spray can feel sharper because fewer jets are operating, or softer because the showerhead mixes air into the stream. Time and volume provide a reliable comparison.
A properly maintained filter may be almost invisible in a high-pressure system. The same cartridge can feel troublesome in a home with narrow pipes, a restrictive showerhead, or marginal supply pressure. Measure the water before replacing parts.
How Each Filter Type Affects Flow
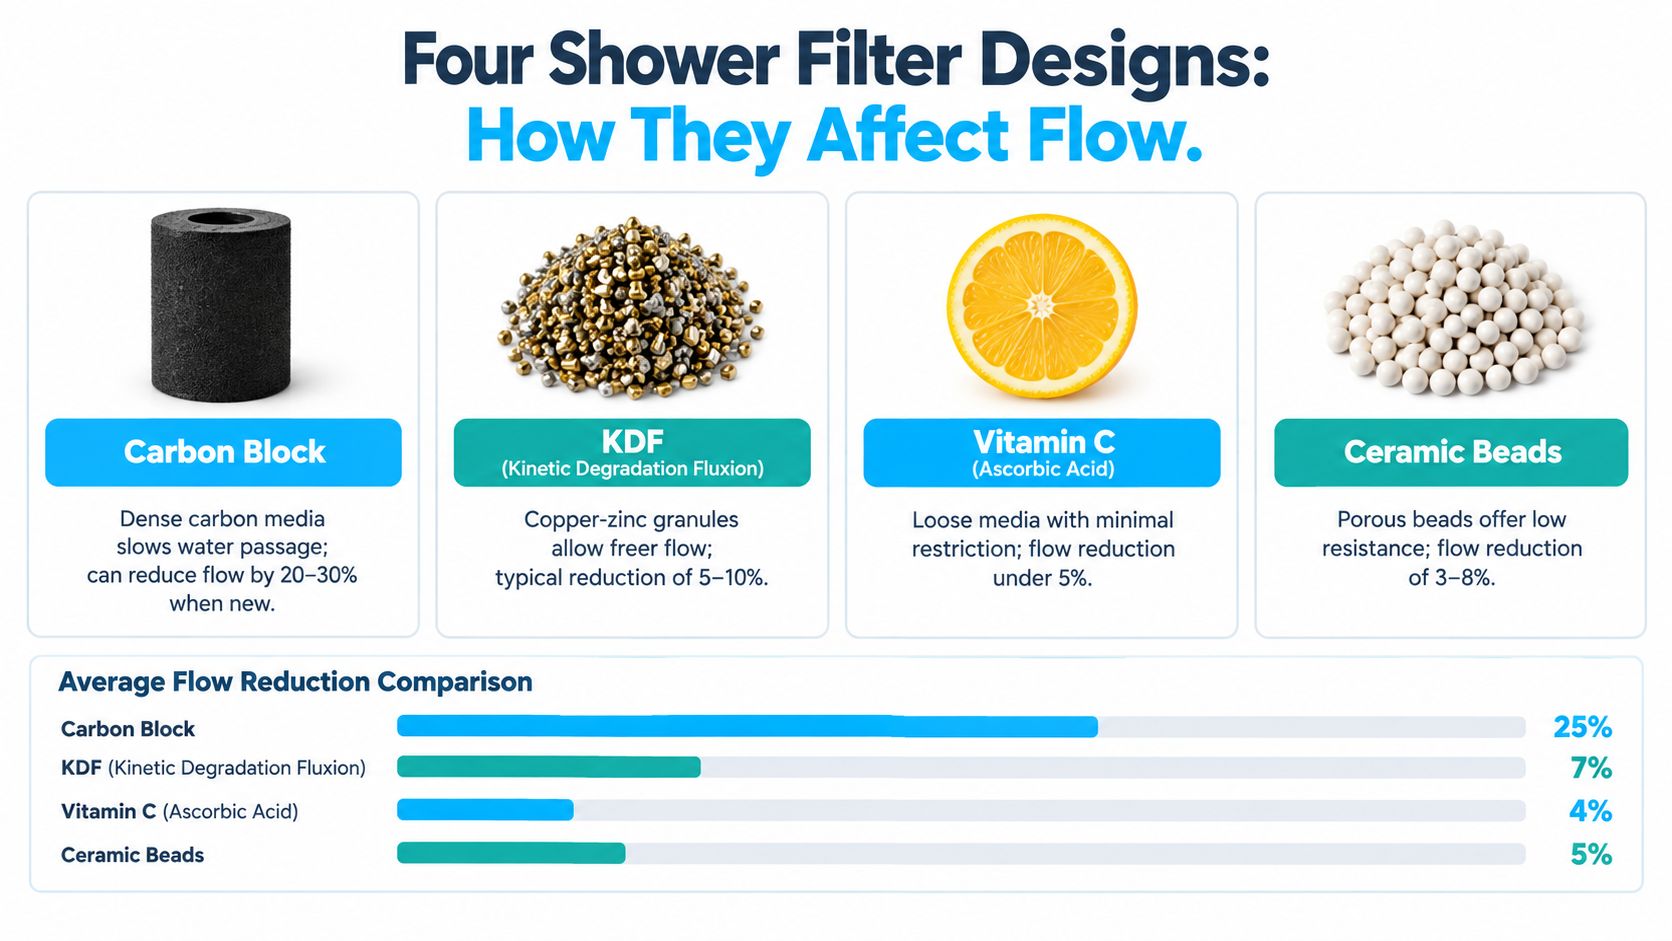
Filter design matters, but housing size and internal fittings matter just as much as the media. A cartridge creates friction as water passes through it. More media, finer passages, smaller screens, and multiple stages can increase that resistance.
Don't assume that one media type always produces the same result. Two products labeled with the same filtration media can have different internal layouts and flow ratings.
Carbon block
Carbon block has a dense structure with many small passages. That structure can provide useful treatment, but it also gives water more surface and internal pathways to negotiate. As the block collects particles, the inlet surface can become even more restrictive.
Carbon block is more likely to soften flow when the cartridge is small, the showerhead already has a low rating, or the home has sediment entering the line. Inspect the inlet side first. A dark cartridge isn't automatically clogged, but visible sediment and a declining bucket result deserve attention.
KDF media
KDF, short for kinetic degradation fluxion, uses copper-zinc media. Granular media generally leaves a more open path than a dense block, though the housing screen and packing arrangement still affect resistance.
A KDF cartridge can work well where the priority is treatment with a relatively open flow path. Don't judge it by the label alone. Check the manufacturer's rated flow, the connection size, and whether the cartridge contains additional stages that create another restriction.
Vitamin C media
Vitamin C, or ascorbic acid, systems often use a replaceable insert or loose treatment media. The open design may create less resistance than dense filtration media, but the product still depends on its inlet screen, diffuser, and internal flow path.
A low-resistance design can preserve flow while treating the water that passes through it. It doesn't excuse poor sizing. A small housing attached to a showerhead with a restrictive inlet can still weaken delivery.
Multi-stage cartridges
Multi-stage designs combine media, often adding sediment screens, carbon, mineral media, or other treatment layers. Every stage introduces another surface or passage that can collect particles.
The right comparison is not “carbon versus KDF” in isolation. Compare the complete system's rated flow with the showerhead's rating. NSF/ANSI 177 requires a certified shower-filtration system to test at a manufacturer-rated flow of at least 1 gallon per minute under an initial dynamic pressure of 80 psi, with testing stopped if flow falls below 1 gpm during the chlorine-reduction test. The NSF/ANSI 177 explanation from PM Engineer also makes clear that a test-flow requirement isn't a promise that every home will receive strong spray performance.
The Real Causes of a Weaker Shower
The filter is often only one part of the system. A clean cartridge in a low-pressure home may perform worse than a modest cartridge in a well-supplied home. Diagnose the whole path before buying a replacement.
The cartridge is dirty or exhausted
Sediment accumulates at the inlet and inside the media bed. Rust can leave orange staining, scale can create white deposits, and a cartridge that once delivered a strong spray can gradually become the system's narrowest point.
A useful maintenance trigger for cartridge systems is a pressure increase of roughly 8 to 10 psi above the clean-filter baseline, or any noticeable flow reduction, as described in the Pentair cartridge filter manual. For a shower filter, the simplest practical sign is a sustained decline in the bucket result.
The showerhead is clogged
A filter doesn't catch every deposit already sitting in the plumbing or showerhead. Mineral scale can narrow spray nozzles and create an uneven pattern. Debris can also move after installation and lodge in the showerhead screen.
Remove the showerhead and repeat the flow test from the open pipe. If the pipe delivers strong flow but the assembled showerhead doesn't, the filter may be innocent.
Supply pressure is marginal
EPA WaterSense testing examines showerhead performance at flowing pressures of 20, 45, and 80 psi. The specification requires a WaterSense showerhead to deliver at least 75% of its rated flow at 45 and 80 psi, and at least 60% at 20 psi, according to the EPA performance specification.
That's why a filter can seem fine in one home and troublesome in another. A restriction may push a marginal system toward its lowest-pressure operating range, where spray quality changes.
Valves, pipes, and competing fixtures
A partially closed shutoff valve, undersized pipe, corrosion, or a restrictive showerhead can reduce flow before water reaches the cartridge. Running a washing machine, irrigation zone, or another shower can produce the same symptom temporarily.
For broader diagnosis, especially when hot-water delivery is the problem, these low hot water pressure solutions can help you separate a fixture issue from a supply or plumbing issue.
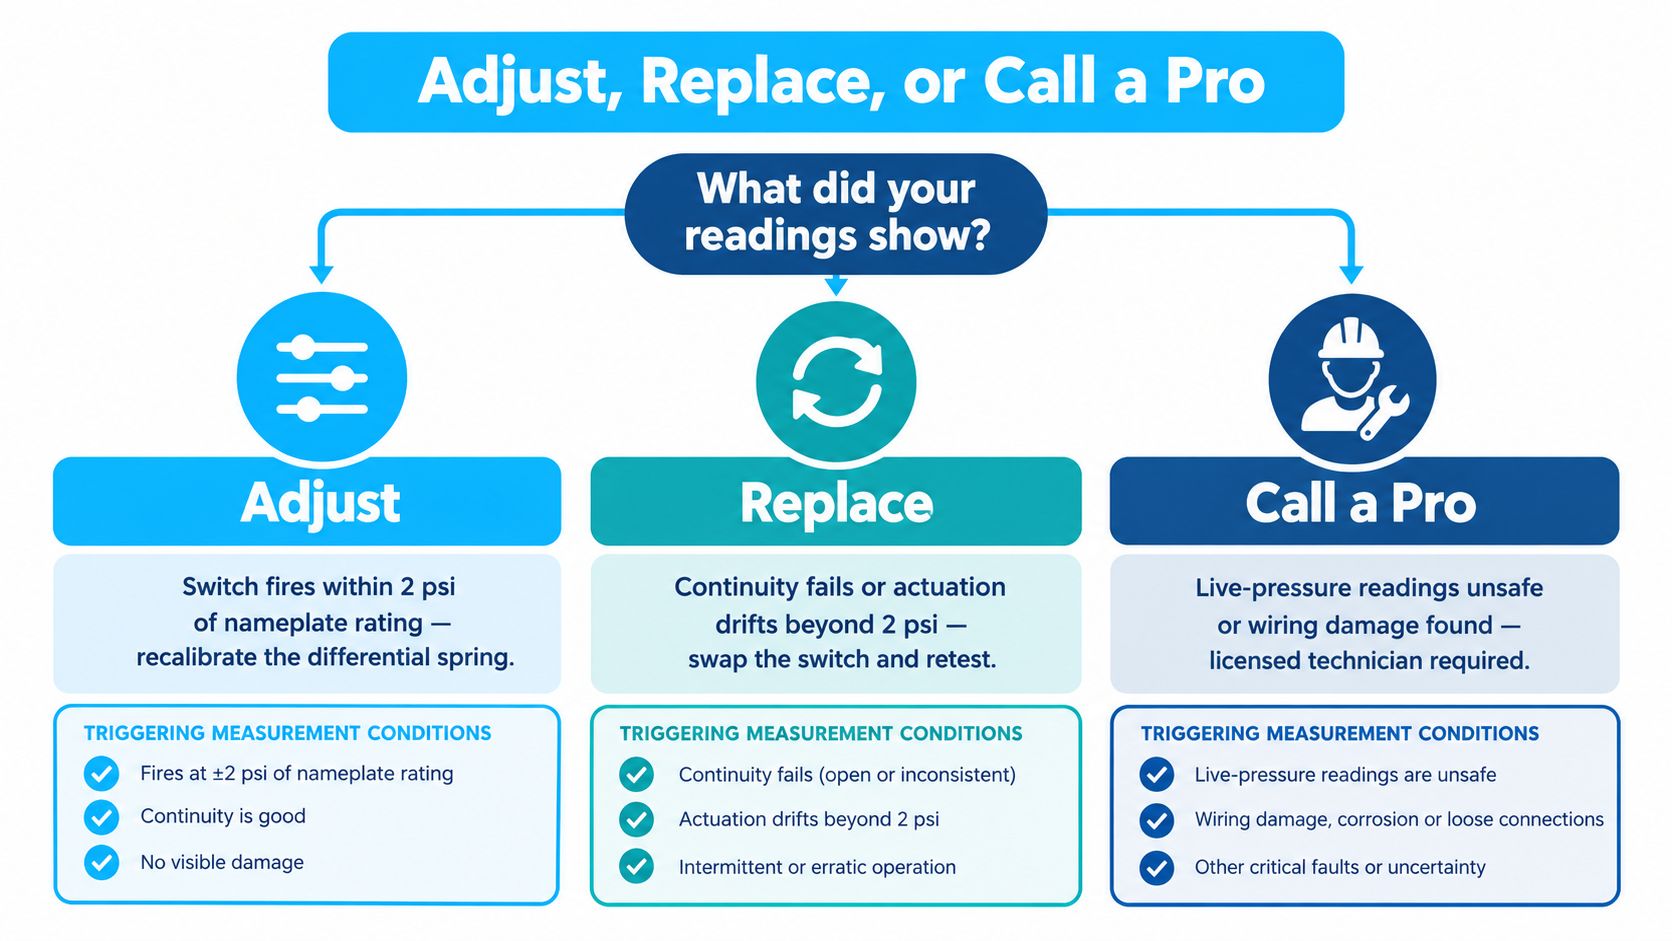
Diagnostic rule: If bypassing the filter restores flow, inspect the cartridge and filter fittings. If flow stays low with the filter removed, look at the showerhead, valve, pipes, or supply.
A Simple Home Test to Pinpoint the Problem
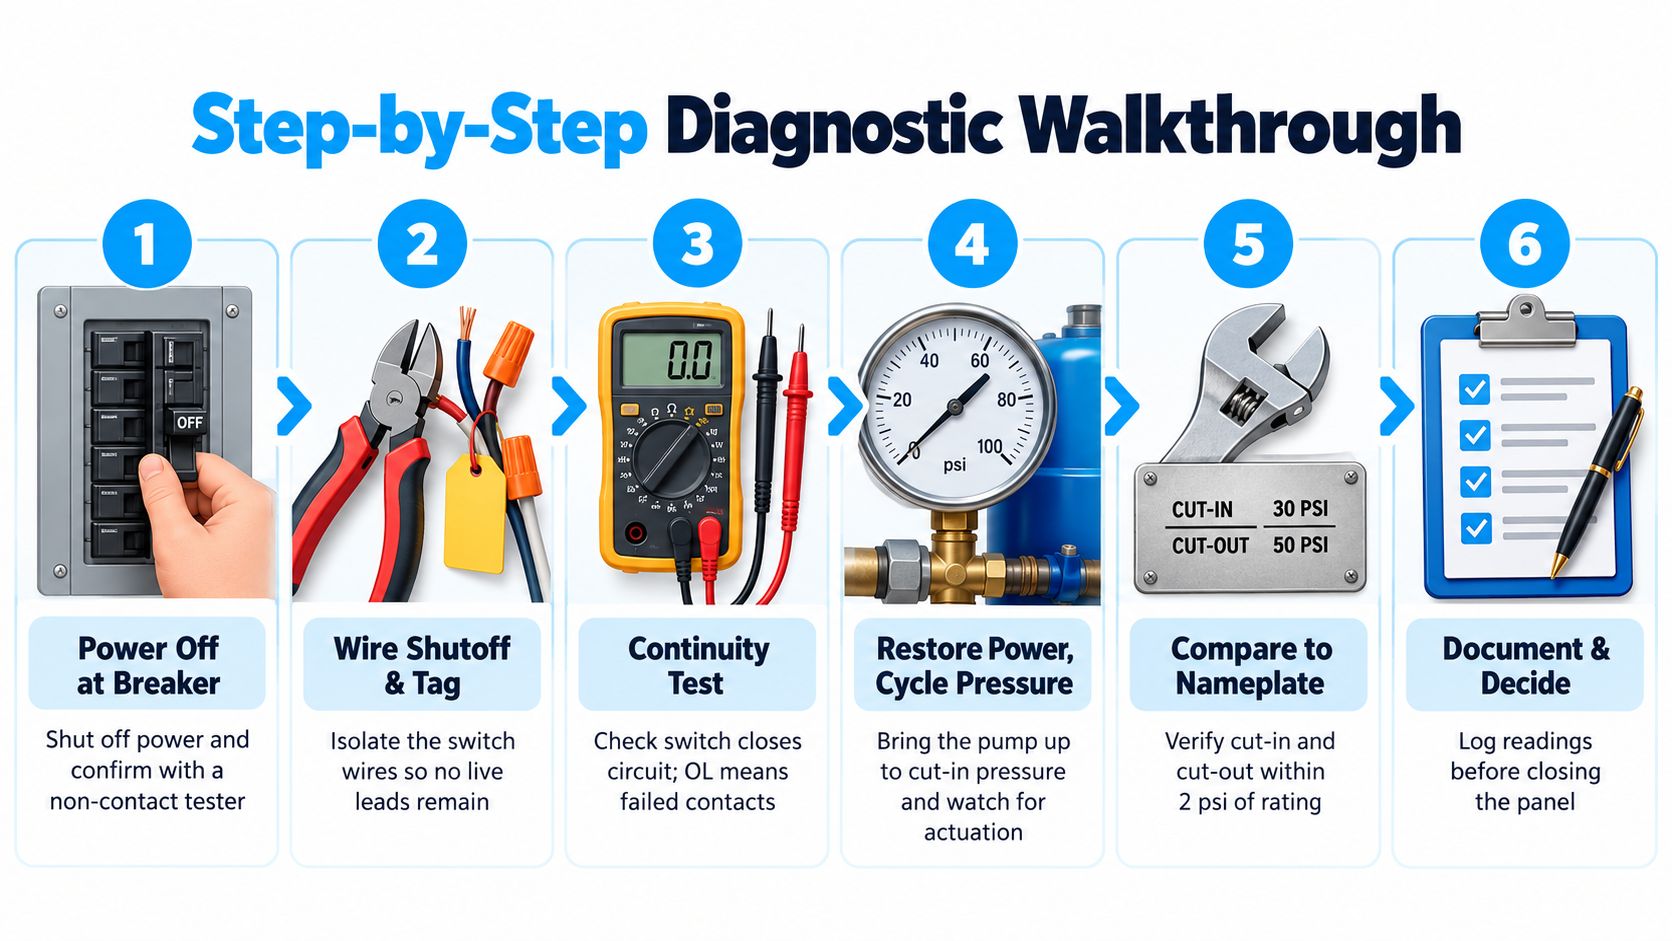
Don't guess at the filter first. Measure the system, then trace the bottleneck. A bucket, a stopwatch, and an optional hose-thread pressure gauge will tell you whether the slowdown comes from the shower assembly, the filter, or the supply.
Start with a timed flow comparison
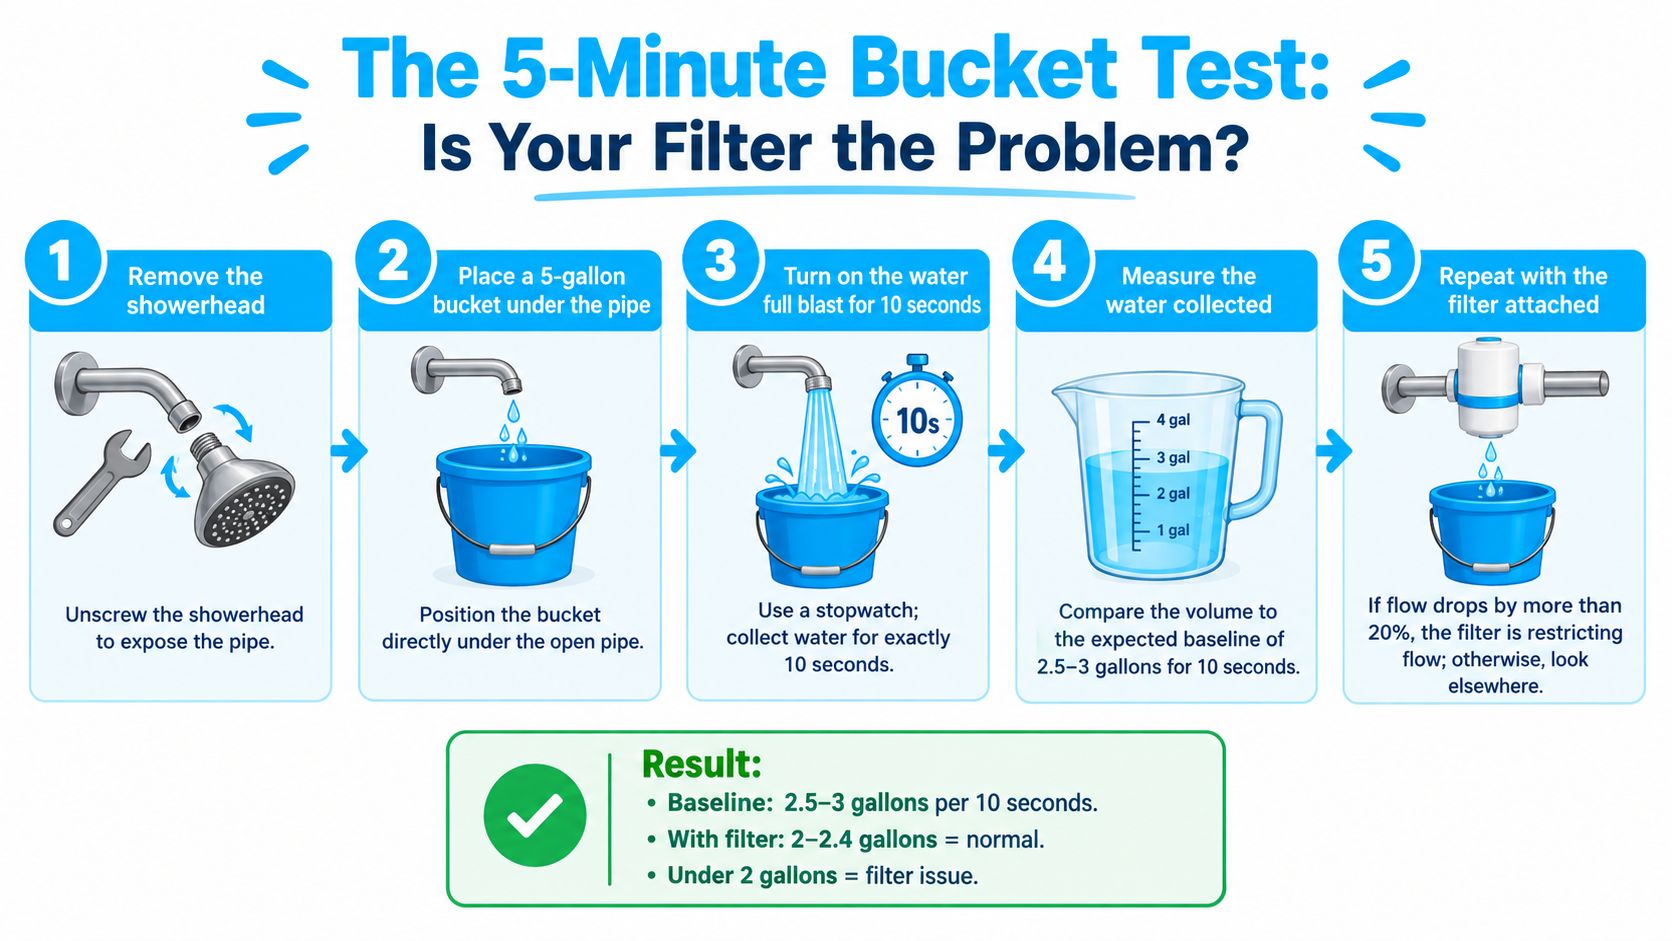
- Test the assembled shower. Turn off other fixtures. Run the shower at full output and collect water for exactly ten seconds. Record the volume.
- Remove the showerhead. Place the bucket under the open shower pipe and repeat the same ten-second test.
- Compare the results. If the open pipe delivers more water than the assembled shower, the restriction sits in the showerhead, filter, or connection path.
- Bypass the filter. Use the manufacturer's bypass arrangement or a suitable threaded bypass loop. Do not leave an improvised connection unsecured.
- Repeat after inspecting the cartridge. If flow improves after a cartridge swap, clogging is the problem. If it does not, look elsewhere.
The showerhead's rating is only a ceiling. A 2.0 gpm head will not produce more than its own design allows, even if the filter can handle more. A lower-rated filter can also choke a higher-flow showerhead.
Add a pressure reading if the bucket points to the supply
Attach a gauge to an accessible hose-thread connection, such as an outdoor spigot. Take one reading with every fixture closed, then another while the shower runs. Record static psi with fixtures closed, then flowing psi with the shower running, and compare the drop to your bucket-test gpm change.
A pressure gauge can look fine while a blocked showerhead or filter still cuts the delivered stream. Use the gauge as a cross-check, not as the whole diagnosis.
Interpret the change, not just the number
A small drop may be fine if the shower still feels normal. A large, persistent drop deserves inspection. The relationship between pressure and flow is not linear. The U.S. Green Building Council notes that reducing outlet pressure from 100 to 50 psi can lower water flow by about one-third, which is enough to turn an acceptable shower into a weak one.
If the bucket test shows a big difference, inspect the cartridge and the inlet path first. For a closer look at the part people miss most, see this guide to the showerhead filter screen.
Filter Smart, Shower Strong Practical Recommendations
Buy for flow capacity first, then evaluate the treatment media. A filter that removes the desired contaminants but can't supply the showerhead's demand is poorly matched to the installation.
Match the filter to the fixture
Read the filter's rated flow and compare it with the showerhead's stated gpm. The filter should meet or exceed the showerhead's requirement, with enough capacity to avoid turning the cartridge into a bottleneck. Remember that the showerhead still controls final output.
Federal history provides a useful ceiling for comparison. Congress established a 2.5 gpm federal maximum for showerheads in 1992, and the Department of Energy codified that standard in 1998 at 80 psi. EPA WaterSense later set a 2.0 gpm, or 7.6 liters per minute, maximum, which is 20% below the federal limit, according to this Department of Energy enforcement guidance.
Keep resistance under control
Choose a housing with a clear flow rating and an accessible cartridge. Use a sediment pre-filter when suspended particles are reaching the shower cartridge, and inspect the inlet screen during maintenance. A pre-filter can protect the main media from becoming the first place sediment accumulates.
Check the cartridge visually each month. Replace it on the manufacturer's schedule, or sooner when the flow declines, the spray weakens, or the inlet shows buildup. Flush the housing and connections when the design permits it.
For homes where the plumbing supply is already marginal, a handheld showerhead designed to produce a stronger-feeling spray can improve comfort, but it can't create water that the system doesn't deliver. If the pressure remains poor throughout the home, use the diagnostic process in this guide to improving water pressure before changing shower hardware.
Quick Answers Homeowners Ask Most
Can renters install a shower filter without tools?
Usually, yes. Many shower filters screw on between the shower arm and the showerhead, so a careful hand-tight install is often enough. Stop as soon as the connection seats. Overtightening can warp a washer, damage threads, and create the leak you were trying to prevent.
Keep the original showerhead and any washers in a small bag. If you move out or your lease requires the fixture to be returned to its prior condition, that small step saves time and arguments.
What should apartment residents do with very low pressure?
Treat this as a building problem until your own test says otherwise. Collect two quick pieces of evidence a landlord or super can use. Measure a short bucket fill with the filter installed, then repeat with it removed. Take photos of both results and note whether the flow improves only slightly or improves a lot.
If the shower is still weak with the filter off, report that measured symptom and ask management to check the shutoff valve, riser, pressure-reducing valve, or shared-demand issues in the building. If the filter-off test improves sharply, replace the cartridge or switch to a less restrictive filter instead of filing a vague pressure complaint.
Is a shower filter suitable for a tankless water heater?
Yes, if the filter still lets the shower reach the heater's activation flow. That is the only question that matters.
Check the heater requirement and the filter's rated flow before you buy. If the cartridge is too restrictive, the heater may fail to stay on, pulse hot and cold, or shut off during a shower. Confirm the cause the simple way. Test the shower with the filter bypassed, then reinstall a clean cartridge and compare the result. If temperature stability changes with the filter in place, stop blaming the heater first.
How should I compare two filter listings?
Ignore “high pressure” unless the listing also gives a rated gpm, cartridge type, connection size, certification details, and clear replacement guidance. Marketing language does not tell you how much resistance the housing and media add in a real bathroom.
A listed service flow of 1.4 gpm is its own number, not proof that two filters will feel the same in your shower. Your plumbing, your valve, and cartridge condition still decide the result.
Use the bucket test as the tie-breaker. The better filter is the one that keeps acceptable flow in your home after installation, not the one with the louder sales copy.
Water Filter Advisor offers practical guidance for comparing shower filters, checking cartridge restrictions, and maintaining filtration without sacrificing usable flow. Visit Water Filter Advisor to compare filtration options and follow the site's pressure and flow testing advice before you buy.