
How to Clean Your Water Softener Brine Tank Like a Pro
To get your brine tank sparkling clean, you'll need to start by putting your water softener into bypass mode. After that, unplug it, and get ready to manually empty out all the old salt and water. Once it's empty, a good scrub with mild soap and warm water is in order, followed by a sanitizing rinse with a diluted bleach or vinegar solution. Rinse it out thoroughly, put it all back together, and you're good to go. This whole process is your secret weapon for getting rid of that nasty sludge and stopping salt bridges before they start.
Why a Clean Brine Tank Is Your Secret Weapon for Soft Water
Ever notice your glassware coming out of the dishwasher with those chalky spots again? Or maybe your skin and hair just feel dry and dull, even though you have a water softener. The problem might not be the system itself, but its often-forgotten sidekick: the brine tank.
This simple tank is the heart of your softener’s regeneration process. Keeping it clean isn’t just a random chore on your to-do list—it's one of the most important maintenance tasks for making sure your home has consistently soft, luxurious water.
Think of the brine tank as the recharger for your entire home water filtration system. It’s where salt dissolves in water to create a powerful brine solution. During a regeneration cycle, this salty water gets pulled into the main resin tank to wash away the hard minerals—calcium and magnesium—that have been collected from your water. If that brine isn't clean and potent, the whole process just falls apart.
The Enemies of Soft Water: Salt Bridges and Mushing
When a brine tank gets neglected, a couple of common villains can pop up and stop your system dead in its tracks. Knowing what they are is the first step to defeating them.
- Salt Bridges: This is when a hard crust of salt forms over the top of the water level in the tank. You're left with a hollow space underneath, which means the rest of the salt can't actually dissolve. Your softener will still try to regenerate, but it ends up pulling in plain water instead of salty brine, leaving the resin beads full of hard minerals.
- Salt Mushing: Down in the murky depths of the tank, undissolved salt can turn into a thick, sludge-like mess. This "mush" can clog up the brine well and block water flow, making the regeneration cycle completely useless.
A properly functioning brine tank is the unsung hero of home water filtration. Regular cleaning isn't just a chore; it’s an investment in protecting your appliances, plumbing, and the soft water your family depends on.
Ignoring these problems means your softener isn't actually softening your water. This brings back all the classic hard water headaches: limescale buildup on faucets and inside pipes, appliances that work harder and die sooner, and needing to use way more soap and detergent. This guide will walk you through the entire cleaning process, turning what seems like a big job into a simple, confidence-building project.
Gearing Up for a Brine Tank Clean-Out
A little prep work goes a long way. Before you even think about touching the brine tank, taking a few minutes to get your gear together can be the difference between a quick, painless job and a messy, frustrating afternoon. Trust us, you don’t want to be halfway through, with salty water on the floor, realizing you need to run to the hardware store.
Let’s walk through exactly what you’ll need to have on hand. The good news? You probably already have most of this stuff tucked away in your garage or laundry room.
Your Brine Tank Cleaning Toolkit
We've put together a quick checklist of everything you'll need for a successful cleaning. Having these items ready and within arm's reach will make the entire process a breeze.
| Item | Recommended Type | Pro Tip |
|---|---|---|
| Buckets | 2-3 gallon buckets (at least two) | Use one for scooping out old salt and the other for dirty water to avoid a sloshy mess. |
| Scoop | Sturdy plastic cup or small scoop | Never use metal! It can easily scratch the inside of the tank, creating little hiding spots for gunk. |
| Shop-Vac | Wet/dry vacuum | This is a game-changer for getting that last bit of water and sludge out of the bottom. Totally optional, but highly recommended. |
| Garden Hose | Standard hose with a spray nozzle | Makes rinsing the tank after scrubbing incredibly fast and effective. |
| Brush | Long-handled with stiff (not metal) bristles | Find one that lets you comfortably reach the bottom of the tank. A toilet brush dedicated to this task works surprisingly well. |
| Towels/Rags | Old, absorbent towels | Spills happen. Be ready for them to protect your floors and make cleanup easy. |
Once your hardware is squared away, you just need a few more things to handle the actual cleaning and, more importantly, to keep yourself safe.
Cleaning Supplies and Safety Gear
Before you start scrubbing, let’s talk safety. You're dealing with grime, possibly some mold, and cleaning agents. It's smart to gear up properly. For a deep dive into why this matters, check out this guide on Personal Protective Equipment for Chemicals.
Here’s what you’ll need to grab:
- Waterproof Gloves: A good pair of rubber or nitrile gloves is a must. Brine is corrosive, and you don’t want that stuff on your hands.
- Safety Glasses: A simple pair of safety glasses will protect your eyes from any accidental splashes, especially if you’re using a bleach solution.
- Mild Dish Soap: Your everyday, non-abrasive dish soap is perfect for breaking down the initial layer of grime inside the tank.
- Sanitizer: You've got options here. A solution of 2-3 tablespoons of unscented household bleach per gallon of water is a powerful disinfectant. If you prefer a non-chemical route, plain old white vinegar works great too.
Pro Tip: The absolute best time to tackle this job is when your salt level is low, right before you’d normally add a new bag. It means a lot less heavy, wet salt you have to scoop out. Work smarter, not harder!
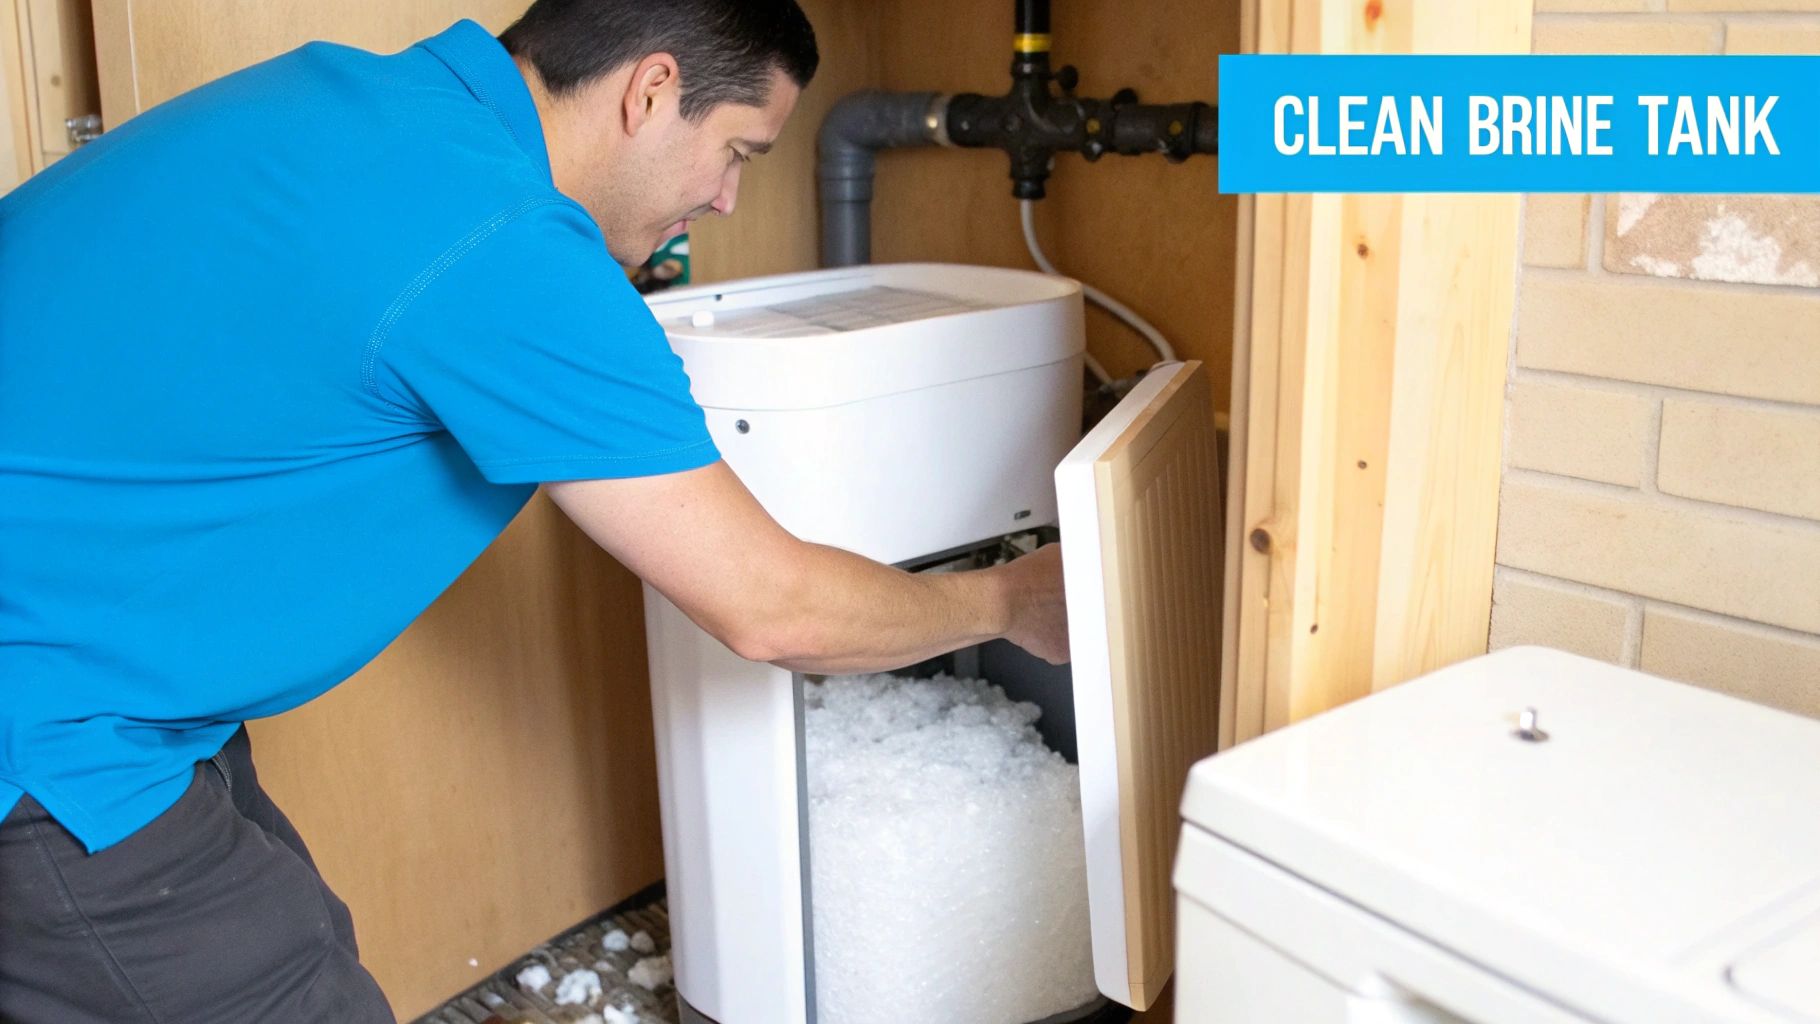
Finally, and this is the most critical part, you need to prep the softener itself. First, find the bypass valve on your unit and push or turn it to the bypass position. This keeps water flowing to your house but stops it from entering the softener.
Once it's in bypass, unplug the water softener from the electrical outlet. This is a non-negotiable safety step. It guarantees the system won’t kick into a regeneration cycle while your hands are inside the tank.
The Complete Guide to Cleaning Your Brine Tank
Okay, you've got your gear ready and the softener is safely in bypass mode. Now for the main event. Don't worry, this isn't some complex plumbing nightmare. We're going to walk through this step-by-step, and you'll see it's more like deep-cleaning a kitchen appliance than anything else.
With a little bit of elbow grease, we'll get that brine tank looking brand new, and your softener will run so much better for it.
Phase One: Draining and Salt Removal
First things first, we need to get everything out of that tank—the water, the old salt, and whatever gunk has settled at the bottom. The less salt you have to deal with, the quicker this goes. That's why timing this for when your salt is already low is a pro move.
This diagram gives you a quick visual of the prep work before you start digging in.
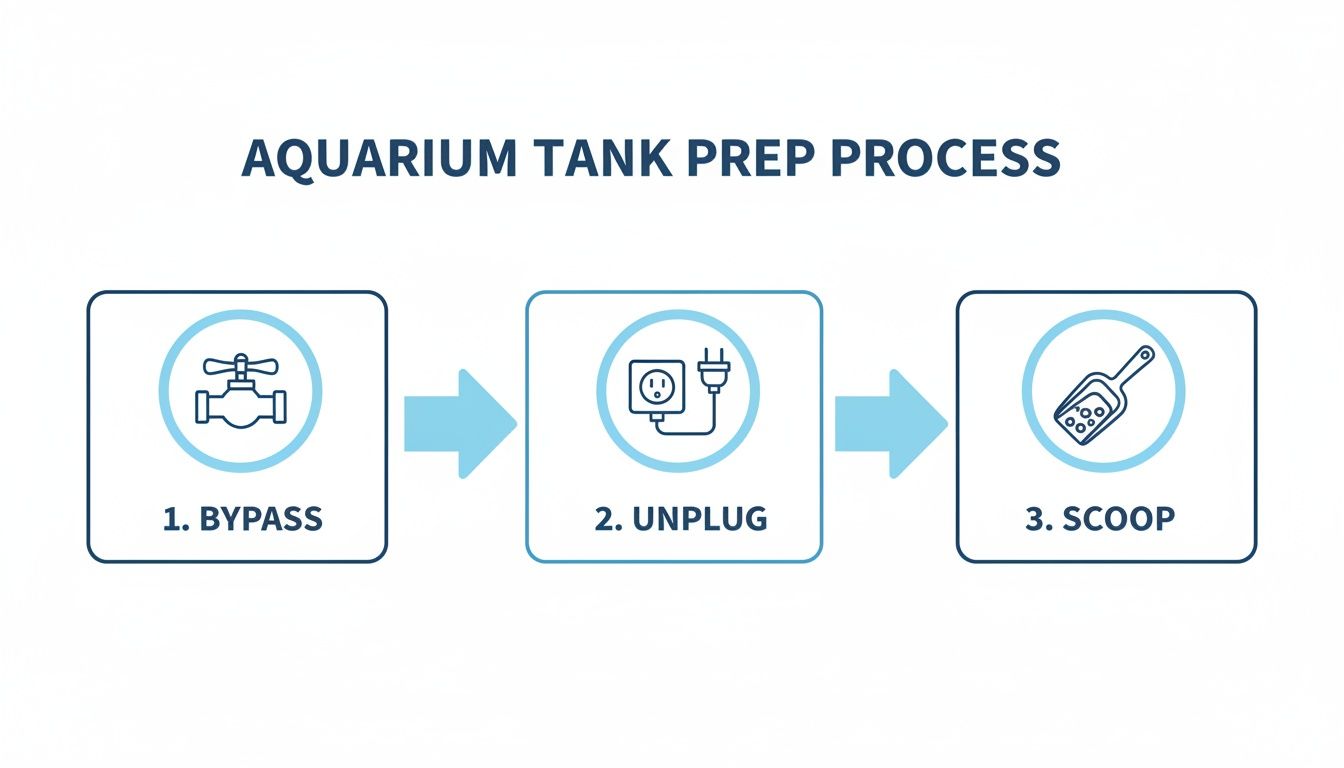
Hitting these three points—bypassing, unplugging, and getting your scoop ready—is the key to a smooth and safe cleaning job.
Go ahead and disconnect the brine line and the overflow tube from the tank. They’re usually held on by simple clips or threaded fittings. Just be gentle here; old plastic can get brittle. Pop them off and move them out of your way.
Now, let's tackle that salt.
- Scoop it out: Grab your plastic scoop and start moving the leftover salt into your buckets. If the salt is damp, it gets heavy fast, so don't try to be a hero and overfill the buckets.
- Keep it or toss it? If the salt looks clean and isn't a mushy mess, feel free to set it aside to reuse later. But if it's discolored or feels sludgy, it’s better to just get rid of it and start fresh.
- Deal with the water: After the salt is out, you'll have a few gallons of salty water left. You can bail it out with your scoop, but a wet/dry shop vac is your best friend here. It makes quick work of that last bit of gritty water.
Once the tank is empty, you'll likely see the enemy: a layer of dirt, sediment, and general sludge. This is the stuff that can clog your system and cause all sorts of problems.
It's really common to find a gritty, sand-like layer in tanks that haven't been cleaned for a few years. This is usually just insoluble material from lower-grade salts that builds up over time and can mess with the brine draw.
With the tank empty, we're ready for the satisfying part—the scrub-down.
Phase Two: Scrubbing and Sanitizing
This is where the magic happens. A clean tank surface is essential for stopping bacteria growth and making sure your new salt dissolves correctly. We want a deep clean, but without using harsh chemicals that could damage the tank.
Grab your mild dish soap. Squirt a good amount into the tank and add a gallon or two of warm water. Now, take your long-handled brush and give the whole interior a really good scrub.
Focus on the bottom and the corners where all the grime likes to collect. Work your way up the sides, breaking loose any salt residue. Don't forget to scrub the lid, too.
After you've scrubbed every surface, it's time to rinse. The easiest way is to take the tank outside and blast it with a garden hose. If you're stuck indoors, you'll have to use your buckets and rags to rinse it completely. Keep rinsing until the water runs clear and all the soap is gone.
Now for the sanitizing step—this is critical for killing any lingering bacteria or mold. You've got a couple of great options:
- Bleach Solution: Mix 2 to 3 tablespoons of unscented household bleach with about 3 gallons of water. Pour it in and use your brush to splash it all over the interior surfaces. Let it sit for about 15 minutes.
- Vinegar Solution: For a non-bleach option, mix one cup of white vinegar with 2 to 3 gallons of water. Do the same thing—pour it in, coat the sides, and let this one sit for 20 minutes. Vinegar is a great natural disinfectant.
After the sanitizing solution has done its job, you have to rinse the tank out thoroughly. Any leftover bleach or soap can cause problems for the resin. Rinse it two or three times until you can't smell any bleach or vinegar.
Phase Three: Cleaning the Brine Well and Float
Look inside your brine tank and you'll see a tall tube—that's the brine well. It holds the safety float, which is the mechanism that keeps your tank from overflowing. It's a key part of the system that needs a gentle cleaning.
The brine well is usually held in by a couple of clips at the bottom. Carefully detach it so you can clean it out properly.
Here’s how to handle it:
- Disassemble with care: The float assembly typically lifts right out of the tube. Pay attention to how it comes apart so you can put it back together the same way.
- Clean the tube: Use your brush and soapy water to clean the inside and outside of the brine well. Slime can build up in there, so get it nice and clear.
- Inspect the float: Wipe down the float mechanism with a rag and soapy water. Make sure it moves up and down its guide rod smoothly. If it sticks, it can't shut off the water properly.
- Rinse and reassemble: Rinse everything well, put the float back inside the brine well, and then snap the whole unit back into place in the tank.
Paying attention to these smaller parts makes sure your whole system is ready to work perfectly.
Phase Four: Reassembly and Refill
We're in the home stretch! The tank is sparkling clean, and it's time to put it all back together.
First, reconnect the brine line and the overflow tube. The connections should be snug, but don't go crazy overtightening them. Hand-tight is almost always enough to prevent leaks.
Next, add the salt. If you saved your old salt, you can put it back in. If not, open up a new bag. Pour the salt into the tank, trying to aim for the sides rather than dumping it right on top of the brine well.
Now for the water. A good rule of thumb is to add just enough water to be about one inch above the salt level. For most home softeners, this will be around 3 to 5 gallons. Use your buckets to pour it in gently.
Don't fill the tank all the way up with water. The softener will automatically add the right amount after it regenerates. This initial water is just to get the first batch of brine made.
Finally, plug the softener back in. Slowly turn the bypass valve back to the "service" position. You should hear water start to flow back into the unit. Do a quick check around your connections for any drips.
With everything hooked up, the very last step is to kick off a manual regeneration cycle. This will pull the new brine into the resin tank and get the whole system back online. Check your manual, but it's usually as simple as holding down a "regenerate" button for a few seconds.
The cycle will probably take an hour or two. Once it's finished, you're all done! Your water softener is now running with a perfectly clean brine tank, ready to give you great soft water again.
How to Bust Salt Bridges and Other Common Problems
Even with a perfectly clean brine tank, you can still run into a couple of really common, frustrating issues. We're talking about the two biggest culprits that can stop your water softener in its tracks: salt bridges and salt mushing.
Think of this as your field guide to fixing these headaches yourself. You'll save a surprise bill from the plumber.
These problems can pop up for a few reasons—high humidity in the basement, using the wrong kind of salt, or just filling the tank a little too high. The good news? Both are usually pretty simple to fix once you know what you're looking for.
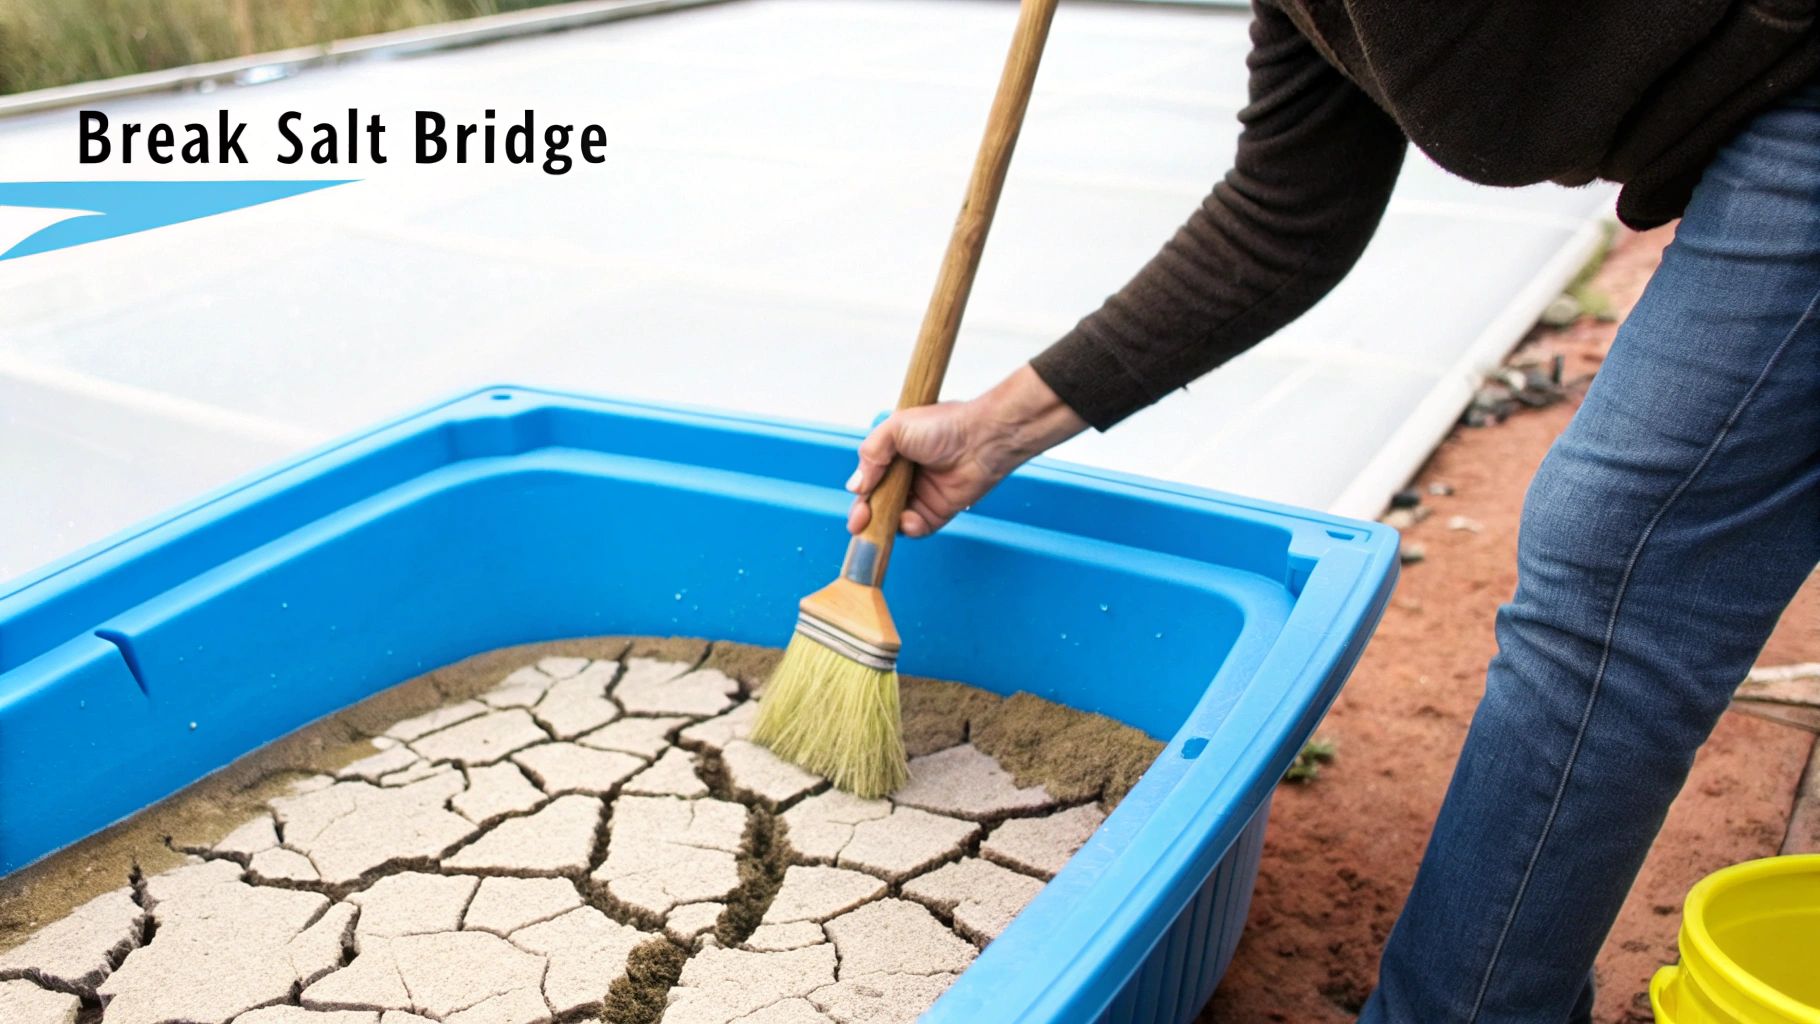
Spotting and Fixing a Salt Bridge
A salt bridge is exactly what it sounds like. It's a hard, solid crust of salt that forms a "bridge" over the water in your tank. This creates a big air pocket underneath, so the loose salt on top never actually dissolves into the brine. Your softener goes through its cycle, but it's just pulling in plain water instead of the saltwater it needs. That's when your hard water problems come roaring back.
So, how do you know you've got one?
- The Tap Test: Your water suddenly feels hard again. Soap isn't lathering like it should, and you're seeing spots on your clean dishes.
- The Visual Check: You look in the tank, and the salt level never seems to go down, even after a few regeneration cycles.
- The Poke Test: This is the surefire way. Grab a broom handle or a long wooden dowel and gently push it down into the center of the salt. If it hits a hard layer and then suddenly breaks through into empty space, you’ve found your salt bridge.
Once you’ve confirmed the bridge, breaking it up is easy. Take your broom handle and gently tap and push down on the crust in a few different places. The goal is just to break it into smaller pieces that can fall down into the water.
Be careful here. Don't use anything sharp or metal, and don't get too aggressive. There's a delicate plastic float mechanism inside that brine well, and one forceful jab can damage it, leading to a much more expensive repair.
After breaking it up, give the salt a good stir to help it dissolve. From there, just kick off a manual regeneration cycle on your softener to get the system back on track.
Dealing with Salt Mushing
Salt mushing is the sneaky cousin of the salt bridge. This is where undissolved salt and all its impurities turn into a thick, gooey sludge right at the bottom of the brine tank. This mush can clog the brine well and completely block the flow of water, making regeneration impossible.
You'll usually discover this problem during a routine cleaning when you empty the tank out. It tends to be more common in homes with high humidity or if you're using lower-purity salts, like rock salt, which often contains more dirt and sediment.
If you find a layer of that sludge at the bottom of your tank, the only real solution is to get it out.
- Scoop the Sludge: Use a plastic scoop to get all of that mushy, recrystallized salt out of the tank and dump it into a bucket.
- Scrub and Rinse: This is where that full clean we already covered becomes essential. You've got to scrub the tank thoroughly to remove every bit of that residue.
- Rinse Again: Make absolutely sure you rinse the tank completely to get rid of any fine sediment that could cause clogs later on.
The best way to prevent both salt bridges and mushing is just to be proactive. In fact, neglecting a brine tank can lead to salt bridges in up to 70% of residential systems within the first year alone. For a deeper dive into your system's health, it's worth reviewing a complete water softener maintenance checklist. Sticking to a simple routine is really the key.
Keeping Your Water Softener in Peak Condition
Now that your brine tank is sparkling clean, let’s talk about how to keep it that way. Moving from a one-off cleaning to a smart, proactive maintenance routine is the real secret to a long-lasting softener and consistently soft water. Trust us, it’s always easier to prevent problems than it is to fix them.
A proactive approach really just starts with a simple schedule. For most homes, giving the tank a thorough cleaning once a year is perfect. However, if you're on well water or dealing with high iron—the usual suspect behind those nasty rust stains—you’ll want to bump that up to every six to eight months. This keeps you ahead of any serious sediment or sludge buildup.
Choosing the Right Salt Makes a Huge Difference
The type of salt you use directly impacts how often you’ll find yourself cleaning that tank. It might seem like salt is just salt, but the purity level makes a world of difference and is the single biggest factor in preventing future gunk.
Here’s a quick rundown of what you’ll find on the shelf:
- Evaporated Salt: This is the good stuff. It’s your best choice for any water softener, hands down. Typically 99.9% pure, it dissolves cleanly and leaves almost nothing behind. Using evaporated salt pellets dramatically cuts down on salt “mushing” and bridging.
- Solar Salt: Made by evaporating seawater, solar salt is a solid, budget-friendly option with a purity of about 99.5%. It’s a huge step up from rock salt but can sometimes contain tiny bits of insoluble material that will eventually build up.
- Rock Salt: This is your cheapest option, but it's also the least pure. It looks like little pebbles for a reason—it’s often full of dirt and other minerals that don't dissolve. This stuff will quickly create a sludgy mess at the bottom of your tank.
By simply switching from rock salt to a high-purity evaporated salt, many homeowners find they can push their cleaning schedule from every six months to once a year, or even longer. The few extra cents per bag absolutely pays for itself in less work for you.
Don't Forget the Resin Cleaner
While keeping the brine tank clean is crucial, it’s only half the battle. Inside the main mineral tank, you have thousands of tiny resin beads doing the heavy lifting of grabbing those hard minerals. Over time, things like iron and manganese can foul these beads, and regular salt regeneration just can't get them clean.
Using a dedicated water softener resin cleaner every few months is a fantastic maintenance habit. You just pour the right amount into the brine well or directly into the tank right before a regeneration cycle. The cleaner gets sucked into the resin tank with the salt water, where it chemically strips away that stubborn buildup and gets the beads back to working like new.
Maintaining your whole system is one of the smartest investments you can make. To keep all your home equipment running smoothly for years, it’s a good idea to adopt some general top preventive maintenance best practices. This proactive mindset doesn’t just save you from surprise repair bills; it ensures your family gets the full benefits of soft water every single day. For more tips on home water systems, check out our guides for more expert advice on water filtration.
Brine Tank Maintenance: Your Top Questions Answered
Let's tackle some of the most common questions that pop up when it's time to clean a brine tank. Getting these details right makes the whole process smoother and keeps your system running like a top.
What’s the Best Salt to Use to Avoid Future Headaches?
Your salt choice is genuinely the biggest factor in how often you'll need to roll up your sleeves and clean this thing. If you want to make life easier, evaporated salt pellets are the way to go, hands down.
These pellets are incredibly pure, often testing at 99.6% to 99.9% sodium chloride. That high purity means they dissolve almost completely, leaving behind minimal gunk that would otherwise turn into sludge at the bottom of your tank. They might be a little more expensive, but they pay for themselves in reduced labor.
A simple switch to a high-purity salt can easily push your cleaning schedule from every six months out to once a year. The few extra bucks per bag are well worth it to avoid the hassle.
Can I Clean My Brine Tank with Vinegar Instead of Bleach?
You absolutely can. White vinegar is an excellent natural sanitizer if you'd rather not use bleach. It's great for handling any lingering mold or bacteria without the harsh chemicals.
Here’s how to do it:
- Once the tank is scrubbed with soap and fully rinsed, pour in 2-3 gallons of fresh water.
- Add about one cup of white vinegar and give it a good swish to mix.
- Let the solution sit for around 20 minutes, making sure it gets on all the inside surfaces.
- Finally, give it one last scrub with your brush and rinse everything out completely.
How Can I Tell if the Softener is Working Right After I Clean It?
This is the satisfying part—confirming your hard work paid off. The fastest and most reliable method is to use a water hardness test strip.
After you've put the tank back together, added the new salt, and poured in a few gallons of water, you'll need to trigger a manual regeneration cycle. This usually takes an hour or two. Once it's finished, grab a water sample from a faucet inside your home. If everything's working correctly, the test strip should show a hardness level near zero.
You'll also feel the difference pretty quickly. Soap will lather up nicely again, and you'll see those tell-tale, spot-free glasses coming out of the dishwasher. That's the real proof.
At Water Filter Advisor, we're here to help you get the best water quality for your home. For more in-depth guides and honest product reviews, check us out at https://www.waterfilteradvisor.com.