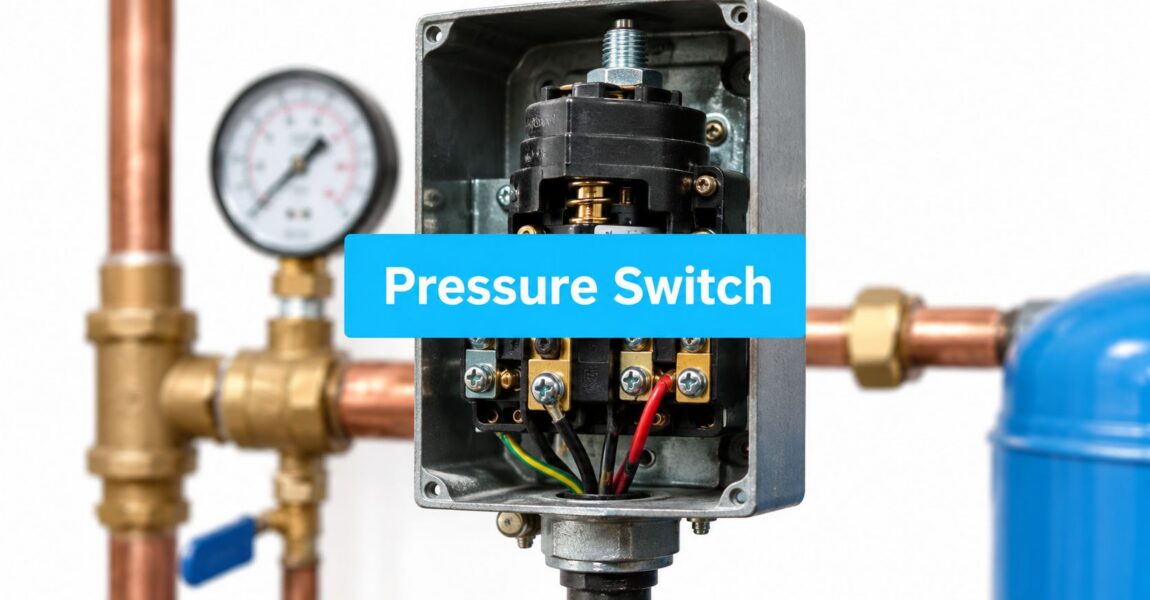
Pressure Switch Troubleshooting for Home Well Systems
Someone opens the shower while the dishwasher is running, the water pressure drops to a trickle, and the well pump starts again less than a minute later. Then the pump keeps running longer than expected, or refuses to shut off at all. That scene often sends homeowners straight to the pressure switch, but the switch may only be reporting a problem elsewhere in the well and filtration system.
Pressure switch troubleshooting works best as a process of elimination. A clogged sediment filter, incorrect pressure-tank air charge, restricted strainer, leaking check valve, weak well recovery, or loose wire can all create symptoms that look like a failed switch. The safest approach is to measure what the system is doing before adjusting or replacing anything.
Why Your Well Pump Is Acting Up
A pressure switch is the control that starts the pump at the lower setpoint and stops it at the higher setpoint. In a common residential setup, those points might be 30/50 psi, while another familiar arrangement is 40/60 psi. Cut-in starts the pump, and cut-out stops it, but the switch depends on the rest of the system to reach those pressures reliably. InspectAPedia's well-pump pressure-switch guidance explains these setpoints and the relationship between switch pressure and tank setup.
Consider a home with a whole-house sediment filter. If the cartridge loads with iron, sand, or other well-water debris, the pump may build pressure at the tank while the fixtures receive weak flow. The homeowner sees low pressure and blames the switch, even though the restriction is downstream. A clogged filter or strainer can also make the pump run longer because the system struggles to satisfy demand.
Match the complaint to the likely fault
- Rapid cycling: A waterlogged pressure tank, a differential set too narrow, a sticking contact, or a faulty check valve can make the pump start and stop repeatedly.
- Weak pressure at the tap: Check a loaded filter cartridge, restricted inlet, failing tank bladder, poor well recovery, or a switch that has drifted out of adjustment.
- No water: The cause may be a tripped breaker, open circuit, loose wire, failed switch diaphragm, pump fault, or an empty well.
- Pump won't shut off: First ask whether the pump can build enough pressure to reach cut-out. A leak, clogged pipe, failing pump, or incorrect setting may be responsible rather than the switch. This pump troubleshooting guide makes that distinction explicit.
Practical rule: The switch is often the messenger, not the culprit. Test the tank, filtration path, wiring, and actual pressure before buying a replacement.
The low-cost checks come first. Look at the filter, inspect visible wiring, confirm the gauge moves, and record when the symptom appears. If pressure falls only when several fixtures run, the system may have a flow restriction or limited well recovery. If the pump cycles with almost no water use, the tank, check valve, or switch differential deserves closer attention.
Safety Gear and Tools You Need First
Pressure switches sit near electrical terminals, pump controls, and pressurized plumbing. Prepare the work area before removing a cover or disconnecting a wire. Wear safety glasses, insulated gloves, and non-conductive footwear, and use a flashlight if the tank and switch are in a dark crawlspace or utility corner.
The first essential instrument is a multimeter set to continuity or resistance. It tells you whether the switch contacts are open or closed when the system is de-energized. The second is an accurate pressure gauge. A gauge rated from 0 to 100 psi or 0 to 200 psi can be fitted to a hose bib or drain port to show what the tank and switch are seeing.
Build the test kit
- Multimeter: Use the ohms or continuity function for contact checks. A meter reading is more useful than guessing from a relay click.
- Pressure gauge: Choose a gauge that covers the switch range and connect it where it can read system pressure.
- Adjustable wrench: Useful for gauge adapters, tank-valve access, and plumbing fittings.
- Correct screwdriver: Match the switch-terminal screws rather than forcing an ill-fitting driver.
- Notepad: Record the pressure at pump start and stop, along with unusual sounds or fluctuations.
- Manual or wiring diagram: Keep the switch model information nearby so the nameplate rating and terminal arrangement are clear.
- Flashlight and non-contact tester: Use the tester to confirm the circuit is de-energized, but don't treat it as a substitute for proper electrical verification.
Turn off the breaker before removing the pressure-switch cover. Confirm the power is off with an appropriate tester, then verify the wiring condition before touching terminals. If you need to disconnect plumbing or remove the switch, bleed pressure from the tank and system first. This pressure-switch safety guidance emphasizes de-energizing equipment and using direct measurements instead of trial and error.
Don't bypass the switch to make the pump run. That removes a control designed to protect the pump and plumbing. Having the meter, gauge, tools, and paperwork ready keeps the diagnostic session orderly instead of turning into a series of guesses.
Reading the Symptoms Your Switch Is Giving You
Before testing, listen to the pump and watch the pressure gauge. A short click followed by an immediate restart tells you something different from a steady pump that never reaches shutoff. The timing, sound, and gauge movement give the electrical test a useful context.
Four patterns deserve attention
Rapid cycling means the pump turns on and off within a short interval. A tank that has lost its air charge is a leading suspect, but a narrow differential, restricted filter, stuck check valve, or sticking switch contact can produce a similar pattern. The gauge should show whether pressure is moving between the intended cut-in and cut-out points or merely oscillating around one setting.
Constant running means the pump doesn't reach cut-out. Check whether the gauge climbs at all, then inspect for a major leak, clogged piping, a failing pump, low well recovery, or a setting the pump can't satisfy. A switch with welded contacts is possible, but replacing it before proving that the pump can build pressure wastes time.
No pump activity with an open faucet points toward a tripped breaker, open circuit, loose wire, failed contact mechanism, or pressure-sensing diaphragm that isn't responding. The gauge may remain below cut-in while the pump stays silent. Don't open the switch until power is isolated.
Weak or inconsistent pressure often begins in the water path rather than the control. A loaded sediment filter, blocked inlet, damaged tank bladder, or filter housing restriction can reduce flow even when the switch starts and stops correctly. Compare pressure at the tank-side gauge with pressure at a fixture if possible.
A homeowner may see a 30/50 psi or 40/60 psi arrangement, but the nameplate is the authority for that particular switch. The well-pump FAQ from InspectAPedia describes the meaning of cut-in and cut-out and gives 30/50 as a common residential example. Record the actual values rather than assuming the label tells the whole story.
Write down when the symptom began, whether a filter was recently changed, whether plumbing work occurred, and whether the pump behavior changes during heavy household use. That history often separates a filtration restriction from an electrical fault before the cover ever comes off.
Step-by-Step Diagnostic Walkthrough
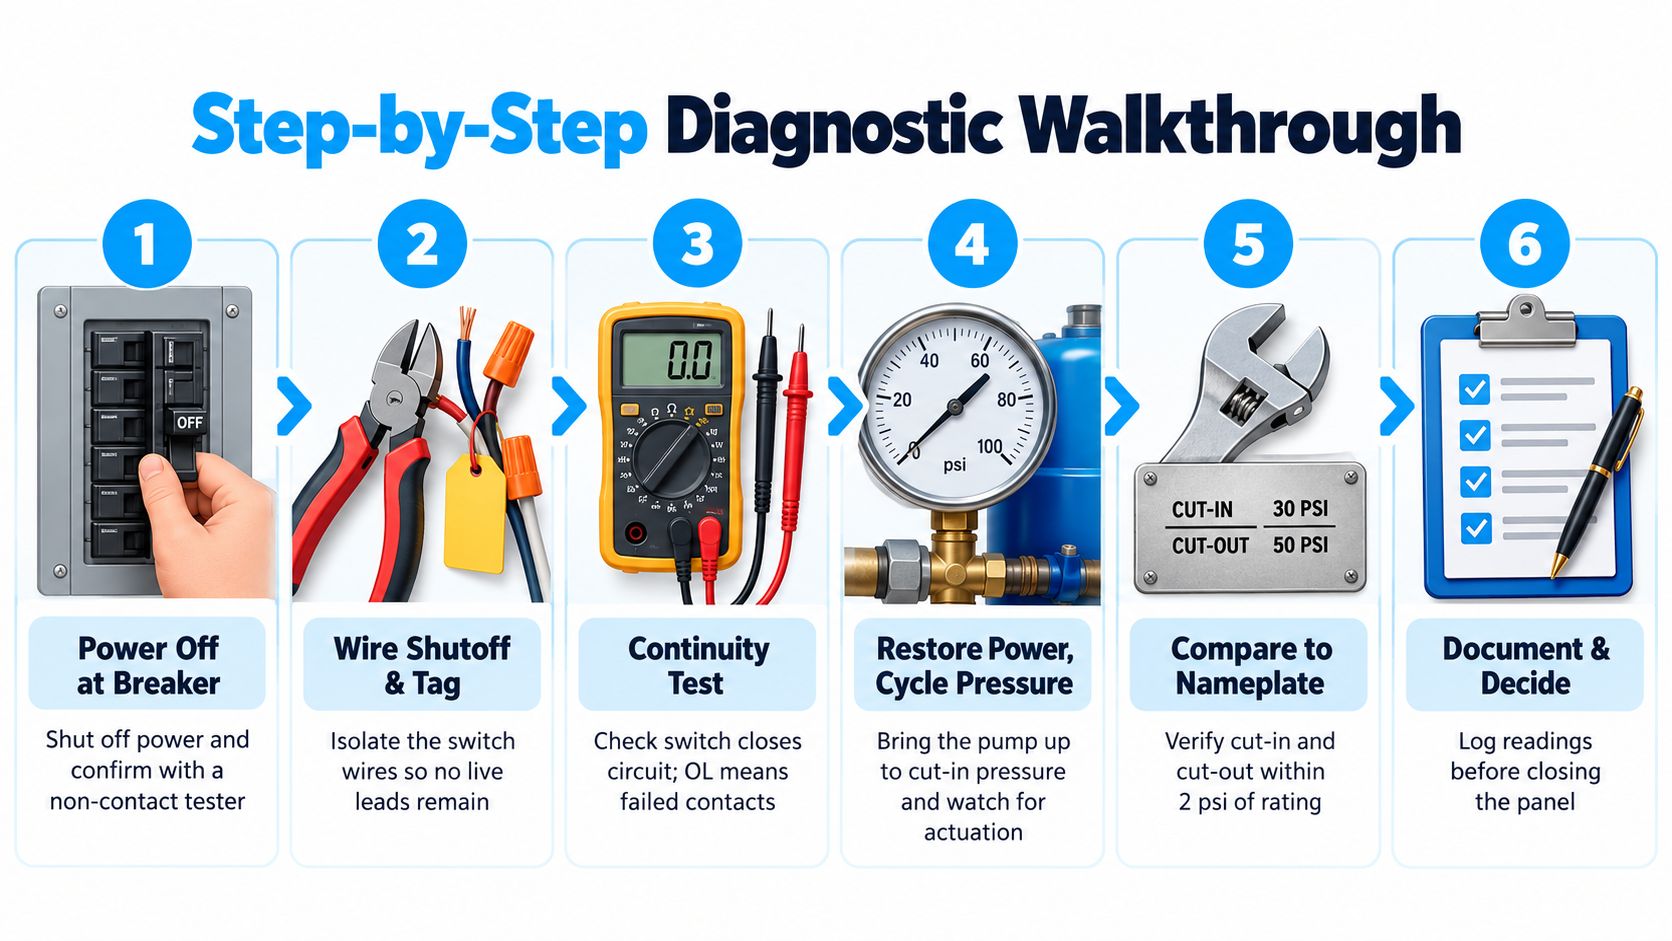
Start with the circuit dead. Turn off the breaker, confirm the switch and pump wiring are de-energized, and don't rely only on a silent pump. Remove or isolate the switch wires only after power has been verified off, keeping track of their original terminals.
Begin with continuity
Set the multimeter to ohms or continuity and place the probes across the switch contacts. At the switch's normal state, the meter should show the corresponding open or closed condition. The useful test is whether the contacts change state at the proper pressure, not whether the switch merely clicks when touched.
If the contacts remain closed when pressure should have reached cut-out, or remain open when pressure falls to cut-in, the switch may have a failed diaphragm, contaminated mechanism, or damaged contacts. However, a continuity failure with no pressure applied doesn't prove the switch is the only fault. The pressure port, tank, and wiring still need inspection.
For homeowners who want broader maintenance context around household mechanical systems, this guide to solving HVAC problems at home is useful because it reinforces the same test-first habit, isolate the system, observe the symptom, and avoid replacing parts blindly.
Verify the live pressure cycle
Reconnect the wiring, restore power, and attach the pressure gauge to a suitable drain port or hose bib. Open a faucet and let the system draw down. Watch the gauge as the pump starts, then close the faucet and observe the rise toward cut-out.
Compare both readings with the switch nameplate. A pump that starts near its marked cut-in but never reaches cut-out points away from a simple switch adjustment and toward pump capacity, leakage, restriction, or well recovery. A switch that changes state at inconsistent readings deserves further inspection rather than repeated adjustment.
Short-cycling becomes easier to diagnose when the gauge shows the actual differential. A narrow operating differential, waterlogged tank, or filter restriction can cause frequent starts. Chattering near cut-in can result from loose terminals, contamination, vibration, or unstable pressure. Check the 1/4-inch sensing port or nipple for blockage, because a restricted port can prevent the diaphragm from seeing the true system pressure.
Record several complete pressure sweeps. The switch should transition consistently at its specified cut-in and cut-out. If readings drift from cycle to cycle, suspect contamination, diaphragm fatigue, or contact wear before changing a spring setting.
Decoding Short-Cycling and Chattering
Short-cycling and chattering sound similar from the utility room, but the gauge and meter separate them. Short-cycling is a complete pump start and stop that repeats too quickly. Chattering is a rapid flutter of the contacts near a pressure threshold, often accompanied by a buzzing or clicking sound.
A waterlogged pressure tank is a common short-cycle cause because the tank no longer provides the intended cushion between pump starts. A clogged filter or stuck foot valve can also make pressure respond poorly to demand. If the switch differential is too narrow, the pump may reach cut-out almost immediately and restart as pressure falls.
Chattering points more directly toward the switch circuit or unstable pressure. Loose or corroded terminal screws, pitted contacts, moisture, contamination, vibration, and electromagnetic interference can all disturb the contact transition. The multimeter should show a clean change of state, while the gauge should move steadily rather than hover around cut-in.
Symptom-to-Cause Quick Reference
| Symptom | Likely Cause | First Check |
|---|---|---|
| Pump starts and stops repeatedly | Waterlogged tank, narrow differential, restriction, or check-valve problem | Observe the gauge through a full cycle and inspect tank setup |
| Contacts buzz or flutter | Loose terminals, pitted contacts, contamination, or vibration | Isolate power, inspect terminals, and test continuity |
| Pressure falls quickly after shutoff | Leaking check valve, plumbing leak, or filter-side restriction | Close fixtures and watch whether pressure holds |
| Pump runs without reaching cut-out | Pump weakness, clogged piping, leak, low recovery, or incorrect setting | Confirm the gauge rises and inspect the filtration path |
| Pressure is low only at fixtures | Loaded cartridge, clogged strainer, or restrictive filter housing | Compare tank-side and fixture-side pressure |
The measurement decides the next move. If the pressure cycle is correct but the contacts chatter, the switch mechanism or wiring becomes more likely. If the contacts operate cleanly while the system cycles rapidly, investigate the tank, filter, valve, and demand profile instead of condemning the switch.
Adjust, Replace, or Call a Pro
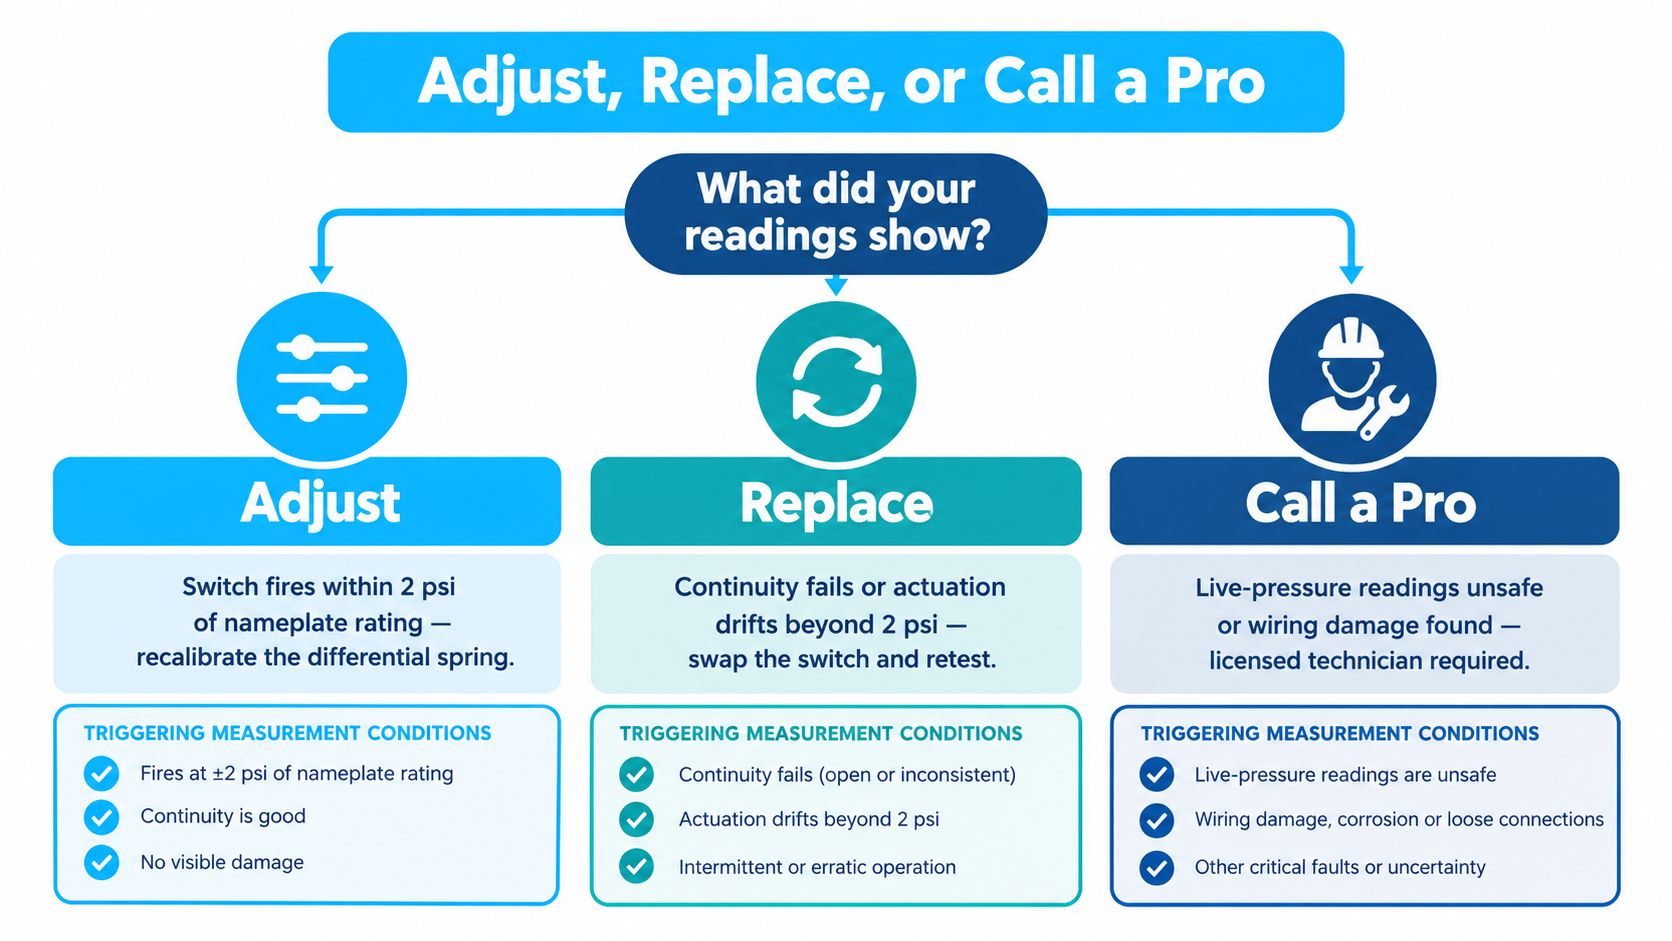
Adjustment is reasonable only when the measurements show a basically healthy system. If the switch actuates within 2 psi of its nameplate rating, and the tank pre-charge is correctly set 2 psi below cut-in, a drifted spring or differential setting may be the only issue. This pressure-tank troubleshooting guide describes the procedure of turning off power, draining the tank, measuring the air charge, and using the 2-psi relationship.
Don't turn adjustment nuts while guessing. Changing one setting can alter the operating range, pump cycling, and filtration performance. Record the original position and pressure readings, make only a controlled change, and retest the complete cycle.
Use the readings to choose
Adjust when the contacts transition consistently, the pump reaches the intended cut-out, and the discrepancy is limited to a setting or tank pre-charge issue. A tank that has lost air should be checked with power off and the tank drained, not while the system is pressurized.
Replace when continuity fails to change at the rated pressure, the diaphragm is visibly bulging or weeping, or the contacts are black, badly pitted, or burned. The Well Guide's pressure-switch troubleshooting advice connects visibly damaged contacts with unreliable pump starting. A standard mechanical switch older than 10 to 12 years is also a sensible replacement candidate when it has become unreliable, although the actual condition and exact model still matter.
Call a licensed well technician if the pump draws unusually high current, the pressure tank shows signs of bladder failure, wiring is damaged, or you're uncomfortable around 240-volt equipment. Local permit requirements may also make professional replacement necessary. A service call costs more than a switch, but a miswired control, dry-running pump, or unsafe pressure setting can cost far more than the part.
Keep the system on a maintenance rhythm
Preventive checks catch many failures before the shower goes cold. Guidance for pressure-switch systems recommends monthly leak checks, quarterly terminal and mounting checks, annual calibration verification, and replacement intervals of 5 to 7 years for standard mechanical switches and 10 to 15 years for standard electronic switches. CFM Distributors' service guidance provides those intervals and emphasizes drift, corrosion, loose wiring, diaphragm wear, and setpoint changes.
For a filtration-focused home, include the filter housing in that routine. Look for a loaded cartridge, pressure loss across the filter, leaks around the sump, and a bypass valve that isn't fully open. Water Filter Advisor also provides water pressure and filtration advice that can help homeowners compare pressure readings with filter maintenance decisions.
Pressure switch troubleshooting ends well when the data points to a specific cause. Check the tank air charge, clean or replace a restricted filter, inspect wiring and sensing ports, and replace the switch only when testing shows the switch has failed.
Water Filter Advisor helps homeowners compare whole-house and under-sink filtration options, understand replacement cartridges and filtration media, and connect water-quality concerns with practical maintenance. Visit Water Filter Advisor to review filtration guidance before a clogged cartridge turns into another pressure problem.
