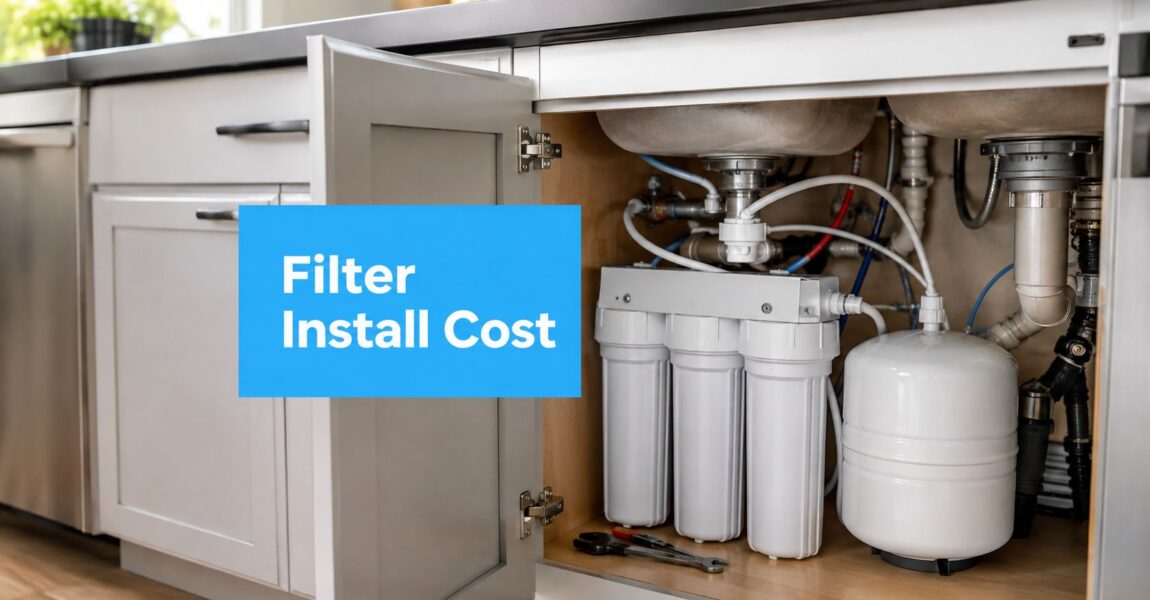
Under Sink Water Filter Installation Cost: A 2026 Homeowner

A standard under-sink water filter installation typically costs $170 to $580, while a reverse osmosis installation commonly reaches $450 to $1,600. The filter itself is only part of the bill, because labor, countertop drilling, faucet installation, drain connections, and difficult cabinet access can shift the final price sharply.

That's why two homeowners can buy the same filter and receive quotes hundreds of dollars apart. A compact carbon unit connected to an accessible cold-water line is a straightforward plumbing job. A reverse osmosis system may need a dedicated faucet, storage tank, drain saddle, new fittings, and leak testing. The right way to budget is to treat installation as a small construction project, not a product purchase.

What You'll Pay to Install an Under Sink Water Filter

A standard carbon block installation usually produces a total bill of $170 to $580, including the unit and labor. That range comes from the filter, the plumbing connection, cabinet access, and any sink modification, not from the cartridge alone. A broader 2026 estimate places the average under-sink installation near $550, with a national range of $100 to $3,000, depending on the system and required work, according to this 2026 under-sink filter installation cost guide.

Reverse osmosis requires a larger project budget. The storage tank, dedicated faucet, drain saddle, membrane, extra tubing, and leak testing give installers more line items to price. A fully installed system can cost $450 to $1,600, based on Angi's reverse osmosis installation cost guidance.

System Type Low End Typical High End
Standard carbon filtration $170 About $170 to $580 total $580
Reverse osmosis $450 About $450 to $1,600 total $1,600

The largest quote differences usually come from labor and modifications. A cramped cabinet, stone countertop, seized shutoff valve, or missing faucet hole can put two quotes for the same filter $250 or more apart. Ask whether the price includes drilling, new fittings, valve replacement, drain work, connection testing, and cleanup. Those details explain where a low initial quote can grow.

Use fast budget-friendly plumbing when the job also includes broader plumbing repairs rather than a filter-only appointment. A filter installation needs a supply connection and housing. Reverse osmosis adds a membrane, tank, faucet, drain connection, and more leak points. Budget by the work required under the sink, not by the box price printed on the system.

How Under Sink Filtration Works and the Main System Types

An under-sink filter is plumbing furniture. The cold-water supply is the front door into the system. A tee fitting or saddle-style valve creates a side entry for filtered water, the filter housing acts like a drawer that holds the treatment stages, and the dedicated faucet becomes a new fixture on the countertop.
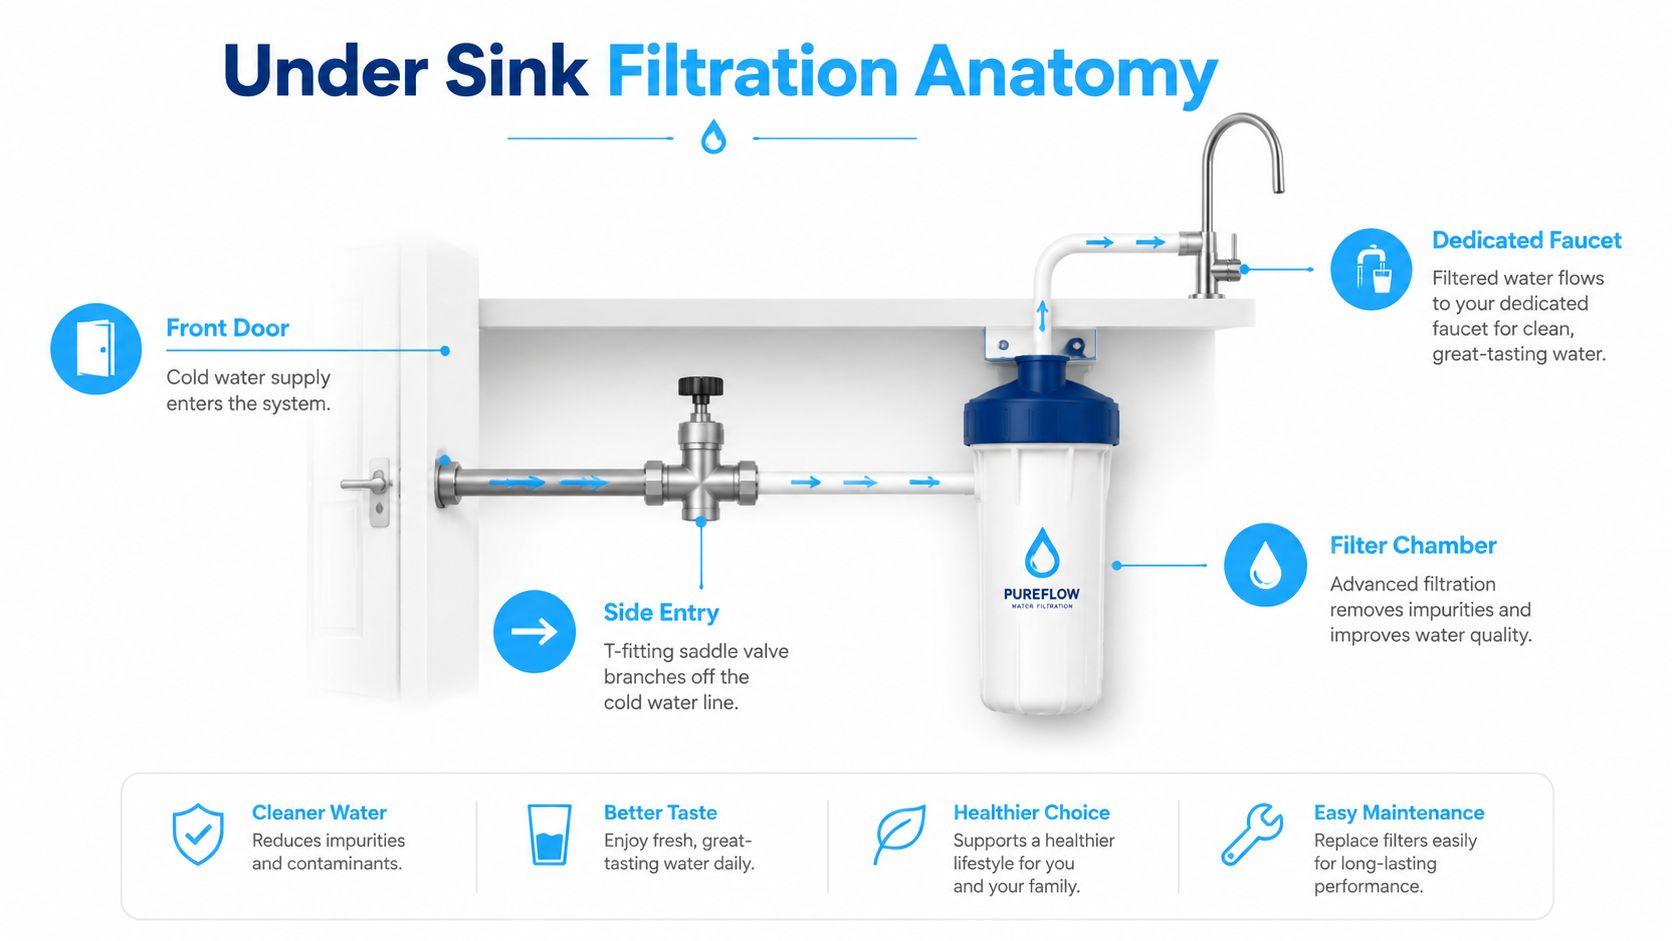
A diagram of an under sink water filtration system showing installation parts and the water flow path.

Start with the water path:

  1. Cold-water feed: The installer shuts off the supply and branches a line toward the filter. A tee fitting is usually cleaner and more dependable than forcing an unsuitable connection onto an old valve.
  2. Filter housing: Water passes through one or more cartridges. The housing needs enough clearance for cartridge changes, so a system that fits on paper may still be frustrating inside a crowded cabinet.
  3. Filtered outlet: A separate tube carries treated water to a faucet or dispenser. Some inline systems send filtered water through the existing faucet, while many dedicated systems use a smaller drinking-water faucet.
  4. Waste connection: Reverse osmosis sends rejected water to the drain through a saddle or another approved drain connection.

The three families buyers usually choose

A single-stage carbon block filter is the simplest option. It primarily targets chlorine taste and odor, with performance depending on the specific cartridge and its claims. It usually has the smallest cabinet footprint and the least complicated installation.

A multi-stage carbon system adds sediment filtration before carbon polishing. That arrangement gives the carbon stage cleaner water to treat and creates a broader treatment sequence without adding the tank and waste line associated with RO.

Reverse osmosis adds a semipermeable membrane, pressurized storage tank, and drain line. It can produce water more slowly at the faucet because the system fills and stores treated water. The tank improves availability, but it also consumes cabinet space. A dedicated faucet is common for RO, while compact inline carbon units may use the existing countertop dispenser.

Practical rule: Choose the treatment method from your water concern first, then choose the cabinet layout and faucet arrangement. Buying the cheapest unit that won't fit or won't address the problem wastes the entire installation budget.

Comparing System Types by Price and What You Get

The price difference between filtration families reflects hardware, not marketing decoration. A single-stage carbon unit has one main housing and a short connection path. Multi-stage filtration adds cartridges and brackets. Reverse osmosis adds the most plumbing, the largest footprint, and the most opportunities for a quote to grow.

The following planning figures are editorial budget ranges supplied for this comparison. They separate equipment from the completed installation so you can see where the money goes.

System Type Unit Price Installed Total Components Under Sink
Single-stage carbon $40 to $120 $130 to $260 One canister or compact inline housing
Multi-stage carbon $150 to $400 $230 to $520 Two or three stacked cartridges
Reverse osmosis $200 to $600 $450 to $1,600 Membrane housing, storage tank, drain saddle, tubing

Single-stage carbon

This is the sensible choice for a homeowner who wants a compact system and a cleaner connection path. The cabinet usually holds one canister, and the installer connects it to the cold-water line and either the existing faucet or a small dedicated dispenser. Labor stays lower because there's less mounting and fewer connection points to test.

Multi-stage filtration

Multi-stage systems occupy more space but give the installer a more structured treatment path. A sediment pre-filter can sit before carbon, followed by another polishing stage. Expect more bracket work, more tubing, and more cartridge clearance when planning the cabinet.

Reverse osmosis

RO is the premium installation because it adds a membrane housing, tank, faucet, and drain connection. The tank can dominate the cabinet floor, while the drain saddle must sit at a workable angle on the waste line. This is the configuration that most often requires a new faucet hole, especially when the sink has no usable soap-dispenser opening.

Don't buy a reverse osmosis kit until you've measured the cabinet and identified the drain connection. The unit price may look attractive, but the physical layout determines whether installation stays routine.

The Line Items That Make Up Your Installation Quote

A professional estimate should look like a project budget, not one unexplained total. Ask the installer to separate the filter system, labor, faucet work, supply connection, drain work, drilling, replacement plumbing, and disposal. Two quotes for the same filter can differ by hundreds of dollars because the labor and modification lines are different.

Line Item What's Included Typical Range
Filter system Housing, cartridges, brackets, included fittings Varies by system
Standard labor Mounting, supply connection, faucet connection, testing $100 to $300
RO labor Tank, membrane, drain line, faucet, leak testing $200 to $900
Dedicated faucet New drinking-water faucet and connection hardware Varies by kit
Tee or saddle connection Branch from the cold-water supply Varies by plumbing
Shutoff valve Removal and replacement of a faulty valve Quote separately
Drain connection RO waste tubing and drain saddle or approved fitting Quote separately
Countertop drilling Hole through stone, porcelain, or another hard surface Quote separately
Tubing and fittings Supply tubing, compression fittings, adapters Varies by material
Mounting hardware Bracket, screws, anchors, cabinet installation Often included
Trip or permit charge Service call or local compliance requirement Ask before scheduling

The labor line is only the starting point. Routine filtration work commonly falls around $100 to $300, while RO labor can reach $200 to $900 when the installer must drill, add a water line, or fit a drain saddle, according to neutral plumbing installation cost references.

Check whether the quote includes the dedicated faucet, a usable sink hole, the shutoff valve, and removal of an old system. A kit may include a faucet, but its hardware may not fit every sink or countertop. A seized valve or corroded connection can turn a routine hookup into replacement plumbing.

Many under-sink kits require a 1-inch faucet hole when no soap-dispenser opening is available. Their installation guidance also directs installers to use Teflon tape on external threads when addressing threaded leaks, as shown in the manufacturer installation instructions.

Before approving the work, ask for written prices for drilling, valve replacement, drain modification, extra tubing, and disposal. Confirm whether mounting hardware, testing, and the first system flush are included. “Installation included” is too vague to protect your budget.

The quote usually balloons when a basic connection requires countertop drilling, a replacement shutoff valve, or changes to the drain. Those modifications, not the filter housing alone, explain why two installers can price the same equipment very differently.

DIY Installation Versus Hiring a Professional

DIY works for a cooperative plumbing setup, not every filter project. Choose it when the shutoff valve closes fully, the cabinet offers clear access, the sink already has a usable faucet hole, and the system is a basic carbon unit without a drain connection. The work then centers on disconnecting the supply, routing tubing correctly, installing the cartridge, flushing the unit, and checking for leaks.

Factor DIY Professional
Cost Avoids installation labor Adds labor to equipment cost
Time Reserve several hours Usually one appointment
Tools Wrench, tubing cutter, drill, bits, tape Installer supplies specialized tools
Skill floor Requires plumbing and fitting judgment Technician handles difficult connections
Main risk Leaks, countertop damage, warranty disputes Service-call limits or added charges
Best fit Accessible carbon setup RO, hard countertop, old or corroded plumbing

The labor line is only part of the decision. A professional installation can cost more upfront, but it can prevent a flooded cabinet and identify failed valves or damaged connections before they cause further trouble. Ask whether the quote covers testing and leak checks, rather than judging it by labor alone.

A basic carbon system favors DIY when the cold-water valve works and no drilling is needed. Hire a professional for reverse osmosis, especially when the drain saddle, storage tank, and dedicated faucet must be coordinated. Those added connections create more opportunities for leaks and make a low equipment price less meaningful.

A cheap installation is only cheap if the connection stays dry after the installer leaves.

Call a professional if you find corrosion, brittle tubing, a valve that will not shut off, or a granite, quartz, or porcelain countertop. Drilling those materials with the wrong bit can cause chips or cracks and turn a filter installation into a countertop repair. Get a written price for any valve work, drilling, drain changes, or extra fittings before approving the job.

Tools Time and Steps for a DIY Install

Gather everything before shutting off the water. You'll want an adjustable wrench, basin wrench, tubing cutter, drill with the correct bit, Teflon tape, a replacement shutoff valve if the existing one is unreliable, a saddle tee or compression tee, and the manufacturer's hardware kit.
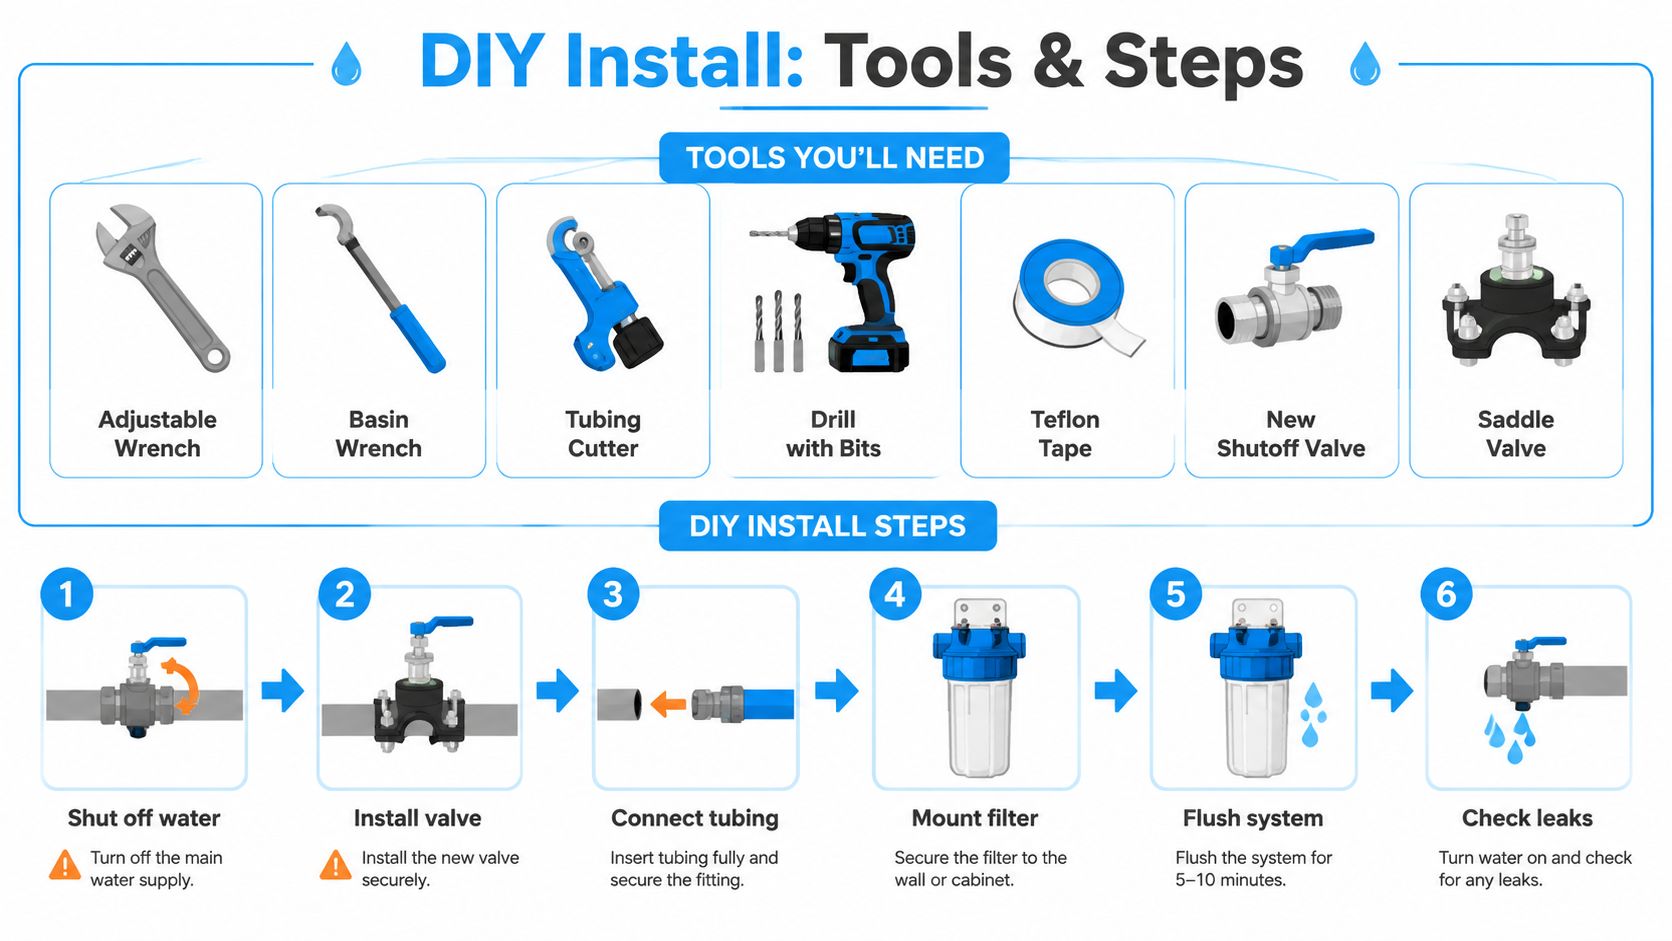
An instructional infographic detailing the tools and step-by-step process for a DIY under sink water filter installation.

The installation sequence

  1. Shut off the water: Close the cold-water valve, then open the faucet to release pressure. If water continues flowing, stop. The valve needs repair before you continue.
  2. Install the supply connection: Fit the tee or approved adapter to the cold-water line. Don't force mismatched compression fittings.
  3. Prepare the faucet: Use an existing opening when possible. If drilling is required, confirm the countertop material and the kit's hole size before touching the drill.
  4. Mount the filter: Secure the bracket where cartridges can be removed without dismantling the cabinet.
  5. Connect tubing: Cut clean, square tube ends and push or compress them fully into the fittings. A crooked cut can create a slow leak.
  6. Install cartridges and flush: Follow the manufacturer's order, open the supply slowly, and flush the system as directed.
  7. Check every connection: Dry the fittings with a paper towel, run the faucet, and inspect again after the cabinet has been closed.

A basic carbon installation commonly takes 2 to 4 hours, while a full RO installation can take 4 to 6 hours, assuming the cabinet and plumbing present no surprises, according to the supplied installation benchmarks. Beginners usually stall at the countertop, compression fittings, and RO drain saddle angle.

For a visual walkthrough of the process, this installation video shows the sequence in a practical format:

Don't skip the final leak check. Leave the cabinet dry and inspect the connections again after the system has operated, because a fitting can remain dry during assembly and seep once the line is pressurized.

Maintenance Filter Replacement and Total Cost of Ownership

The purchase price is a down payment. A filter that sits under the sink still needs cartridges, sanitation, tubing, and occasional faucet hardware. The least expensive installation can become the costlier ownership choice if replacement parts are difficult to find or the system uses several expensive stages.

The supplied maintenance benchmarks put sediment pre-filters around $15 to $30 every 6 to 12 months, carbon cartridges around $25 to $60 annually, and RO membranes plus polishing filters around $40 to $120 every 12 to 24 months. Annual sanitization may cost $20 in vinegar for a homeowner or $80 to $150 when a professional handles it.

System Type Filters/Year 3-Year Total 5-Year Total 10-Year Total
Standard carbon Sediment and carbon replacements Qualitatively, low ongoing spend Qualitatively, moderate cumulative spend Near $300 to $500
Multi-stage carbon Several cartridge stages Higher than single-stage Builds with each replacement stage Depends on cartridge pricing and usage
Reverse osmosis Prefilters, post-filter, membrane Higher maintenance burden Includes periodic membrane replacement Can exceed $1,200 in filters alone

The ten-year planning figures above come from the supplied ownership guidance. A basic unit can land near $300 to $500 over a decade, while a full RO system can exceed $1,200 in filters alone, before labor or water charges enter the calculation.

RO also carries non-filter expenses. It sends roughly 3 to 4 gallons of water to the drain for every gallon produced, according to the reverse osmosis cost guide. UV add-ons consume electricity, and a replacement dedicated faucet can cost $25 to $70 if the original develops a leak or cracks.

Maintenance that protects the installation

Replace cartridges on the manufacturer's schedule, sanitize the housings when required, and inspect tubing whenever you change a filter. If the cabinet floor shows moisture, don't wait for the next maintenance date. Shut off the system and find the leak before water reaches the cabinet base or flooring.

The ownership math favors the simplest system that addresses the actual water problem. Don't pay for an RO tank and membrane if a properly selected carbon unit meets your needs, but don't choose carbon solely because the initial installation looks cheaper.

When to DIY When to Hire and How to Budget Smartly

Use a three-tier decision instead of guessing.

DIY is appropriate when the cold-water shutoff works, the feed line is a standard 1/2-inch connection, the cabinet is accessible, and the countertop doesn't require difficult drilling. A homeowner who already owns the basic tools can keep the job simple and avoid routine labor charges.

A handyman fits the middle ground when the installation is straightforward but the cabinet is tight or the homeowner lacks the tools. This is a practical choice for a standard carbon unit, provided the handyman can identify incompatible fittings and knows when to stop.

Hire a licensed plumber when the shutoff valve is missing or corroded, the supply line is brittle, the countertop is granite or quartz, or the RO drain connection must tie into ABS or cast iron. A permit or pressure test requirement also moves the job out of casual DIY territory.

For broader guidance on choosing and maintaining filtration equipment, the Water Filter Advisor advice center is a useful reference alongside the manufacturer's installation manual.
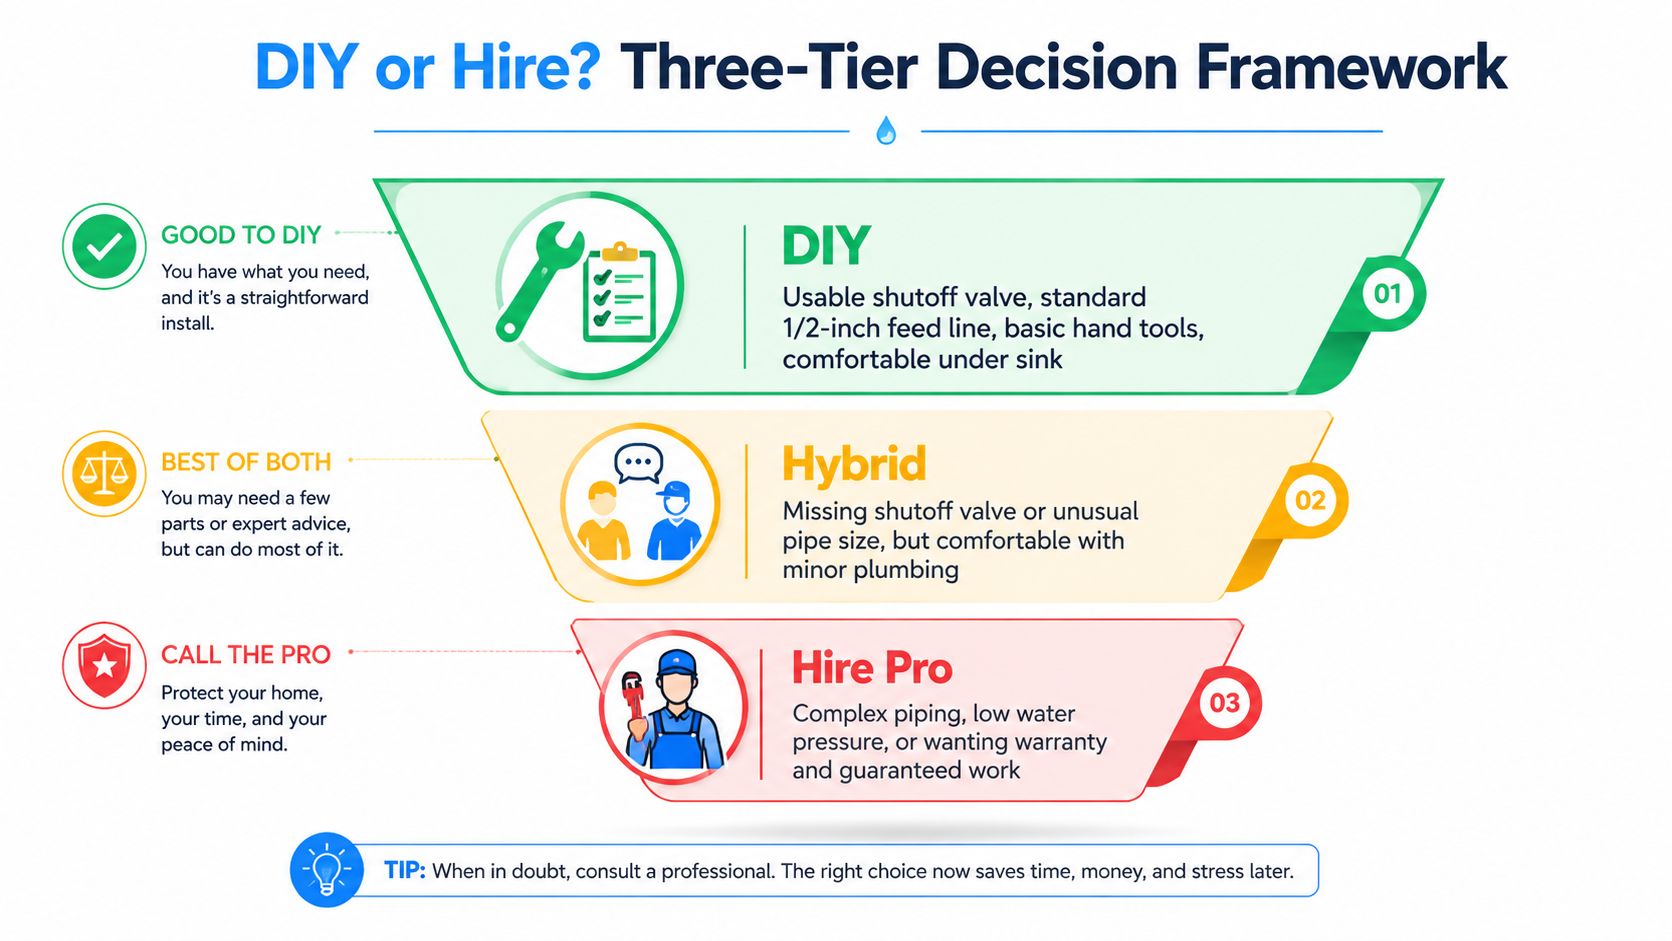
A DIY or hire decision framework infographic for installing water filters based on complexity and skill.

Five ways to keep the quote under control

  • Get two written quotes: Make installers price the same equipment and scope.
  • Demand an itemized breakdown: Separate labor, faucet work, drilling, valves, fittings, and drain work.
  • Watch subscriptions: Bundled replacement-filter plans can make a low equipment price expensive over time.
  • Coordinate with a remodel: If the sink or countertop is already being changed, absorb faucet drilling and plumbing work into that project.
  • Skip unnecessary hardware: Don't buy a separate dedicated faucet when the included dispenser or air-gap hardware fits the sink.

My recommendation is straightforward. Choose standard carbon for a simple taste and chlorine project, choose multi-stage filtration when the water calls for more treatment stages, and choose RO only when its added hardware and maintenance make sense for your water concerns. Then pay for the installation complexity you have, not the complexity printed on a sales page.


Water Filter Advisor helps homeowners compare under-sink, reverse osmosis, faucet, whole-home, and replacement-filter options while explaining installation, maintenance, certifications, and water testing. Visit Water Filter Advisor before you buy, compare your project against the cost drivers above, and make a filter decision that fits both your water and your cabinet.
Water Filtration System Cost: A Clear Guide to Your Home’s H2O Upgrade

So, you've decided to upgrade your tap water. Fantastic! But as you start shopping for a water filter, you'll find prices are all over the map. You could spend $30 on a simple pitcher or go all-in with a $3,000+ whole-house system that treats every drop in your home. The final water filtration system cost really boils down to the type of filter, how tricky the installation is, and what it costs to keep it humming with fresh cartridges.

Your Quick Guide to Water Filtration System Costs

Diving into the world of water filters can feel like stepping onto a car lot. You've got your no-frills, get-you-from-A-to-B models (hello, water pitchers!) and your fully-loaded, luxury SUVs with all the bells and whistles (we're looking at you, whole-house systems). Each serves a different purpose and, naturally, comes with a very different price tag. This guide is your friendly salesperson, here to cut through the noise and give you a crystal-clear look at what you can expect to pay for better water at home.

First, let's take a quick snapshot of the typical price ranges for the most common home systems. Think of this as your cheat sheet—a way to get a feel for the market before you get lost in a sea of technical jargon. After all, the best filter is one that solves your water woes without springing a leak in your budget.

Finding the Right Fit for Your Wallet

The true cost of a water filter isn't just the number on the box. It’s a cocktail of three key ingredients: the upfront price of the system, the ongoing maintenance (mostly filter swaps), and the specific water problem it’s built to solve. If you're a renter who just wants your tap water to taste less like a swimming pool, a simple faucet filter is a brilliant, low-cost fix. But for a homeowner trying to shield their pipes and appliances from the tyranny of hard water, a whole-house system is a much more significant, long-term investment.

This chart breaks down those core costs so you can see exactly where your money goes.

A bar chart visually breaking down filter costs, showing upfront, annual maintenance, and per-use expenses.

As you can see, the systems with a higher price tag upfront often treat more water and can sometimes have lower annual costs relative to their output. On the other hand, the simpler filters are cheap to get started with but need more frequent attention.

To lay it all out, here's a quick comparison of the most popular types of home water filters. This table breaks down what you'll pay initially, what you can expect to spend each year to keep it running, and who each system is really for.

The real water filtration system cost isn't just the initial purchase. It’s the total you'll invest over its entire life, including the hardware, any installation help, and all the replacement filters.

Use this table as a quick reference to match a filter to your needs and budget.

Home Water Filter Costs at a Glance

Filter Type Upfront Cost Range Annual Maintenance Cost Best For
Pitcher/Dispenser $20 – $80 $60 – $180 Renters and individuals looking for basic taste and odor improvement for drinking water.
Faucet-Mounted $30 – $100 $50 – $150 Easy, tool-free filtration for drinking and cooking water directly from the kitchen tap.
Under-Sink $150 – $1,200 $100 – $300 Homeowners wanting advanced, multi-stage filtration for drinking water, hidden from view.
Whole-House $500 – $4,000+ $75 – $500 Homeowners aiming to treat all water entering the house to protect plumbing and appliances.

This at-a-glance view should give you a solid idea of which categories make the most sense for you to explore further.

Decoding the Upfront Price of Different Filter Types

Ever wonder why a whole-house system can set you back thousands while a simple faucet filter costs less than dinner for two? The upfront water filtration system cost is a lot like comparing home security. A basic door alarm is great for one entry point, but a fully integrated smart system protects the entire property.

Each filter type is engineered for a different mission, and its price tag reflects that—from its complexity and capacity to its raw power to yank out contaminants.

An under-sink water filtration system with multiple filters and a separate faucet in a kitchen cabinet.

Let's start with the heavy hitters and work our way down. Knowing what you're paying for is the first step to making a smart investment in your home's water quality.

Whole-House Systems: The Ultimate Home Protection

Whole-house water filters are the undisputed champions of home water treatment—and they have the price tag to prove it. Plumbed in right where your main water line enters your home, these systems treat every single drop you use, from the kitchen sink to the shower and washing machine.

Their price reflects their beefy construction and massive capacity. You aren't just buying a filter; you're investing in a serious piece of equipment designed to process tens of thousands of gallons.

  • Carbon-Based Systems ($500 – $1,500): Think of these as the all-stars for great-tasting water. They're fantastic for kicking out chlorine, sediment, and chemicals that cause funky tastes and smells.
  • Water Softeners ($800 – $3,000): Built specifically to fight the scourge of hard water, these use ion exchange to remove minerals like calcium and magnesium, stopping that crusty scale buildup in its tracks.
  • Multi-Stage Systems ($1,500 – $4,000+): These are the all-in-one powerhouses. They combine sediment filters, carbon filters, and sometimes even UV purifiers to tackle a whole mess of issues, from dirt and chemicals to bacteria and viruses.

That high upfront cost covers durable tanks, complex valve heads, and huge beds of filter media that are built to last for years.

Under-Sink Systems: The Hidden Powerhouse

For anyone who wants targeted, high-purity drinking water without a major plumbing overhaul, under-sink filters are a fantastic middle ground. Tucked away in a cabinet, these systems hook right into your cold water line and give you filtered water through a separate, dedicated faucet.

An under-sink system's price is mostly about its filtration tech. A simple two-stage carbon filter might run you $150, but a more advanced reverse osmosis (RO) system can easily jump past $500.

Reverse osmosis systems are wildly popular for a reason—they offer one of the most thorough filtration methods you can get at home. By forcing water through a super-fine membrane, they can remove up to 99% of dissolved solids, including nasty stuff like fluoride, lead, and arsenic.

The demand for these powerful systems is booming. The global water treatment market is expected to rocket from USD 45.15 billion in 2025 to USD 91.39 billion by 2034. Reverse osmosis units already grab a huge 29% share of that market, with home setups typically costing between $300 and $1,200. You can dig into the numbers and trends in this detailed analysis about global water treatment system growth on precedenceresearch.com.

Point-of-Use Filters: Affordable and Accessible

Let's be real—not everyone needs or can afford a big, permanent system. Point-of-use filters are your friendly neighborhood heroes, offering an easy, budget-friendly way to get clean water right where you use it most. These devices are all about convenience and a low initial cost.

Their simplicity is their superpower, and it's what keeps them cheap. They use smaller, less complicated parts and are usually designed for you to install yourself, which saves you a plumber's fee.

Here’s a quick look at the most common types:

  • Faucet Filters ($30 – $100): These little gadgets attach right to your kitchen faucet, letting you switch between filtered and unfiltered water with the flick of a lever. They're perfect for renters or anyone who wants a quick upgrade for cooking and drinking.
  • Countertop Filters ($50 – $200): Sitting next to your sink, these systems pull water from the faucet through a separate filtration unit. They usually have bigger filters than the faucet-mounted kind, which means fewer changes.
  • Showerhead Filters ($25 – $75): These are specifically made to get chlorine and other chemicals out of your shower water. By doing so, they can help cut down on dry skin and hair, making them a cheap and easy investment in your daily routine.

While the upfront cost is low, just remember their smaller filters need to be swapped out more often—we'll get into that in the next section on maintenance.

The Hidden Costs of Filter Maintenance and Upkeep

Buying a water filtration system is a lot like adopting a pet—the initial price is just the beginning. The real, long-term water filtration system cost comes from the ongoing care and feeding. It's the filter changes, occasional tune-ups, and other little expenses that you really have to budget for over its lifetime.

This is where you'll find the lifetime expenses you need to plan for. From replacement cartridges and plumbing fees to the subtle costs of extra water or electricity, knowing these factors helps you figure out the true cost of ownership before you commit.

Household water filtration system components including filters, a faucet, and a tank, highlighting upfront costs.

The Never-Ending Story of Replacement Filters

The biggest recurring expense for any water filter is, without a doubt, the replacement cartridge. Think of it as a subscription for clean water. The filters are the unsung heroes, trapping all the gunk, but eventually they fill up and have to be swapped out to keep your water safe and delicious.

How often you do this—and how much it costs—varies wildly. A cheap water pitcher might seem like a bargain, but its small filters usually need replacing every 1-2 months. That can add up to $60 to $180 per year. On the other hand, a big whole-house system might only need a new filter once every 12 months or even longer, with annual costs running from $75 to $500.

Here’s a quick look at what to expect:

  • Pitcher Filters: Every 40 gallons (about every 2 months).
  • Faucet Filters: Every 100 gallons (roughly every 3 months).
  • Under-Sink Filters: These have multiple stages. Expect to change sediment filters every 6-12 months, carbon filters annually, and the RO membrane every 2-4 years.
  • Whole-House Sediment Filters: Typically every 3-6 months.
  • Whole-House Carbon Tanks: The carbon media inside can last 3-5 years or more before it needs to be replaced.

Putting off a filter change is a bad idea. Not only does it stop working well, but an old, clogged filter can actually become a breeding ground for bacteria. It can even release all the junk it trapped right back into your water, making it worse than when you started.

Professional Installation and Setup Fees

While you can install many smaller filters yourself, bigger systems like whole-house filters and some under-sink units are best left to a professional plumber. This is a one-time cost, but it's a big one, often adding $300 to $1,500 to your initial investment.

That fee covers the expertise needed to cut into your main water line, install the right valves, and make sure everything is leak-free and up to code. Sure, a DIY job can save you cash, but one mistake could lead to thousands in water damage. For complex jobs, a pro is worth every penny.

The Cost of Checking Your Work: Water Testing

How do you know if your filter is actually doing its job? You have to test your water. While it’s not a direct maintenance cost for the filter itself, it's the only way to be sure you're getting the clean water you're paying for.

You've got a few options here:

  1. DIY Test Strips: These are cheap ($20-$40) and give you a quick read on basics like chlorine, pH, and hardness.
  2. Mail-in Lab Kits: For around $100-$300, you can send a sample to a certified lab for a deep dive into contaminants like lead, arsenic, and VOCs.

My advice? Test your water before you buy a filter, and then re-test it once a year to make sure your system is still on its A-game, especially if you're on well water.

Hidden Utility Costs: Water and Electricity

Finally, don't forget that some systems use water and electricity to run. Reverse osmosis (RO) systems are famous for being incredibly effective, but they also create wastewater. For every gallon of pure water you get, an RO system might send 3-4 gallons of concentrated, contaminated water down the drain. It's a necessary part of the process, but it will show up on your water bill.

Systems with UV purifiers or booster pumps will also draw a small but constant amount of electricity. It's not much, but it's another small piece of the total cost puzzle. A standard residential RO unit, for example, might run $200 to $800 upfront, with another $50 to $150 per year for filters.

For folks in the U.S., systems with official NSF testing offer peace of mind, and their lifetime costs can be 30% lower than buying bottled water over five years. With growing health concerns, U.S. households spent a whopping $15 billion on bottled water in 2023, which is driving more people to home filtration. You can dive deeper into this trend in the full market analysis on water purifiers from fortunebusinessinsights.com.

Calculating Your Return on Investment

So, is a water filter actually worth the money? After looking at the upfront price tags and long-term upkeep, it’s easy to get lost in the numbers. Let’s shift the conversation from just cost to real-world value. Think of a filtration system less as an expense and more as a smart investment in your home.

The easiest way to see this is by looking at your wallet. The return on investment (ROI) is a fancy term for a simple idea: comparing what you spend on the system to what you save over time. For most people, the biggest and fastest savings come from finally kicking the bottled water habit.

Two water filters, a calendar, and a notebook titled 'Maintenance Costs' on a blue mat, planning expenses.

Let's break down how quickly a filter can pay for itself and start putting cash back into your budget.

The Financial Payback Period

Picture a family that spends about $50 a month on cases of bottled water. That habit adds up to a surprising $600 per year. When you stack that annual cost against a one-time purchase of a filtration system, the benefits become pretty clear.

  • Faucet Filter Example: A simple $50 faucet filter with maybe $100 in replacement cartridges for the year brings your total first-year cost to $150. That little gadget would pay for itself in just three months, saving the family $450 in that first year alone.

  • Under-Sink System Example: Let's say you go for a more serious under-sink unit that costs $400 upfront, plus $150 for the first year's filters. Your total is $550. Even at that price, it pays for itself in just under a year. After that, it’s pure savings, year after year.

This quick ROI is getting easier to achieve. For homeowners who are comfortable with a little DIY, a $400 investment in a good under-sink system can cancel out a $600-a-year bottled water habit in as little as eight months. Plus, recent water treatment system advancements on precedenceresearch.com show that new materials have caused a 25% drop in filtration media costs since 2015, making bottled-quality water at home more affordable than ever.

The core idea is simple: you are shifting your spending from a disposable product (bottled water) to a durable home asset. Once the initial water filtration system cost is covered, your ongoing expense for clean water drops dramatically, often to just pennies per gallon.

Beyond the Bank Account: The 'Soft' Returns

While saving money is great, the true value of a water filter goes way beyond your budget. These are the "soft" returns—the daily quality-of-life upgrades you'll start to notice almost immediately.

It’s kind of like buying a really good mattress. You don’t just do it to save on future chiropractor bills; you do it for the immediate reward of better sleep and feeling great every morning. A water filter delivers similar, everyday perks.

Healthier Skin and Hair

Ever get out of the shower and your skin feels tight and itchy? Or your hair feels dry and brittle? The culprit is often chlorine, the standard disinfectant used in city water. A simple showerhead filter or a whole-house system removes that chlorine before it even gets to you.

The difference is immediate:

  • Softer, more hydrated skin that doesn't need as much lotion.
  • Shinier, healthier-looking hair that's less frizzy and easier to style.
  • Less irritation for anyone with sensitive skin or conditions like eczema.

Better Tasting Food and Drinks

Think about it—your morning coffee is over 98% water. So is your tea, your soup, and the water you use to boil pasta. If your tap water tastes a little "off" because of chlorine or other chemicals, that flavor is going straight into everything you cook and drink.

With filtered water, you get:

  • A cleaner, smoother cup of coffee where you can actually taste the notes of the bean.
  • Tea that tastes pure and refreshing, without any weird chemical aftertaste.
  • Food that tastes the way it's supposed to, without picking up funky flavors from the water.

In the end, calculating the ROI isn't just a spreadsheet exercise. It’s about recognizing that a water filtration system is a powerful investment in your home’s comfort, your family’s health, and your long-term financial well-being.

How to Save Money on Your Water Filtration System

Getting clean, great-tasting water flowing from your taps shouldn't mean draining your bank account. The initial water filtration system cost can definitely look intimidating, but there are plenty of smart ways to chip away at both the upfront price and those pesky long-term expenses.

With a bit of planning, you can make a savvy financial choice without ever having to compromise on your family’s water quality. Think of it like grocery shopping—you could pay full price, or you can stack sales, coupons, and smart choices to get the exact same quality for a lot less. It’s all about knowing where to look.

Hunt for Deals and Seasonal Sales

Your first stop should always be a hunt for discounts. Manufacturers and big-box retailers are constantly running promotions, especially around holidays like Black Friday, Memorial Day, and Labor Day. A quick sign-up for a few brand newsletters can also give you a heads-up on flash sales or exclusive offers.

As you're zeroing in on a system, keep an eye out for coupons or promotional offers from both manufacturers and installers. A simple search can sometimes turn up a percentage-off deal or a rebate that takes a real bite out of the purchase price.

Prioritize Certified Systems

This one might feel a little backward, but spending a little more on a certified product can absolutely save you money down the road. You want to see systems that have been independently tested and certified by organizations like the NSF (National Sanitation Foundation) or ANSI (American National Standards Institute).

These certifications are your proof that a filter actually does what the box says it does. A cheap, uncertified filter might claim to remove lead and chlorine, but without that NSF/ANSI stamp, you’re just taking their word for it. Paying for performance you aren't actually getting is the quickest way to throw money away.

When you choose a certified system, you’re not just buying a filter; you’re buying confirmed results and avoiding overpaying for empty promises. If you need more in-depth guidance on finding the right system for your specific water issues, you can find a ton of resources and advice for water filters on waterfilteradvisor.com.

Consider DIY Installation for Simpler Systems

One of the biggest cost drivers is installation. While a big whole-house system is almost always a job for a professional plumber, a lot of the smaller filters are designed for an easy DIY install.

  • Good for DIY: Faucet filters, countertop systems, showerhead filters, and most under-sink units can be up and running in under an hour with just a few basic tools. This can easily save you $200 to $500 in labor fees.
  • Call a Pro: Leave the whole-house systems and some of the more complex reverse osmosis units to the experts. These often involve cutting into your main water line, and one mistake there could lead to a very expensive water damage problem. A plumber is a worthwhile investment here.

Explore Filter Subscription Services

Let's be honest, the biggest long-term cost is replacing the filters. To make this easier on the wallet, a lot of companies now offer subscription services. Signing up often gets you a nice discount (usually 10-15%) on replacement cartridges, and they’ll show up at your door right when it’s time for a change.

This not only saves you money but also takes the guesswork out of maintenance, ensuring your system keeps running at peak performance.

To help you keep track of all the ways you can save, here’s a quick checklist you can use.

Your Cost-Saving Checklist for Water Filtration

Use this table to pinpoint the best strategies for your budget and needs. A little effort upfront can lead to significant savings over the life of your system.

Strategy Potential Savings Effort Level
Shop Holiday & Seasonal Sales 15-30% off initial purchase price Low
Search for Manufacturer Coupons $25 – $100 or more off upfront cost Low
Choose NSF/ANSI Certified Filters Avoids wasted money on ineffective products Medium
DIY Installation (for simple systems) $200 – $500 in professional labor fees Medium
Sign Up for Filter Subscriptions 10-15% off all replacement filters Low
Buy Multi-Packs of Filters 5-10% discount compared to single packs Low
Perform Regular Maintenance Prevents costly repairs and extends system life Medium

By combining a few of these tips, you can make a huge dent in the total cost of ownership. Smart shopping and a little bit of planning go a long way.

Making the Right Financial Choice for Your Home

So, what's the bottom line? Picking the best water filter isn't about grabbing the cheapest option you can find. It’s about matching a system to your home's specific water, your family's needs, and—of course—your budget.

Making a smart call means looking past the initial price tag. The real water filtration system cost shows up over years of use, once you factor in filter replacements and any ongoing maintenance. A simple pitcher is cheap to buy, but those filter swaps add up. A whole-house system is a bigger investment upfront, but it protects every tap in your home with less frequent upkeep. You just have to match the solution to the problem.

From Cost to Investment

Think of a quality filter system as a proactive investment in a healthier home. For many people, it pays for itself a lot faster than you'd think.

For example, a solid reverse osmosis system can pay for itself in just 2-3 years by cutting out bottled water completely. With households spending an average of $300 on bottled water in 2023, the savings are real. As our water sources get more stressed, a good filtration system also protects you from potential price hikes down the road.

Ultimately, choosing the right system is just one part of a bigger plan to master your household monthly expenses and keep your finances in good shape for the long haul.

Here's the most important takeaway: the upfront price is just the first chapter. The total cost of ownership is what really impacts your wallet and your peace of mind.

Now that you know what to look for, your first step is simple: get your water tested. Once you know exactly what’s in your water, you can choose the right system with confidence and without wasting a dime.

Got Questions About Filtration Costs? We’ve Got Answers.

Still have a few things you're wondering about? You're not the only one. When it comes to the cost of a water filtration system, the same handful of questions tend to pop up. Let's clear the air and give you the straightforward answers you need.

Here are some of the most common questions we hear from homeowners.

What’s the Real Cost to Install a Whole House Water Filter?

Getting a whole-house water filter professionally installed will typically run you somewhere between $300 and $1,500. Where you land in that range really depends on a few things: how complicated your plumbing setup is, the type of system you bought, and what plumbers charge in your neck of the woods.

A basic, single-tank carbon filter, for instance, will be on the lower end of that scale. But if you're installing a beefier, multi-stage system that includes a water softener, expect the price to creep toward that $1,500 mark. Sure, you can save that cash by doing it yourself, but unless you're confident in your plumbing skills, it's a risky move that could lead to some very pricey leaks.

Is a Water Filter System Actually Cheaper Than Buying Bottled Water?

In the long run? Absolutely, and it's not even close. The initial cost of a filtration system might seem steep, but it almost always beats a bottled water habit over time. Think of it as paying a bit more upfront to save a whole lot more down the road.

Let's do the math. A family spending just $30 a month on bottled water is shelling out $360 a year. A simple faucet filter or under-sink system will pay for itself in well under a year. Even a high-end whole-house system will give you a solid return on your investment within a few years, all while delivering clean water from every tap in your house.

Do I Really Need a More Expensive Filter for My Well Water?

More often than not, yes. Unlike city water that's been treated, well water is raw and can carry a much wider, and wilder, range of contaminants. You could be dealing with everything from heavy sediment and iron to bacteria that municipal water plants would have zapped long before it reached a home.

This means you’ll likely need a more powerful, multi-stage filtration system to get your well water clean and safe—and that naturally costs more. The single most important thing you can do is get your well water professionally tested first. Those test results will give you a perfect roadmap, showing you exactly what contaminants you need to target so you can buy the right system and not a penny more.

Can I Save Money by Using Generic Replacement Filters?

You can, but you have to be careful. Generic or third-party filter cartridges are usually a lot cheaper than the brand-name ones, which is obviously tempting. The catch is that they might not have the same quality, performance, or—most importantly—the certifications (like NSF/ANSI) that come with the manufacturer's own filters.

You could end up with a filter that barely removes contaminants or, worse, one that could damage your system. If you're going to try generic filters, do your homework first. Dig into the brand, check for any independent certifications, and read a ton of user reviews to make sure it's a safe and effective choice for your system.


At Water Filter Advisor, our goal is to help you find the right filtration solution for your home and your budget. Check out our in-depth guides and reviews to make a smart, confident decision for your family's health. Learn more at https://www.waterfilteradvisor.com.

Your Ultimate Guide to Water Filtration System Installation Costs

So, you're ready to ditch questionable tap water and upgrade your home with a water filtration system. Fantastic choice! But the big question looms: What’s this going to cost? The truth is, it’s a bit of a choose-your-own-adventure. You could be looking at a breezy $150 for an under-sink filter you tackle on a Saturday afternoon, or you could invest upwards of $5,000 for a top-of-the-line whole-house system installed by a seasoned pro. The final bill really comes down to the system you pick and whether you're calling in the plumbing cavalry.

Your Quick Guide To Water Filter Installation Costs

Trying to pin down the water filtration system installation cost can feel like trying to guess the number of jellybeans in a jar. Are you just looking to make your kitchen tap water taste like it came from a mountain spring, or do you need a fortress-like system that purifies every drop coming into your home? Each path has a different price tag, not just for the unit itself but for the labor to get it humming along.

This guide is here to demystify the dollars and cents. We’ll walk through the typical costs for the most common types of home water filters, from small, single-faucet heroes to the big guns that guard your entire home, so you can build a realistic budget from the get-go.

A First Look at the Numbers

Before we dive into the nitty-gritty of plumber rates and filter replacements, let's get a bird's-eye view. Your initial investment is always a mix of two things: the hardware (the filter system itself) and the installation (the brains and brawn to get it working). Some simpler systems are perfect for a weekend DIY project, while others really need a professional touch to avoid turning your basement into an accidental swimming pool. If you're curious about what the pros handle, checking out their professional water filtration system services can give you a great idea of the scope of work.

A kitchen counter features a new water filtration system next to a sink, with an 'Installation Costs' sign.

Here’s a pro tip: always start with a water test. Once you know exactly what’s in your water—whether it’s just chlorine giving it a "pool party" vibe or something more complex—you can choose the right filter without paying for features you don’t need. It's the smartest first step you can take.

To make things easier, we've put together a quick comparison table. It gives you an at-a-glance look at what to expect so you can match your needs to your budget. For a deeper dive into picking the perfect system for your water quality issues, you can find some fantastic advice at Water Filter Advisor.

Estimated Installation Costs By System Type

Here’s a breakdown of what you can generally expect to pay for the most common types of water filtration systems, including both the unit and the cost of professional installation.

System Type Average Total Installation Cost (Materials + Labor) Best For
Faucet/Shower Filter $50 – $150 Renters or those needing targeted chlorine and sediment removal at a single point.
Under-Sink Filter $150 – $700 Improving the taste and quality of drinking and cooking water at the kitchen sink.
Reverse Osmosis (RO) $300 – $1,200 Homeowners wanting to remove a wide spectrum of contaminants, including heavy metals and dissolved solids.
Whole-House System $1,000 – $5,000+ Families seeking comprehensive filtration for every tap, protecting plumbing and appliances from sediment and scale.

As you can see, the range is pretty wide. A simple screw-on faucet filter is a quick and cheap fix, while a comprehensive whole-house system is a much bigger investment that protects your entire home's water supply.

Breaking Down Your Installation Quote

When a plumber hands you an installation quote, it can feel like you're trying to decipher a secret code. You see a jumble of line items, part numbers, and dollar signs, but what does it all really mean for your wallet?

At the end of the day, every water filtration system installation cost breaks down into two main buckets: the equipment itself and the skilled labor needed to get it up and running in your home. Getting a handle on this split is the first step toward really understanding what you're paying for and not just blindly trusting the numbers.

Decoding The Labor Cost Component

Labor is almost always the wildcard in any quote. A plumber's hourly rate can swing wildly from $45 to over $200, depending on where you live and their level of expertise. For a simple under-sink filter, you might only be looking at an hour or two of work, which keeps the labor cost pretty manageable.

But things can get complicated—and expensive—fast. A few common curveballs can turn a quick job into a much bigger project.

  • Tricky Pipe Rerouting: If your main water line is tucked away in a cramped crawlspace or the existing plumbing looks like a plate of spaghetti, you can bet the labor hours will start to add up.
  • Drilling Through Countertops: That sleek, dedicated faucet for your new reverse osmosis system looks great, but someone has to drill a hole through your granite or quartz countertop to install it. That’s a delicate job that takes extra time, skill, and a steady hand.
  • Adding Pre-Treatment Systems: Have really hard water or lots of sediment? You might need a pre-filter installed ahead of your main unit, which means more parts, more connections, and more labor.
  • Running Electrical: Some systems, like those with UV purifiers, need power. If there isn't an outlet handy, you might need an electrician to run a new line, adding another professional's time to the bill.

This is exactly why you should always ask for an itemized quote. Seeing a breakdown of the estimated hours helps you understand precisely where the money is going and ensures there are no surprises.

Understanding The Equipment Cost Component

The other half of the story is the system itself. The price tag on the hardware is all about the technology inside, the brand name on the box, and how much water it can handle. It’s no secret that high upfront costs are a major hurdle in the water filtration world, especially for advanced units.

While you can get a countertop reverse osmosis system installed for $100-$500 or an under-sink model for $300-$1,000, a whole-house solution can easily jump to $5,000-$12,000. Brand matters, too. A GE Pro Elite unit might run you $200-$500 for the hardware, whereas a system from a premium brand like Culligan could be anywhere from $250 to over $2,000. And that’s before you even factor in the national average labor cost of $300-$700. You can learn more about the factors influencing reverse osmosis system costs and see how they stack up.

By understanding both the materials and labor sections of your quote, you transform from a passive customer into an informed homeowner. You can ask targeted questions, compare estimates effectively, and ensure you're getting fair value for a system that will protect your home's water for years.

Think of a detailed quote not just as a bill, but as a blueprint for the project. It tells you exactly what parts are being used (like a Culligan versus an EcoWater system), how long the job is expected to take, and any obstacles the plumber is planning for. This kind of transparency is key to spotting a fair deal and making a confident investment in your home's water quality.

DIY Project vs. Professional Plumber: Who Should You Call?

One of the biggest forks in the road for your water filtration system installation cost is deciding whether to go it alone or bring in a pro. It’s the age-old debate: save some cash on labor or guarantee the job gets done right the first time? The answer really boils down to the complexity of the system and how comfortable you are getting up close and personal with your home's plumbing.

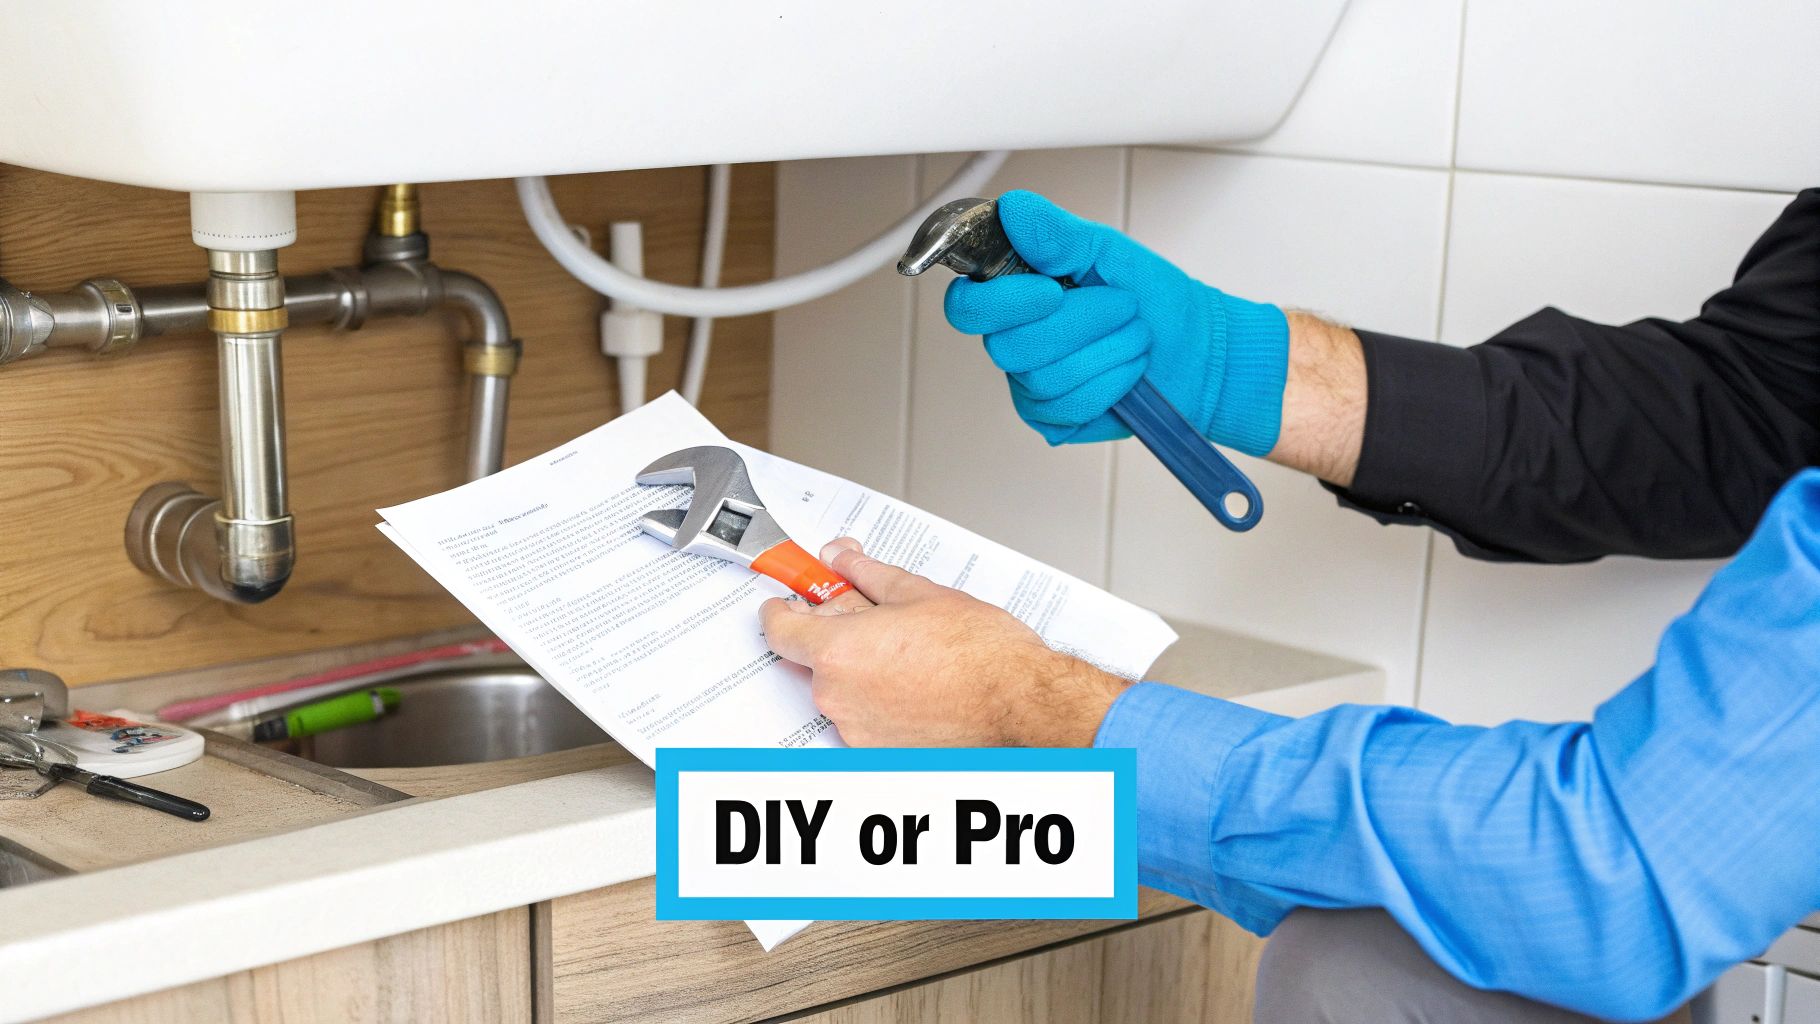
Two sets of hands, one gloved holding a pipe wrench, the other ungloved with an adjustable wrench and papers, under a sink with plumbing, illustrating DIY vs professional options.

This decision is about more than just the upfront cost; it's a balance between immediate savings and long-term peace of mind. Let's dig into when you should roll up your sleeves and when it's time to pick up the phone.

The Weekend Warrior's DIY Route

For the handy homeowner, installing your own filter can be a really satisfying project. You pick up a new skill, get to know your home's plumbing a little better, and—best of all—you get to keep that labor money in your pocket.

Many systems are practically made for DIY. Faucet-mounted filters, showerhead units, and most countertop systems are genuinely "plug-and-play." You’re usually just unscrewing an old part and attaching the new one. Even many under-sink filters are well within the grasp of a confident DIYer with a good YouTube tutorial.

If you're tackling it yourself, you'll need a few basic tools on hand:

  • Adjustable Wrenches: A must-have for getting fittings tight (but not too tight!).
  • A Bucket and Towels: Trust us, there will be drips. Be prepared.
  • A Drill: You might need this to mount the filter housing or its separate faucet.
  • Teflon Tape: Your best friend for creating a watertight seal on any threaded connection.

There’s nothing quite like that feeling of turning on the faucet and tasting crisp, clean water from a system you installed yourself. But it's not a path without a few potential pitfalls.

When to Call in a Professional Plumber

As tempting as it is to save a few hundred bucks, some jobs are just better left to the experts. A licensed plumber doesn't just bring tools; they bring years of experience, a keen eye for potential problems, and crucial liability insurance.

Whole-house filtration systems and more complex reverse osmosis units often require cutting into your home's main water line. This isn't a beginner-friendly task. One small mistake here isn't a tiny drip under the sink—it could mean a flooded basement, serious water damage, and a repair bill that dwarfs what you would have paid for installation.

A slow, hidden leak from a poorly installed fitting can quietly fester behind a wall or cabinet, leading to thousands in mold remediation and structural repairs down the road. Worse yet, fumbling the installation yourself could instantly void your new system's warranty, leaving you high and dry if the unit itself fails.

Hiring a pro gives you some major advantages:

  • Expertise: They’ve seen it all and can handle any weird plumbing quirks your house throws at them.
  • Efficiency: A professional can knock out an installation in a couple of hours that might take a novice an entire weekend of frustration.
  • Guarantees: A reputable plumber will stand by their work, giving you someone to call if things go wrong.

When looking for a plumber, make it a rule to get at least three itemized quotes from licensed and insured professionals. A quick check of their online reviews and a request for references can save you a world of headache. You're not just paying for labor; you're buying expertise and the confidence that the job is done right.

Comparing Costs Of Popular Home Water Filters

Not all filters are created equal, and neither are their price tags. Think of choosing a water filter like picking a vehicle—a zippy scooter is perfect for city errands, while you'll need a heavy-duty truck for hauling big loads. The right system for your home really depends on your specific needs and what's lurking in your water.

The biggest question is: what are you trying to get out of your water? Are you just fighting the funky chlorine taste from city treatment, or are you in a full-on battle with heavy sediment and iron from a private well? Each job requires a different tool, and each comes with its own water filtration system installation cost.

Let’s break down the most popular options to see how their costs and capabilities stack up.

Point-Of-Use Filters: The Targeted Approach

Point-of-use (POU) filters are the specialists. Instead of treating every drop of water in your home, they focus their efforts on a single spot—usually the kitchen sink. This targeted approach is a super cost-effective way to get high-quality drinking and cooking water right where you use it the most.

Two main players dominate this category:

  • Standard Under-Sink Filters: These are the workhorses for improving taste and odor. They’re great for getting rid of chlorine, sediment, and some volatile organic compounds (VOCs). Expect the filter itself to cost between $100 and $500, with a pro installation adding another $150 to $300.
  • Reverse Osmosis (RO) Systems: These are the surgeons of water filtration. Using a special membrane, they can remove an incredible range of tough contaminants, including lead, arsenic, fluoride, and other dissolved solids. Because they're more complex, RO systems cost more upfront—anywhere from $250 to over $1,000 for the equipment. Installation is also more involved, often running $200 to $600 since it needs its own faucet and a drain line connection.

For a family that uses a lot of water, a high-capacity RO system is a serious investment. A 1000 GPD (gallons per day) system for a 4-5 person household can cost around $3,734, plus another $2,040 for a 220-gallon storage tank. Tack on $600-$1,000 for installation, and you're looking at a total of $6,374-$6,774 just to get started.

Over a decade, the total cost of ownership can hit $13,398.59, which works out to about $111.65 per month. That might sound like a lot, but it often beats the relentless expense and waste of bottled water. In comparison, a standard under-sink filter is a much more affordable solution, ranging from $150-$4,800 fully installed, and it still does a great job on common problems like TTHMs and iron. You can dig into more details by exploring the latest market research on home water filtration systems.


To help you visualize the differences, we've put together a handy table comparing the most common system types side-by-side.

Cost & Feature Comparison Of Home Water Filter Types

System Type Upfront Equipment Cost Average Installation Cost Annual Maintenance Cost Primary Benefits
Under-Sink Filter $100 – $500 $150 – $300 $50 – $150 Improves taste and odor at one faucet; removes chlorine and sediment.
Reverse Osmosis $250 – $1,000+ $200 – $600 $100 – $300 Removes the widest range of contaminants, including heavy metals, fluoride, and salts.
Whole-House Filter $800 – $4,000+ $500 – $2,000+ $150 – $500+ Treats all water in the home, protecting plumbing and appliances while improving water quality everywhere.

Ultimately, the right choice balances your water quality goals with your budget, both for the initial purchase and for the ongoing upkeep.


Whole-House Systems: The Ultimate Guardian

If you want comprehensive protection for every faucet, shower, and appliance in your house, a whole-house system is the way to go. These systems are installed right where the main water line enters your home, acting as a gatekeeper to make sure only clean, filtered water flows through your pipes.

This all-in-one approach is perfect if you're dealing with widespread issues like:

  • Hard Water: A whole-house water softener (a type of filter) removes minerals like calcium and magnesium that cause nasty scale buildup, protecting your pipes, water heater, and dishwasher.
  • Heavy Sediment or Iron: If you're on well water, a whole-house sediment or iron filter is practically a must-have to prevent stained sinks and clogged pipes.
  • Chlorine and Chemicals: A whole-house carbon filter improves water everywhere. That means healthier skin and hair in the shower and better-tasting water from every single tap.

The real benefit of a whole-house system is total peace of mind. You’re not just getting better drinking water; you're protecting your entire home's plumbing infrastructure, from the water heater to the washing machine.

Because they’re bigger and more complex, whole-house systems are a bigger investment. The equipment alone can run from $800 to over $4,000. You'll almost certainly need a professional to install it, which typically adds another $500 to $2,000 to the bill, depending on how complicated your plumbing is. For homes on well water that need multi-stage treatment (for sediment, iron, and bacteria, for example), the total installed cost can easily climb to $9,500 or more.

The Hidden Costs Of Clean Water

That feeling of satisfaction on the day your new water filter is installed is great, but it’s not where the story ends for your wallet. The initial water filtration system installation cost is just chapter one. To really get a handle on what you're spending, you have to look at the total cost of ownership—all the ongoing expenses that keep clean, safe water flowing for years to come.

It’s a bit like buying a car. You could grab one with a low sticker price that turns out to be a gas-guzzler with pricey, frequent oil changes. Or, you could spend more upfront for a fuel-efficient model that barely needs any maintenance. Over ten years, that "cheaper" car can easily cost you a whole lot more. Water filters are the exact same way.

Uncovering The Ongoing Expenses

The biggest recurring cost for any water filtration system is, without a doubt, the replacement filters. These cartridges are the heart of the whole operation, trapping all the gunk you don't want in your water. And just like any filter, they eventually get clogged and have to be swapped out.

How often you’ll be doing this comes down to two main things:

  • Your Water Quality: If your local water is loaded with sediment, chlorine, or other contaminants, your filters are going to be working overtime and will need to be replaced sooner.
  • Your Water Usage: A big family that’s constantly running the dishwasher, doing laundry, and taking showers will burn through filters much faster than someone living alone.

On top of the initial setup, you'll also need to factor in things like monthly water system maintenance, which is absolutely essential for keeping your system running efficiently for the long haul.

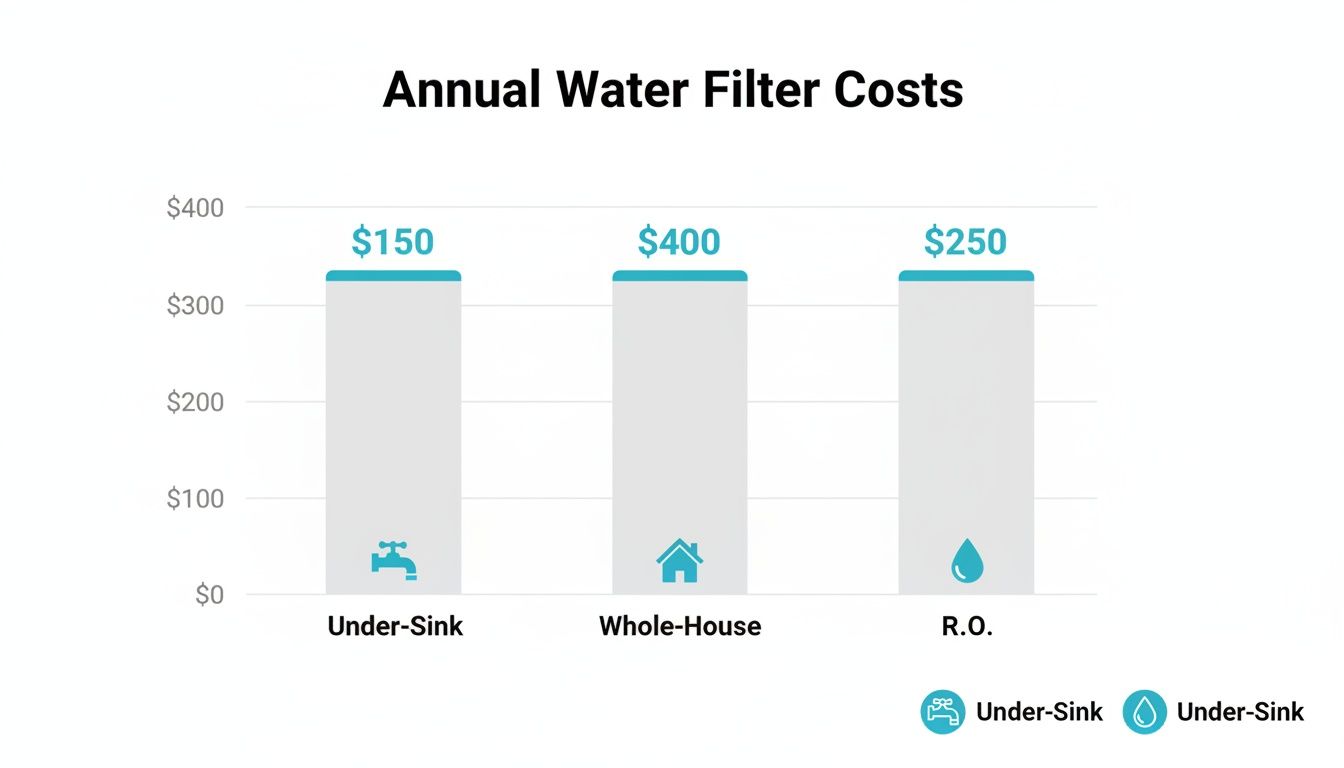
This chart gives you a quick look at what you can expect for annual filter replacement costs for the most common types of systems.

Bar chart illustrating annual water filter costs for Under-Sink, Whole-House, and R.O. systems.

As you can see, whole-house systems usually have the highest yearly upkeep cost, mainly because their filters are bigger and more complex.

Calculating The True Lifetime Cost

Let's put some real numbers to this. For a typical family home of 4-5 people, a reverse osmosis system could run you anywhere from $5,100 to $7,200 once it's fully installed with a storage tank. That price can creep up past $7,400 if you have well water and need pretreatment for things like iron.

But that's not all. You should also plan on spending about $400 a year for general maintenance and filter changes. And then, every 3-5 years, you’ll need to replace the RO membranes, which can cost another $50 to $100. It all adds up, so planning for the long term is key.

The real "cost" of clean water isn’t just the price on the installation invoice. It’s the sum of the upfront price plus a decade of replacement filters, membranes, and any professional servicing required.

When you're shopping around and comparing different systems, always ask about the price and lifespan of the replacement filters. A system that looks cheap at first but uses expensive, hard-to-find proprietary filters can become a real financial headache. Often, the smarter move is to spend a little more on a unit that uses affordable, widely available filters. That’s how you make sure your investment keeps paying you back with clean, safe water for your family.

Smart Ways To Save On Your Installation

Getting clean, safe water into your home is one of the best investments you can make, but it doesn't need to break the bank. With a little strategic thinking, you can knock down the total water filtration system installation cost quite a bit without skimping on quality. It's all about planning ahead before you pull out your credit card.

One of the easiest tricks in the book is to time your purchase right. Just like you wouldn't buy a new grill at the start of summer, water filtration systems often go on sale during certain times of the year. Keep an eye out for seasonal deals around Black Friday or end-of-year sales when companies are trying to clear out inventory.

The Most Powerful Money-Saving Tool

Before you even think about which system to buy, the absolute best thing you can do to save money is get your water tested. Think of a comprehensive water test as your roadmap—it points out exactly what contaminants you're dealing with. Without that information, you could easily waste money on a heavy-duty system built to tackle iron and arsenic when all you really had was a chlorine taste problem that a simple carbon filter could fix.

Don't pay for filtration you don't need. A water test is your best defense against overspending. It makes sure the system you buy is the right tool for your specific problem, potentially saving you hundreds or even thousands on gear you never needed in the first place.

Once you know what's in your water, you can shop with surgical precision. This targeted approach is the cornerstone of a cost-effective installation.

Bundle and Save on Labor Costs

Here’s a great pro tip: if you’ve already got a plumber scheduled to come over for something else—maybe to fix that drip under the sink or install a new water heater—ask them about bundling the filter installation. Many plumbers will cut you a deal for getting multiple jobs done in one trip, since it saves them time and travel. This is a fantastic way to shave a decent chunk off that final labor bill.

Finally, you need to play the long game. The price on the box is just the beginning.

  • Filter Affordability: Always check the price of replacement cartridges for any system you're considering. A unit that seems cheap upfront can become a money pit if it uses expensive, proprietary filters.
  • Filter Availability: Stick with systems that use standard-sized filters. They're sold everywhere by lots of different brands, which keeps prices competitive and guarantees you’ll never have trouble finding a replacement.

Choosing a system with cheap, easy-to-find filters is one of the smartest financial decisions you can make. It turns what could be a one-time purchase with expensive upkeep into a truly sustainable, long-term solution for clean water.

Installation Costs: Your Questions Answered

When you're staring down the final quote, it's easy to get a little nervous. The world of plumbing, local codes, and your home's unique water situation can feel like it's adding a lot of complexity to the water filtration system installation cost.

Let’s clear the air and tackle those common "what if" questions head-on. We've put together answers to the most frequent things homeowners ask, so you can build your budget with confidence and sidestep any last-minute surprises.

Does My Location Really Change the Installation Cost?

It absolutely does. The cost of living in your area directly impacts what a licensed plumber charges per hour. You can expect a plumber in a major city like San Francisco or New York to have a much higher rate than one in a small, rural town.

On top of that, local regulations might require permits, which can add another line item to your bill. The best way to get a real number for your specific area? Get at least three quotes from local, reputable plumbers. That'll give you a solid baseline to work from.

Are There Hidden Costs I Should Brace For?

A good plumber will be upfront about everything, but sometimes your home's plumbing throws a curveball. These "hidden" costs aren't about dishonesty; they're about dealing with unforeseen issues.

  • Old Plumbing: If the installer finds corroded pipes that won't create a secure connection, they'll need to be replaced first. That's an added cost.
  • Electrical Needs: Systems with UV purifiers need power. If there's no outlet handy, you'll need to hire an electrician to run one.
  • Cabinet Modifications: Squeezing a reverse osmosis system under your sink might mean the plumber needs to make a few small cuts to your cabinetry to get it to fit.

Here's a pro tip: always set aside a contingency fund of about 10-15% of the total quoted price. Think of it as a safety net. If an unexpected issue pops up, it won't wreck your budget or stall the project.

How Much More Is It To Install a Filter For Well Water?

Filtering well water is a whole different ballgame—it's usually more complex and definitely more expensive than treating city water. Wells can have a nasty cocktail of contaminants that municipal water doesn't, like high iron, manganese, sulfur, sediment, and even bacteria like E. coli.

Because of this, a well water system is almost never a single filter. It's a multi-stage solution that often includes:

  1. A sediment pre-filter to grab the big stuff like sand and dirt.
  2. An iron and sulfur filter to get rid of rust stains and that "rotten egg" smell.
  3. A water softener to tackle hard water minerals.
  4. A UV light to neutralize bacteria and viruses.

A complete system designed to handle well water problems can easily run from $3,000 to over $9,500 once installation is factored in. A professional water test is the essential first step to figure out exactly what your well needs.

Can I Actually Negotiate the Price With a Plumber?

While you probably can't haggle over a plumber's hourly rate, you're not powerless. Your best negotiating tool is being prepared. When you get at least three itemized quotes, you can compare them line by line.

If one quote seems way out of line for a specific part or labor task, you can politely ask them to explain the difference. You can also see if they offer discounts for bundling the job with other plumbing work, paying with cash, or if you buy the system directly from them. A homeowner who has done their homework is always in the best position to get a fair price.


Ready to stop wondering and start enjoying cleaner, safer water? At Water Filter Advisor, we provide in-depth guides, unbiased reviews, and practical tips to help you make the best choice for your home and budget. Explore our resources today to find your perfect water filtration solution. Find out more at https://www.waterfilteradvisor.com.